Advertisement
Ro
outer
rBOAR
Qu
ick Setup
p Guide a
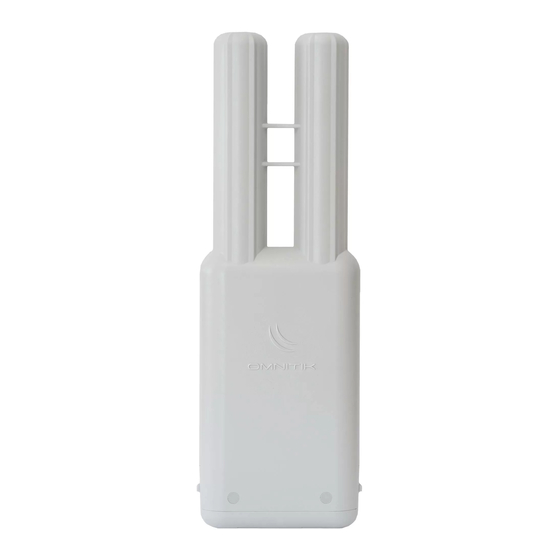
The
RouterBOARD
D OmniTik com
wire
less and five 1
10/100 Ethern
in an
ntennas. One
antenna is v‐p
aged
d with a 24V p
power adapter
Fir
rst use
Open the
e small door o
net port.
If you want t
hole‐bloc
ckers.
OmniTik
accepts 8‐30V
er adapte
er and a PoE i
The defa
ult IP address
Usernam
me is admin an
Pow
wering
The
board accepts
s powering fro
Ethernet
port accepts
adapter a
and a PoE inje
Max
imum power
consumption
Pow
wer outp
put
The
OmniTik UPA‐
‐5HnD can su
is co
nvenient as y
ou don't need
devic
ces. This featu
ure is indicate
will b
be the same a
as input Voltag
it is d
disabled. Outp
put is possible
Bo
oting pro
ocess
This
device doesn
't come fitted
the M
MikroTik Winb
box utility. W
adm
min and no pas
ssword.
In ca
ase IP connect
tion is not ava
http
p://wiki.mikro
otik.com/wi
In ca
ase you wish t
o boot the de
whe
n starting it u
ntil the LED lig
Mo
ounting
Omn
niTik comes bu
undled with o
nect
ing a loose Et
hernet cable t
the p
port. It is reco
ommended to
dam
age the port b
by its weight,
www.routerb
oard.com
RD O
mniT
Tik UP
and Warr
ranty Info
mes preinstall
led in an outd
net ports whic
ch support MD
pol, the other
is h‐pol. Ante
r, a PoE inject
tor, a mountin
on the bottom
m of the case, c
o connect mo
ore than one E
V Passive PoE
from a PoE in
njector.
s from LAN is 1
192.168.88.1
nd there is no
password
om the Ethern
net port (Pass
passive Powe
er over Ethern
ector.
of the device
e is 9W.
pply PoE pow
wering to exter
d any addition
nal PoE injecto
ed by the lette
er "P" in the d
ge, and this fe
eature will hav
e on ports 2‐5
5.
d with a Serial
Port connect
inbox should
be used to co
ailable, Winbo
ox can also be
ki/First_time
e_startup
evice from net
twork, for exa
ght turns off,
and the devic
one mounting
bracket and o
to the Ethern
et port, secur
secure the Et
thernet cable
or doesn't fal
ll out.
PA‐5H
HnD
ormation
n
door case, wit
h a built‐in 5G
DI‐X auto dete
ection. There
enna gain is 6‐
‐6.5dbi. The d
ng bracket and
d a hose clam
connect an Et
thernet cable
Ethernet cable
e, you have to
njector. The p
ackage includ
for configurat
tion
sive PoE):
net 8‐30V DC.
Package cont
rnal devices fr
rom its Ethern
ors on a towe
r to power ot
device model n
name. The ou
ve to be enab
bled on the sp
tor, so initial c
connection ha
onnect to the d
default IP add
used to conn
ect to the MA
ample to use M
MikroTik Netin
ce will start to
o look for Neti
one hose clam
mp for putting
re the cable to
o a wall or the
less than 2m
from the dev
1
GHz 802.11a/n
n
are two built‐
‐
evice is pack‐
‐
p.
to the Ether‐
o break out th
he
es a 24V pow
w‐
tains a 24V
net ports. This
s
her wireless
tput Voltage
ecific ports in
n RouterOS sof
s to be done v
via the Ethern
dress of 192.16
68.88.1 with t
AC address of
the device. In
nstall, hold th
he RESET butto
nstall servers
s.
the device on
n a pole. You
e pole, so that
t the cable we
ice. This is to
ensure that t
ftware. By def
fault
net cable, usin
ng
the username
e
nformation he
ere:
on of the devi
ice
should avoid
con‐
eight is not pu
lling
he cable does
sn't
28-Jun-20
11
Advertisement
Table of Contents

Related Manuals for MikroTik RouterBOARD OmniTIK U-5HnD


Summary of Contents for MikroTik RouterBOARD OmniTIK U-5HnD
- Page 1 5. oting pro ocess This device doesn 't come fitted d with a Serial Port connect tor, so initial c connection ha s to be done v via the Ethern net cable, usin ng the M MikroTik Winb box utility. W inbox should be used to co onnect to the d default IP add dress of 192.16 68.88.1 with t the username e min and no pas ssword. In ca ase IP connect tion is not ava ailable, Winbo ox can also be used to conn ect to the MA AC address of ...
- Page 2 Must short circuit the metallic sides of the hole (with a screwdriver, for example) and boot the device. Hold screwdriver in place until RouterOS configuration is cleared. RouterBOOT reset button (access through the plastic door) has two functions: Hold this button during boot time until LED light starts flashing, release the button to reset RouterOS configu‐ ration (same result as with reset hole) Hold this button during boot time longer, until LED turns off, and then release it to make the device look for Netinstall servers. Operating System Support Currently tested operating system is MikroTik RouterOS (starting from version v4.17). Copyright and Trademarks. Copyright MikroTikls SIA. This manual contains information protected by copyright law. No part of it may be reproduced or transmitted in any form without prior written permission from the copyright holder. RouterBOARD, RouterOS, RouterBOOT and MikroTik are trademarks of MikroTikls SIA. All trademarks and registered trademarks appearing in this manual are the property of their respective holders. Hardware. MikroTik warrants all RouterBOARD series equipment for the term of fifteen (15) months from the shipping date to be free of defects in materials and workmanship under normal use and service, except in case of damage caused by mechanical, electrical or other accidental or intended damages caused by improper use or due to wind, rain, fire or other acts of nature. To return failed units to MikroTik, you must perform the following RMA (Return Merchandise Authorization) procedure. Follow the instructions below to save time, efforts, avoid costs, and improve the speed of the RMA process. 1. If you have purchased your product from a MikroTik Reseller, please contact the Reseller Company regarding all war‐ ranty and repair issues, the following instructions apply ONLY if you purchased your equipment directly from MikroTik in Latvia. 2. We do not offer repairs for products that are not covered by warranty. Exceptions can be made for RB1000, RB1100 and RB1200. 3. Out‐of‐warranty devices and devices not covered by warranty sent to Mikrotikls will be returned to the sender at send‐ er's cost. RMA Instructions are located on our webpage here: http://rma.mikrotik.com Manual. This manual is provided “as is” without a warranty of any kind, expressed or implied, including, but not limited to, the implied warranty of merchantability and fitness for a particular purpose. The manufacturer has made every effort to ensure the accuracy of the contents of this manual; however, it is possible that it may contain technical inaccuracies, typographical or other errors. No liability is assumed for any inaccuracy found in this publication, nor for direct or indirect, incidental, consequential or other damages that may result from such an inaccuracy, including, but not limited to, loss of data or profits. Please report any inaccuracies found to support@mikrotik.com www.routerboard.com 28-Jun-2011...
- Page 3 Federal Communication Commission Interference Statement (FCC ID: TV7OMNITIK5HND) This equipment has been tested and found to comply with the limits for a Class B digital device, pursuant to Part 15 of the FCC Rules. These limits are designed to provide reasonable protection against harmful interference in a residential installation. This equipment generates, uses and can radiate radio frequency energy and, if not installed and used in accordance with the instructions, may cause harmful interference to radio communications. However, there is no guarantee that interference will not occur in a particular installation. If this equipment does cause harmful interference to radio or television reception, which can be determined by turning the equipment off and on, the user is encouraged to try to correct the interference by one of the following measures: Reorient or relocate the receiving antenna. Increase the separation between the equipment and receiver. Connect the equipment into an outlet on a circuit different from that to which the receiver is connected.
Need help?
Do you have a question about the RouterBOARD OmniTIK U-5HnD and is the answer not in the manual?
Questions and answers