Table of Contents
Advertisement
Advertisement
Table of Contents

Related Manuals for Savoy House Circulaire


Summary of Contents for Savoy House Circulaire
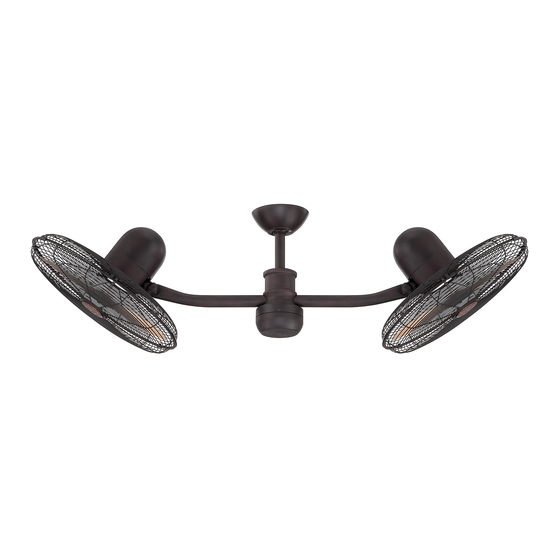
- Page 1 OWNER’S MANUAL READ AND SAVE THESE INSTRUCTIONS Circulaire C E I L I N G FA N...
-
Page 2: Tools And Materials Required
1. TOOLS AND MATERIALS REQUIRED ● Philips screw driver ● Blade screw driver ● Step Ladder ● Wire Cutters ● Carpenter’s Level 2. PACKAGE CONTENTS The following items should be contain within the package; Hanger Bracket Assembly Downrod Fan Head Assembly Light Kit Package Hardware: Screws... -
Page 3: Safety Rules
3. SAFETY RULES 7. Do not adjust fan heads while fan blades are 1. To reduce the risk of electrical shock, insure in motion. Fan must be turned off and blades electricity has been turned off at the circuit stopped before adjusting fan heads or reversing breaker or fuse box before beginning. -
Page 4: Mounting Options
4. MOUNTING OPTIONS If there isn’t an existing CUL listed mounting box, then read the following instructions. Disconnect the power by removing fuses or turning off circuit breakers. Secure the outlet box directly to the building Outlet box structure. Use appropriate fasteners and building materials. -
Page 5: Hanging The Fan
5. HANGING THE FAN Remember to turn off the power. Follow the steps CUL Listed Electrical Box below to properly hang the fan. Hanger Bracket Step 1. Pass the 120-volt supply wires through Washer the center hole in the Hanger Bracket and secure Tooth Washer the Hanger Bracket to the CUL Listed Electrical Spring Washer... - Page 6 Step 4. Route wires exiting the top of the Collar through the Decorative Housing, the Canopy and Ball/Downrod the Ball/Downrod. Align the holes at the bottom of the Downrod with the holes in the Collar. Carefully Canopy insert the Hanger Pin through the holes in the Collar and the Downrod.
- Page 7 Step 7. Securely connect each of the Receiver Unit wires to its corresponding color wire exposed from Ground Wires the top of the Downrod Ball with a connecting wire nut. Also, connect all Ground wires (green) with the main Ground wire from the Electrical Box. (Fig. 5.7) Step 8.
-
Page 8: Installing The Light Kit
6. INSTALLING THE LIGHT KIT Remember to turn off the power. Follow the steps Screw below to properly install the light. Step 1. Remove the three Screws that hold the Decorative Center Hub in place. Step 2. Plug the Upper Housing Electrical Connectors into the Light Housing Electrical Decorative Connectors. - Page 9 Step 4. Align the channels on the Light Cover to align with the Pins inside the Light Housing and slide the cover in. Carefully twist the Light Cover clockwise to secure it in place. The Light Cover should fit snug against the Light Housing. (Fig. 6.4) Light Housing Channel...
-
Page 10: Rotation Speed
7. ADJUSTING SPREAD AND ROTATION SPEED Remember to turn off the power when adjusting the Spread and Rotation Speed. Horizontal Support Bar Tilt Adjustment Fan Heads adjust individually. Knob SPREAD Adjusting the Fan Head angle up expands the spread of the air movement in the space. Adjusting the Fan Head angle down contains the air movement. - Page 11 CLEANING • Remember to turn off the power when cleaning the fan. • Clean the Motor Housings, Decorative Housing and Horizontal Support Bar using a clean, soft cloth, slightly dampened, if necessary. • DO NOT allow water to drip on or into the fan motor housings.
- Page 12 Exclusively Distributed by IMPORTANT: READ AND SAVE THESE INSTRUCTIONS...
Need help?
Do you have a question about the Circulaire and is the answer not in the manual?
Questions and answers