
Related Manuals for Sunny SF-B1001


Summary of Contents for Sunny SF-B1001
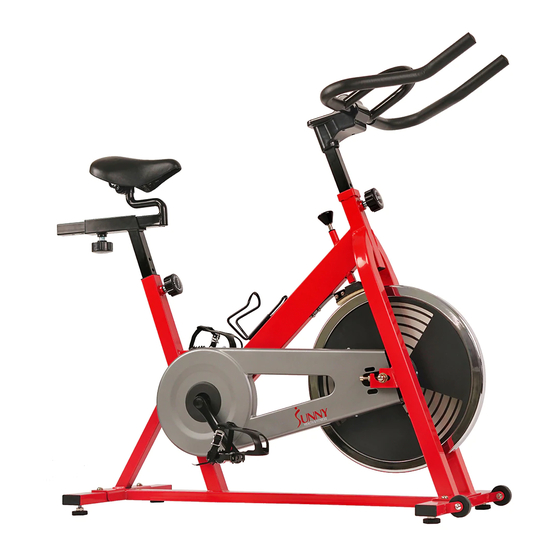
- Page 1 INDOOR CYCLING BIKE SF-B1001 USER MANUAL IMPORTANT! Read all instructions carefully before using this product. Please retain owner’s manual for adjustment and maintenance instructions. For customer service, please contact: support@sunnyhealthfitness.com...
- Page 2 IMPO ORTA ANT SA AFETY Y INFO ORMAT TION We t thank you for choosi ng our pro duct. To e nsure you r safety an nd health, p please use e this equip pment corre ectly. It is i important t to read this s entire ma...
-
Page 3: Exploded Drawing
EXPLODED DRAWING... -
Page 4: Hardware Tools
EXPLODED DRAWING HARDWARE TOOLS A Allen Wrench S6 1pc B Spanner S 13, 14, 15 1pc... -
Page 5: Parts List
PARTS LIST Part Part No. Description Description Main Frame Protective Cover Front Stabilizer Brake Knob Rear Stabilizer Hex Nut M8 Handlebar Hex Nut Seat Post SpacerΦ12XΦ9X15 Seat Slider Square Nut M8 Seat Spring Pop-Pin Knob Mat Cover 9L/R Pedal 1 pr. Block 10L/R Crank... - Page 6 Small Chain Wheel Stop Washer Two-Slot Nut Flat WasherΦ5.5X1.0X Ball Bearing Φ12 Cross Pan Head Tapping Screw Centre Bowl ST4.2X25 Cross Pan Head Three Slot Nut Tapping screw ST5X10 Flat Washer Φ Big Flat Washer 5.5X0.5XΦ10 Long Spacer Φ16XΦ Allen Wrench S6 12X41 Crank Cover Spanner S 13, 14, 15...
-
Page 7: Assembly Instructions
ASSEMBLY INSTRUCTIONS STEP 1: Remove the preassembled 4 Bolts (No. 14) and 4 Flat Washers (No. 13) from the Front Stabilizer (No. 2) and Rear Stabilizer (No. 3). Attach the Front Stabilizer (No. 2) and Rear Stabilizer (No. 3) to the Main Frame (No. 1) with 4 Bolts (No. - Page 8 STEP 3: Lock the Seat (No. 7) onto the Seat Slider (No. 6) tightly. Adjust the seat to the desired position by sliding it on Seat Slider (No. 6) then lock the Seat Slider (No. 6) on the Seat Post (No. 5) with Pop-pin Knob (No.
-
Page 9: Adjustment Guide
ADJUSTMENT GUIDE LEVELING THE BIKE HANDLEBAR ADJUSTMENT This bike can be leveled to Loosen and pull the compensate for uneven grounding. Pop-Pin (No. 8) out, To level the bike, please raise or then raise or lower lower the Foot Levelers (No. 11) the Handlebar (No. - Page 10 RESISTANCE ADJUSTMENT MOVING THE BIKE Carefully lift the Rear Stabilizer The pedal resistance is (No. 3) to move the bike. Always controlled by the tension move with caution control knob. sudden impact may affect the increase resistance, turn operation of the machine as well the tension control knob as your safety.
-
Page 11: Maintenance Instructions
MAINTENANCE INSTRUCTIONS DAILY MAINTENANCE MONTHLY MAINTENANCE After each exercise session, wipe down all 1. Check all hardware is secure, such as: water the equipment: seat, frame, handlebars. Pay bottle holder, flywheel nuts, belt guard bolts, special attention to the seat post, handlebar brake caliper lock nuts and brake caliper post and belt guard.
Need help?
Do you have a question about the SF-B1001 and is the answer not in the manual?
Questions and answers