
Related Manuals for Sungrow SG2KTL-S


Summary of Contents for Sungrow SG2KTL-S
- Page 1 User Manual SG2KTL-S / SG3KTL-S / SG3KTL-D / SG5KTL-D PV Grid-Connected Inverter SG2_3_5KTL V21-UEN-Ver20-201608 Version:2.0...
-
Page 3: About This Manual
Documents must be stored carefully and be available at all times. All rights to the content of this manual are owned by Sungrow Power Supply Co., Ltd. (hereinafter “SUNGROW”). No part of this document can be modified, distributed, reproduced or published in any form or by any means without prior written permission from SUNGROW. - Page 4 Symbols Safety instructions will be highlighted with the following symbols. Symbol Explanation Indicates a hazard with a high level of risk that, if not avoided, will result in death or serious injury. Indicates a hazard with a medium level of risk that, if not avoided, could result in death or serious injury.
-
Page 5: Table Of Contents
Contents About This Manual ................I 1 Safety ..................1 General Safety ......................1 Inverter ........................2 Skills of Qualified Personnel ................3 2 Product Introduction ............... 4 Intended Use ......................4 Inverter ........................ - Page 6 Connection Overview ..................19 Grounding the Inverter ..................20 Grid Connection ....................21 5.4.1 AC Side Requirements ..................21 5.4.2 Assembling the AC Connector ................22 5.4.3 Installing the AC Connector ................23 ...
- Page 7 Routine Maintenance ..................49 10 FAQs for SolarInfo Wi-Fi ............51 10.1 Cannot Find Wi-Fi Signal of Inverter ............51 10.2 Too Weak Wi-Fi Signal of Inverter ..............51 10.3 Cannot Find Wi-Fi Network of Router ............53 ...
-
Page 9: 1 Safety
1 Safety The inverter has been designed and tested strictly according to international safety regulations. Read all safety instructions carefully prior to any work and observe them at all times when working on or with the inverter. Incorrect operation or work may cause: injury or death to the operator or a third party;... -
Page 10: Inverter
1 Safety User Manual 1.2 Inverter There is a warning label on the inverter body. Disconnect the inverter from all the external power sources before service! Do not touch live parts until 10 minutes after disconnection from the power sources. There is a danger from a hot surface that may exceed 60°C. -
Page 11: Skills Of Qualified Personnel
User Manual 1 Safety All the warning labels and nameplate on the inverter body: must be clearly visible; and must not be removed, covered or pasted. Risk of burns due to hot components! DO not touch the hot parts (such as heat sink) during operation. Only the LED indicator panel and the optional DC switch can be touched. -
Page 12: 2 Product Introduction
Monocrystalline silicon, polycrystalline silicon PV strings thin-film without grounding Inverter SG2KTL-S, SG3KTL-S, SG3KTL-D or SG5KTL-D Metering Meter cupboard with power distribution system device Utility grid Line types: TT, TN Any use other than the intended use is not permitted. It is not permitted for the positive pole or the negative pole of the PV strings... -
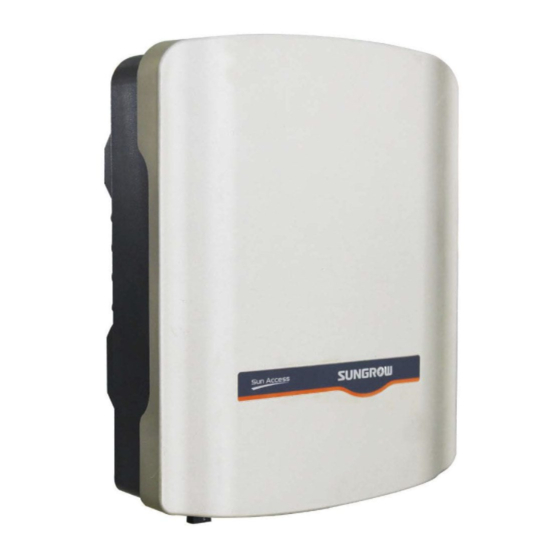
Page 13: Inverter
User Manual 2 Product Introduction For the TT utility grid, the N line voltage to ground must be less than 30 V. Do not connect local loads (such as home appliances, lights, motor loads, etc.) between the inverter and the AC circuit breaker. 2.2 Inverter 2.2.1 Appearance Fig. -
Page 14: Dimensions And Weight
Tab. 2-1 Dimensions and Weight Type W(mm) H(mm) D(mm) Net weight(kg) SG2KTL-S/SG3KTL-S SG3KTL-D/SG5KTL-D 2.2.3 LED Indicator Panel User can observe the color and blinking frequency of the indicator to get the current state of the inverter. Fig. 2-4 LED Indicator Panel For indicator state descriptions, see Tab. -
Page 15: Function Description
Parameter configuration Inverter provides various parameter configurations for optimal operation. You can set the country by APP, if you need a more professional setting, please contact SUNGROW. Communication interface You can choose the RS485 terminal for connecting a communication or monitoring device to the PV system, such as eShow, eShow+, ZE100 and so on. -
Page 16: As4777:2015 Compliant
2 Product Introduction User Manual 2.4 AS4777:2015 Compliant The inverter supports the demand response modes (DRMs), the reactive power regulation, and the power quality response, as specified in the standard AS 4777:2015. External Demand Response Reactive Power Regulation Power Quality Response For details about the connection and settings, see the Quick User Manual delivered with the eShow module or ZE100 module. -
Page 17: Reactive Power Regulation
User Manual 2 Product Introduction 2.4.2 Reactive Power Regulation The inverter is capable of operating in reactive power regulation modes for the purpose of providing support to the grid. These various operating modes can be enabled or disabled via the LCD menu. PF: Fixed power factor mode. -
Page 18: 3 Unpacking And Storage
Check the delivery contents for completeness according to the packaging list. Contact SUNGROW or the distributor in case of any damaged or missing components. It is the best choice to store the inverter in the original packaging. So, do not dispose of it. -
Page 19: Identifying The Inverter
* The image shown here is for reference only. The actual product you receive may differ. Item Description Item Description SUNGROW logo and product Marks of certification institutions type Barcode, company name and Technical data origin Tab. 3-1 Description of Icons on the Nameplate... -
Page 20: Delivery Contents
3 Unpacking and Storage User Manual Icon Description TUV mark of conformity. 3.3 Delivery Contents Fig. 3-3 Delivery Contents a) One pair for the –S series and two pairs for the –D series. b) The documents include the Quick User Manual, 1 CD, quality certificates, packaging list and product test reports. -
Page 21: 4 Mechanical Mounting
4 Mechanical Mounting 4.1 Safety during Mounting Make sure there is no electrical connection before installation. In order to avoid electric shock or other injury, be sure there is no electricity or plumbing installations before drilling holes. Risk of injury due to improper handling The weight can cause injuries, serious wounds, or bruise. - Page 22 4 Mechanical Mounting User Manual Do not install the inverter in the living area or bedrooms. The noise during its operation may affect daily life. The location should be not accessible to children. The max. output power will reduce when the ambient temperature exceeds 45°C.
- Page 23 User Manual 4 Mechanical Mounting Place at eye level for easy Install vertically for good heat viewing: dissipation. Never install the inverter horizontally, or with a forward tilt or with a backward tilt or even with upside down. The horizontal installation could result in damage to the inverter.
-
Page 24: Installing The Inverter
4 Mechanical Mounting User Manual 4.3 Installing the Inverter Inverter is installed on the wall by means of wall-mounting bracket and the expansion plug sets. The expansion plug set shown below is recommended for the installation. Place the wall-mounting bracket to the wall and adjust it until it is in a horizontal position. - Page 25 User Manual 4 Mechanical Mounting Mount the inverter to the bracket, and secure it with an M4 screw (torque: 1.5 N m). (Optional) Install the communication module to the inverter. The following figure takes the eShow module as an example. Refer to the manual delivered with the module for details.
-
Page 26: 5 Electrical Connection
5 Electrical Connection Prior to any electrical connections, keep in mind that the inverter has dual power supplies. It is mandatory for the technical personnel to wear personal protective equipments (PPE) during the electrical work: helmet, footwear and gloves. Danger to life due to a high voltage inside the inverter Make sure that the cables are not live before electrical connection. -
Page 27: Terminal Description
User Manual 5 Electrical Connection 5.1 Terminal Description All electrical terminals are located at the bottom of the inverter. Fig. 5-1 Terminal Description * The image shown here is for reference only. The actual product you receive may differ. Tab. 5-1 Terminal Descriptions Item Terminal Description... -
Page 28: Grounding The Inverter
220 Vac/230 Vac. If there are several inverters connected to the grid in parallel, each phase of the transformer can connect 10 inverters at most. Please contact SUNGROW for a technical evaluation if more than 10 inverters are connected. 5.3 Grounding the Inverter All non-current carrying exposed metal parts of the equipment and other enclosures in the PV power system should be grounded, e.g. -
Page 29: Grid Connection
The recommended specifications are as follows: Inverter Type Specification SG2KTL-S/SG3KTL-S/SG3KTL-D SG5KTL-D It is not allowed for several inverters to use the same AC circuit breaker. It is not allowed to connect loads between the inverter and the AC circuit breaker. -
Page 30: Assembling The Ac Connector
AC Cable Requirements The recommended specifications are shown in the following table Cable diameter (mm) Cross-section (mm²) Type Recommende Range Recommended Range SG2KTL-S/SG3KTL-S/ 4…6 10…14 SG3KTL-D SG5KTL-D 4…6 10…14 5.4.2 Assembling the AC Connector Lead the AC cable through the Remove the cable jacket by cable gland and the housing. -
Page 31: Installing The Ac Connector
User Manual 5 Electrical Connection Assemble the housing, the terminal block and cable gland. Make sure that the rib of the terminal block and the groove on the housing engage perfectly until a “Click” is heard or felt. 5.4.3 Installing the AC Connector Disconnect the AC circuit breaker and secure it against reconnection. -
Page 32: Pv Inputs Configuration
There is one input area with one MPP tracker. Only one input can be connected, as shown in the following figure. Total DC Input Power Open-circuit Short-circuit Current Type Limit Voltage Limit Limit SG2KTL-S 3000 W 600 V 12 A SG3KTL-S 4000 W 600 V 12 A -D Series There are two PV input areas, each with its MPP tracker. - Page 33 User Manual 5 Electrical Connection To make sure the maximum DC power, PV strings connected to individual input area should have a homogenous structure, i.e. the same type, identical tilt and identical orientation. Prior to connecting the inverter to PV inputs, the specifications in the following table should be met: Open-circuit Short-circuit...
-
Page 34: Assembling The Pv Connector
5 Electrical Connection User Manual Prior to connecting the inverter to PV inputs, the specifications in the following table should be met: Total DC Input Open-circuit Short-circuit Type Power Limit Voltage Limit Current Limit SG3KTL-D 4000 W 600 V 24 A SG5KTL-D 6500 W 600 V... -
Page 35: Installing The Pv Connector
User Manual 5 Electrical Connection Lead the cable through cable gland, and insert into the insulator until it snaps into place. Then tighten the cable gland (torque 2.5 N m to 3 N m). Make sure that the cable polarities of the PV string are correct. The inverter will not function properly if the DC polarities are reversed. - Page 36 5 Electrical Connection User Manual 480.0 The inverter will not function properly if the DC polarities are reversed. Check the positive and negative polarities of the PV cells before installation. For –D series, configure PV configuration mode according to actual PV conditions.
-
Page 37: 6 Communication
6 Communication 6.1 Communication Terminal The RS485 communication terminal is located at the bottom of the inverter. User can connect a communication module or cable to the terminal. Module/Cable Function Communication between the inverter and the smart phone can be established via SolarInfo Wi-Fi. Use SolarInfo Home APP to set SolarInfo Wi-Fi the country and protection parameters according to the module... -
Page 38: Distance Requirements
6 Communication User Manual 6.2 Distance Requirements 6.2.1 Scenario 1: No Barriers If there are no barriers between the inverter and the smartphone/router, the maximum linear distance between them can be 100 m. If the smartphone is connected to the router, the effective distance between them depends on the technical parameters of the router and the external environment. -
Page 39: Scenario 2: On Different Floors
User Manual 6 Communication Material Wireless signal strength Possible Environment Cordless smartphones, microwave ovens 6.2.2 Scenario 2: On Different Floors The inverter and the smartphone/router can be located in different floors of a building, yet the floors must be adjacent. * The image shown here is for reference only. -
Page 40: Scenario 3: In Different Rooms On The Same Floor
6 Communication User Manual 6.2.3 Scenario 3: In Different Rooms on the Same Floor The Wi-Fi module cannot be blocked by metal. Keep the inverter at the same height as the external antenna of the router. In order to avoid wireless electromagnetic interference, please keep the inverter away from equipment such as cordless smartphones, microwave ovens and so on. - Page 41 Or scan the QR code on the right side. Search for SolarInfo Home in your APP Store, from which you can download it and complete the installation. For Android address downloading SolarInfo Home https://play.google.com/store/apps/ details?id=com.sungrow.home. Http://www.solarinfobank.com/app /SolarInfoHome_v1.0.apk. Or scan the following QR codes.
- Page 42 6 Communication User Manual Search for SolarInfo Home in your Play Store, from which you can download it and complete the installation. SolarInfo Home APP supports two kinds of operation: “[Direct visit]” and “Remote [Login]”. In “[Direct visit]” mode, you can connect your smartphone to the inverter directly via Wi-Fi to check the inverter information.
-
Page 43: Visiting Inverter Via "[Direct Visit]" Mode
User Manual 6 Communication 6.3.2 Visiting Inverter via “[Direct visit]” Mode To perform the operations in this section, be sure that the distance between the smartphone and the inverter is within the valid range. Checking Information... - Page 44 6 Communication User Manual Country Selection and Router Connection To visit the inverter via “Remote [Login]” mode and check information anywhere, firstly connect the inverter to home router.
-
Page 45: Visiting Inverter Via "Remote [Login]" Mode
User Manual 6 Communication 6.3.3 Visiting Inverter via “Remote [Login]” Mode Complete the registration and you can then log into SolarInfo Home via the Internet to view the information wherever you happen to carry the device. Registration... - Page 46 6 Communication User Manual The e-mail address will be used to receive relevant mails, so it must be valid. The username will be needed to find the forgotten password. If you forget the username, re-register. Login To perform the operations in this section, be sure that your phone can access the Internet.
-
Page 47: 7 Commissioning
Commissioning After setting the country parameter, set other parameters according to the specific requirements of the local grid. Check thoroughly if the parameters meet the requirements before commissioning. 7.1 Inspection before Commissioning Check the following items before starting up the inverter: The inverter is firmly secured and the site is accessible for operation, maintenance and service. - Page 48 (3) The earth fault buzzer will beep when the eShow module is connected. The LED indicator will be red and green at the same time when the inverter is in its upgrading process. If in other status, please contact SUNGROW Service Dept. for troubleshooting.
-
Page 49: 8 System Decommissioning
8 System Decommissioning 8.1 Disconnecting the Inverter For maintenance or other service work, the inverter must be switched off. Proceed as follows to disconnect the inverter from the AC and DC power sources. Lethal voltages or damage to the inverter will follow if otherwise. Disconnect the AC circuit breaker and secure it against reconnection. -
Page 50: Dismantling The Inverter
8 System Decommissioning User Manual 8.2 Dismantling the Inverter Risk of burn injuries and electric shock! Do not touch any inner live parts until at least 10 minutes after disconnecting the inverter from the utility grid and the PV input. Refer to Chapter 5 for the inverter disconnection of all cables in reverse steps. -
Page 51: 9 Troubleshooting And Maintenance
4. Check whether the voltage of DC input exceeds the inverter start-up voltage. 5. If all the above conditions are OK, please contact SUNGROW. Should you have any questions in operating the inverter, please contact Telephone: +86 551 6532 7817. -
Page 52: For The Faults On The App Or Screen
Disconnect the external DC circuit breaker or pull off the DC connectors. Reconnect the breakers or connectors and restart the inverter. If the fault still exists, check whether the communication cable of eShow is firmly connected If the communication cable is firmly connected, contact Sungrow Service Dept. Fault Description... - Page 53 Islanding 3. Check whether grid is not in service. 4. If all conditions are OK and this fault still occurs in the LCD screen, contact Sungrow Service Dept. The DC component of 1. Wait a moment for inverter recovery.
- Page 54 1. Wait a moment for inverter recovery. transient 2. If the fault occurs repeatedly, contact voltage is high. Sungrow Service Dept. 1. Wait a moment for inverter recovery. The bus voltage is high. 2. If the fault occurs repeatedly, contact Sungrow Service Dept.
- Page 55 3. If the grid voltage is within the permissible range, contact Sungrow Service Dept. 1. Check the grid frequency. 2. If the grid frequency exceeds the permissible range of inverter protection...
- Page 56 AC connection grounding line, if there is access to the block nor the second PE ground, and the fault still exists, please terminal contact Sungrow Service Dept. enclosure reliably connected. 1. Wait for inverter recovery after bus voltage lower.
-
Page 57: Routine Maintenance
User Manual 9 Troubleshooting and Maintenance 9.2 Routine Maintenance Risk of inverter damage or personal injury due to incorrect service! Always keep in mind that the inverter is powered by dual sources: PV array and utility grid. Before any service work, observe the following procedure. Disconnect the inverter from the utility grid side first and then PV array;... - Page 58 9 Troubleshooting and Maintenance User Manual Servicing of the device in accordance with the manual should never be undertaken in the absence of proper tools, test equipments or the more recent revision of the manual which has been clearly and thoroughly understood.
-
Page 59: 10 Faqs For Solarinfo Wi-Fi
If all the above-mentioned items are ok, yet this problem still exists, it can be verified that the Wi-Fi module has been damaged. Please submit a warranty claim to SUNGROW for replacement. 10.2 Too Weak Wi-Fi Signal of Inverter The Wi-Fi signal strength of inverter is too weak (less than one). - Page 60 10 FAQs for SolarInfo Wi-Fi User Manual Material Wireless signal strength Possible Environment Glass Window Water Aquarium, pool, fish tank Brick wall Marble Floor Reinforced Floor panels, wall concrete Metal Iron sheet cordless smartphones, microwave ovens Check and ensure that the installation of inverter and Wi-Fi module has met the requirements, as shown in the following figure.
-
Page 61: Cannot Find Wi-Fi Network Of Router
User Manual 10 FAQs for SolarInfo Wi-Fi 10.3 Cannot Find Wi-Fi Network of Router If you cannot find the assigned router in the router list, please follow the procedures below for the solutions. Click the icon on the phone screen to refresh the router list, as shown in the following figure. -
Page 62: Cannot Connect To Wi-Fi Network Of Router
10 FAQs for SolarInfo Wi-Fi User Manual Fig. 10-3 Right Setting (Visible) − Check the setting of router’s max. rate. The Wi-Fi network of router may not be searched when the max. rate is set to 300 Mbps. 10.4 Cannot Connect to Wi-Fi Network of Router The signal strength and other items meet requirements, but the Wi-Fi module of the inverter cannot connect to the Wi-Fi network of the router. - Page 63 User Manual 10 FAQs for SolarInfo Wi-Fi − “Wireless filter policy” is to set which devices are allowed to be connected to the Router. Do not set this parameter. You may not able to connect to the Router if otherwise. −...
-
Page 64: Transmission Signal Strength Of Different Materials
10 FAQs for SolarInfo Wi-Fi User Manual 10.5 Transmission Signal Strength of Different Materials The following table shows the wireless signal strength of different transmission materials. Make sure that there are not materials with poor transmission signal strength between the smart phone and inverter, and the router and the inverter. See “Tab. -
Page 65: 11 Appendix
11 Appendix 11.1 Technical Data Parameters SG2KTL-S SG3KTL-S SG3KTL-D SG5KTL-D Input Side Data Max. PV input power 3000W 4000 W 4000 W 6500W Max. PV input voltage 600 V Startup voltage 120 V Nominal input voltage 360 V MPP voltage range 110…560 V... - Page 66 11 Appendix User Manual Parameters SG2KTL-S SG3KTL-S SG3KTL-D SG5KTL-D Protection Anti-islanding protection short circuit protection Leakage current protection LVRT DC reverse connection protection DC switch Optional DC fuse Overvoltage protection Varistors System Data Max. efficiency 97.4% 97.5% 97.4% 97.5% Max.
-
Page 67: Exclusion Of Liability
Exclusion of Liability The content of these documents is periodically checked and revised where necessary. Discrepancies therefore may exist. Readers are cautioned that SUNGROW reserves the right to make changes without notice. Please call us or visit our website www.sungrowpower.com for the latest information. -
Page 68: About Us
The power rating of SUNGROW products covers from several hundred watt to large mega-watt systems. The vision of Sungrow is to help our customers acquire stable and clean power with minimum cost, maximum reliability and enhanced safety. Contact Information Should you have any problems, please contact us through the following information.
Need help?
Do you have a question about the SG2KTL-S and is the answer not in the manual?
Questions and answers