Table of Contents
Advertisement
Quick Links
Advertisement
Table of Contents

Related Manuals for Logik LHFDAB11


Summary of Contents for Logik LHFDAB11
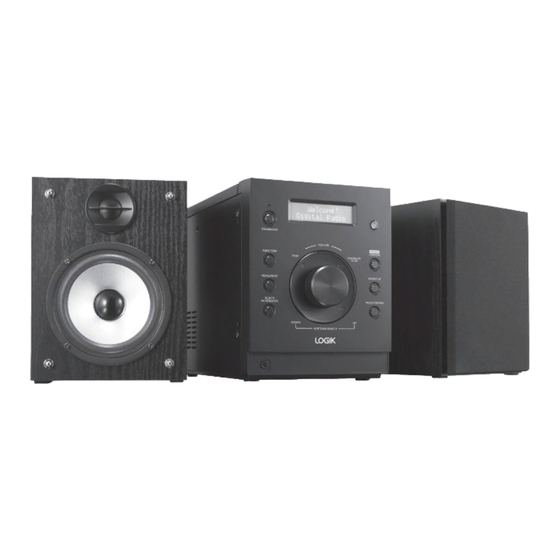
- Page 1 Hi-Fi with DAB Radio Instruction Manual LHFDAB11...
-
Page 4: Table Of Contents
Contents Unpacking ............................6 Product Overview ..........................7 Front View .................................. 7 Rear View ................................... 8 Top View ..................................8 Remote Control ..........................9 Operating Your Remote Control ....................10 Battery Installation for the Remote Control ................10 Remote Control Operation Range ....................11 Connections ..........................12 Speaker Connections ............................12 Playing music from an Audio Device ......................12 Using Earphones ..............................13... - Page 5 FM Operation ..........................20 Auto Scan .................................20 Manual Scan ................................20 Audio Mode ................................20 Storing Stations ..............................20 Recalling a Stored Station ..........................21 FM Display Modes ..............................21 Compatible Disc Types ........................22 CD Operation ..........................22 Playback ...................................22 To Pause Playback ..............................22 To Stop Playback ..............................22 Skipping to Another Track ..........................22 Repeat Playback ..............................23 Programme Setting ..............................23...
-
Page 6: Unpacking
Thank you for purchasing your new Logik Hi-Fi with DAB Radio. We recommend that you spend some time reading this instruction manual in order that you fully understand all the operational features it offers. You will also find some hints and tips to help you resolve any issues. -
Page 7: Product Overview
Product Overview Front View STANDBY/ON PRESET FUNCTION /MEMORY STOP PLAY/PAUSE SCAN MENU/INFO PRESET UP SELECT/ FM MONO/ST. PRESET DOWN DOWN SKIP/TUNE SEARCH STANDBY LED Indicator Earphones Socket STANDBY/ON Button 10. LCD Display VOLUME +/– Control 11. Remote Control Sensor Turn to adjust the volume. Receives signals from the remote control. -
Page 8: Rear View
Rear View Speaker L/R Sockets Radio Aerial AUX IN Socket ON/OFF Switch ANT. To switch the unit ON/OFF AUX IN Top View CD Compartment button... -
Page 9: Remote Control
Remote Control STANDBY/ON Button MENU/INFO Button Press to display menu/ information. STANDBY/ON REPEAT Button SKIP/TUNE SEARCH Button MENU/INFO FUNCTION PRESET /MEMORY • Press to skip backwards to the beginning of the track or the REPEAT SCAN previous track. • Press and hold to perform fast SELECT/ MONO/ST. -
Page 10: Operating Your Remote Control
Operating Your Remote Control Remove the insulating mylar strip from the remote control if the battery is being used for the first time. It is located at the bottom back side of the remote control. Battery Installation for the Remote Control The remote control requires a CR2032, 3V Lithium battery. -
Page 11: Remote Control Operation Range
Handling the Battery • Improper or incorrect use of batteries may cause corrosion or battery leakage, which could cause fire, personal injury or damage to property. • Install the battery correctly by following the polarity (+ and –) indications in the battery compartment. -
Page 12: Connections
Connections Speaker Connections Connect the speaker cables at the back of the speakers to the Speaker L/R sockets at the rear of the unit. (+: Black wire; –: Black/White wire) ANT. AUX IN Playing music from an Audio Device The AUX input is located on the rear side of the unit. Use a 3.5mm audio stereo cable (not included) to connect the audio device through the AUX IN socket. -
Page 13: Using Earphones
Using Earphones Turn down the volume before connecting the earphones. Slowly raise the volume with the earphones on until you reach your desired volume. When earphones are connected, the speaker is automatically muted. STANDBY/ON PRESET FUNCTION /MEMORY STOP PLAY/PAUSE SCAN MENU/INFO MENU/INFO SELECT/... -
Page 14: Basic Operation
Basic Operation Powering ON/OFF When you first connect the unit to the mains socket. Switch the ON/OFF switch at the rear of the unit to the ON position. The unit will be in STANDBY mode. Press the STANDBY/ON button to switch the unit on. •... -
Page 15: Manual Setting The Clock
Manual Setting the Clock When you first connect the unit to the mains socket and the ON/OFF switch at the rear is switched to the ON position, the unit will be in STANDBY mode, and the display will show “–– : ––”. 1. -
Page 16: To Cancel The Daily Timer
To Cancel the Daily Timer In STANDBY mode, press the TIMER button on the remote control repeatedly to select Timer Off mode. “Timer Off” will show on the display and the “ ” icon will disappear from the display. Settings the Sleep Timer Use the sleep timer to turn the system off after a certain number of minutes in play mode. -
Page 17: Dab Operation
DAB Operation If the unit is connected to the mains power, the ON/OFF switch at the rear is switched to the ON position and then press the STANDBY/ON button to switch the unit on for the first time, the unit will automatically enter into the DAB mode and perform quick scan function. -
Page 18: Secondary Services
Secondary Services You may see a “>” symbol after the name of the station, this indicates that there are secondary services available to that station. These secondary services contain extra services that are related to the primary station. e.g. a sports station may want to add extra commentaries. -
Page 19: Dab Display Modes
DAB Display Modes Every time you press the MENU/INFO button, the display will cycle through the following display modes: Programme Type, Ensemble/Multiplex (Group name), Signal Strength, Time / Date, Channel no. / Frequency, Audio Mode / Audio Bit Rate, DLS. The information is displayed on the lower Programme Type segment of the display. -
Page 20: Fm Operation
FM Operation Press the FUNCTION button repeatedly to select FM mode. The display will show FM and the frequency. Auto Scan To search for an FM station, press the PLAY/PAUSE/SCAN button to start the auto scan. Once a station has been found, the scanning will stop automatically. Manual Scan To search for FM stations manually, press the SKIP/TUNE SEARCH buttons or... -
Page 21: Recalling A Stored Station
Recalling a Stored Station 1. Once you have saved a station to one of the preset buttons, you can recall it by pressing the PRESET/MEMORY button. 2. Press the PRESET UP/DOWN buttons on the unit or the PRESET buttons on the remote control repeatedly to select your desired preset station number. -
Page 22: Compatible Disc Types
Compatible Disc Types Disc Types Disc Logo Recorded Content CD-R (CD Recordable) AUDIO CD-RW (CD-Rewritable) AUDIO AUDIO-CD (Compact Disc Digital Audio) AUDIO CD Operation Press the FUNCTION button repeatedly to select CD mode. Playback 1. Press the button on the unit and the disc tray will open automatically. 2. -
Page 23: Repeat Playback
Repeat Playback 1. Press the REPEAT button once on the remote control, “REP 1” will show on the display. The CD will play the current track repeatedly. 2. Press the REPEAT button twice, “REP ALL“ will show on the display. The CD will play all the tracks repeatedly. -
Page 24: Intro Playback
Intro Playback Press the INTRO button on the remote control. The “INTRO” indicator will show on • the display. The unit will play the first 10 seconds of each track. • Press the INTRO button on the remote control again to resume normal playback. LINE IN Operation There is a AUX IN socket located on the rear of the unit. -
Page 25: Maintenance
Maintenance Handling Discs • Do not touch the playback side of the disc. • Do not attach paper or tape to the disc. Playback side Cleaning Discs • Fingerprints and dust on the disc cause picture and sound deterioration. Wipe the disc from the centre outwards with a soft cloth. -
Page 26: Hints And Tips
Hints and Tips If a problem does occur, it may often be due to something very minor. The following table contains various tips. Menu Description No power. • Ensure the mains plug is connected. • Make sure that the unit is turned on. The remote control • Use the remote control near the unit. -
Page 27: Specifications
Specifications Model LHFDAB11 Disc Format CD, CD-R, CD-RW Audio 2-Channel Analogue Frequency Range DAB: 174 – 240 MHz FM: 87.5 – 108 MHz Compact Disc Optical Pickup: 3 - Beam Laser Power Adapter: Power Supply AC 230-240V ~50Hz Power Consumption... -
Page 28: Safety Warnings
Safety Warnings Ventilation • Read all the instructions carefully before using the unit and keep them for future reference. • To prevent the risk of electric shock or fire hazard due to overheating, ensure that curtains and • Retain the manual. If you pass the unit onto a other materials do not obstruct the ventilation third party make sure to include this manual. - Page 29 Supervision Service • Children should be supervised to ensure that • To reduce the risk of electric shock, do not they do not play with the unit and the remote remove screws. The unit does not contain control. any user-serviceable parts. Please leave all maintenance work to qualified personnel.
- Page 30 NOTE: If you require a replacement for any of the items listed below, please quote their corresponding part numbers: Replacement Part Part Number Remote Control 070-0019DN-01K1 Visit Partmaster.co.uk today for the easiest way to buy electrical spares and accessories. With over 1 million spares and accessories available we can deliver direct to your door the very next day.
Need help?
Do you have a question about the LHFDAB11 and is the answer not in the manual?
Questions and answers