Table of Contents
Advertisement
Advertisement
Table of Contents

Related Manuals for Logik L55DAB15


Summary of Contents for Logik L55DAB15
- Page 1 DAB RADIO L55DAB15...
-
Page 2: Table Of Contents
Contents Safety Warnings ............................. 4 Unpacking .............................. 6 Product Overview ..........................7 Front View .....................................7 Rear View ....................................8 Power Source ............................9 Battery Power ..................................9 Knowing When to Replace the Batteries ........................9 Mains Power ..................................10 Connections ............................10 Connecting to the Earphones Socket........................10 Basic Operation ...........................11 Powering ON/OFF ................................11 Selecting Modes ................................11... - Page 3 Scan Settings ..................................21 Audio Settings .................................21 System Settings ................................21 FM Display Modes ................................22 Maintenance ............................22 Hints and Tips ............................23 Specification ............................23...
-
Page 4: Safety Warnings
Safety Warnings Ventilation • Read all the instructions carefully before using the unit and keep them for future reference. • To prevent the risk of electric shock or fire hazard due to overheating, ensure that • Retain the manual. If you pass the unit onto a third party make sure to include this manual. - Page 5 Supervision • Children should be supervised to ensure that they do not play with the unit and the remote control. • Never let anyone especially children push anything into the holes, slots or any other openings in the case - this could result in a fatal electric shock.
-
Page 6: Unpacking
Thank you for purchasing your new product. We recommend that you spend some time reading this instruction manual in order that you fully understand all the operational features it offers. You will also find some hints and tips to help you resolve any issues. -
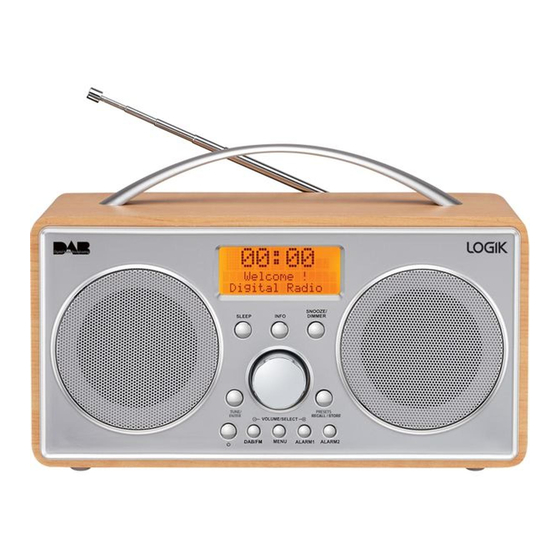
Page 7: Product Overview
Product Overview Front View SNOOZE/ SLEEP INFO DIMMER TUNE/ PRESETS RECALL / STORE ENTER VOLUME/SELECT DAB/FM MENU ALARM 1 ALARM 2 10 11 1. Handle 6. VOLUME/SELECT 11. ALARM 1 Button Control 2. LCD Display 12. ALARM 2 Button 7. TUNE/ENTER Button 3. -
Page 8: Rear View
Rear View AUX IN 1. Aerial 2. Battery Compartment Door Earphones Socket 4. DC IN Socket... -
Page 9: Power Source
Power Source Battery Power Insert 4 x 1.5V AA battery (not included) into the battery compartment located at the bottom of the unit. The Alarm function is not available under battery power. AUX IN Battery Life (Approx. Hours) volume set to 50% Battery Type Alkaline (Size AA) Using your radio at high volume will reduce your battery life. -
Page 10: Mains Power
Mains Power This unit will automatically scan for DAB radio stations when switched on for the first time. Before connecting the power cable, fully extend the aerial vertically to ensure best reception. Before using, connect the supplied power cable to the mains cable socket at the rear of the unit and to the mains socket. -
Page 11: Basic Operation
Basic Operation Powering ON/OFF STANDBY button to switch the unit on, press the STANDBY button again • Press the to switch the unit back to standby mode. • To switch the unit off completely, disconnect the mains plug from the mains socket. Selecting Modes Press the DAB/FM button repeatedly to switch between modes (DAB or FM). -
Page 12: Setting The Clock
Setting the Clock The clock can only set and be updated if you can receive DAB signals in your location. In order for the clock to synchronise to the current local time you must leave it on one DAB station for a short period of time. Manual clock setting is not required. Manually Setting the Time and Date You can manually set the time and date if you wish. -
Page 13: Setting The Alarm (Mains Operation Only)
Setting the Alarm (Mains Operation Only) Make sure you have preset FM and DAB stations before setting the Alarm. 1. The unit has two alarms. Press the ALARM 1/ALARM 2 button to set alarm 1 or alarm 2. The display will show “Alarm # Setup”. 2. -
Page 14: Activating/Deactivating The Alarm Function
Activating/Deactivating the Alarm Function 1. To activate or deactivate the alarm function, press the ALARM 1 or ALARM 2 button, then turn the VOLUME/SELECT control to select Alarm On or Alarm Off. 2. Press the TUNE/ENTER button to confirm. If you have activated the alarm function and the wake-up mode is DAB or FM, make sure that the volume is at a sufficient level for you to hear. -
Page 15: System Reset
System Reset There may be times when you need to reset your unit back to the factory settings, especially if you have moved house or if you experience reception problems. If you move to another part of the country and pick up the local and national DAB stations in that area, your previously tuned channels may no longer be available. -
Page 16: Dab Operation
DAB Operation Ensure that you fully extend the aerial vertically before switching the unit on. When the unit is connected to the mains power and then switched on from standby for the first time, or you have just performed a factory reset the unit will automatically enter into the DAB mode and perform auto scan function. -
Page 17: Manual Tuning
Manual Tuning As well as the auto scan functions, you can manually tune the radio. This can help if you know your radio has missed stations. You will need to know which multiplex the missing radio station is in. 1. Press the MENU button and then turn the VOLUME/SELECT dial to select Manual tune, the display will now show Manual tune. -
Page 18: Storing Stations
Storing Stations You can store up to 10 of your favourite DAB stations to the memory. This will enable you to access your favourite stations quickly and easily. 1. To store a preset, you must first be listening to the station that you would like to save, press and hold the PRESETS RECALL/STORE button for 2 seconds. -
Page 19: Dab Display Modes
DAB Display Modes Every time you press the INFO button, the lower segment of the display will cycle through the following display modes: DLS (Dynamic Label Segment) Dynamic label segment is a scrolling message that the broadcaster may include with their transmissions. -
Page 20: Fm Operation
FM Operation Switching from DAB to FM Mode To switch the unit from DAB to FM mode, press the DAB/FM button once. The display will show FM and the frequency. Auto Scan Ensure that you fully extend the aerial vertically before starting the auto scan. To search for an FM station, press and hold the TUNE/ENTER button to start the auto scan. -
Page 21: Audio Mode
Audio Mode The unit will automatically switch between stereo and mono mode, but you can override this and switch this function manually. This is helpful when receiving poor signal reception. Press the MENU button, then turn the VOLUME/SELECT control to select <Audio setting>, then press the TUNE/ENTER button to confirm. -
Page 22: Fm Display Modes
FM Display Modes Every time you press the INFO button, the lower segment of the display will cycle through the following display modes: Radio Text As with DAB, the broadcaster can include a scrolling text that displays information about the current program. If Radio text information is not available, then the display will show <No Radio Text>. -
Page 23: Hints And Tips
This may occur if the broadcaster changes the label of a service or removes a label. The unit will try to retune or perform a scan. Specification Main Unit Model L55DAB15 Batteries 1.5V x 4, AA size Output Power 2W x 2 Radio Frequency Range FM87.5 –... - Page 24 Declaration of Conformity (RED) Hereby, DSG Retail Ltd. declares that the radio equipment type [L55DAB15] is in compliance with Directive 2014/53/EU. The full text of the EU declaration of conformity is available at the following internet address: https://www.teamknowhow.com/...
Need help?
Do you have a question about the L55DAB15 and is the answer not in the manual?
Questions and answers