
Related Manuals for Hillyard TRIDENT R30SC


Summary of Contents for Hillyard TRIDENT R30SC
- Page 1 Scrubbing machine Use and Maintenance manual Original instructions - DOC. 10075358- Ver. AA - 11-2017...
-
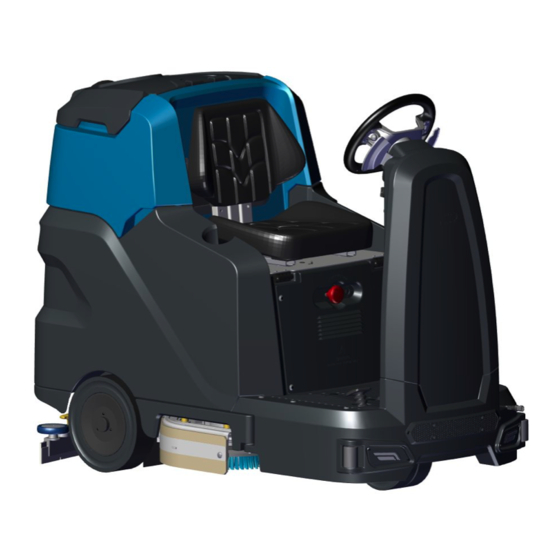
Page 3: Main Machine Components
MAIN MACHINE COMPONENTS The machine's main components are the following: Operator seat Recovery tank lid. Right-hand splash guard pre-assembly. Recovery tank. Scrubbing brush head. Solution tank. Squeegee body. Right hatch. Hour meter display – battery charge level. Left hatch. Headlights (optional). Squeegee support. -
Page 4: Table Of Contents
CONTENTS MAIN MACHINE COMPONENTS .......... 3 5. CLEANING THE RECOVERY TANK......... 20 CONTENTS ................4 6. EMPTYING THE SOLUTION TANK .......... 20 1. GENERAL SAFETY REGULATIONS ........ 5 7. CLEANING THE WATER SYSTEM FILTER ......21 8. CLEANING THE VACUUM TUBE ..........21 1. -
Page 5: General Safety Regulations
1. GENERAL SAFETY REGULATIONS The following symbols are used to indicate any potentially hazardous situations. Always read this information carefully and take the necessary precautions to protect any people and/or objects that may be present. Operator cooperation is paramount for accident prevention. No accident prevention programme can be effective without the full cooperation of the person directly responsible for the machine's operation. -
Page 6: Using The Machine
2. USING THE MACHINE DANGER: • In the event of danger, quickly press the emergency button in the electrical system panel near the operator's seat. • Never collect gases, explosive/inflammable liquids or powders, nor acids and solvents! These include gasoline, paint thinners and fuel oil (which, when mixed with the vacuum air, can form explosive vapours or mixtures), and also non-diluted acids and solvents, acetones, aluminium and magnesium powders. - Page 7 • Read the labels on the machine carefully. Do not cover them for any reason, and replace them immediately if they become damaged. • The machine must only be used and stored in an enclosed or covered environment. • The machine must not be used or stored outdoors in damp conditions or directly exposed to rain.
-
Page 8: Deactivation Of The Machine
3. DEACTIVATION OF THE MACHINE WARNING: • Always protect the machine against sunlight, rain, and other atmospheric agents, both while it is stationary and while it is in function. Store the machine in a dry, sheltered place: this machine is only designed for use under dry conditions, and must not be used or stored outdoors under humid conditions. -
Page 9: Transport
All repairs must be carried out by qualified personnel. • Do not physically change the design characteristics of the machine. • Use spare parts supplied by Hillyard or by Hillyard service centres. • Wear personal protective equipment as required and as suggested in the manual. 5. TRANSPORT WARNING: •... -
Page 10: Symbols Used In The Manual
The descriptions contained in this document are not binding. The company therefore reserves the 5. STORING THE USE AND MAINTENANCE MANUAL right to make any modifications at any time to elements, details, or accessory supply, as considered necessary for reasons of improvement or manufacturing/commercial requirements. The reproduction, The Use and Maintenance Manual must be stored in its special pouch close to the machine, protected even partial, of the text and drawings contained in this document is prohibited by law. -
Page 11: Technical Data
13. TECHNICAL DATA TRIDENT TRIDENT TECHNICAL DATA TECHNICAL DATA R30 SC R30 SC Rated machine power 2025 Maximum forward speed in transport mode Working capacity up to sq.ft/h 43056 Vacuum motor (voltage - nominal power rating) V / W 24 - 424 Working width 29,7 Vacuum on vacuum head... -
Page 12: Symbols Used On The Machine
14. SYMBOLS USED ON THE MACHINE Main switch symbol: Solution tank drainage cap symbol: Applied to the control panel, positioned on the front of the machine, to Applied to the back of the machine to identify the solution tank's indicate the main switch. drainage cap. -
Page 13: Machine Preparation
15. Press the drive pedal (7) (Fig.10) to begin moving the machine. 16. MACHINE PREPARATION 16. Drive the machine down the ramp. 1. HANDLING THE PACKAGED MACHINE ATTENTION: during this operation, check there are no people or objects near the machine. The machine's overall weight including packaging is 685lb. -
Page 14: Securing The Machine
CAUTION: the lifting hooks must not damage the blocks, connectors or cables. 4. SECURING THE MACHINE The procedure for securing the machine, thus allowing the operations to be performed under conditions NOTE: before inserting the batteries, remember to cover the terminals with a little grease to of complete safety, is as follows: protect them against external corrosion. -
Page 15: Assembling The Brush Head Brushes (Scrubbing Version)
Remove the cap (4) from the battery charger socket (Fig.4). CAUTION: before connecting the batteries to the battery charger, make sure it is suitable for the batteries used. WARNING: Before inserting the battery charger's power cable into the socket (5), make sure that no condensate or other types of liquid are present (Fig.5). -
Page 16: Preparing To Work
ATTENTION: the dosing system is suitable for frequent maintenance cleaning. Acid or alkaline maintenance detergent tank be used with pH values between 4 and 10 and that do not contain: oxidising agents, chlorine or bromine, formaldehyde, mineral solvents. The detergents used must be suitable for use with scrubbing machines. -
Page 17: Drying
If the command display shows the code H2O 0, the machine doesn't dispense detergent (Fig.4). 3. DRYING This mode is used when the floor is already wet or in general when the chemical action of water and To carry out “DRYING WITHOUT SCRUBBING” tasks, proceed as follows: detergent solution is not necessary. -
Page 18: Working Headlights (Optional)
2. Raise the brush head body by turning the brush head control lever (2) on the rear part of the steering 9. WORKING HEADLIGHTS (OPTIONAL) column (Fig.2). 3. Raise the squeegee body by turning the squeegee control lever (3) at the rear of the steering Upon request, the machine can be equipped with front and rear working lights. -
Page 19: Recommended Maintenance Operations
20. RECOMMENDED MAINTENANCE OPERATIONS TYPE OF MAINTENANCE 3. CLEANING THE BRUSH HEAD BRUSHES (SCRUBBING VERSION) EMPTYING THE RECOVERY TANK Careful cleaning of the brush guarantees better cleaning of the floor as well as a longer brush head gearmotor lifespan. To clean the brush, proceed as follows: CLEANING THE SQUEEGEE BODY 1. -
Page 20: Cleaning The Recovery Tank
NOTE: Use a jet of water to eliminate any remaining dirt, and use a spatula or a brush with soft 8. Activate the optional tank cleaning kit ON/OFF pump by pressing the button (5) on the front left part bristles to eliminate any dirt that is particularly hard to remove. of the machine (Fig.7). -
Page 21: Cleaning The Water System Filter
7. CLEANING THE WATER SYSTEM FILTER 2. REPLACING THE SQUEEGEE BODY RUBBER BLADES In order to clean the water system's filter, do the following: Ensuring the integrity of the squeegee body's rubber blades guarantees better floor cleaning and drying results, as well as a longer service life for the vacuum motor. In order to replace the squeegee body's 1. -
Page 22: Adjustment Interventions
22. ADJUSTMENT INTERVENTIONS 23. DISPOSAL To dispose of the machine, take it to a demolition centre or an ADJUSTING THE SQUEEGEE BODY'S RUBBER BLADES authorised collection centre. Before scrapping the machine, it is necessary to remove The careful adjustment of the squeegee body rubber blades guarantees better cleaning of the floor. and separate out the following materials, then send them To adjust the squeegee body blades, proceed as follows: to the appropriate collection centres in accordance with the... -
Page 23: Troubleshooting
25. TROUBLESHOOTING This chapter lists the most common problems linked with the use of the machine. If you are unable to resolve the problems with the information given here, please contact your nearest assistance centre. PROBLEM POSSIBLE CAUSE SOLUTION The main switch is set to “0”. Make sure that the main switch is in its "I"... - Page 24 NOTES...
- Page 25 NOTES...
- Page 26 NOTES...
- Page 28 HILLYARD INDUSTRIES - PO Box 909 - St.Joseph, Missouri 64502-0909 U.S.A. - Telephone: 816-233-1321 - www.hillyard.com...
Need help?
Do you have a question about the TRIDENT R30SC and is the answer not in the manual?
Questions and answers