Table of Contents
Advertisement
Instruction Manual
X-RAY INSPECTION GENERATOR
High Voltage Power Supply
SPELLMAN
HIGH VOLTAGE ELECTRONICS
CORPORATION
475 Wireless Blvd.
Hauppauge, New York, 11788
+1(631) 630-3000*FAX: +1(631) 435-1620*
E-mail:
sales@spellmanhv.com
Website: www.spellmanhv.com
XRV SERIES MANUAL
XRV SERIES
MODEL :
SERIAL# :
DATE :
R
118115-001 Rev B
Advertisement
Table of Contents

Related Manuals for Spellman XRV160*1800


Summary of Contents for Spellman XRV160*1800
- Page 1 Instruction Manual X-RAY INSPECTION GENERATOR XRV SERIES High Voltage Power Supply MODEL : SERIAL# : DATE : SPELLMAN HIGH VOLTAGE ELECTRONICS CORPORATION 475 Wireless Blvd. Hauppauge, New York, 11788 +1(631) 630-3000*FAX: +1(631) 435-1620* E-mail: sales@spellmanhv.com Website: www.spellmanhv.com XRV SERIES MANUAL...
- Page 2 -40°C to +85°C e-mail: sales@spellmanhv.com +1-631-630-3000 FAX: +1-631-435-1620 +44 (0)1798 877000 FAX: +44 (0)1798 872479 www.spellmanhv.com 128060-001 REV.F JAPAN +81 (0)48-447-6500 FAX: +81 (0)48-447-6501 CHINA +86 (0)512-67630010 FAX: +86 (0)512-67630030 Spellman High Voltage is an ISO 9001:2000 and ISO 14001:2004 registered company...
- Page 3 *Specify “P” for positive or “N” for negative polarity. e-mail: sales@spellmanhv.com +1-631-630-3000 FAX: +1-631-435-1620 +44 (0)1798 877000 FAX: +44 (0)1798 872479 www.spellmanhv.com 128060-001 REV.F JAPAN +81 (0)48-447-6500 FAX: +81 (0)48-447-6501 CHINA +86 (0)512-67630010 FAX: +86 (0)512-67630030 Spellman High Voltage is an ISO 9001:2000 and ISO 14001:2004 registered company...
- Page 4 M6 X 20MM, with M6 nut. e-mail: sales@spellmanhv.com +1-631-630-3000 FAX: +1-631-435-1620 +44 (0)1798 877000 FAX: +44 (0)1798 872479 www.spellmanhv.com 128060-001 REV.F JAPAN +81 (0)48-447-6500 FAX: +81 (0)48-447-6501 CHINA +86 (0)512-67630010 FAX: +86 (0)512-67630030 Spellman High Voltage is an ISO 9001:2000 and ISO 14001:2004 registered company...
- Page 5 +1-631-630-3000 FAX: +1-631-435-1620 +44 (0)1798 877000 FAX: +44 (0)1798 872479 www.spellmanhv.com 128060-001 REV.F JAPAN +81 (0)48-447-6500 FAX: +81 (0)48-447-6501 CHINA +86 (0)512-67630010 FAX: +86 (0)512-67630030 Spellman High Voltage is an ISO 9001:2000 and ISO 14001:2004 registered company...
-
Page 6: Important Safety Precautions
CAUTION notes in the text indicate procedures to be followed to avoid possible damage to equipment. Copyright © 2000, Spellman High Voltage Electronics Corporation. All Rights Reserved. This information contained in this publication is derived in part from proprietary and patent data. This information has... -
Page 7: Wichtige Sicherheitshinweise
WICHTIGE SICHERHEITSHINWEISE SICHERHEIT DIESES HOCHSPANNUNGSNETZTEIL ERZEUGT LEBENSGEFÄHRLICHE HOCHSPANNUNG. SEIN SIE SEHR VORSICHTIG BEI DER ARBEIT MIT DIESEM GERÄT. Das Hochspannungsnetzteil muß immer geerdet sein. Berühren Sie die Stecker des Netzteiles nur, wenn das Gerät ausgeschaltet ist und die elektrischen Kapazitäten des Netzteiles und der angeschlossenen Last entladen sind. Die internen Kapazitäten des Hochspannungsnetzteiles benötigen ca. - Page 8 PRECAUTIONS IMPORTANTES POUR VOTRE SECURITE CONSIGNES DE SÉCURITÉ ETTE ALIMENTATION GÉNÈRE DES TENSIONS QUI SONT DANGEUREUSES ET PEUVENT ÊTRE FATALES OYEZ EXTRÊMENT VIGILANTS LORSQUE VOUS UTILISEZ CET ÉQUIPEMENT Les alimentations haute tension doivent toujours être mises à la masse. Ne touchez pas les connectiques sans que l’équipement soit éteint et que la capacité à la fois de la charge et de l’alimentation soient déchargées.
- Page 9 IMPORTANTI PRECAUZIONI DI SICUREZZA SICUREZZA QUESTO ALIMENTATORE GENERA TENSIONI CHE SONO PERICOLOSE E POTREBBERO ESSERE MORTALI. PONI ESTREMA CAUTELA QUANDO OPERI CON QUESO APPARECCHIO. Gli alimentatori ad alta tensione devono sempre essere collegati ad un impianto di terra. Non toccare le connessioni a meno che l’apparecchio sia stato spento e la capacità interna del carico e dell’alimentatore stesso siano scariche.
-
Page 10: Table Of Contents
Table of Contents INTRODUCTION ............................3 1.1............................3 EVICE LASSIFICATION 1.2..............................3 NTENDED 1.3........................3 NTERFERENCES ETWEEN QUIPMENT 1.4............................3 EVICE ESCRIPTION WARNINGS & SAFETY INFORMATION......................4 2.1. SAFETY SYMBOLS............................5 ... - Page 11 6.5. T1..........................26 RANSFORMER SSEMBLY 6.6..............................26 SSEMBLY 6.6.1. HV Multiplier Assembly ........................26 6.6.2. Filament Rectifier /Transformer Assembly ..................26 TURN UNIT ON AND CONTROL ........................27 7.1........................28 SER PTIONS AND ETTINGS 7.1.1. Changing user settings or setting X‐ray tube operating limits............28 ...
-
Page 12: Introduction
INTRODUCTION 1.1. Device Classification The device described herein is a Security Radiological Power Supply. Using Annex H of the “Safety Requirements for Electrical Equipment for Measurement, Control and Laboratory Use”, EN61010-1, we have concluded that the model XRV SERIES is classified as a Class I device. -
Page 13: Warnings & Safety Information
Both outputs connect to the x-ray tube through a single modified three-pin HV receptacle (J1). The outputs are designed to drive through a shielded HV cable (cable supplied by customer). The Power Supply is computer controlled via RS232, USB, Ethernet or an Analog User I/O available through a 25 pin DB connector. -
Page 14: Safety Symbols
2.1. SAFETY SYMBOLS The following safety-related symbols are found on the unit: Caution: consult operation manual High-voltage connection dangerous Voltage >1000V Ground connection XRV SERIES Page 5 118116-001 REV C... -
Page 15: Unpacking
UNPACKING Remove the unit from its shipping container, but do not discard the packing materials; retain the packing materials and carton in case the unit needs to be returned. Inspect the unit for dents or other damage, which may have occurred during shipping. In the unusual event that shipment damage has occurred, contact the transportation company and the manufacturer immediately. -
Page 16: Installation
INSTALLATION Install the Power Supply in its designated place. Make sure that AC power is off to Power Supply. Turning power to the unit is the last step of the procedure. Only persons who are properly trained are allowed to carry out the installation 4.1. -
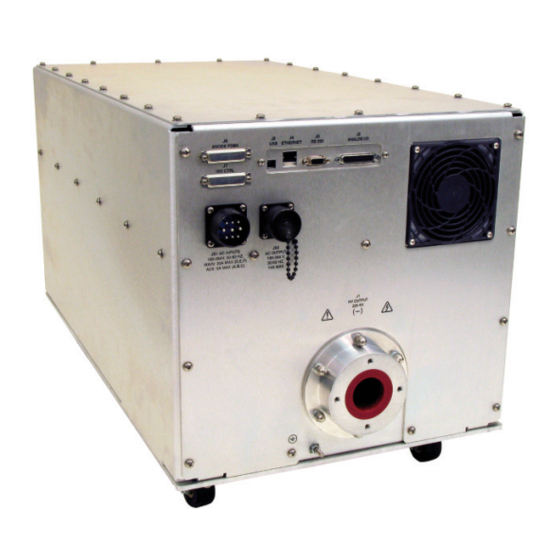
Page 17: Overview Of The Connections (Anode 160Kv)
4.2. Overview of the Connections (Anode 160kV) AC Input J3 Inverter J2 Feedback JB1 Control Ground Stud J1 High‐Voltage connector XRV 160kV Anode XRV SERIES Page 8 118116-001 REV C... -
Page 18: Overview Of The Connections (Cathode 225Kv)
4.3. Overview of the Connections (Cathode 225kV) JB2 Main AC Output Anode Feedback J7 Inverter Control (Bipolar) JB1 Main Input (Bipolar) (Bipolar) User I/O Connections Ground Stud ‐ ... -
Page 19: Overview Of The Connections (Anode 225Kv)
4.4. Overview of the Connections (Anode 225kV) Feedback J3 Inverter AC Input Control J1 High‐Voltage connector Ground Stud XRV 225kV Anode XRV SERIES Page 10 118116-001 REV C... -
Page 20: Supply Voltage
4.5. Supply Voltage Before the XRV Power Supply is installed, it is critical that the unit meets the correct input voltage level. It is not field selectable. To meet the safety requirements the Power Supply has two separate input voltages. The Auxiliary supply is fed at all times and the Main supply is interrupted via a door switch of safety contactor when the High Voltage output is not required. -
Page 21: Interlocks And Warning Connections
4.8. Interlocks and Warning Connections Connect Interlocks, Pre-Warning and X-RAY ON Indicator to J2 connector. Make all connections using a 25 D male connector. The HVPS has interlock circuits that will immediately turn off the HV output if the interlock is opened. -
Page 22: System Interconnections And Setup (Bi-Polar)
4.10. System Interconnections and Setup (Bi-Polar) XRV SERIES Page 13 118116-001 REV C... -
Page 23: 4.11. Hv Connector - J1
4.11. HV Connector – J1 Pin C – HV Output (Filament Common) Pin S – Small Filament Output Pin L – Large Filament Output 4.12. HV Cable installation instructions: Turn Off power to the unit. Remove HV cable from the Power Supply Discharge cable by grounding the high voltage tip of cable to the power supply chassis ... - Page 24 This procedure should be followed whenever the cable plug is removed from the cablewell. Silicone Compound Area Tip Mounting Flange XRV SERIES Page 15 118116-001 REV C...
-
Page 25: User Interface And Control
USER INTERFACE AND CONTROL There are two ways the HVPS can be controlled. Using computer control with “GUI” Graphic User Interface control Software via RS232, Ethernet or USB interface connected to the HVPS. The second way is connecting the unit to J2 a manual analog controller. The Analog controller must meet the interface requirement as indicated on page 18 (J2 I/O PINOUT) for both analog and digital logic signals. -
Page 26: 5.1.2. Ethernet Digital Interface - J4, 8-Pin Rj45 Connector
Baud Rate 115200 Parity NONE Data Bits Stop Bits 5.1.2. Ethernet Digital Interface – J4, 8-pin RJ45 connector The Ethernet interface has the following attributes: 10-Base-T (rev A-B), 10/100-Base-T (rev C and higher) IP address can be set by the system integrator ... -
Page 27: Usb Digital Interface-J5, 4 Pin Usb "B" Connector
5.1.3. USB Digital Interface-J5, 4 pin USB “B” connector The USB interface has the following attributes: Compliant with USB 1.1 and USB 2.0 specifications Type B male connector Included driver can be communicated with via standard Windows serial communications methods Signal Parameters... -
Page 28: Theory Of Operation
THEORY OF OPERATION 6.1. Introduction The XRV SERIES is a 3kW (Single ended) / 4.5KW(Bipolar) high voltage switching power supply which incorporates the latest in high frequency, high power switching technology used to drive an NDT x-ray tube, as well as to serve as a source of a reliable high voltage for other type of loads. -
Page 29: Kv Regulator
main functions of kV and mA regulation. The DSP provides the digital circuitry to monitor report and latch fault conditions. The DSP works together with ADCs, DACs to coordinate the control, calibration and to implement Remote (RS 232 or other) control via serial communications. -
Page 30: Fault Detection
not possible to generate emission current, as when the HV is off, the mA regulator will regulate the filament current, in a current preheat mode. The secondary function of the mA regulator is to regulate, or limit, the filament current when emission current regulation is not possible, such as when the HV is turned off. - Page 31 Software Comparator Function Threshold HV Over Voltage (window compare to program ref) +10% HV under voltage (window compare to program ref) _-10% mA Over Current (window compare to program ref) Fast mA under Current (window compare to program ref) Fast Over Power (user setting) ½...
- Page 32 LED Summary on System Control Description Color Status During Normal Operation 3.3V supply Green DSP Alive Green Flashes Communication Active Green Flashes USB Connected Green ON if USB is connected HV in current limit Filament in current limit Over temp cathode inverter Over temp cathode inverter Cable connection Cathode DS10...
-
Page 33: Arc Counter, Arc Fault
6.2.5. ARC Counter, ARC Fault Arcs in the HV are sensed by a current transformer in the “Low End” of the multiplier and fed to comparator on System Control board. These comparators have a threshold that is varied with the kV program reference level. Arc management is handled in the DSP. The ARC signal will be received and latched by the DSP, which at Hardware speeds disables the kV regulator with the goal of quenching the arc. -
Page 34: Filament Inverter/Feedback (460158-Xxx)
to minimize IGBT switching losses and to reduce EMI noise that might be produced by the High Power Switching power supply. The IGBT’s are mounted on the heat sink and located between the IGBT’s , mounted directly on the heat sink is a thermal switch that monitors the temperature of the inverter plate. -
Page 35: Transformer Assembly T1
6.5. Transformer Assembly T1 The Transformer Assembly consists of a HV Transformer primary winding and secondary winding which is then connected to HV Assembly by HV connectors. The HV Transformer leakage inductance together with the combined capacitance of the transformer secondary, and the HV Section, produces a resonant tank on the primary side of transformer. -
Page 36: Turn Unit On And Control
TURNING UNIT ON AND CONTROL NEVER ATTEMPT TO RAISE HIGH VOLTAGE WITHOUT HIGH VOLTAGE CABLE BEING INSTALLED AND SECURED IN THE POWERS SUPPLY CABLEWELL! THE OTHER HIGH VOLTAGE CABLE END MUST BE CONNECTED TO AN X-RAY TUBE OR OTHER LOAD! There are two ways the HVPS can be controlled. -
Page 37: Settings
7.1. User I/O Options and Settings This should only be performed with trained personnel only. 7.1.1. Changing user settings or setting X-ray tube operating limits. Enter upper operating limits Connect the RS-232 cable from PC to J3 of HVPS. ... - Page 38 User configurations (example) User Parameters KV over voltage: Over Voltage Fault will occur at this setting. This percentage is related to a full-scale reading of analog converter on the system control board. The default setting for all units is 87%; this value should not be changed without consulting the factory. XRV160 100% =192kV, 87% = 167kV ...
- Page 39 X-ray Pre-warning: delay time from X-ray ON and the actual turn on of HV. The Pre-warning indicator will be on during this time. The time values are in seconds. KV ramp rate: time in seconds for the kV high voltage output to go from 0 to FS rated output voltage.
-
Page 40: Application Software Installation
User Options Parameter/Function Range Default Notes Large Filament Power Limit XRV160,225 0-3000 Watts 3000 watts See tube data XRV320,450 0-4500 watts 4500 watts Small Power Limit XRV160,225 0-3000 Watts 3000Watts See tube data XRV320,450 0-4500 watts 4500 watts Max kV XRV160 0-160kV 160kV... -
Page 41: Installing Gui Software From The Cd Provided
7.2.1. Installing GUI Software from the CD provided Insert the XRV disk in the CD Drive, double click on My Computer icon and the CD drive icon, and double-click on the XRV setup. Follow the instructions on displayed screen. 7.2.2. Downloading Application Software via FTP Site XRV GUI software ... -
Page 42: Recognizing Faults
8.2. RECOGNIZING FAULTS Faults and unit operation can be recognized by the front panel LED display or by GUI computer control. 8.2.1. Front Panel Faults During normal operation, only Green LEDs should be illuminated on the front panel. Any red LED indicates a fault or incorrect operation. LED’s on the control board report any faults or incorrect operation that the XRV recognizes and that occur during normal operation. -
Page 43: Front Panel Led Summary
8.2.2. Front Panel LED Summary Description Color Status During Normal Operation Power ON Aux Power is ON Green Power Supply Ready Power is Ready if Green OFF- ON Program Voltage Requested = Actual Filament ON Filament Is ON Green X-Ray ON X-ray’s are ON Green Pre-Warning... - Page 44 OV Fault This fault occurs when the system output voltage exceeds the maximum allowable voltage, +10% above the programmed voltage or for full output operation. This may be caused by: System Control PWB failure Filament/Feedback PWB failure HV Divider Failure Diagnosis ...
- Page 45 Arc Fault This fault occurs when the system output has experienced arcs beyond the maximum allowable of one arc. This may be caused by: Problems with the x-ray tube Failure in the HVPS High Voltage Assembly ,Filament Transformer section ...
- Page 46 HV Inverter Fault This fault occurs when the DC Rail supply did not properly come up to 400 VDC within 3 sec from Setup Start Enable. This may be caused by: Bad or OFF Circuit Breaker for AC Mains. ...
-
Page 47: Filament Adjustments
8.3. Filament Adjustments Trained personnel only Filament current calibration is performed at the initial installation and every time the tube is changed with a different type. This calibration is performed at the tubes current limit for both large and small filament. The filament current is measured directly in the high voltage cable connected to the tube. - Page 48 Connect Safety Ground to E1 GND Stud Turn ON power to the HVPS with Aux Circuit Breaker CB2, Only The Main Circuit Breaker must remain OFF during this adjustment! Set filament pre-heat setting to Zero, with either RS-232 GUI or Analog Control ...
- Page 49 Large Filament Cal. Small Filament Cal. The same procedure should be followed for the small filament by connecting digital miltimeter (3) in series with the small filament wire of measuring adapter (1) and small filament wire of measuring adapter (2) on the high voltage cable side. Small/Large Filament Current Calibration ...
- Page 50 Set filament pre-heat setting to Zero, with either RS-232 GUI or Analog Control Set Max Limit Current for the Small Filament, with either RS-232 GUI or Analog Control Select Small Filament and turn the Filament ON. Starting from zero current slowly increases filament small pre-heat setting and at the same time monitoring the actual current (from the digital multimeter).
-
Page 51: Field Replaceable Items
FIELD REPLACEABLE ITEMS The following is a list of field replaceable items. These items, when determined to be faulty, can be replaced in the field. Description Drawing Ref Spellman Part Number HV Assembly, Cathode 160/320 407003-001 HV Assembly, Anode 160/320 407111-001... -
Page 52: 10. Schematics And Drawing List
10. SCHEMATICS AND DRAWING LIST Schematics and drawings are available upon request DESCRIPTION XRV160 XRV 225 XRV320 XRV450 System Diagram 441202-001 441204-001 441177-001 441178-001 Overall Drawing 407175-001 407181-001 407035-001 407034-001 Assembly Drawing Cathode 407106-001 407118-001 407106-001 407118-001 Assembly Drawing Anode 407110-001 407098-001 Fil/FDBK Bd. Assy Cathode 460158-001 460158-001 460158-001... - Page 53 The buyer’s sole remedy for a claimed breach of this warranty, and Spellman’s sole liability is limited, at Spellman’s discretion, to a refund of the purchase price or the repair or replacement of the power supply at Spellman’s cost. The buyer will be responsible for shipping charges to and from Spellman’s plant. The buyer will not be entitled to make claim for, or recover, any anticipatory profits, or incidental, special or consequential damages resulting from, or in any way relating to, an alleged breach of this warranty.
Need help?
Do you have a question about the XRV160*1800 and is the answer not in the manual?
Questions and answers