Table of Contents
Advertisement
Advertisement
Chapters
Table of Contents

Subscribe to Our Youtube Channel
Related Manuals for Spellman SLM SERIES


Summary of Contents for Spellman SLM SERIES
- Page 1 Instruction Manual SLM SERIES High Voltage Power Supply MODEL : SERIAL# : DATE : SPELLMAN HIGH VOLTAGE ELECTRONICS CORPORATION 475 Wireless Blvd. Hauppauge, New York, 11788 +1(631) 630-3000*FAX: +1(631) 435-1620* E-mail: sales@spellmanhv.com Website: www.spellmanhv.com 118072-001 Rev A SLM MANUAL...
- Page 2 1200 watts: 26 pounds (11.8kg) Corporate Headquarters www.spellmanhv.com 128035-001 REV. M Hauppauge, New York USA Spellman High Voltage is an ISO 9001:2008 and ISO 14001:2004 registered company +1-631-630-3000 FAX: +1-631-435-1620 e-mail: sales@spellmanhv.com Copyright © 2006 Spellman High Voltage Electronics Corp.
- Page 3 *Specify “P” for positive polarity or “N” for negative polarity Corporate Headquarters www.spellmanhv.com 128035-001 REV. M Hauppauge, New York USA Spellman High Voltage is an ISO 9001:2008 and ISO 14001:2004 registered company +1-631-630-3000 FAX: +1-631-435-1620 e-mail: sales@spellmanhv.com Copyright © 2006 Spellman High Voltage Electronics Corp.
- Page 4 SIDE VIEW 12.00 [304] FLOW FLOW Corporate Headquarters www.spellmanhv.com 128035-001 REV. M Hauppauge, New York USA Spellman High Voltage is an ISO 9001:2008 and ISO 14001:2004 registered company +1-631-630-3000 FAX: +1-631-435-1620 e-mail: sales@spellmanhv.com Copyright © 2006 Spellman High Voltage Electronics Corp.
-
Page 5: Important Safety Precautions
CAUTION notes in the text indicate procedures to be followed to avoid possible damage to equipment. Copyright © 2000, Spellman High Voltage Electronics Corporation. All Rights Reserved. This information contained in this publication is derived in part from proprietary and patent data. This information has... -
Page 6: Wichtige Sicherheitshinweise
WICHTIGE SICHERHEITSHINWEISE SICHERHEIT DIESES HOCHSPANNUNGSNETZTEIL ERZEUGT LEBENSGEFÄHRLICHE HOCHSPANNUNG. SEIN SIE SEHR VORSICHTIG BEI DER ARBEIT MIT DIESEM GERÄT. Das Hochspannungsnetzteil muß immer geerdet sein. Berühren Sie die Stecker des Netzteiles nur, wenn das Gerät ausgeschaltet ist und die elektrischen Kapazitäten des Netzteiles und der angeschlossenen Last entladen sind. Die internen Kapazitäten des Hochspannungsnetzteiles benötigen ca. - Page 7 PRECAUTIONS IMPORTANTES POUR VOTRE SECURITE CONSIGNES DE SÉCURITÉ ETTE ALIMENTATION GÉNÈRE DES TENSIONS QUI SONT DANGEUREUSES ET PEUVENT ÊTRE FATALES OYEZ EXTRÊMENT VIGILANTS LORSQUE VOUS UTILISEZ CET ÉQUIPEMENT Les alimentations haute tension doivent toujours être mises à la masse. Ne touchez pas les connectiques sans que l’équipement soit éteint et que la capacité à la fois de la charge et de l’alimentation soient déchargées.
- Page 8 IMPORTANTI PRECAUZIONI DI SICUREZZA SICUREZZA QUESTO ALIMENTATORE GENERA TENSIONI CHE SONO PERICOLOSE E POTREBBERO ESSERE MORTALI. PONI ESTREMA CAUTELA QUANDO OPERI CON QUESO APPARECCHIO. Gli alimentatori ad alta tensione devono sempre essere collegati ad un impianto di terra. Non toccare le connessioni a meno che l’apparecchio sia stato spento e la capacità interna del carico e dell’alimentatore stesso siano scariche.
-
Page 9: Table Of Contents
Table of Contents PAGE 1. INTRODUCTION Description of the SLM Series................1 SLM Specifications....................1 Standard Features....................2 System Status and Fault Diagnostic Display ............3 Interpreting the Model Number ................4 2. INSPECTION & INSTALLATION Initial Inspection ....................5 Mechanical Installation..................5 3. OPERATING INSTRUCTIONS Operation ......................7 Standard Features....................8... -
Page 10: Introduction
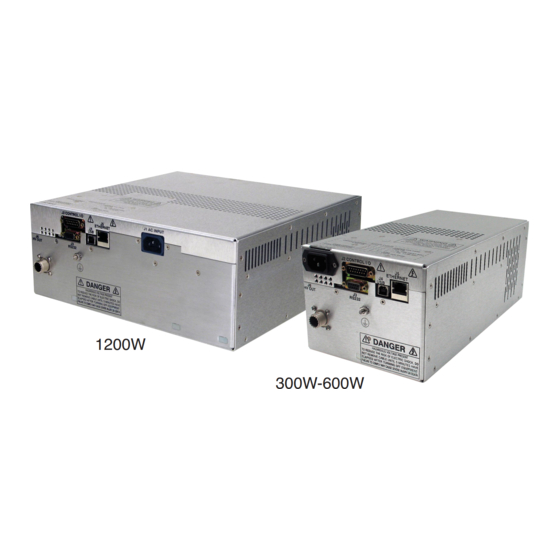
600Watt and 1200Watt models. The input is power maximum rating via 0-10VDC input. factor corrected and the SLM series operates at full power continuous. The ambient temperature must be kept below ... -
Page 11: Standard Features
20 seconds. 1.3 Standard Features Quench Time: The SLM series incorporates several standard features This sets the length of time that the high voltage is designed to optimize user operation. shutdown to quench the arc after an arc occurs. It is programmable from 100ms to 500ms. -
Page 12: System Status And Fault Diagnostic Display
Indicates the over Watchdog Timer OVER CURRENT FAULT: If there is no communication between the HVPS and the current protection circuitry has caused the high host computer for more than 10 seconds the HV output voltage to turn off. This fault will occur if the output will shutdown and the Watchdog Timer fault will be sent current exceeds 110% of full scale. -
Page 13: Interpreting The Model Number
Power On LED: When the input power is applied to the unit it is indicated by PWR ON LED status on the SLM 70 P 600/X(#) front panel. Indicates the output current regulator I MODE: circuit is maintaining current regulation. This is Serie Polarity indicated by I Mode LED status on the front panel... -
Page 14: Inspection & Installation
Standard unit dimensions Inspect the package exterior for evidence of damage due are shown in Figure 2.1 to handling in transit. Notify the carrier and Spellman immediately if damage is evident. Do not destroy or For custom mounting requirements or specific remove any of the packing material used in a damaged package size requirements consult Spellman’s... - Page 15 Figure 2.2 Unit Dimensions (1200W) SLM MANUAL 118073-001 Rev C...
-
Page 16: Operating Instructions
Chapter 3 PERATING NSTRUCTIONS For initial turn-on, program the voltage and 3.1 Operation current for zero output. Connect the enable/disable signal to disable. WARNING The input power cable may now be connected to THIS EQUIPMENT GENERATES the AC power line. DANGEROUS VOLTAGES THAT MAY BE Enable the power supply via the enable/disable FATAL. -
Page 17: Standard Features
(this is done automatically upon opening of the current controls on the front panel can be used as follows: Spellman GUI/APPLET).If the unit is in Local Mode and For local current control, jump J2-2 to J2-7. For local enabled prior to switching it to Remote Mode, the UUT voltage control, jump J2-3 to J2-5. - Page 18 WARNING It is extremely dangerous to use this circuit to inhibit high voltage generation for the purpose of servicing or approaching any area of load considered unsafe during normal use. Figure 3.2 Local Programming Via Internal Front Panel Pot Voltage Source. SLM MANUAL 118073-001 Rev C...
- Page 19 Figure 3.3 Local Programming via External Voltage Source SLM MANUAL 118073-001 Rev C...
- Page 20 Figure 3.4 Remote Monitoring SLM MANUAL 118073-001 Rev C...
- Page 21 RELAY Figure 3.5 Enable/Interlock Logic Control WARNING It is extremely dangerous to use this circuit to inhibit high voltage generation for the purpose of servicing or approaching any area of load considered unsafe during normal use. SLM MANUAL 118073-001 Rev C...
-
Page 22: Principles Of Operation
Cockroft-Walton multiplier is used. A feedback signal is generated by the high voltage resistor divider. The SLM series can operate from 90 - 265Vac, for the This feedback signal is sent to control circuits to provide 300Watt model and 180 –264Vac for the 600 and voltage regulation and monitoring. -
Page 23: Control Circuits
Due to the variations of models and options provided in Feedback signals are calibrated and buffered via general the SLM series, details of actual circuits used may differ purpose OP-AMPS. Pulse width control is accomplished slightly from above descriptions. -
Page 24: Custom Designed Models
Chapter 5 5.1 Custom Designed Models X (#) Units built to customer specifications are assigned an X number be the factory. If this unit is an X model, specification control sheet is added at the end of this instruction manual. SLM MANUAL 118073-001 Rev C... -
Page 25: Maintenance
Spellman Customer Service Department. Test equipment, including an oscilloscope, a high impedance voltmeter, WARNING and a high voltage divider such as the Spellman HVD- 100 is needed for performance tests. All test components must be rated for operating voltage. THIS POWER SUPPLY GENERATES VOLTAGES THAT ARE DANGEROUS AND MAY BE FATAL. -
Page 26: Factory Service
Follow received at the Spellman Repair Center. In the event that the return procedures described in Section 7.2. repair work is extensive, Spellman will call to seek customer shall pay for shipping to and from Spellman. - Page 27 The buyer’s sole remedy for a claimed breach of this warranty, and Spellman’s sole liability is limited, at Spellman’s discretion, to a refund of the purchase price or the repair or replacement of the power supply at Spellman’s cost. The buyer will be responsible for shipping charges to and from Spellman’s plant. The buyer will not be entitled to make claim for, or recover, any anticipatory profits, or incidental, special or consequential damages resulting from, or in any way relating to, an alleged breach of this warranty.
- Page 28 Serial – RS-232 Universal Serial Bus - USB Copyright © 2007, Spellman High Voltage Electronics Corporation. All Rights Reserved. This information contained in this publication is derived in part from proprietary and patent data. This information has been prepared for the express purpose of assisting operating and maintenance personnel in the efficient use of the model described herein, and publication of this information does not convey any right to reproduce it or to use it for any purpose other than in connection with installation, operation, and maintenance of the equipment described.
- Page 29 6.2 Command Arguments ......................67 6.3 Checksums .......................... 67 6.4 Command Overview ......................69 6.5 Response Overview ......................70 6.6 Command Structure ......................72 6.7 Spellman Test Commands ....................95 6.8 Serial Command Handling....................95 Page 2 of 95 118080-001 REV A...
-
Page 30: Scope
WARNING THIS EQUIPMENT GENERATES DANGEROUS VOLTAGES THAT MAY BE FATAL. PROPER GROUNDING OF ALL HIGH VOLTAGE EQUIPMENT IS ESSENTIAL.SEE SLM OWNERS MANUAL FOR PROPER GROUNDING TECHNIQUE AND SAFETY PRECAUTIONS BEFORE APPLING AC INPUT POWER TO THE SLM UNIT. TO PREVENT DAMAGE TO THE HOST COMPUTER ,THE COMPUTER SHOULD BE GROUNDED TO THE UNIT. - Page 31 Figure 1 – J3, RS-232 DB-9M pinout (front view) DESCRIPTION Tx Out Rx In Ground Page 4 of 95 118080-001 REV A...
-
Page 32: Ethernet Interface
3.2 ETHERNET INTERFACE The Ethernet interface has the following attributes: • 10/100-Base-T • IP address can be set by the system integrator • Network Mask can be set by the system integrator • TCP Port Number can be set by the system integrator •... -
Page 33: Universal Serial Bus Interface
3.3 USB – UNIVERSAL SERIAL BUS INTERFACE The USB interface has the following attributes: • Compliant with USB 1.1 and USB 2.0 specifications • Type B male connector • Included driver can be communicated with via standard Windows serial communications methods Figure 3 –... - Page 34 A direct connection requires a non-standard cable where the wires are not run straight through. Please refer to the two cable ends shown below in figure 4. Figure 4 – Crossover Cable for Direct Connection A standard connection through a hub, switch, or network uses a standard CAT5 patch cable.
-
Page 35: Usb Cabling
USB CABLING A high-quality double-shielded USB 2.0 Type A to B (host to slave) cable should be used in all applications. This type of cable is a standard PC to peripheral cable that utilizes full-size connectors. Figure 6 – USB A-to-B cable 3.6.1 HIGH EMI ENVIRONMENTS If the SLM USB interface is being used in a high-EMI environment, ferrites should be added to the USB cable. - Page 36 Ferrite beads should be attached to the USB cable next to the connectors – both sides should be installed. In extreme cases ferrite cores may be added where the cable is looped 3 or 4 times around the core as shown in figure 8.
-
Page 37: Getting Started - Software
GETTING STARTED – SOFTWARE The following sections detail how to create software to interface to the SLM communications interfaces. RS-232 The RS-232 interface makes use of a standard ‘command/response’ communications protocol. See section 6.0 for the syntax of the serial interface protocol. - Page 38 For the “Default” scenario, include the following commands in the Form_Load() routine: MSComm1.CommPort = portNumber MSComm1.PortOpen = True For the “Choice” scenario, place the above two commands in a selectable menu item. Page 11 of 95 118080-001 REV A...
-
Page 39: Ethernet
Web Page 1: Contact Information Page Figure 9 displays a picture of the SLM and information on how to contact Spellman High Voltage Electronics Corporation. By clicking on the picture of the SLM or on the button labeled “Click Here to Monitor and Control”... - Page 40 Figure 9 - Web Page 1- Contact Information Page 13 of 95 118080-001 REV A...
- Page 41 Web Page 2: License Agreement Page Figure 10 displays the license agreement. Here the user can either agree or disagree with the Spellman license agreement. Click on “I Accept” to continue on to the applet. Figure 10 - Web Page 2 – License Agreement...
- Page 42 4.2.2.3 Web Page 3 - Monitor and Control Applet 4.2.2.3.1 Requirements The Monitor and Control Applet is a java “applet” (“small java application” specifically written to be embedded in a web page and invoked from a browser) that requires an Internet browser with an installed JVM (Java Virtual Machine).
- Page 43 View the screen as a “left” and a “right” with the right half containing status read from the SLM and the left half containing the values that are programmable by the user. For any programmable setting you click on the button to the left of the setting, which brings up the program set point screen.
- Page 44 4.2.2.6 “Tabs” on Applet The user can view and set operating parameters of the applet or network configurations of the SLM or view firmware version information by changing tabs. 4.2.2.7 User Settings Figure 13 – User Setting The User Settings tab allows the user to set firmware configurable options, as shown above.
- Page 45 4.2.2.8 Fault log Figure 14 – Fault log Fault log displays faults with their date and time. Page 18 of 95 118080-001 REV A...
- Page 46 4.2.2.9 About Displays version information and model number. Figure 15 – About Page 19 of 95 118080-001 REV A...
- Page 47 4.2.2.10 Turning the SLM HVOn/Off and Connection Status Please refer to Figure 11, the Monitor and Control Applet. Setting Name Range Values Local/Remote Local mode/Remote mode On/Off Interlock Open/Closed Fault Status OK/Fault Connection Status Connected/No Data Received/Disconnected Unlike the controls we previously discussed at the top of the screen which required a separate dialog screen to enter values, these are controlled by a button.
- Page 48 When direct connecting the SLM to a computer using a crossover cable over Ethernet they are essentially participating in a private network. As such you need to pick two valid IP addresses, one for each device. The table below illustrates that not all IP addresses are actually valid IP addresses.
- Page 49 Figure 17 – Select Properties After selecting properties you are brought up to the screen below (Figure 18). You must RIGHT CLICK and select Properties on Local Area Connection, and not double click which will display a window similar to figure 19. Figure 18 –...
- Page 50 Figure 19 – Local Area Connection Properties Now you must select “Internet Protocol (TCP/IP)” and click on the Properties button to be brought to figure 20. Lastly you must disable any firewall software you have running. If you are running a proxy server for Internet access, you must also disable the proxy client.
- Page 51 Figure 20 – TCP/IP Properties 4.2.3.2 Testing a Direct Connection You can use the program “Ping” to test a network connection between the computer and the SLM. “Ping” is a command line tool so we will need to bring up a command prompt. Under Windows NT, 2000 and XP the name of this command is “CMD”.
- Page 52 Reply from 192.168.1.4: bytes=32 time<1ms TTL=64 Reply from 192.168.1.4: bytes=32 time<1ms TTL=64 Reply from 192.168.1.4: bytes=32 time<1ms TTL=64 Reply from 192.168.1.4: bytes=32 time<1ms TTL=64 Ping statistics for 192.168.1.4: Packets: Sent = 4, Received = 4, Lost = 0 (0% loss), Approximate round trip times in milli-seconds: Minimum = 0ms, Maximum = 0ms, Average = 0ms 4.2.4 Configuring the SLM For a Local Area Network (LAN)
- Page 53 Figure 21 - Configure Network Settings The settings that can be changed are the: • Device Name • IP Address • TCP Port • Subnet Mask Once the Apply button is clicked on the network settings screen, the network component of the SLM is configured, rebooted and the applet is disconnected from the SLM.
- Page 54 require reconfiguring the host computer with the correct host IP address, subnet mask, and TCP port. The device name does not affect the operation of the SLM; it is simply a way for the user to differentiate multiple units on the same network.
- Page 55 If (portType = "ethernet") Then tcpClient.SendData (str) Else MSComm1.InBufferCount = 0 On Error GoTo done MSComm1.Output = str done: tmrOpenClose.Enabled = True End If 4.2.6.2 Data Input Example If (portType = "ethernet") Then DoEvents ............................................... ttcpClient.GetData temp$ str = str + temp$ Loop Until InStr(str, Chr(3)) Or Timer - t1 >...
-
Page 56: Usb
Figure 22 – System Properties Then select Device Manager and expand the Human Interface Devices. View the properties of the USB Human Interface Device icon and verify that Spellman USB HID appears in the Location section. Page 29 of 95 118080-001 REV A... - Page 57 Figure 23 – Device Manager showing USB HID 4.3.2 USB and EMI The USB protocol utilizes a heartbeat signal from each client device back to the host (PC). If the heartbeat is interrupted due to radiated or conducted transient noise, it is possible that the host may lose connection with the client.
- Page 58 4.3.3 Enabling Communications Objects in Visual Basic for USB The dynamic link library USB_dll.dll will be provided which needs to be added to the project. The library has three functions that can be called from the VB code. The three functions are: •...
- Page 59 4.3.5.2 Retrieve data only if it exists 1: Do DoEvents If MSComm1.InBufferCount > 0 Then str = str & MSComm1.Input End If Loop Until InStr(str, Chr(3)) Or Timer - t1 > 1 'str = str & MSComm1.Input If InStr(str, Chr(3)) > 0 Then tmrOpenClose.Enabled = False End If Notice that in line 3 we check for the existence of data before we...
- Page 60 4.3.5.4 Example Input Routine Notice on line 26 we check for data first before extracting data from the input. Then if we have actual data we turn off the timer. Otherwise the timer routine toggles the port open/close. 1: Private Function inputInputString() As String Dim str As String Dim t1 As Single 4: Dim temp$...
- Page 61 End If StatusBar1.Panels(3).Text = "RX: " & str 40: inputInputString = str tmr_RCVTIMER.Enabled = True 42: End Function 4.3.5.5 Example Timer Routine: Toggle Port State This is the timer routine in which the open/closed state of the port is toggled. If communications are interrupted, the USB device will re- register itself with the OS (vendor term: renumeration).
- Page 62 If MSComm1.PortOpen = False Then MSComm1.PortOpen = True Else MSComm1.PortOpen = False End If 22: End If 4.3.5.7 Data Parsing Example Here we have an example of a code that parses incoming data. Notice that it makes use of our generic input and output routines. The important consideration is to gracefully handle corrupted input data after a noise event.
- Page 63 On Error GoTo endhere Response1$ = Mid(temp2$, Start, (CommaPos - Start)) 'With a 5v reference: ODATA$ = Format(str(Response1$ * 0.0004884), "0.##0") 32: txt_DACB.Text = ODATA$ + " mA" frm_RAWDATA.txt_RAWDACB.Text = str(Response1$) txt_DACB.BackColor = vbWhite CommStatusFlag = True 36: endhere: 38: If portType = "ethernet" Then 39: tmr_NETRCVTMR.Enabled = True 40: Else tmr_RCVTIMER.Enabled = True...
-
Page 64: Ethernet Commands
ETHERNET COMMANDS TCP/IP FORMAT Each Ethernet command will consist of a TCP/IP header followed by the required data bytes. Figure 27 summarizes the TCP/IP header configuration. Please note that this functionality is provided by the software implementation of the Open Systems Interconnection (OSI) TCP/IP protocol stack, specifically the upper 4 layers. -
Page 65: Command Arguments
The format of Data Bytes 1 through N are as follows: <STX><CMD><,>ARG><,><ETX> Where: <STX> = 1 ASCII 0x02 Start of Text character <CMD> = 2 ASCII characters representing the command ID <,> = 1 ASCII 0x2C character <ARG> = Command Argument <,>... - Page 66 Request User None Configs Request unit None Scaling Reset HV On None Hours Counter Reset Faults None Request Network None Settings Program Network 6 ASCII Settings Description Read Interlock 1 ASCII 0 or 1 Status Request kV None monitor Request mA None monitor Request –15V...
-
Page 67: Response Overview
RESPONSE OVERVIEW The command responses will follow the same network TCP/IP header format as outlined above in section 5.1. This list is comprised of Commands with complex responses only. Commands using a simple response will use the <$> character (ASCII 0x24) as a “Success” response or a single character error code. These will be seven ASCII characters in length. -
Page 68: Command Structure
COMMAND STRUCTURE 5.5.1 Program kV Description: The host requests that the firmware change the setpoint of kV. Direction: Host to supply Syntax: <STX><10><,><ARG><,><ETX> Where: <ARG> = 0 - 4095 in ASCII format Example: <STX>10,4095,<ETX> Response: <STX><10><,><$><,><ETX> <STX><10><,><ARG><,><ETX> where <ARG> = error code Error Codes TBD, 1 = out of range Page 41 of 95 118080-001 REV A... - Page 69 5.5.2 Program mA Description: The host requests that the firmware change the setpoint of mA. Direction: Host to supply Syntax: <STX><11><,><ARG><,><ETX> Where: <ARG> = 0 - 4095 in ASCII format Example: <STX>11,4095,<ETX> Response: <STX><11><,><$><,><ETX> <STX><11><,><ARG><,><ETX> where <ARG> = error code Error Codes TBD, 1 = out of range Page 42 of 95 118080-001 REV A...
- Page 70 5.5.3 Request Total Hours High Voltage On Description: The host requests that the firmware sends the present value of the Total Hours High Voltage On. Direction: Host to supply Syntax: <STX><21><,><ETX> Example: <STX>21,<ETX> Response: <STX><21><,><ARG1>< ARG2>< ARG3><ARG4><ARG5> <.><ARG6><,><ETX> Where: <.> = ASCII 0x2E ARGx =0-9 in ASCII format Example: <STX>21,99999.9,<ETX>...
- Page 71 5.5.4 Request Status Description: The host requests that the firmware sends the power supply status. Direction: Host to supply Syntax: <STX><22><,><ETX> Example: <STX>22,<ETX> Response: <STX><22><,><ARG1><,><ARG2><,><ARG3><,><ARG4><,><ARG5><, ><ARG6><,><ARG7><,><ARG8><,<ETX> Where: <ARG1> 1 = HvOn, 0 = HvOff <ARG2> 1 = Interlock 1 Open, 0 = Interlock 1 Closed <ARG3>...
- Page 72 5.5.5 Request DSP Software Part Number/Version Description: The host requests that the firmware sends the DSP firmware version. Direction: Host to supply Syntax: <STX><23><,><ETX> Example: <STX>23,<STX> Response: <STX><23><,>< ARG><,><ETX> Where: <ARG> consists of eleven ASCII characters representing the current firmware part number/version. The format is SWM9999-999 Example: <STX>23,SWM9999-999,<ETX>...
- Page 73 5.5.6 Request Hardware Version Description: The host requests that the firmware sends the hardware version. Direction: Host to supply Syntax: <STX><24><,><ETX> Example: <STX>24,<ETX> Response: <STX><24><,>< ARG><,><ETX> Where: <ARG> consists of 3 ASCII characters representing the hardware version. The format is ANN, where A is an alpha character and N is a numeric character Example: <STX>24,A01,<ETX>...
- Page 74 5.5.7 Request Webserver Software Part Number/Version Description: The host requests that the firmware sends the Web Server firmware part number/version. Direction: Host to supply Syntax: <STX><25><,><ETX> Example: <STX>25,<ETX> Response: <STX><25><,><ARG><,><ETX> Where: <ARG> consists of eleven ASCII characters representing the current firmware part number/version.
- Page 75 5.5.8 Request Model Number Description: The host requests that the firmware sends the unit model number Direction: Host to supply Syntax: <STX><26><,><ETX> Example: <STX>26,<ETX> Response: <STX><26><,><ARG><,><ETX> Where: <ARG> consists of five ASCII characters representing the model number. The format is SLMNNANNN or XNNNN, where N is a numeric character and where A is a letter character.
- Page 76 5.5.9 Reset Run Hours Description: The host requests that the firmware resets the run hour counter. Direction: Host to supply Syntax: <STX><30><,><ETX> Example: <STX>30,<ETX> Response: <STX><30><,><$><,><ETX> Page 49 of 95 118080-001 REV A...
- Page 77 5.5.10 Reset Faults Description: The host requests that the firmware resets all Fault messages and indicators. Direction: Host to supply Syntax: <STX><31><,><ETX> Example: <STX>31,<ETX> Response: <STX><31><,><$><,><ETX> Page 50 of 95 118080-001 REV A...
- Page 78 5.5.11 Request Network Settings Description: The host requests that the firmware transmits the network settings Application: ARG 1 ARG2 ARG3 ARG4 ARG5 Function Device Remote Remote Subnet Name Address Port Mask Address Direction: Host to supply Syntax: <STX><50><,><ETX> Example: <STX>50,<ETX> Response: <STX><50><,><ARG1><,><ARG2><,><ARG3><,><ARG4><,>...
- Page 79 5.5.12 Program Network Settings Description: The host requests that the firmware programs the network settings and then reboots. Application: ARG 1 ARG2 ARG3 ARG4 ARG5 Function Device Remote Remote Subnet Name Address Port Mask Address Direction: Host to supply Syntax: <STX><51><,><ARG1><,><ARG2><,><ARG3><,><ARG4><,>...
- Page 80 5.5.13 Read Interlock Status Description: The host requests that the firmware read the status of the interlock channel. Direction: Host to supply Syntax: <STX><55><,><ETX> Response: <STX><55><,><ARG1><,><ETX> Where ARG1 is Interlocks 1. A 1 indicates that the Interlock is energized Example: <STX>55,1,<ETX>...
- Page 81 5.5.14 Request kV Monitor Description: The host requests that the firmware report kV monitor. Direction: Host to supply Syntax: <STX><60><,><ETX> Response: <STX><60><,><ARG><,><ETX> Where: <ARG>=0-4095 in ASCII format representing unscaled value. Example: <STX>60,4095,<ETX> Page 54 of 95 118080-001 REV A...
- Page 82 5.5.15 Request mA Monitor Description: The host requests that the firmware report mA monitor. Direction: Host to supply Syntax: <STX><61><,><ETX> Response: <STX><61><,><ARG><,><ETX> Where: <ARG>=0-4095 in ASCII format representing unscaled value. Example: <STX>61,4095,<ETX> Page 55 of 95 118080-001 REV A...
- Page 83 5.5.16 Request –15V LVPS Description: The host requests that the firmware report –15V LVPS. Direction: Host to supply Syntax: <STX><65><,><ETX> Response: <STX><65><,><ARG><,><ETX> Where: <ARG>=0-4095 in ASCII format representing unscaled value. Example: <STX>65,4095,<ETX> Page 56 of 95 118080-001 REV A...
- Page 84 5.5.17 Request Faults Description: The host requests that the firmware report Faults. Direction: Host to supply Syntax: <STX><68><,><ETX> Response: <STX><68><,><ARG1><,><ARG2><,><ARG3><,><ARG4><,><ARG5><, ><ARG6><,><ARG7><,><ETX> Where: <ARGx> 1 = Fault, 0 = No Fault in ASCII format ARG1 = ARC ARG2 = Over Temperature ARG3 = Over Voltage ARG4 = Under Voltage ARG5 = Over Current...
- Page 85 5.5.18 Turn HV on/off Description: The host requests that the firmware turn high voltage on or high voltage off. Direction: Host to supply Syntax: <STX><98><,><ARG><,><ETX> Where: <ARG> 1 = HV on, 0 = HV off in ASCII format Example: <STX>98,1,<ETX> Response: <STX><98><,><$><,><ETX>...
- Page 86 5.5.19 Program Local/Remote Mode Description: The host requests that the firmware to switch between Local and Remote Mode. Direction: Host to supply Syntax: <STX><99><,><ARG><,><ETX> Where: <ARG> 1 = Remote, 0 = Local in ASCII format Example: <STX>99,1,<ETX> Response: <STX><99><,><$><,><ETX> <STX><99><,><ARG><,><ETX> where <ARG>...
- Page 87 5.5.20 Program RS-232 Baud rate Description: The host requests that the firmware change the Baud rate for RS-232. Direction: Host to supply Syntax: <STX><07><,><ARG><,><ETX> Where: <ARG> 1 = 9.6k in ASCII format <ARG> 2 = 19.2k in ASCII format <ARG> 3 = 38.4k in ASCII format <ARG>...
- Page 88 5.5.22 Program User Configs Description: The host requests that the firmware program the user configs. Direction: Host to supply Syntax: <STX><09><,><ARG1><,><ARG2><,><ARG3><,><ARG4><,><ARG5><, ><ARG6><,><ARG7><,><ARG8><,><ARG9><,><ETX> Where: <ARG1> = 1 = ROV enabled, 0 = ROV disabled in ASCII format. <ARG2> = 0-110 in ASCII format representing the overvoltage percentage.
- Page 89 5.5.23 Request unit Scaling Description: The host requests that the firmware report the unit scaling. Direction: Host to supply Syntax: <STX><28><,><ETX> Example: <STX>28,<ETX> Response: <STX><28><,>< ARG1><,>< ARG2><,><ETX> Where: <ARG1> =0-65535 in ASCII format representing the voltage full-scale value. <ARG2> =0-65535 in ASCII format representing the current full-scale value.
- Page 90 5.5.24 Request User Configs Description: The host requests that the firmware report the User Configs. Direction: Host to supply Syntax: <STX><27><,><ETX> Example: <STX>27,<ETX> Response: <STX><27><,><ARG1><,><ARG2><,><ARG3><,><ARG4><,><ARG5><, ><ARG6><,><ARG7><,><ARG8><,><ARG9><,><ETX> Where: <ARG1> = 1 = ROV enabled, 0 = ROV disabled in ASCII format. <ARG2>...
- Page 91 5.5.25 Watchdog Enable Description: The host requests that the firmware enable the Communication Watchdog. Direction: Host to supply Syntax: <STX><89><,><ARG><,><ETX> Where: <ARG> 1 = enable, 0 = disable in ASCII format Example: <STX>89,1,<ETX> Response: <STX><89><,><$><,><ETX> <STX><89><,><ARG><,><ETX> where <ARG> = error code Page 64 of 95 118080-001 REV A...
- Page 92 5.5.26 Watchdog Tickle Description: The host requests that the firmware resets the Watchdog timer. Direction: Host to supply Syntax: <STX><88><,><ETX> Response: <STX><88><,><$><,><ETX> <STX><88><,><ARG><,><ETX> where <ARG> = error code Page 65 of 95 118080-001 REV A...
- Page 93 5.5.27 Request Analog Monitor Readbacks Description: The host requests that the firmware transmit the present values of Analog Monitor Readbacks. Direction: Host to supply Syntax: <STX><19><,><ETX> Example: <STX><19>,<ETX> Response: <STX><19><,><ARG1><,><ARG2><,><ARG3><,><ETX> Where: ARG1 = kV monitor = 0 – 4095 ARG2 = mA monitor = 0 – 4095 ARG3 = unused = 0–...
-
Page 94: Serial Commands - Rs-232 / Usb
SERIAL COMMANDS – RS-232 / USB SERIAL INTERFACE PROTOCOL Serial communications will use the following protocol: <STX><CMD><,>ARG><,><CSUM><ETX> Where: <STX> = 1 ASCII 0x02 Start of Text character <CMD> = 2 ASCII characters representing the command ID <,> = 1 ASCII 0x2C character <ARG>... - Page 95 The following is sample code, written in Visual Basic, for the generation of checksums: Public Function ProcessOutputString(outputString As String) As String Dim i As Integer Dim CSb1 As Integer Dim CSb2 As Integer Dim CSb3 As Integer Dim CSb$ Dim X X = 0 For i = 1 To (Len(outputString)) 'Starting with the CMD character...
-
Page 96: Command Overview
6.4 COMMAND OVERVIEW Data Byte section of the TCP/IP Datagram Command Name <CMD> <ARG> RANGE Program RS-232 ASCII 1 - 5 unit baud rate Program User 9 ASCII Configs Description Program kV 1-4 ASCII 0-4095 Program mA 1-4 ASCII 0-4095 Request kV None Setpoint... -
Page 97: Response Overview
Program 1 ASCII 0 or 1 Local/Remote Mode RESPONSE OVERVIEW The command responses will follow the same format as outlined above in section 6.1. This list is comprised of Commands with complex responses only. Commands using a simple response will use the <$> character (ASCII 0x24) as a “Success”... - Page 98 Request Faults 20 ASCII Page 71 of 95 118080-001 REV A...
-
Page 99: Command Structure
6.6 COMMAND STRUCTURE 6.6.1 Program kV Description: The host requests that the firmware change the setpoint of kV. Direction: Host to supply Syntax: <STX><10><,><ARG><,><CSUM><ETX> Where: <ARG> = 0 - 4095 in ASCII format Example: <STX>10,4095,<CSUM><ETX> Response: <STX><10><,><$><,><CSUM><ETX> <STX><10><,><ARG><,><CSUM><ETX> where <ARG> = error code Error Codes TBD, 1=out of range Page 72 of 95 118080-001 REV A... - Page 100 6.6.2 Program mA Description: The host requests that the firmware change the setpoint of mA. Direction: Host to supply Syntax: <STX><11><,><ARG><,><CSUM><ETX> Where: <ARG> = 0 - 4095 in ASCII format Example: <STX>11,4095,<CSUM><ETX> Response: <STX><11><,><$><,><CSUM><ETX> <STX><11><,><ARG><,><CSUM><ETX> where <ARG> = error code Error Codes TBD, 1=out of range Page 73 of 95 118080-001 REV A...
- Page 101 6.6.3 Request Total Hours High Voltage On Description: The host requests that the firmware sends the present value of the Total Hours High Voltage On. Direction: Host to supply Syntax: <STX><21><,><CSUM><ETX> Example: <STX>21,<CSUM><ETX> Response: <STX><21><,><ARG1>< ARG2>< ARG3><ARG4><ARG5> <.><ARG6><,><CSUM><ETX> Where: <.> = ASCII 0x2E ARGx = 0 - 9 in ASCII format Example: <STX>21,99999.9,<CSUM><ETX>...
- Page 102 6.6.4 Request Status Description: The host requests that the firmware sends the power supply status. Direction: Host to supply Syntax: <STX><22><,><CSUM><ETX> Example: <STX>22,<CSUM><ETX> Response: <STX><22><,><ARG1><,><ARG2><,><ARG3><,><ARG4><,><ARG5><, ><ARG6><,><ARG7><,><ARG8><,><CSUM><ETX> Where: <ARG1> 1 = HvOn, 0 = HvOff <ARG2> 1 = Interlock 1 Open, 0 = Interlock 1 Closed <ARG3>...
- Page 103 6.6.5 Request DSP Software Part Number/Version Description: The host requests that the firmware sends the DSP firmware version. Direction: Host to supply Syntax: <STX><23><,><CSUM><ETX> Example: <STX>23,<CSUM><STX> Response: <STX><23><,>< ARG><,><CSUM><ETX> Where: <ARG> consists of eleven ASCII characters representing the current firmware part number/version. The format is SWM9999-999 Example: <STX>23,SWM9999-999,<CSUM><ETX>...
- Page 104 6.6.6 Request Hardware Version Description: The host requests that the firmware sends the hardware version. Direction: Host to supply Syntax: <STX><24><,><CSUM><ETX> Example: <STX>24,<CSUM><ETX> Response: <STX><24><,>< ARG><,><CSUM><ETX> Where: <ARG> consists of 3 ASCII characters representing the hardware version. The format is ANN, where A is an alpha character and N is a numeric character Example: <STX>24,A01,<CSUM><ETX>...
- Page 105 6.6.7 Request Webserver Software Part Number/Version Description: The host requests that the firmware sends the Web Server firmware part number/version. Direction: Host to supply Syntax: <STX><25><,><CSUM><ETX> Example: <STX>25,<CSUM><ETX> Response: <STX><25><,><ARG><,><CSUM><ETX> Where: <ARG> consists of eleven ASCII characters representing the current firmware part number/version.
- Page 106 6.6.8 Request Model Number Description: The host requests that the firmware sends the unit model number Direction: Host to supply Syntax: <STX><26><,><CSUM><ETX> Example: <STX>26,<CSUM><ETX> Response: <STX><26><,><ARG><,><CSUM><ETX> Where: <ARG> consists of five ASCII characters representing the model number. The format is SLMNNANNN or XNNNN, where N is a numeric character and where A is a letter character.
- Page 107 6.6.9 Reset Run Hours Description: The host requests that the firmware resets the run hour counter. Direction: Host to supply Syntax: <STX><30><,><CSUM><ETX> Example: <STX>30,<CSUM><ETX> Response: <STX><30><,><$><,><CSUM><ETX> Page 80 of 95 118080-001 REV A...
- Page 108 6.6.10 Reset Faults Description: The host requests that the firmware resets all Fault messages and indicators. Direction: Host to supply Syntax: <STX><31><,><CSUM><ETX> Example: <STX>31,<CSUM><ETX> Response: <STX><31><,><$><,><CSUM><ETX> Page 81 of 95 118080-001 REV A...
- Page 109 6.6.11 Read Interlock Status Description: The host requests that the firmware read the status of the interlock channel. Direction: Host to supply Syntax: <STX><55><,><CSUM><ETX> Response: <STX><55><,><ARG1><,><CSUM><ETX> Where ARG1 is Interlocks 1. A 1 indicates that the Interlock is energized Example: <STX>55,1,<CSUM><ETX>...
- Page 110 6.6.12 Request kV Monitor Description: The host requests that the firmware report kV monitor. Direction: Host to supply Syntax: <STX><60><,><CSUM><ETX> Response: <STX><60><,><ARG><,><CSUM><ETX> Where: <ARG>=0-4095 in ASCII format representing unscaled value. Example: <STX>60,4095,<CSUM><ETX> Page 83 of 95 118080-001 REV A...
- Page 111 6.6.13 Request mA Monitor Description: The host requests that the firmware report mA monitor. Direction: Host to supply Syntax: <STX><61><,><CSUM><ETX> Response: <STX><61><,><ARG><,><CSUM><ETX> Where: <ARG>=0-4095 in ASCII format representing unscaled value. Example: <STX>61,4095,<CSUM><ETX> Page 84 of 95 118080-001 REV A...
- Page 112 6.6.14 Request –15V LVPS Description: The host requests that the firmware report –15V LVPS. Direction: Host to supply Syntax: <STX><65><,><CSUM><ETX> Response: <STX><65><,><ARG><,><CSUM><ETX> Where: <ARG>=0-4095 in ASCII format representing unscaled value. Example: <STX>65,4095,<CSUM><ETX> Page 85 of 95 118080-001 REV A...
- Page 113 6.6.15 Request Faults Description: The host requests that the firmware report Faults. Direction: Host to supply Syntax: <STX><68><,><CSUM><ETX> Response: <STX><68><,><ARG1><,><ARG2><,><ARG3><,><ARG4><,><ARG5><, ><ARG6><><,><ARG7><,><CSUM><ETX> Where: <ARGx> 1 = Fault, 0 = No Fault in ASCII format ARG1 = ARC ARG2 = Over Temperature ARG3 = Over Voltage ARG4 = Under Voltage ARG5 = Over Current...
- Page 114 6.6.16 Program Local/Remote Mode Description: The host requests that the firmware to switch between Local and Remote Mode. Direction: Host to supply Syntax: <STX><99><,><ARG><,><CSUM><ETX> Where: <ARG> 1 = Remote, 0 = Local in ASCII format Example: <STX>99,1,<CSUM><ETX> Response: <STX><99><,><$><,><CSUM><ETX> <STX><99><,><ARG><,><CSUM><ETX> where <ARG>...
- Page 115 6.6.17 Program RS-232 Baud rate Description: The host requests that the firmware change the Baud rate for RS-232. Direction: Host to supply Syntax: <STX><07><,><ARG><,><CSUM><ETX> Where: <ARG> 1 = 9.6k in ASCII format <ARG> 2 = 19.2k in ASCII format <ARG> 3 = 38.4k in ASCII format <ARG>...
- Page 116 6.6.19 Program User Configs Description: The host requests that the firmware program the user configs. Direction: Host to supply Syntax: <STX><09><,><ARG1><,><ARG2><,><ARG3><,><ARG4><,><ARG5><, ><ARG6><,><ARG7><,><ARG8><,><ARG9><,><CSUM><ETX> Where: <ARG1> = 1 = ROV enabled, 0 = ROV disabled in ASCII format. <ARG2> = 0-110 in ASCII format representing the overvoltage percentage.
- Page 117 6.6.20 Request unit Scaling Description: The host requests that the firmware report the unit scaling. Direction: Host to supply Syntax: <STX><28><,><CSUM><ETX> Example: <STX>28, <CSUM><ETX> Response: <STX><28><,>< ARG1><,>< ARG2><,><CSUM><ETX> Where: <ARG1> =0-65535 in ASCII format representing the voltage full-scale value. <ARG2> =0-65535 in ASCII format representing the current full-scale value.
- Page 118 6.6.21 Request User Configs Description: The host requests that the firmware report the User Configs. Direction: Host to supply Syntax: <STX><27><,><CSUM><ETX> Example: <STX>27, <CSUM><ETX> Response: <STX><27><,><ARG1><,><ARG2><,><ARG3><,><ARG4><,><ARG5><, ><ARG6><,><ARG7><,><ARG8><,><ARG9><,><CSUM><ETX> Where: <ARG1> = 1 = ROV enabled, 0 = ROV disabled in ASCII format. <ARG2>...
- Page 119 6.6.22 Watchdog Enable Description: The host requests that the firmware enable the Communication Watchdog. Direction: Host to supply Syntax: <STX><89><,><ARG><,><CSUM><ETX> Where: <ARG> 1 = Enable, 0 = Disable in ASCII format Example: <STX>89,1,<CSUM><ETX> Response: <STX><89><,><$><,><CSUM><ETX> <STX><89><,><ARG><,><CSUM><ETX> where <ARG> = error code Error Codes TBD, 1 = out of range Page 92 of 95...
- Page 120 6.6.23 Watchdog Tickle Description: The host requests that the firmware resets the Watchdog timer. Direction: Host to supply Syntax: <STX><88><,><CSUM><ETX> Response: <STX><88><,><$><,><CSUM><ETX> <STX><88><,><ARG><,><CSUM><ETX> where <ARG> = error code Error Codes TBD, 1 = out of range Page 93 of 95 118080-001 REV A...
- Page 121 6.6.24 Request Analog Monitor Readbacks Description: The host requests that the firmware transmit the present values of Analog Monitor Readbacks. Direction: Host to supply Syntax: <STX><19><,>< CSUM><ETX> Example: <STX><19>,< CSUM><ETX> Response: <STX><19><,><ARG1><,><ARG2><,><ARG3><,>< CSUM><ETX> Where: ARG1 = kV monitor = 0 – 4095 ARG2 = mA monitor = 0 –...
-
Page 122: Spellman Test Commands
• Toggle Passthrough Mode (Diagnostics) • Store A/D Calibration Value (Hardware setup) • Request Miscellaneous Analog Readbacks Contact Spellman High Voltage for details and the syntax of these commands. 6.8 SERIAL COMMAND HANDLING 6.8.1 Command Time Out The host computer should set a serial time out at approximately 100mS.
Need help?
Do you have a question about the SLM SERIES and is the answer not in the manual?
Questions and answers