Table of Contents
Advertisement
Quick Links
THRILL Compact PAR Mini LED
User Guide
WARNING!
Read the Safety and Installation Guide supplied
with this product before installing or using this
product.
1
2
3
4
8
5
9
10
6
11
7
12
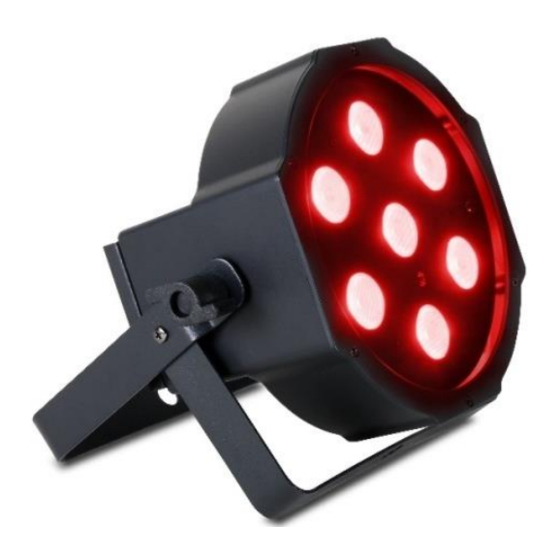
Fixture overview
1
Multi-function bracket
7
DMX Out
2
LED emitters
8
AC Mains in
3
Hand wheel
9
Secondary attachment
point
4
IR receiver
10
control panel
5
DMX IN
11
AC Mains out
6
Microphone
12
Clamp attachment point
Using the control menu
The control menu is shown below. To
access the menu, press the MENU
button. Scroll through options with the ▼
(down) and ▲ (up) buttons. Press ENTER to select an option.
To return to a higher level in the menu, press MENU. To exit the
menu, press and hold MENU or wait a few seconds.
The default menu settings are shown in bold.
Menu
Sub-menu
Explanation
Set DMX address
Select 3-channel DMX mode
Select 6-channel DMX mode
Set Slave fixtures
Set Master fixtures
-
Show selection off
Select preprogrammed show.
Select auto-trigger speed from
1-8
Toggle sound activation on/off
Set microphone sensitivity
Black out if DMX lost
Run stand-alone show
Hold last values if no DMX
-
Toggle display on/off
Inverted/normal display
Manual Mode, select effect
and set level from 0 to 255.
Run fixture test routine
Readout fixture hours
Readout firmware version
Reset to default values
DMX mode operation and settings
DMX channel mode ()
The Compact PAR Mini LED has 2 DMX modes that use 3 or 6
channels. The 3 channel mode provides color mixing with 0-
100% control of each color; red, green, blue.
In 6-channel mode, the Compact PAR Mini LED provides
color mixing, 36 popular preset colors, full-range dimming, and
strobe effects. The DMX command tables list all functions and
their values.
To set 3 channel or 6 channel DMX mode:
Press MENU to enter the control menu.
Scroll to
. Press ENTER to confirm.
Scroll to the desired mode:
or
.
Press ENTER to save your selection.
DMX address ()
A DMX controller uses either 3 or 6 DMX channels to control the
Compact PAR Mini LED. The DMX address is the first channel
used. If fixtures are set to 6 channel DMX mode and the first
fixture's DMX address is set to 1, then it receives instructions on
DMX channels 1, 2, 3, 4, 5, and 6. The next fixture could then
be set to a DMX address of 7.
For independent control, each fixture must have its own unique
control channels. For symmetric control, identical fixtures can be
set to the same DMX address.
Assign an address for the fixture on the DMX controller. Then set
that address on the Compact PAR Mini LED as follows:
1.
Press MENU to enter the control menu.
2.
Scroll to
. Press ENTER.
3.
Scroll to the address that you assigned to the fixture.
Press ENTER to save the address.
DMX state ()
The fixture runs in DMX mode whenever it receives DMX
signals. When there is no DMX signal, the fixture can be set to
run in Show Mode (
), black out (
), or hold the last
DMX values received (
). For Show Mode operation, DMX
state must be set to
.
To select behavior when there is no DMX signal:
Select
in the control menu and press ENTER.
Select the desired behavior:
,
, or
.
Press ENTER to save your selection.
DMX commands, 3 Channel Mode
Ch.
Value
Function
1
0-255
Red 0-100%
2
0-255
Green 0-100%
3
0-255
Blue 0-100%
DMX commands, 6 Channel Mode
Ch.
Value
Function
Shutter
0-7
Closed
8-15
Open
16-131
Strobe, slow to fast
132-139
Open
1
140-181
Pulse, fast close/slow open
182-189
Open
190-231
Pulse, slow close/fast open
232-239
Open
240-247
Random strobe
248-255
Open
2
0-255
Dimmer, intensity 0-100%
3
0-255
Red, intensity 0-100%
4
0-255
Green, intensity 0-100%
5
0-255
Blue, intensity 0-100%
Color presets
0-10
Off
11-15
Color 1
16-20
Color 2
21-25
Color 3
26-30
Color 4
6
31-35
Color 5
36-40
Color 6
41-45
Color 7
46-50
Color 8
51-55
Color 9
56-60
Color 10
61-65
Color 11
66-70
Color 12
71-75
Color 13
76-80
Color 14
81-85
Color 15
86-90
Color 16
91-95
Color 17
96-100
Color 18
Ch.
Value
Function
101-105
Color 19
106-110
Color 20
111-115
Color 21
116-120
Color 22
121-125
Color 23
126-130
Color 24
131-135
Color 25
136-140
Color 26
6
141-145
Color 27
146-150
Color 28
151-155
Color 29
156-160
Color 30
161-165
Color 31
166-170
Color 32
171-175
Color 33
176-180
Color 34
181-185
Color 35
186-190
Color 36
191-192
Off (no preset color)
193-214
Continuous color scroll,
fast to slow
215-221
Color scroll stop
222-243
Reverse color scroll,
slow to fast
244-247
Random colors, fast
248-251
Random colors, medium
252-255
Random colors, slow
Show mode operation and settings
Show mode lets you run a standalone light show without a DMX
controller. Shows can be triggered by sound, or automatically
triggered at eight speeds.
To enable Show Mode operation, set the DMX state setting
to
.
Show selection ()
Four shows are available. To select a preprogrammed show:
Press MENU to enter the control menu.
1.
Scroll to
and press ENTER.
2.
Select
and press ENTER.
3.
Select a show from
to
, or select
Show Mode. Press ENTER.
Music trigger (
)
The fixture's built-in microphone triggers effect and color
changes in sync with music. To enable sound activation:
1.
Select
in the control menu and press ENTER.
2.
Select
to enable sound activation or
to disable it.
3.
Press ENTER to save your selection.
To adjust microphone sensitivity for the volume of the music:
1.
Turn on the music source and set it to the desired volume.
2.
Select
in the control menu and press ENTER.
Press ▼ or ▲ to decrease or increase the sensitivity level.
3.
4.
When the fixture responds as desired, press ENTER.
Auto trigger speed ()
To use auto trigger in Show Mode:
1.
Turn off sound activation as described above.
2.
Select
in the control menu and press ENTER.
3.
Scroll to
. Press ENTER.
4.
Select a trigger speed from 1 (slow) to 8 (fast). Press
ENTER.
Master/slave mode operation and settings
Up to 32 Compact PAR Mini LEDs can be linked in a chain and
set to master/slave operation, where the first Compact PAR Mini
LED in the chain is set to operate as the "master" that controls
the others. This provides synchronized operation without a
controller.
to disable
Advertisement
Table of Contents

Related Manuals for Martin THRILL


Summary of Contents for Martin THRILL
- Page 1 Using the control menu DMX address () THRILL Compact PAR Mini LED Value Function A DMX controller uses either 3 or 6 DMX channels to control the The control menu is shown below. To 101-105 Color 19 access the menu, press the MENU Compact PAR Mini LED.
- Page 2 Press ENTER to set the effect. disabled (- = ) and animals. Contact Martin Professional for Service and Press MENU and repeat for the other colors or effects. Support. Auto test () To test all of the fixture functions select ...
Need help?
Do you have a question about the THRILL and is the answer not in the manual?
Questions and answers