QOLSYS IQ Panel 2 Installation Manual
Control panel
Hide thumbs
Also See for IQ Panel 2:
- Installation manual (122 pages) ,
- Installation manual (58 pages) ,
- Quick manual (2 pages)
Table of Contents
Advertisement
Quick Links
Advertisement
Table of Contents

Related Manuals for QOLSYS IQ Panel 2


Summary of Contents for QOLSYS IQ Panel 2
- Page 1 DO IT YOURSELF INSTALLATION MANUAL...
-
Page 2: What's In The Box
WHAT’S IN THE BOX? The IQ Panel 2 keeps you connected to an entire ecosystem of smart devices giving you control over your entire home. Exciting features like touchless disarming using Bluetooth and a built in glass break detector are enabled through powerful software that improves over time through regular software updates. - Page 3 SETTING UP YOUR PANEL Let’s start by connecting your power. Plug in the power connector Route the wire behind the Insert the wire into the strain- retainer clip relief Now let’s put on your cover and attach the table stand. Place the top of the cover onto Push the cover down until it Insert the table stand into the...
- Page 4 INSTALLING YOUR DOOR SENSOR DOORS & WINDOWS...
- Page 5 INSTALLING THE IQ MINI SENSOR Your IQ Mini is an ultra compact encrypted sensor that can be placed on anything that opens or closes. Apply the included Remove the Remove the two adhesive. protective film. battery tabs. Line up the sensor Secure the sensor and with the magnet.
- Page 6 INSTALLING ON A WINDOW Typical installation of magnet/sensor with the magnet on the window and the sensor on the window frame. When installing the sensor on a window, place the “magnet” on the part of the window that moves, to reduce possibility of damage to the sensor as you open and close the window.
- Page 7 INSTALLING ON A DOOR Standard install magnet/sensor orientation. Alternate install magnet/sensor orientation. (used when door trim does not allow standard install) When installing the sensor on a door, place the “magnet” on the door and the sensor on the door frame. This helps to reduce the possibility of damage to the sensor as you open and close the door.
-
Page 8: Motion Detection
INSTALLING YOUR MOTION SENSOR MOTION DETECTION... - Page 9 INSTALLING THE IQ MOTION Your IQ Motion is an encrypted infrared sensor with a range of 25 feet. The motion detector is most effective when a person moves across its field of view, rather than towards the sensor. We recommend that all motions are installed at a height of 6.5 feet.
- Page 10 WALL MOUNT: FLAT Have pets? By mounting the motion sensor flat against the wall you get more more open air coverage within the room but less floor coverage, reducing the risk of false alarms. Reduce False Alarms: When possible, avoid installing your motion sensor Install Finished toward windows, as the heat or...
- Page 11 CORNER MOUNT: FLAT Corner mounting is the most common placement because it allows the sensor to provide wall to wall protection. Have pets? By mounting the motion sensor flat against the wall you get more more open air coverage within the room but less floor coverage, reducing the risk Install Finished...
- Page 12 WALL MOUNT: ANGLED DOWNWARD Angle Mount: pointing the motion downward gives you less open air coverage but more floor coverage. This is a great installation in homes without pets. Reduce False Alarms: When possible, avoid installing your motion sensor Install Finished toward windows, as the heat or screws here...
- Page 13 INSTALLING YOUR MOTION CORNER MOUNT: ANGLED DOWNWARD Corner mounting is the most common placement because it allows the sensor to provide wall to wall protection. Angling downward is a great installation in homes without pets. Reduce False Alarms: When possible, avoid installing your motion sensor Install Finished...
-
Page 14: Using Your System
USING YOUR SYSTEM USING YOUR SYSTEM... -
Page 15: Basic Navigation
BASIC NAVIGATION Navigation Move from page to page and access information on each page using finger touches, Swipe down to swipes, and scrolling. access settings Scroll up/down to reveal additional content on a page Swipe left/right to change pages Touch an icon to view its contents Dismiss To dismiss a pop up when... -
Page 16: Additional Arming Options
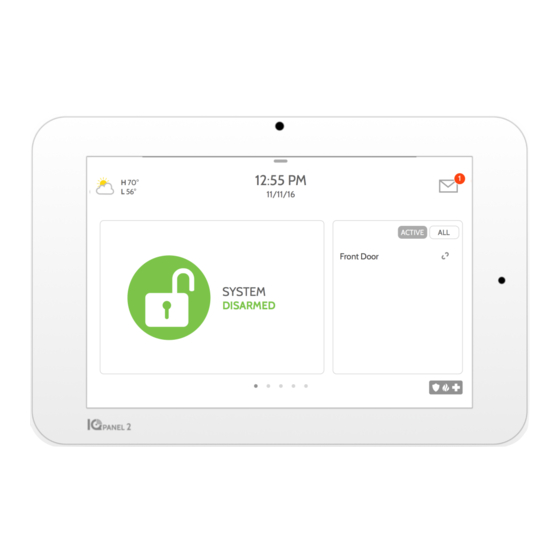
ARMING Sensor List Open or active sensors appear in a scrollable list on the right. Touch the icons in the upper right corner to switch your view to either “Active” or “All” sensors. Sensor status: Open Closed Active Idle Touch to access Unreachable arming options Tampered... - Page 17 DISARMING Bluetooth Touchless Disarming Step 1: Swipe down to access settings tray Step 2: Touch “SETTINGS” Touch to disarm Step 3: panel manually Touch “ADVANCED SETTINGS” Step 4: Enter your code Disarming your System Step 5: Touch “BLUETOOTH DEVICES” When your system is armed, there are multiple ways to disarm: Step 6: Disarming Manually Put your Bluetooth device in “pairing”...
-
Page 18: Camera Page
CAMERA PAGE 1- View Photo Touch a photo thumbnail on the right to view it on the left. 2- Full Screen Touch the photo on the left to view it full screen. Touch it again to return to the camera page. Camera Page Your IQ Panel’... - Page 19 SETTINGS Settings Tray Access common settings by swiping down from the top of the screen. HOW TO ACCESS: Security Status Battery & Radios See your panel’ s Touch an icon to get security status in the more information upper right. Touch it -Battery level to go directly to the -Wi-Fi connection...
-
Page 20: Message Center
MESSAGE CENTER Message Center Access your message center by touching the icon in the upper right corner. Once it’ s open you’ll see three sections: Contact, Video Tutorials, and Messages/Alerts/Alarms (Note: This icon may appear different than shown, depending on your provider’ s settings) Contact Easy access to your provider’... -
Page 21: Emergency Panic
EMERGENCY PANIC Emergency Panic If you have a police, fire, or medical emergency and your system is not armed or a sensor has not been triggered, you can send a manual emergency panic by touching the icon in the bottom right corner and selecting the type of emergency you are experiencing. -
Page 22: Photo Frame
PHOTO FRAME Photo Frame When your panel is not in use, it turns into a customizable photo frame. Settings Inside settings you can choose whether you want photos or a weather clock, if you want the panel to turn itself off automatically in the evenings, and more. -
Page 23: Adding A User
ADDING A USER User Types You can add up to 242 users to your system, each with a custom name and access level you allow. Master: Access panel functions, camera, and system settings. User: Access panel functions, camera, but NOT system settings. Guest: Used to give arm and disarm access to those users who will use the panel on a Notifications... - Page 24 CHANGING SENSOR NAMES How to Change Sensor Names Step 1: Step 2: Step 3: Swipe down to access Touch “SETTINGS” Touch “ADVANCED settings tray SETTINGS” Step 5: Step 4: Select the sensor you Step 6: Enter master code want to customize Touch “Edit Sensor”...
-
Page 25: Testing Your System
TESTING YOUR SYSTEM Testing Regularly You should test your system regularly to ensure it is operating at peak efficiency. The IQ Panel has a number of tests built in that are easy to perform: Wi-Fi Test How to Access System Tests Run this test every 30 days or if the IQ Panel’...
Need help?
Do you have a question about the IQ Panel 2 and is the answer not in the manual?
Questions and answers