Table of Contents

Related Manuals for QOLSYS Panel 2+


Summary of Contents for QOLSYS Panel 2+
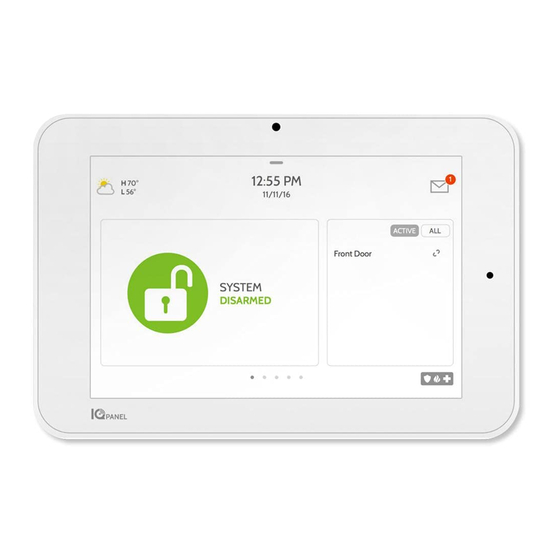
- Page 1 Qolsys IQ Panel 2+ Software Version 2.5.0 INSTALLATION MANUAL The Qolsys IQ Panel 2+ is a 7” (17.8cm) touchscreen built with an Android operating system, providing full security and smart home functionality in an easy to use interface.
- Page 2 Features accessible to users and installers alike are outlined in the IQ Panel 2+ User Guide. The information contained is confidential and proprietary, and is solely owned by Qolsys Inc. Any reproduction, modification or distribution without permission is strictly prohibited.
-
Page 3: Table Of Contents
TABLE OF CONTENTS PANEL OVERVIEW 54- Auto Learn Sensor 103- Bluetooth Devices 142- Weather 143- Photo Frame 5- Exterior Front 55- Add Sensor 104- Add Device 6- Exterior Back 56- Scan QR Code 105- Edit Device 146- Load Images from SD Card 7- Interior 57- Partition Name 106- Delete Device... -
Page 4: Panel Overview
PANEL OVERVIEW Warning: This Product should be installed in accordance with the National and Local Fire Codes and National and Local Electrical Codes. Printed information describing proper installation, operation, testing, maintenance, evacuation planning, repair service, recycling and disposal is to be provided with this Product. Warning: For all installations this Product and all sensors associated with it (collectively, the “System”) should be tested once a week. -
Page 5: 5- Exterior Front
PANEL OVERVIEW EXTERIOR FRONT Panel Camera User Interface Page Indicator Microphones QOLSYS CONFIDENTIAL AND PROPRIETARY PAGE OF... -
Page 6: 6- Exterior Back
Steelman Pro 78944 PH0 recommended. Micro SD Card Slot Siren Speaker For EN Grade 2 Speaker applications this screw shall be used for tamper Rear Access Cover protection against Microphone Microphone mounting removal QOLSYS CONFIDENTIAL AND PROPRIETARY PAGE OF... - Page 7 (Not provided for CE or EN Grade 2) Panel Battery* Tamper Switch *CAUTION The battery should NEVER be disconnected without following proper power-down procedures Failure to comply may result in data corruption, panel failure, and a void of the manufacturer's warranty QOLSYS CONFIDENTIAL AND PROPRIETARY PAGE OF...
-
Page 8: Installing The Panel
INSTALLING THE PANEL... -
Page 9: 9- Wall Mount Option
INSTALLING THE PANEL WALL MOUNT OPTION Note: For EN Grade 2 installations use only wall mount option Note: For EN50131 Grade2 compliant installations, the enclosure shall be glued during the initial installation. After mounting the enclosure base on the wall in its intended position, connect the internal battery and insert the SIM card for the cellular communicator. Once all connections are done apply a few drops of the provided glue on each of the four corners of the enclosure base and attach the enclosure cover so that all top and bottom sides latches snap in place and the enclosure is properly closed. -
Page 10: 10- Table Stand Option
“click” from each side. Route the cable under the cover “snaps” into place. hook next to the battery. Route the cable through the strain relief opening. QOLSYS CONFIDENTIAL AND PROPRIETARY PAGE... -
Page 11: 11- Wiring Diagram
EXT SIREN*** 4.7k EOL ***NOTE: SENSOR 1, 2 & EXT SIREN are not permissible in EN Grade 2 installations. EXT SIREN: Maximum Voltage: 12vDC +++NOTE: External siren for US or Maximum Current: 300mA Canada only. QOLSYS CONFIDENTIAL AND PROPRIETARY PAGE OF... -
Page 12: 12- Powering The Panel
3 cannot be turned off by a switch, dimmer, or Residual Current Device. seconds to power up. Failure to provide this circuit may prevent it from providing constant protection. QOLSYS CONFIDENTIAL AND PROPRIETARY PAGE... -
Page 13: User Interface
USER INTERFACE... -
Page 14: 14- Home Screen Overview
Settings tray. The Primary interface shows arming options and sensor status & partition select. The footer shows panic options and additional pages. Header & Settings Tray Primary User Interface & Partition Page Indication and Emergency QOLSYS CONFIDENTIAL AND PROPRIETARY PAGE... -
Page 15: 15- Message Center
This is where you will find the Security Provider’ s Contact Information This is where you will find Video Tutorials to help with common questions This is where you will find messages from the Security Provider, Panel Alerts and Alarm Notifications. QOLSYS CONFIDENTIAL AND PROPRIETARY PAGE... -
Page 16: 16- Settings Tray
Status icon. Touch this icon to switch between partitions. When partitions are DISABLED, a Status icon resides in the upper left corner of the settings tray. Touch this icon to return to the security page. QOLSYS CONFIDENTIAL AND PROPRIETARY PAGE... - Page 17 PROGRAMMING...
-
Page 18: 18- Screen Lock
This prevents unauthorized access to the panel and/or one partition from accessing another as well as managing permissions to “Advanced Settings”. 4 DIGIT SCREEN LOCK 6 DIGIT SCREEN LOCK QOLSYS CONFIDENTIAL AND PROPRIETARY PAGE... - Page 19 PROGRAMMING SETTINGS FIND IT The Settings page allows quick access to various simple features & settings that do not require the protection of a Swipe down Dealer, Installer or Master code to be changed. for access SETTINGS Setting Description Display Adjust brightness, font size &...
- Page 20 - Quick Access: 300 second temporary access - Deactivate: Disarms 24 hour sensors until they are re-activated manually License Qolsys End User License Agreement Access advanced settings & programming. A valid Dealer (default 2222), Installer (default 1111) or Master Advanced Settings...
-
Page 21: 21- Advanced Settings
SETTINGS level for Advanced Settings. ADVANCED SETTINGS INSTALLER MENU (1111) DEALER MENU (2222) ENTER CODE (1111, 2222) * The “Partitions” icon will only appear if Partitions are enabled under Installer/Dealer Settings QOLSYS CONFIDENTIAL AND PROPRIETARY PAGE... -
Page 22: 22- Setup Wizard
Easy Setup Wizard based on the ENTER CODE (1111, 2222) page configuration chosen. SETUP WIZARD Wizard Settings Choose which pages you want to be shown during the Wizard walkthrough. Select Advanced or Simple sensor setup. QOLSYS CONFIDENTIAL AND PROPRIETARY PAGE... - Page 23 Wizard Settings. Available pages are: Welcome, Swipe down for access Network, System Check, Security, Sensor Test, Panel Glass Break, Z-Wave, Bluetooth, IQ Remote, Users, Dealer & Update. SETTINGS ADVANCED SETTINGS ENTER CODE (1111, 2222) SETUP WIZARD LAUNCH WIZARD QOLSYS CONFIDENTIAL AND PROPRIETARY PAGE...
- Page 24 Show the option to include and edit Z-Wave devices in the Setup WIZARD SETTINGS Z-Wave Enabled Wizard Show the option to pair Bluetooth devices in the Setup Wizard. Not Bluetooth Enabled approved for CE/EN Grade 2 QOLSYS CONFIDENTIAL AND PROPRIETARY PAGE...
- Page 25 Show the option to pair IQ Remotes in the Setup Wizard. ADVANCED SETTINGS Sensor Signal Test Enabled Activate the sensor test as part of the Setup Wizard ENTER CODE (1111, 2222) SETUP WIZARD WIZARD SETTINGS QOLSYS CONFIDENTIAL AND PROPRIETARY PAGE...
- Page 26 This information is used to populate the “Contact Us” tab in the Message for access Center. NOTE: Company Name and Company Phone Number are required and must be filled out to continue with panel programming. SETTINGS ADVANCED SETTINGS ENTER CODE (1111, 2222) INSTALLATION QOLSYS CONFIDENTIAL AND PROPRIETARY PAGE...
- Page 27 PROGRAMMING INSTALLATION FIND IT Swipe down for access SETTINGS ADVANCED SETTINGS ENTER CODE (1111, 2222) INSTALLATION QOLSYS CONFIDENTIAL AND PROPRIETARY PAGE...
-
Page 28: 28- Installer/Dealer Settings
PROGRAMMING INSTALLER/DEALER SETTINGS FIND IT Installer/Dealer Settings Change panel settings like supervisory times, power and cell loss timeout and Swipe down for access SIA settings. Setting Default Description Account Number blank Security provider account number (up to 10 characters) SETTINGS Power Management Enabled An energy-saving function when running on battery power only... - Page 29 NOTE: for EN Grade 2 set entry delay (45s) and exit (30s) delay. When enabled the range for Dialer Delay is: 15 to 45 seconds When disabled the range for Dialer Delay is: 0 to 254 seconds QOLSYS CONFIDENTIAL AND PROPRIETARY PAGE...
- Page 30 Determines the number of times a particular event will record to “EU Events” log before EU Event Swinger Shutdown Count shutdown. The count (3-10) will reset after and arm or disarm event. NOTE: This setting is greyed out and not selectable unless EN Grade 2 is Enabled. QOLSYS CONFIDENTIAL AND PROPRIETARY PAGE...
- Page 31 NOTE: This feature can not be enabled if Partitions are enabled. When enabled the panel will display a pop up when entering “Settings” letting the end WI-FI Warning Messages Enabled user know that Wi-Fi has been disconnected. QOLSYS CONFIDENTIAL AND PROPRIETARY PAGE...
- Page 32 PROGRAMMING INSTALLER/DEALER SETTINGS Setting Default Description Create up to 4 partitions by enabling this feature. NOTE: This setting will automatically be greyed out Partitions Disabled and unavailable when EN Grade 2 is Enabled. When Enabled, the Panel can support Zigbee Automation devices as well as Deako Lighting integrations.
- Page 33 Jam Detection Disabled (319.5MHz, 345MHz or 433MHz) leading to a potential panel malfunction. This event reports to the central station when enabled. Not evaluated for CE/EN Grade 2. QOLSYS CONFIDENTIAL AND PROPRIETARY PAGE...
- Page 34 PROGRAMMING INSTALLER/DEALER SETTINGS Setting Default Description When enabled the system will sound a local alarm. “Jam Detection” must be active for Jam Detection Local Alarm Disabled this to function properly NOTE: Not evaluated for CE/EN Grade 2 RF Jam Sensitivity Level Normal Choose between HIGH and NORMAL sensitivity levels NOTE: Not evaluated for CE/EN Grade 2...
- Page 35 This feature erases all User data previously stored. (Wi-Fi SSID & Password, User Codes, Panel Camera Data Recycle Images, Custom PhotoFrame Images, Message Center & Panel Event History). If Enabled, the IQ Remote will require authentication (Dealer or Installer Code) to master IQ Remote Reset Authentication Disabled reset it. QOLSYS CONFIDENTIAL AND PROPRIETARY PAGE...
-
Page 36: 36- System Logs
Error: Record all errors and fatal issues Warn: Record warnings, errors, and fatal issues Info: Record all generic, non-customer related information Debug: Record diagnostic messages, Info, Warnings, Errors, and Fatal issues Verbose: Record all non-customer identifying information QOLSYS CONFIDENTIAL AND PROPRIETARY PAGE... -
Page 37: 37- Siren And Alarms
PROGRAMMING SIREN AND ALARMS FIND IT Siren and Alarms Change siren and alarm settings for certain types of alarm events. Swipe down for access Setting Default Description All Sirens Off: This will disable the siren for all alarm types including any paired or hardwired external sirens. After 30 mins SETTINGS the fire siren will be re enabled. - Page 38 PROGRAMMING SIREN AND ALARMS Setting Default Description Amount of time (in seconds) before panel will attempt call to central station after an alarm event is triggered Dialer Delay When SIA Limits enabled: :15 to :45 seconds When SIA Limits disabled: :0 to :254 seconds NOTE: Shall not be used for EN Grade 2 Determine how long before siren stops sounding during an alarm event (4 minutes to 15 Siren Timeout...
-
Page 39: 39- Security And Arming
NOTE: This setting is required * Additional options available and is automatically enabled when Partitions are enabled. It must be Enabled for EN Grade 2 only through the Dealer Code. QOLSYS CONFIDENTIAL AND PROPRIETARY PAGE... - Page 40 When enabled this will Allow a keyfob to disarm alarm events, except panics originating from Keyfob Alarm Disarm Disabled the same key fob Keyfob Disarming Enabled When Disabled, a Keyfob will not be able to disarm the panel QOLSYS CONFIDENTIAL AND PROPRIETARY PAGE...
- Page 41 Long Exit Delay 120 Secs (45-254secs). With SIA limits disabled the minimum time can be set to 5 secs. Door/Window group 12 follows the “Long Exit Delay”. NOTE: Not for use with EN Grade 2. QOLSYS CONFIDENTIAL AND PROPRIETARY PAGE...
-
Page 42: 42- Camera Settings
When an alarm is triggered the panel will record a video clip for 4 Alarm Videos Enabled mins from it’ s built in 5mp panel camera Note: Supplementary feature not evaluated as part of EN Grade 2 QOLSYS CONFIDENTIAL AND PROPRIETARY PAGE... - Page 43 Description Settings Photos Disabled Whenever Advanced Settings are accessed the panel will take and store a photo Allow Master Code to Access Disabled Allow the master code to access these features and settings Image Settings QOLSYS CONFIDENTIAL AND PROPRIETARY PAGE...
- Page 44 • Supported Command Classes Z-WAVE DEVICE LIST Pressing “Re-Interview” will resend all initial pairing commands to that device. *This page only available through the Dealer Code. Not evaluated for use with EN Grade 2 applications. QOLSYS CONFIDENTIAL AND PROPRIETARY PAGE...
- Page 45 “speak” Sensors Enabled Turns Sensor voices on (enabled) or off (disabled) Panel Enabled Turns Panel voices on (enabled) or off (disabled) Activity Monitoring Enabled Turns Activity Monitoring voices on (enabled) or off (disabled) QOLSYS CONFIDENTIAL AND PROPRIETARY PAGE...
- Page 46 Sensor Chimes Enabled Turns chimes on (enabled) or off (disabled) for Sensors SOUND Panel Enabled Turns Panel chimes on (enabled) or off (disabled) Activity Sensor Enabled Turns Activity Sensor chimes on (enabled) or off (disabled) QOLSYS CONFIDENTIAL AND PROPRIETARY PAGE...
- Page 47 Panel will sound a trouble alert if a fire safety device is tampered, Setting shall be set to 3 minutes Disabled Trouble Beeps failed or has a low battery (disabled by default) for EN Grade 2 applications. QOLSYS CONFIDENTIAL AND PROPRIETARY PAGE...
- Page 48 PROGRAMMING SOUND FIND IT Setting Default Description Swipe down for access Partition Sounds* When Partitions are enabled this setting determines whether Fire Global Fire Siren Enabled alarms sound in all partitions (enabled) or in only the partition they are assigned to (disabled) SETTINGS Global Instrusion Disabled...
- Page 49 There must be at partition being protected appear if Partitions are enabled least one sensor assigned under Installer/Dealer Settings to a partition before it can * Feature not evaluated as part of be viewed/edited EN Grade 2 QOLSYS CONFIDENTIAL AND PROPRIETARY PAGE...
-
Page 50: 50- Local Automation
AUTO mode with a target temperature of LOCAL AUTOMATION 18.3°C - 25°F - Turn Light 1 ON at night (8pm) and then turn all lights OFF in the morning (6am) *This page only available through the Dealer Code. QOLSYS CONFIDENTIAL AND PROPRIETARY PAGE... - Page 51 PROGRAMMING DEVICES FIND IT Swipe down for access SETTINGS ADVANCED SETTINGS ENTER CODE (1111, 2222) INSTALLATION DEVICES *Unsupported Z-Wave Devices icon only available through the Dealer Code. QOLSYS CONFIDENTIAL AND PROPRIETARY PAGE...
-
Page 52: Security Sensors
SECURITY SENSORS... -
Page 53: 53- Security Sensors
SECURITY SENSORS SECURITY SENSORS FIND IT Security Sensors Swipe down Add, edit or delete up to 128 security PowerG or life safety devices. for access Auto Learn Sensor Sensor Group Pair sensors quickly by tripping or Quick reference to all sensor SETTINGS tampering and then editing the groups and their actions... -
Page 54: 54- Auto Learn Sensor
3. Panel will chime and display the sensor’ s DL code. Select OK to confirm 4. Configure Partition Name, Sensor Type, Sensor Group, Sensor Name, Chime Type and Voice Prompts with the smart filtering drop down lists. 5. Select “Add New” to complete and move to the next sensor. QOLSYS CONFIDENTIAL AND PROPRIETARY PAGE... -
Page 55: 55- Add Sensor
SECURITY SENSORS ADD SENSOR 1. Select “Add Sensor” (NOTE: These same fields can be edited later from the “Edit Sensor” app) 2. Select the appropriate Source based on the frequency of device being manually learned in 3. Tap the field marked “Sensor DL ID” to open the keyboard. Enter the DL code or Sensor ID on the back of the device and touch “Done”... - Page 56 SECURITY SENSORS SCAN QRCODE 1. Select “Add Sensor” 2. Tap the button marked “Scan QRCode” to open the camera. Hold the QR code label on the sensor box up to the camera to automatically scan the Sensor DL ID 3. Use the drop down menu to select which Partition you would like the sensor to be added to (if enabled) 4.
-
Page 57: 57- Partition Name
When Partitions are enabled (see Dealer/Installer Settings) you may then assign a sensor to a specific partition. This will allow independent control and arming of that partition without disrupting the main panel’ s master partition. You may create and use up to 4 partitions. Feature not evaluated as part of EN Grade 2. QOLSYS CONFIDENTIAL AND PROPRIETARY PAGE... - Page 58 SECURITY SENSORS SENSOR TYPE When adding or editing security devices you can choose from the following sensor types: Door/Window Motion Glass Break Key Fob Keypad Auxiliary Pendant Smoke Detector CO Detector Hardwire Translator Wireless Translator Temperature Heat Water Shock Sensor Freeze Tilt Image Sensor...
- Page 59 Sensor Type, displaying only what’ s relevant. Touch the “Sensor Group” drop down to change. A full list of Sensor Groups and descriptions can be found under “Sensor Groups” listed in the manual below. QOLSYS CONFIDENTIAL AND PROPRIETARY PAGE...
-
Page 60: 59- Sensor Groups
SENSOR GROUPS SENSOR GROUPS IQ Panel 2+ supports PowerG. DOOR/WINDOW GROUP NAME SUPERVISED SCENARIO Gives a period of time to exit the home or to disarm the panel when Entry-Exit- Normal Delay returning before sounding the alarm Gives a period of time to exit the home or to disarm the panel when Entry-Exit- Long Delay returning before sounding the alarm. - Page 61 "Activity Monitoring" is active, regardless of panel status. This sensor has Sensor an entry delay * Power G Door/Window contact 8945 adds an additional drop down menu to determine the contact type, Reed Switch or Wired. QOLSYS CONFIDENTIAL AND PROPRIETARY PAGE...
- Page 62 SENSOR GROUPS MOTION/IMAGE SENSOR GROUP NAME SUPERVISED SCENARIO Active only when armed to “Away”, and trips instantly when motion is Away- Instant Motion detected. Does not trip if an entry/exit sensor is tripped first Active in both “Stay” & “Away” modes, and trips instantly when motion is Stay- Instant Motion detected.
- Page 63 SENSOR GROUPS GLASS BREAK GROUP NAME SUPERVISED SCENARIO Glass Break Active in both “Stay” and “Away” mode Glass Break -Away Active in “Away” mode only Only KEY FOB GROUP NAME SUPERVISED SCENARIO Mobile Intrusion Worn or carried, the button(s) is/are programmed to trigger a police panic Worn as a wrist watch or pendant, the button(s) is/are programmed to trigger an Mobile Auxiliary Auxiliary panic.
- Page 64 Mobile Intrusion Keypad can be mobile and is programmed to trigger a police panic Installed in a fixed location such as under a desk, the button(s) is/are Fixed Silent programmed to trigger a silent police panic QOLSYS CONFIDENTIAL AND PROPRIETARY PAGE...
- Page 65 Installed in a fixed location such as night stand, the button(s) is/are programmed Fixed Auxiliary to trigger an auxiliary panic Safety Auxiliary Used for local alerts like a nurse call button. Will not report an alarm to the Pendant Central Station QOLSYS CONFIDENTIAL AND PROPRIETARY PAGE...
- Page 66 Triggers an alarm when sensor detects smoke/rapid rise in heat SMOKE-M GROUP NAME SUPERVISED SCENARIO Smoke-Heat Triggers an alarm when sensor detects smoke or a rapid rise of heat. CO DETECTOR GROUP NAME SUPERVISED SCENARIO Triggers an alarm when sensor detects Carbon Monoxide QOLSYS CONFIDENTIAL AND PROPRIETARY PAGE...
- Page 67 “Activity Monitoring” is active, regardless Garage Tilt- Safety Tilt of panel status. Great for detached garage/shops. NOTE: Functionality in conjunction with garage door openers has not been evaluated by CE/EN Grade 2. QOLSYS CONFIDENTIAL AND PROPRIETARY PAGE...
- Page 68 SENSOR GROUPS WATER GROUP NAME SUPERVISED SCENARIO Triggers an alarm when sensor detects presence of water. Water Sensor NOTE: Flood sensor functionality has not been evaluated by CE/EN Grade 2. Water Non-Reporting Used for local alerts. Will not report an alarm to the Central Station SHOCK SENSOR GROUP NAME...
- Page 69 Used for local alerts. Will not report an alarm to the Central Station Please note: When using the PG8905 with Group 53, the High threshold setting is set to 38°C by default. The High threshold can be customized between -40°C and 85°C. QOLSYS CONFIDENTIAL AND PROPRIETARY PAGE...
- Page 70 Used for supervising Z-Wave sirens for wireless connectivity. Siren Reports to the central station. Used for supervising Z-Wave sirens for wireless connectivity. Local Local Safety Sensor supervision only. Does NOT report to the central station. QOLSYS CONFIDENTIAL AND PROPRIETARY PAGE...
- Page 71 An interior sensor that triggers an alarm instantly while armed to both Instant Interior Door stay and away. Does not trip if an entry/exit sensor is tripped first Away Instant- Follower Interior door that triggers alarm instantly when system is armed to away Delay mode only QOLSYS CONFIDENTIAL AND PROPRIETARY PAGE...
- Page 72 SENSOR GROUPS DOOR/WINDOW-M (For use only with Multi-function Door/Window Sensors) GROUP NAME SUPERVISED SCENARIO This sensor does not report or trigger an alarm. This is a chime only sensor Local Safety Sensor when “Activity Monitoring” is active, regardless of panel status. Used for medicine cabinets, chemical storage etc This sensor reports to the central station and triggers an alarm when Reporting Safety Sensor...
- Page 73 When using Group 52, the Low threshold setting is set to 4°C by default. When using Group 53, the High threshold setting is set to 38°C by default. Thresholds can be customized between -40°C and 85°C. QOLSYS CONFIDENTIAL AND PROPRIETARY PAGE...
-
Page 74: 74- Sensor Name
SECURITY SENSORS SENSOR NAME When you select the sensor name field you can choose from a variety of preset sensor names by scrolling up and down or create a custom description. QOLSYS CONFIDENTIAL AND PROPRIETARY PAGE... - Page 75 When you select “Custom Description” as your sensor name the android keyboard will appear. Type in the desired name (up to 56 characters) and click “Done. ” The name will appear in the field below “Sensor Name. ” QOLSYS CONFIDENTIAL AND PROPRIETARY PAGE...
-
Page 76: 76- Chime Type
To customize your chime for a particular sensor touch the Chime Type drop down and choose from the list. QOLSYS CONFIDENTIAL AND PROPRIETARY PAGE... -
Page 77: 77- Voice Prompts
“Off. ” Touch the drop down menu to change. Choose individually which sensors should have voice prompts ON or OFF *NOTE: “Activity Monitoring Sensors” will also audibly report when they have been closed. QOLSYS CONFIDENTIAL AND PROPRIETARY PAGE... - Page 78 SECURITY SENSORS SOURCE Source indicates the sensor’ s incoming frequency when pairing to the IQ Panel 2 and IQ Panel 2+. IQ Panel 2+ will show the following options: - PowerG QOLSYS CONFIDENTIAL AND PROPRIETARY PAGE...
-
Page 79: 79- Edit Sensor
To make changes SETTINGS to a sensor, touch the “Pencil” icon ADVANCED SETTINGS next to the sensor that needs editing. ENTER CODE (1111, 2222) Change desired fields and then INSTALLATION touch “SAVE”. DEVICES SECURITY SENSORS EDIT SENSOR QOLSYS CONFIDENTIAL AND PROPRIETARY PAGE... -
Page 80: 80- Delete Sensor
ADVANCED SETTINGS “OK” to confirm or “CANCEL” to quit the operation ENTER CODE (1111, 2222) INSTALLATION DEVICES SECURITY SENSORS Select the sensor(s) from the list that are to be deleted and then touch “DELETE” DELETE SENSOR QOLSYS CONFIDENTIAL AND PROPRIETARY PAGE... -
Page 81: 81- Sensor Status
SETTINGS allows you to quickly review ADVANCED SETTINGS programming for things like Zone ENTER CODE (1111, 2222) number, Partition, Signal Source INSTALLATION (PowerG), Sensor Name, Sensor DEVICES Type and Sensor Group. SECURITY SENSORS SENSOR STATUS QOLSYS CONFIDENTIAL AND PROPRIETARY PAGE... - Page 82 The Sensor SETTINGS Group list is sorted by “Type” ADVANCED SETTINGS in alphabetical order from A - Z. ENTER CODE (1111, 2222) INSTALLATION DEVICES SECURITY SENSORS SENSOR GROUP QOLSYS CONFIDENTIAL AND PROPRIETARY PAGE...
-
Page 83: 83- Panel Motion Settings
“SAVE MASK” to save. Up to 4 bar on the right side of the screen to * Not evaluated for use with EN Grade 2 independent mask areas can be drawn. determine trigger threshold. applications. QOLSYS CONFIDENTIAL AND PROPRIETARY PAGE... -
Page 84: Wi-Fi Devices
WI-FI DEVICES... - Page 85 WI-FI DEVICES FIND IT Wi-Fi Devices View and remove Wi-fi devices associated with the panel as well as Swipe down configure the Qolsys Access point. for access Access Point Connected Devices Wi-Fi View connected device information Scan and connect to a...
- Page 86 ENTER CODE (1111, 2222) Then touch “Wi-Fi” INSTALLATION Enable Wi-Fi if not already active DEVICES WI-FI DEVICES Available networks appear in a list. Touch the desired network and use the keyboard to type the password (if required) QOLSYS CONFIDENTIAL AND PROPRIETARY PAGE...
-
Page 87: 87- Access Point Settings
Change the password of the SSID to one of your choosing. Activate WPS: Connect devices to the panel’ s built-in access point using WPS push button. Access Point Password: Shows current password in use for the Panel Access Point QOLSYS CONFIDENTIAL AND PROPRIETARY PAGE... - Page 88 Select “Actions” to then remove a device that has been associated with the panel. You must remove saved network information from the device otherwise it will re- connect to the panel. QOLSYS CONFIDENTIAL AND PROPRIETARY PAGE...
- Page 89 (device name and sensor group), ping, delete or appear on the zone list in the order in which it is paired. Sensor Groups 0, 1 & 2 are available options for this Sensor Type. rediscover the device if necessary QOLSYS CONFIDENTIAL AND PROPRIETARY PAGE...
-
Page 90: 90- 3Rd Party Connections
ENTER CODE (1111, 2222) to apply the change. Once INSTALLATION enabled a secure token can be DEVICES generated in order to sync with 3rd WI-FI DEVICES party device 3RD PARTY integration. CONNECTIONS QOLSYS CONFIDENTIAL AND PROPRIETARY PAGE... -
Page 91: Z-Wave Devices
Z-WAVE DEVICES... - Page 92 Z-WAVE DEVICES Z-WAVE DEVICES Note: Not evaluated for use with EN Grade 2 installations. Z-Wave Devices Add, Edit, Clear and Remove Z-Wave Devices. You can also View/Edit associations as well as access Z- Wave Settings. View/Edit Associations Remove All Devices (Factory Add Device (Inclusion) Manually change Z-Wave Default Reset)
-
Page 93: 93- Add Device
Z-WAVE DEVICES ADD DEVICE FIND IT 2. Touch “Include” 1. Select “Add Device” Swipe down for access 3. Press the “Pair” or “Learn” button on the device when the message appears. (see individual device documentation for instructions on button location) SETTINGS 4. -
Page 94: 94- Clear Device
“Pair” or “Learn” button on device* NOTE: Each Z-Wave device is different, and not all devices have a hard button to pair or learn. Refer to your device’ s installation manual for specifics on pairing or learning. QOLSYS CONFIDENTIAL AND PROPRIETARY PAGE... -
Page 95: 95- Delete Failed Device
“Exclude” a Z-Wave device. Only allows a Node ID to be deleted if it has failed and is no longer communicating. Check the boxes next to the device(s) you want to delete Touch “Delete Failed Device From Panel” Touch “Delete” QOLSYS CONFIDENTIAL AND PROPRIETARY PAGE... -
Page 96: 96- Remove All Devices
Z-WAVE DEVICES REMOVE ALL DEVICES Deletes all Z-Wave devices from the panel and resets the panel’ s Z-Wave Touching “Remove All Devices” controller. brings a confirmation pop-up asking you to confirm your decision to remove all devices. If this controller is the primary controller for your network, resetting it will result in the nodes in your network being... -
Page 97: 97- View/Edit Associations
Note: The IQ Panel 2+ supports Lifeline in Group 1 to send out Device Reset Locally when it has been associated to another Z- Wave Plus device. This is triggered when “REMOVE ALL DEVICES” is used QOLSYS CONFIDENTIAL AND PROPRIETARY PAGE... - Page 98 Z-WAVE SETTINGS unit. Note: Additional Z-Wave devices other than what has been indicated as maximum limits have not been evaluated. * Additional option available only through the Dealer Code. QOLSYS CONFIDENTIAL AND PROPRIETARY PAGE...
- Page 99 Z-WAVE DEVICES Z-WAVE SETTINGS Setting Default Description Allow Master Code Z-Wave Disabled Allow Master User Code to access Z-Wave Settings Settings Allow Master Code Z-Wave Allow Master User Code to access Z-Wave Devices (Add, Edit, Clear, Delete Failed Device, Disabled Management Remove All Devices &...
- Page 100 Z-WAVE DEVICES SMARTSTART FIND IT 2. Touch “Include” 1. Select “SmartStart” Swipe down for access 3. Scan the Box or Device’ s QR code or manually enter the DSK code and select Add DSK. SETTINGS 4. Adjust the device name by touching and making the ADVANCED SETTINGS appropriate selections.
- Page 101 Included: When a device has completed the inclusion process it will then show as “included” in the provisioning list and at that point the panel’ s UI will reflect the included devices. QOLSYS CONFIDENTIAL AND PROPRIETARY PAGE...
-
Page 102: Bluetooth Devices
BLUETOOTH DEVICES... - Page 103 Delete Device 3109 Bluetooth speaker with Delete a paired Bluetooth DEVICES the panel for remote voice device annunciations, chimes and two- BLUETOOTH DEVICES way voice. Remove All Devices Removes all paired Bluetooth devices at once. QOLSYS CONFIDENTIAL AND PROPRIETARY PAGE...
- Page 104 Partition to be disarmed (if Partitions are enabled). 6. Your mobile device will now show under the “Paired Devices” list on the panel. NOTE: Your phone may show the IQ Panel as “Not Connected”. This is normal QOLSYS CONFIDENTIAL AND PROPRIETARY PAGE...
- Page 105 3. Select which Partition you would like the device to disarm. Note: This option is only available when “Partitions” are enabled. A device can only be assigned to one Partition at a time. QOLSYS CONFIDENTIAL AND PROPRIETARY PAGE...
- Page 106 (For North American Market Only - Not functional for CE/EN Grade 2) 1. Select the check box next to the device you would like to delete. 2. Select “Delete” at the bottom of the page. 3. Select “OK” to confirm and delete the device. QOLSYS CONFIDENTIAL AND PROPRIETARY PAGE...
- Page 107 (For North American Market Only - Not functional for CE/EN Grade 2) To delete and remove all enrolled Bluetooth devices at once, select “Remove All Devices”. Next select “OK” to confirm you would like to delete. QOLSYS CONFIDENTIAL AND PROPRIETARY PAGE...
- Page 108 Change the time in which the panel must wait after it’ s been armed to away before it allows a bluetooth device to disarm it. Default 10 min Select from 1, 5, 10, 20 or 30 minute disarm timeout QOLSYS CONFIDENTIAL AND PROPRIETARY PAGE...
- Page 109 4. Once paired, a pop up showing “Bluetooth Device Added Successfully” will appear. Touch “OK” to confirm. 5. Your speaker will now show under the “Paired Devices” list on the panel. NOTE: Only “Anker” brand (models 3102, 3108 or 3109) speakers are supported. QOLSYS CONFIDENTIAL AND PROPRIETARY PAGE...
-
Page 110: System Tests
SYSTEM TESTS... - Page 111 & environment advanced diagnostics Cellular Test PowerG Test Test the panel’ s connection to the Ping and receive signal cellular network and Alarm.com strength from a PowerG sensor. QOLSYS CONFIDENTIAL AND PROPRIETARY PAGE...
- Page 112 Glass Break ✓ SETTINGS Panel Test Dual Path Test Runs through a complete test ADVANCED SETTINGS Verifies the Wi-Fi path is of the panel’ s running connecting to Alarm.com processes ENTER CODE (1111, 2222) SYSTEM TESTS QOLSYS CONFIDENTIAL AND PROPRIETARY PAGE...
- Page 113 ENTER CODE (1111, 2222) SYSTEM TESTS A successful test will result in a WI-FI TEST “pass” and indicates the date and time of the test along with connection speed. NOTE: If test fails, please check your Wi-Fi settings. QOLSYS CONFIDENTIAL AND PROPRIETARY PAGE...
- Page 114 NOTE: For UL/cUL , perform a graphed signal strength in placement test first for all wireless real time. initiating devices. The acceptable result Refer to page 99 for the sensor packet results table. shall be “Excellent". QOLSYS CONFIDENTIAL AND PROPRIETARY PAGE...
- Page 115 Lower dBm levels mean there is less noise or interference on the sensor’ s specific SETTINGS operating band or frequency. ADVANCED SETTINGS ENTER CODE (1111, 2222) SYSTEM TESTS SENSOR TEST NOTE: Manufacturer recommended signal to noise ratio is min 7dB QOLSYS CONFIDENTIAL AND PROPRIETARY PAGE...
- Page 116 SENSOR TEST door/window or adjust the panel’ s RF pigtail antenna. Then re-test to see the if the result NOTE: Manufacturer recommended improved. signal to noise ratio is min 7dB QOLSYS CONFIDENTIAL AND PROPRIETARY PAGE...
- Page 117 SENSOR TEST Excellent Good NOTE: For UL/cUL , perform a Minimum placement test first for all wireless initiating devices. The acceptable result No Signal No RF packets received ( 8 ) shall be “Excellent”. QOLSYS CONFIDENTIAL AND PROPRIETARY PAGE...
- Page 118 Alarm.com prior to running this test. Cell signal strength is only available after the test has been ran successfully. SETTINGS ADVANCED SETTINGS To begin the test press “Start” and watch for ENTER CODE (1111, 2222) the results on the screen. SYSTEM TESTS CELLULAR TEST QOLSYS CONFIDENTIAL AND PROPRIETARY PAGE...
- Page 119 Select the desired Image Sensor by SYSTEM TESTS touching “View” next to it’ s name PIR Test checks the motion sensor IMAGE SENSOR CONFIG Installer Peek In tests the camera (Results appear through the Alarm.com app) Touch “Sensor Tests” QOLSYS CONFIDENTIAL AND PROPRIETARY PAGE...
- Page 120 To perform a Z-Wave Test, touch the “Run” button. A successful test will result in a “Pass” and a time stamp. SETTINGS ADVANCED SETTINGS ENTER CODE (1111, 2222) SYSTEM TESTS Z-WAVE TESTS Z-WAVE TEST NOTE: If a test fails, relocate device, change batteries and/or rediscover network. QOLSYS CONFIDENTIAL AND PROPRIETARY PAGE...
- Page 121 ENTER CODE (1111, 2222) “Rediscover”. A result including a time stamp SYSTEM TESTS will appear under “Status”. Z-WAVE TESTS REDISCOVER NETWORK NOTE: If a test fails, relocate device, change batteries and/or rediscover network. QOLSYS CONFIDENTIAL AND PROPRIETARY PAGE...
- Page 122 SETTINGS Touch “View” next to any device and a pop- ADVANCED SETTINGS up will appear listing it’ s “Neighbor Nodes” ENTER CODE (1111, 2222) SYSTEM TESTS Z-WAVE TESTS NEIGHBOR INFO QOLSYS CONFIDENTIAL AND PROPRIETARY PAGE...
- Page 123 A well designed network should have at least a 98% acknowledgment vs failed rate. SETTINGS ADVANCED SETTINGS ENTER CODE (1111, 2222) SYSTEM TESTS Z-WAVE TESTS COUNTERS QOLSYS CONFIDENTIAL AND PROPRIETARY PAGE...
- Page 124 Reset All Resets all counters back to 0 as to better diagnose the network Shows individual device details such as passed and failed commands. Here you can also reset an individual device’ s Details counter QOLSYS CONFIDENTIAL AND PROPRIETARY PAGE...
- Page 125 SETTINGS ADVANCED SETTINGS ENTER CODE (1111, 2222) SYSTEM TESTS Z-WAVE TESTS ✓ Z-WAVE DIAGNOSTICS QOLSYS CONFIDENTIAL AND PROPRIETARY PAGE...
- Page 126 Z-Wave repeaters SYSTEM TESTS on the network Z-WAVE TESTS Last Working Route Shows the last working route ADVANCED Z-WAVE for a specific node on the DIAGNOSTICS network. Also allows you to set a static “sticky” route QOLSYS CONFIDENTIAL AND PROPRIETARY PAGE...
- Page 127 24hrs as well as review the PowerG PIR CAM image. SETTINGS ADVANCED SETTINGS ENTER CODE (1111, 2222) SYSTEM TESTS POWERG TEST STRENGTH can be: Strong, Good, Poor or No Signal Note: for EN Grade 2 signal strength shall be “Strong” QOLSYS CONFIDENTIAL AND PROPRIETARY PAGE...
- Page 128 ENTER CODE (1111, 2222) test has been detected and Microphones are SYSTEM TESTS listening. PANEL GLASS BREAK Circle will turn GREEN TEST when the panel hears the proper glass break frequency being detected. QOLSYS CONFIDENTIAL AND PROPRIETARY PAGE...
- Page 129 Once tripped an alarm will be sent to the central station. Follow the on screen instructions to ensure a proper test. SETTINGS ADVANCED SETTINGS ENTER CODE (1111, 2222) SYSTEM TESTS PANEL GLASS BREAK TEST QOLSYS CONFIDENTIAL AND PROPRIETARY PAGE...
- Page 130 - Plated Glass - 1/8” to 1’4” - Panel Glass Break detection enabled - Insulated Glass - 1/8” to 1/4” - Armed “Away” or “Stay” depending - Window must be framed on programming - Minimum Dimensions 12” by 12” QOLSYS CONFIDENTIAL AND PROPRIETARY PAGE...
- Page 131 DUAL PATH TEST broadband connection to Alarm.com. NOTE: The IQ Panel 2 must be connected to a wi-fi network to enable Dual Path NOTE: Wi-Fi is for supplemental use only QOLSYS CONFIDENTIAL AND PROPRIETARY PAGE...
- Page 132 “Pass” ENTER CODE (1111, 2222) or “Fail”. SYSTEM TESTS If the test results in “Fail” double check the DAUGHTER CARDS TEST daughter card connection, reboot the panel and rerun the test again. QOLSYS CONFIDENTIAL AND PROPRIETARY PAGE...
- Page 133 Select “Run” to perform ADVANCED SETTINGS an individual test or “Run All” to perform a ENTER CODE (1111, 2222) test of all processes. SYSTEM TESTS ✓ Running all tests at once PANEL TEST will sound the siren. QOLSYS CONFIDENTIAL AND PROPRIETARY PAGE...
-
Page 134: Customization
CUSTOMIZATION... - Page 135 CUSTOMIZATION USER MANAGEMENT FIND IT The IQ Panel 2 can hold up to 242 user codes. Only Dealer, Installer and Swipe down Master user codes can can create or edit user codes. Once a code is created, for access all information can be edited, except for the “User Type”. User Type Access Level Partition Access...
- Page 136 Enable/Disable On-Screen to the panel replacing the Billboard photo lock feature envelope. On-Screen Billboard Add advertising images to the photo frame which cannot be deleted by a user. *This page available only through the Dealer Code QOLSYS CONFIDENTIAL AND PROPRIETARY PAGE...
- Page 137 Dealer Contact fields allow up to 50 characters, Tag Line 2 allows up to 50. SETTINGS Example: ADVANCED SETTINGS ABC Security ENTER CODE (2222) Automation & Security Atlanta’s Preferred DEALER BRANDING 798-123-4567 CONTACT INFO jondoe@abcsecurity.com ABCSecurity.com 84008 *This page available only through the Dealer Code QOLSYS CONFIDENTIAL AND PROPRIETARY PAGE...
- Page 138 NOTE: Before removing the SD Card, go to “Settings” then - 200 x 100 pixels (or less) *This page available only through the touch “SD Card” and select “Unmount” - JPEG or PNG Dealer Code QOLSYS CONFIDENTIAL AND PROPRIETARY PAGE...
- Page 139 NOTE: Before removing the SD Card, go to “Settings” then - 1280 x 800 pixels (or less) *This page available only through the touch “SD Card” and select “Unmount” - JPEG or PNG Dealer Code QOLSYS CONFIDENTIAL AND PROPRIETARY PAGE...
- Page 140 - Aspect ratio: 1280 x 800 - File Type: .m4v NOTE: Before removing the SD Card, go to “Settings” then - Total Storage Space: 200MB *This page available only through the touch “SD Card” and select “Unmount” Dealer Code QOLSYS CONFIDENTIAL AND PROPRIETARY PAGE...
- Page 141 (Installer Code) ENTER CODE (1111, 2222) Then touch “Wi-Fi” WI-FI Enable Wi-Fi if not already active Available networks appear in a list. Touch the desired network and use the keyboard to type the password (if required) QOLSYS CONFIDENTIAL AND PROPRIETARY PAGE...
- Page 142 4 day forecast Alarm.com services. (Will not display or update weather connected to wifi only) LOCATION Weather reporting is based on location as indicated by the zip code entered into Alarm.com when the account is created. QOLSYS CONFIDENTIAL AND PROPRIETARY PAGE...
- Page 143 Frame Settings”. (Swipe down from the menu bar) PHOTO FRAME Display type Choose a display type for your photo frame. Opt to turn it off completely, scroll through pre loaded images or view a “weather clock” QOLSYS CONFIDENTIAL AND PROPRIETARY PAGE...
- Page 144 “Wi-Fi” photo sets using your panel’ s WiFi connection SETTINGS: Change the Photo Frame’ s “Display Type” from Off to On or enable a “Weather Clock” screen saver. Change transitions, adjust display time, set automatic on/off times and more QOLSYS CONFIDENTIAL AND PROPRIETARY PAGE...
- Page 145 CUSTOMIZATION PHOTO FRAME SETTINGS FIND IT Item Default Description Swipe down for access How long each image will show before transitioning to the next image in Duration 1 minute the library (1, 2, or 5 minutes) Effect Dissolve Transition effect used between each image (fade to black, dissolve) Shuffle Enabled Display pictures in random or sequential order...
- Page 146 - 1280 x 800 pixels (or less) Card will slide all the way in. - No larger than 5MB each To remove, push gently and card will spring out. - No more than 20 images - Saved in folder entitled “Photos” QOLSYS CONFIDENTIAL AND PROPRIETARY PAGE...
-
Page 147: Maintenance
MAINTENANCE... - Page 148 MAINTENANCE UPGRADE SOFTWARE FIND IT Upgrade Software Upgrade the panel’ s software version using Wifi or an SD Card. Swipe down for access Setting Description Search the network for updates and install new software Upgrade Using Network SETTINGS NOTE: For EN Grade 2, remote software uploading is not allowed Upgrade Using SD Card Search an inserted SD Card for updates and install new software ADVANCED SETTINGS...
- Page 149 Touch "OK. " Your panel will install NOTE: For EN Grade 2 the the update and automatically restart. remote software feature shall not be used and the panel shall not be setup to remotely upgrade. QOLSYS CONFIDENTIAL AND PROPRIETARY PAGE...
- Page 150 FIND IT 1- Insert an SD card into your computer. (*We recommend a class 4 or higher SDHC card with 4gb – 16gb storage space) Swipe down 2- Download the current software from dealers.qolsys.com for access (requires login) 3- Once the file is downloaded, right click the file and select "Unzip"...
- Page 151 Touch “Upgrade Software” ADVANCED SETTINGS Make sure the “Automatic Background Check and Download” button is checked. Change update interval by selecting “Automatic Check Interval” ENTER CODE (1111, 2222) UPGRADE SOFTWARE QUESTIONS? Contact us at techsupport@qolsys.com QOLSYS CONFIDENTIAL AND PROPRIETARY PAGE...
- Page 152 Plug the battery connector back into the board. CAUTION: Do NOT use a screwdriver or anything sharp that could puncture the battery. Do NOT pull on the battery cable to try and remove battery. QOLSYS CONFIDENTIAL AND PROPRIETARY PAGE...
-
Page 153: Troubleshooting
TROUBLESHOOTING... - Page 154 TROUBLESHOOTING ABOUT FIND IT Swipe down for access SETTINGS ADVANCED SETTINGS ENTER CODE (1111, 2222) ABOUT QOLSYS CONFIDENTIAL AND PROPRIETARY PAGE...
- Page 155 Software Version: Current Software Version LInux Version: Software Build Number: Android Version: Hardware Version: System Serial #: Manufacturer: Qolsys Inc. San Jose, CA RF PIC Version: Hardware PCA Serial #: EEPROM Format Version: Part #: Image Sensor Version: System Configuration:...
- Page 156 Total Space: Total space shown in GB Videos: Breakdown of space used for videos Internal Storage Available Space: Space available for media Logs: Space used for storing panel logs Photos: Breakdown of space used for photos QOLSYS CONFIDENTIAL AND PROPRIETARY PAGE...
- Page 157 4. Wait for panel LED to turn off IMPORTANT: Failure to perform these 5. Disconnect the power ENTER CODE (1111, 2222) steps in the proper sequence may result in data corruption and/or panel failure. POWER DOWN QUESTIONS? Contact us at techsupport@qolsys.com QOLSYS CONFIDENTIAL AND PROPRIETARY PAGE...
- Page 158 4. Wait for the panel to restart SETTINGS ADVANCED SETTINGS IMPORTANT: Failure to follow these steps properly may ENTER CODE (1111, 2222) result in data corruption and/or panel failure. PANEL REBOOT QUESTIONS? Contact us at techsupport@qolsys.com QOLSYS CONFIDENTIAL AND PROPRIETARY PAGE...
- Page 159 TROUBLESHOOTING HARD REBOOT x 30 sec IMPORTANT: Performing a hard reset may result in data corruption and/or panel failure. Only use this when absolutely necessary. QUESTIONS? Contact us at techsupport@qolsys.com QOLSYS CONFIDENTIAL AND PROPRIETARY PAGE...
- Page 160 Battery Checks panel battery health 2) If test continues to fail, replace the battery 1) Reboot the panel and run the test again LED Green/Red Check panel LED operation 2) Master reset and repeat test QOLSYS CONFIDENTIAL AND PROPRIETARY PAGE...
- Page 161 Wifi network 2) Connect to a Wifi Network Checks that the panel can receive Upgrade Service 1) Verify internet and Wi-Fi connections. updates from the Qolsys servers Check panel's Z-Wave module 1) Reboot the panel and repeat test. Z-Wave operation 2) Master reset and repeat test Check that the panel’...
- Page 162 If your panel cannot load a help video you will receive an error message. Please ensure that your video(s) meet the requirements: Acceptable File types: .m4v Total storage space: 200MB NOTE: videos look best in aspect ratio 1280 x 800 QOLSYS CONFIDENTIAL AND PROPRIETARY PAGE...
-
Page 163: Legal
LEGAL... - Page 164 LEGAL IMPORTANT Important warning and information can be found on the interior and exterior of the panel’ s mounting plate. QOLSYS CONFIDENTIAL AND PROPRIETARY PAGE...
- Page 165 Directives. Also, a CE declaration of conformity (DoC) for this product can be found at www.qolsys.com Simplified EU Declaration of Conformity Hereby, Qolsys Inc. declares that the radio equipment type is in compliance with Directive 2014/53/EU. The full text of the EU declaration of conformity is available at the following internet address: www.qolsys.com...
- Page 166 The PowerG peripheral devices have two-way communication functionality, providing additional benefits as described in the technical brochure. This functionality has not been tested to comply with the respective technical requirements and should therefore be considered outside the scope of the product’ s certification. QOLSYS CONFIDENTIAL AND PROPRIETARY PAGE...
- Page 167 LEGAL EN COMPLIANCE STATEMENT continued… Enable “EN Grade 2” Setting By enabling “EN Grade 2” setting, the following parameters will be changed automatically. - Entry Procedure (EU) - Follows entry procedures and alarm transmission delays specified by EN 50131-1 standards section 8.38 - Enables arming protest feature when trouble conditions are present.
- Page 168 Notes for EN50136-1:2012 Compliant Installations: The IQ Panel 2 has an integral communicator using the Qolsys proprietary serial interface. The communicator circuitry operates in pass- through mode and it does acknowledge the alarm to the compatible controls panel after an acknowledgement has been received from the compatible alarm receiver.
-
Page 169: Specifications
SPECIFICATIONS... - Page 170 Up to 128 RF Zones (PowerG 868MHz) Flash Memory Internal Storage 12GB NAND Flash SD Card Slot Push-Push Micro SD slot x 1 *Note: User interface is disabled for 90s after 5 invalid code entries have been made. QOLSYS CONFIDENTIAL AND PROPRIETARY PAGE...
- Page 171 SPECIFICATIONS Items Parameters IQ Panel 2 LED Indicator Status LED Green (Disarmed), Red (Armed). Note: not enabled for EN50131 certified systems Speaker Stereo 1W x 2 Stereo speakers (unified audio) Camera Front Camera 5MP fixed focus Microphone Microphone Stereo microphones x 2 Siren Piezo SPL minimum 85dB.
- Page 172 SUPPORTED POWER-G SENSORS Detector Type Model Ceiling Mount Detector MP-862/MP-872 / PG8862/PG8872 / BW-862 Door/Window MC-302E / PG8945 / BW-MCN Door/Window - Shock Sensor SD-304 / PG8935 / BW-SHK Dual Tech (PIR+Microwave) Motion Detector Tower-32 AM / PG8984(P) / BW-DTM Flood Detector FLD-550(1) / PG8985 / BW-FLD Glassbreak Detector...
- Page 173 IQ Panel 2 Document#: IQP2-IM-CE Qolsys Inc. proprietary. AT&T Revision Date: 10/14/20 Reproduction without permission is not permitted. QS9212-0G09-724 Software version: 2.5.0...
Need help?
Do you have a question about the Panel 2+ and is the answer not in the manual?
Questions and answers