Table of Contents
Advertisement
Quick Links
Advertisement
Table of Contents

Related Manuals for Triplett CamView HD Pro 8065


Summary of Contents for Triplett CamView HD Pro 8065
- Page 1 HD P USER MANUAL P/N UM-8065 Rev. 01/2018...
-
Page 2: Safety Information
Thank you for purchasing the Triplett CamView™ HD Pro. Please read the manual carefully before using the product. To assure safe use of this product, please read the section on Safety carefully, and observe any Cautions or Warnings posted there and throughout this manual. -
Page 3: Table Of Contents
TABLE OF CONTENTS 1. Introduction............01 1.1 General Use . - Page 4 4.4 Device Settings and Updating the Firmware......18 4.4.1 Overview ........... .18 4.4.2 Viewing and Changing Settings .
-
Page 5: Introduction
Tester’s screen along with the analog video input signal for simple visual comparison. 1.2.4 DC Output The Tester will provide 12VDC output via the “12V 1A Output” jack on the left side of theTester to power an analog camera. www.Triplett.com... -
Page 6: Accessories
• Tool Bag with Shoulder Strap • Power Cable for Charging • BNC Cable • RS485 Cable • 12V Power Output Cable (for supplying power from the Tester to the Camera) • Audio Cable • USB Cable • Screen Protector Film www.Triplett.com... -
Page 7: Device Diagram And Functions
Please review the information carefully. Also note, many of the Tester’s screens also show On-Screen Instructions / a cheat list of the functions that are available on that screen and which buttons you need to push to select / access them. www.Triplett.com... -
Page 8: Front Of Tester
CamView HD Pro User Manual 2.1 Front of Tester www.Triplett.com... - Page 9 Iris Control Key — Controls PTZ Iris and other functions depending on the individual screen. When altering settings, use Iris+ to confirm and Iris- to cancel. Arrow Keys — Use these to navigate menus, alter settings, and pan/tilt cameras. www.Triplett.com...
-
Page 10: Back Of Tester
CamView HD Pro User Manual 2.2 Back of Tester 2.3 Left Side of Tester / Right Side of Tester 2.4 Top of Tester www.Triplett.com... - Page 11 Analog Video Output BNC Connector — This is the output from the tester to the monitor, if needed Analog Video Input BNC Connector — This is the input from the camera to the tester Flashlight — Extremely bright; do not look directly into the lights. www.Triplett.com...
-
Page 12: Basic Operation
• Due to calculation deviation or other reason, the battery level can be as low as 90% when the charge light turns off. You can ensure the battery Is fully charged by extending the charge time for up to 60 minutes after the light turns off. www.Triplett.com... -
Page 13: Lanyard
Flashlight is turned on accidentally). WARNING The LEDs are high brightness LEDs. When the LEDs are on, do not look directly at them or point them at someone’s eyes as doing so may cause injury. www.Triplett.com... -
Page 14: How To Use Your Camview Hd Pro
If the camera has PTZ, plug the PTZ cable into the RS485 Port on the side of the Tester then use the alligator clips on the RS485 cable to connect to the camera’s RS485 leads, red to positive (+) and black to negative (-). www.Triplett.com... - Page 15 NOTE — The Tester’s output power is 12V/1A. When the current needed by the camera exceeds the limit, power output will automatically stop in order to protect the Tester. This limitation may impact your ability to use the Tester to supply power to a camera that has high-power IR lights. www.Triplett.com...
-
Page 16: Using The Interface - Step-By-Step Instructions
Protocol (e.g. Pelco P to Pelco D), Baud Rate, Address, PTZ Speed, and Set and Load Presets to enable the Tester to communicate with and control the PTZ on the Analog Camera (assuming the camera has PTZ). Press SET to save changes and exit, or press www.Triplett.com... - Page 17 Go Preset Adjust this value, and then press Iris+. The camera will go to the corresponding pre-saved position at maximum speed. This function is provided by the camera. Refer to the camera’s manual for details. www.Triplett.com...
- Page 18 RECORDING SCREEN SHOTS AND SAMPLE VIDEOS: Focus + While on the Video Analysis screen, press the to save a Screen Shot to the Tester’s internal flash memory, or press the Focus - to record video to the Tester’s internal flash memory. www.Triplett.com...
-
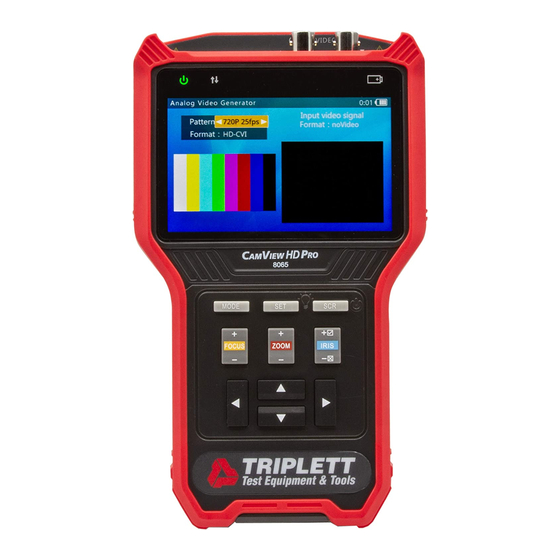
Page 19: Analog Video Generator
Format you have chosen. Output Image Left side. Input Image Right side. Input Format Format, resolution, and framerate of input video signal. Input Level Input of the video’s level as displayed in dB. 0dB is the standard value (1vpp@75 ohms) www.Triplett.com... -
Page 20: Testing Remote Analog Monitors
You can also test the Optical Transmitters/Receivers in the circuit by connecting an optical video transmitter to the BNC Out on the Tester, then connecting that transmitter to an optical video receiver, and finally connecting the receiver to the BNC In on the Tester. (See image below.) www.Triplett.com... -
Page 21: Reviewing And Accessing Snapshots And Videos
To disconnect the USB connection from a computer, eject or unmount the disk from the host system before disconnecting the cable. WARNING Failure to properly Eject/Undock the Tester from your computer can damage the Flash Storage drive that is built into the Tester. www.Triplett.com... -
Page 22: Device Settings And Updating The Firmware
SYSTEM DATE: Focus+/- Zoom+/- When the field is highlighted, use to change the year, to change the month, and the Left and Right Arrow Keys to change the day, then press Iris+ to apply the changes. www.Triplett.com... -
Page 23: Upgrading Firmware And Identifying Current Firmware Version
STEP 1: Download the Firmware to Your Windows Computer Go online to Triplett.com/Downloads. Find the Firmware Update in the list and download it to your computer. - Page 24 Do not run any other programs or make any changes on either the computer or the Tester during the firmware update as doing so can cause a catastophic failure on the Tester. If this happens, you may need to call Triplett Technical Support to walk you through a Manual Configuration of the Tester.
-
Page 25: Audio Test
Select the correct Baud Rate by pressing , then move the joystick or software controls in the Control Center. A hexadecimal representation of the commands from the joystick/software controls will appear if the commands are making it to the Tester. www.Triplett.com... -
Page 26: Appendix 1: Technical Specifications
150, 300, 600, 1200, 2400, 4800, 9600, 19200bps RECORD PLAYBACK Video Supports frame-by-frame playback; digital zoom; full-screen play; fast forward/rewind; delete file; fast switching between files. Screen Shot Supports image playback; digital zoom; full-screen display; delete file; and fast switching between files. www.Triplett.com... - Page 27 OTHER Storage 8GB flash built in; use micro USB port to connect external device. LED Light (2) 35lm LED lights WORKING ENVIRONMENT AND SPECIFICATIONS Operating -10°C ~+55°C Temperature Operating 30%~90% Humidity Dimensions 175mm x 113mm x 37mm Weight 1.6kg www.Triplett.com...
-
Page 28: Warranty And Technical Support
Triplett / Jewell Instruments extends the following warranty to the original purchaser of these goods for use. Triplett warrants to the original purchaser for use that the products sold by it will be free from defects in workmanship and material for a period of (1) one year from the date of purchase. - Page 30 Triplett Test Equipment and Tools has been desiging specialized test equipment for over 100 years. Triplett was acquired by Jewell Instruments in 2007. Jewell Instruments is a world leader in the manufacturing and distribution of advanced sensors, controls, panel meters, and avionics. Jewell provides custom solutions for the aerospace, medical, industrial, marine, telecommunications, and railroad industries.
Need help?
Do you have a question about the CamView HD Pro 8065 and is the answer not in the manual?
Questions and answers