Table of Contents
Advertisement
Quick Links
Advertisement
Table of Contents

Related Manuals for Triplett WiFi Hound


Summary of Contents for Triplett WiFi Hound
- Page 1 ound USER MANUAL P/N UM-WFHOUND 05/2019...
- Page 2 SAFETY AND CLEANING Thank you for purchasing the Triplett WiFi Hound™. Please read the manual carefully before using the product. To assure safe use of this product, please read the section on Safety carefully, and observe any Cautions or Warnings posted there and throughout this manual.
-
Page 3: Table Of Contents
5. Using Your WiFi Hound in the Field ....... . . -
Page 5: Introduction
This is the fundamental difference between those “free” apps and this Tester. Those free apps will only get you so far because they are not Spectrum Analyzers. For example, the picture from the WiFi Hound below shows microwave interference from a nearby manufacturing facility. Phone Apps are incapable of showing this level of detail about the Wireless Environment because it requires specialized hardware to see that detail. -
Page 6: Hardware
2.1 FRONT OF TESTER The WiFi Hound has a touch-screen user interface. Be sure to keep the screen clean. You can wipe it with a dry cloth, or use a touch-screen-approved mild cleaner. It is a capacitive touch screen, which means that your finger completes the cir- cuit. -
Page 7: Top Of Tester
• Mini HDMI Port – Can be used to mirror the Tester’s screen to a larger monitor/HDMI-connectable TV set. • DC port for charging – Charger is included with your WiFi Hound. Do not use aftermarket chargers. • Hard Reboot Inset – use a paperclip, insert it into the hole and count to 5. This will force the tester to reboot. -
Page 8: Initial Setup
If you press the power button and see the above screen, you are in the correct place. Give the Tester a minute to fully boot up. This is the WiFi Hound Startup Screen. This is the screen you will see once the unit has completed its boot-up process. Swipe up from the Lock icon to begin using your Tester. -
Page 9: Adding Your Company's Information
3.2 Setting up Your Company Information This is the WELCOME SCREEN. You will only need to add this information once when you first set up your WiFi Hound. To add more Technicians or select a different Technician, you can go to Settings > Company Info in the Main Screen after you have completed the Initial Setup here. -
Page 10: Adding Your First Client
WiFi Hound User Manual 3.3 Setting Up Initial Client Information This creates the FOLDER on the tester in which all of that specific client’s data is kept. It is important to fill in both the Client Name and Location Name. In this example, the Client Name is University of NYC, and the Location Name would be, for example, a specific campus/building/floor/wing, etc. -
Page 11: User Interface
Settings screen where you can connect to the local WiFi. DO NOT USE THAT FEATURE. Instead, go to Settings > Connect to WiFi. Once you have connected, use the Android Back Arrow to get back to the WiFi Hound Main Screen. -
Page 12: Settings Button
4.2.5 Check for Update This will automatically check for an updated version of the WiFi Hound firmware and install it for you. You must be con- nected to a WiFi network that has internet access for this to work. We do not recommend doing firmware updates when on a jobsite. -
Page 13: Left Side Of The User Interface
WiFi Hound User Manual 4.3 Left Side of the User Interface 4.3.1 Access Point (AP) Label Refresh Rate The AP Label Refresh Rate controls how often a ping is sent out by the Tester to request an update from any routers that are broadcasting in the area. -
Page 14: Selecting The Channel Width
WiFi Hound User Manual 4.3.3 Selecting the Channel Width The Channel Width selection is designed to help narrow the viewing range and make it easier for you to troubleshoot saturated wireless environments. You will not see the impact of your selection until you select the next option in the Frequency View Range filter. - Page 15 WiFi Hound User Manual After you are done using the filter, you can then reselect the Frequency View Range filter and change it back to All Channels which brings you back to the full, unfiltered view. The photo above shows the 5GHz Channel Width Options. Notice that bonded channels are included in your options.
- Page 16 WiFi Hound User Manual If you had selected 80MHz on the prior option, then you would see the above list of channels. If you selected Channel 122, which is an 80MHz-wide channel in the 5GHz part of the wireless spectrum, you would then see the filter applied in the photo below.
-
Page 17: Rssi View Range
WiFi Hound User Manual 4.3.5 Received Signal Strength Indicator (RSSI) View Range This filter controls the RSSI range that is displayed. A couple notes on this feature: 1. Selecting “Reset” will set the Tester to the maximum dBm of that specific Tester. Due to variances in tolerance, this number may differ slightly from Tester to Tester. -
Page 18: Real Wave Label Options
WiFi Hound User Manual 4.3.6 Real Wave Labels There are several additional items you can display alongside the SSID, including the Channel Number, Broadcast Type, and MAC Address. When to use the MAC ADDRESS option When working in a campus environment, there will often be multiple Access Points (APs) that are broadcasting the same SSID. -
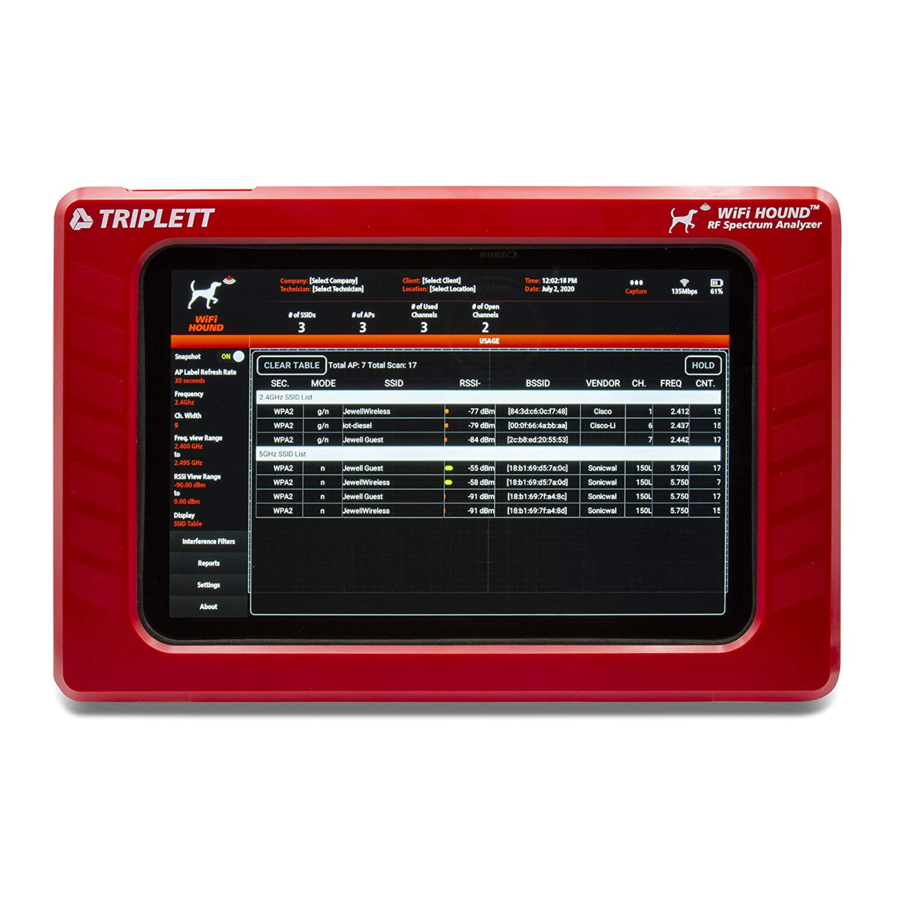
Page 19: Ssid Table
WiFi Hound User Manual To use the Interference Filters, first Select the Access Point(s) from the drop-down list. After you have selected the Access Point(s), you can then select which filter you would like to apply. Deselect the Access Point(s) to reset the filter. -
Page 20: Capturing Information To Create Reports
However, do not mistake SIGNAL STRENGTH for SIGNAL QUALITY. And this distinction is where you need a profes- sional Spectrum Analyzer like the WiFi Hound in order to properly troubleshoot a wireless environment. You can have very strong signal strength, but incorrect channel management and/or interference which will still cause poor wireless network performance. - Page 21 Tester for future reference. Data Logging currently creates a .csv file that must be interpreted. Future releases of the WiFi Hound software will include a simplified visual timeline instead, so be sure to register your Tester in order to receive the software update!
-
Page 22: Create And Review Reports
WiFi Hound User Manual As mentioned before, we recommend that you add a Note after you capture each piece of information (e.g., after each snapshot or video) about what you are seeing and where you are in the client’s facility. For example, “Far left corner by window [always work clockwise in a room], notice the 6 competing APs and interference from the neighboring restau- rant’s microwave ovens.”... - Page 23 WiFi Hound User Manual Remember – the pre-filled information on this report is controlled at SETTINGS, so it is very important that you input your company information, and the client’s information accurately. Highlight each file you want to add and press SELECT. (Note—you can’t add video here).
-
Page 24: Sending Reports
User Manual 4.6 Sending Reports You can either email your files (see below), or connect a computer to the WiFi Hound using the Micro USB port on the left side (see next page for instructions). The image above shows the standard Android interface to set up your email. If multiple technicians will be sharing one WiFi Hound, you should set up a single email address that can be used by all of your technicians when emailing completed site surveys. -
Page 25: Transferring Files To A Computer
WiFi Hound User Manual 4.7 Transferring Files to a Computer Follow the instructions above to access the files on the WiFi Hound and back up your client data. www.Triplett.com... -
Page 26: Using Your Wifi Hound In The Field
User Manual Source: http://www.odessaoffice.com/wireless/channel-overlap.jpg 5. USING YOUR WIFI HOUND IN THE FIELD The above graphic shows the Channel Allocation for the 2.4GHz part of the WiFi spectrum. You are likely already famil- iar with Channels 1-11 if you are trying to troubleshoot a wireless network. A few key things to keep in mind when you are troubleshooting: 5.1 Always Start with Channel Management... - Page 27 WiFi Hound User Manual Now imagine that the truck driver in Lane 1 (aka, Channel 1) can only see other trucks and their cargo if the other truck is also in Lane 1. If the other truck is in Lane 2, the truck driver in Lane 1 won’t even know they are there and may acci- dentally crash into it.
-
Page 28: Waveforms
WiFi Hound User Manual Source: https://transition.fcc.gov/oet/ea/presentations/files/may17/31-Part-15-Panel-UNII-UpdatesDT.pdf 5GHz does not have the same issue with channels as the 2.4GHz spectrum has insofar as NetworkA on Channel 36 will be able to negotiate with NetworkB on Channel 38 for airtime. However, it is important to note that 5GHz does contain Dynamic Frequency Selection (DFS) channels, which are also used by radar systems. -
Page 29: Walking To Source
5.3 Walking to Source You can use the WiFi Hound to try to find the Point of Origin of a signal by walking the area methodically with the Tester. The closer you get to the source, the taller the waveform will be. Any sort of rhythmic spike is likely originating from a machine, although depending on the environment, it may not be easy to isolate the origin. -
Page 30: Training Your Technicians And Communicating With Your Clients
WiFi Hound User Manual 5.5 Training Your Technicians and Communicating with Your Clients • Perform and document a Site Survey • Set up a regular process. (For example, enter the door, and go left to each extreme of the room, taking snap- shots as you go.) -
Page 31: Technical Specifications
WiFi Hound User Manual 6. TECHNICAL SPECIFICATIONS The WiFi Hound complies with Part 15 of the FCC Rules. Operation is subject to the following two conditions: (1) This device may not cause harmful interference, and (2) this device must accept any interference received, including interference that may cause undesired operation. -
Page 32: Warranty And Technical Support
Some states (USA ONLY) do not allow the exclusion or limitation of incidental or consequential damages, so the above limitation or exclusion may not apply to you No representative of Triplett / Byte Brothers or any other person is autho- rized to extend the liability of Triplett in connection with the sale of its products beyond the terms hereof.
Need help?
Do you have a question about the WiFi Hound and is the answer not in the manual?
Questions and answers