Advertisement
6
1
2
4
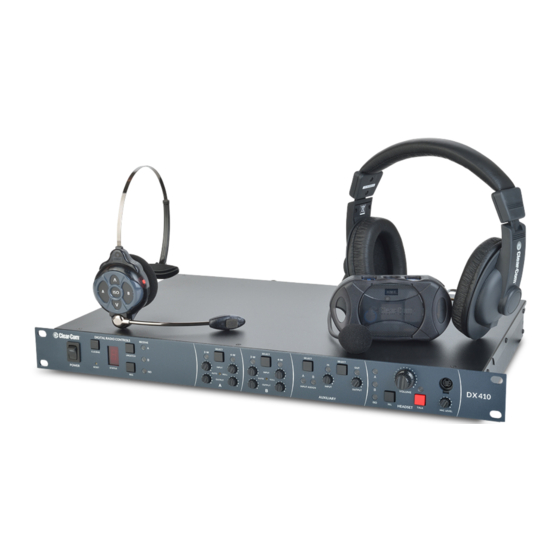
All-In-One Headset
1. Channel A (Intercom 1) button - Includes 2-wire
and 4-wire connections
2. ISO (Isolate) button - To All Wireless Headsets
and Belt Packs, Base, ISO Relay and AUX OUT
(if activated)
3. Increase Volume button (
4. Decrease Volume button (
5. Channel B (Intercom 2) button - Includes 2-wire
and 4-wire connections
6. Power/Mode lights
7. Microphone
8. Power button (On/Off)
9. Battery
10. Battery-release latch
Settings & Adjustments
All-In-One Headset Lights Off:
• Make certain the headset power is Off.
• Press and hold the B button while pressing and releasing the Power button.
Note: "Lights Off" is temporary. Lights return when power is cycled.
Belt Pack Sidetone Adjustment:
• Press and hold the A button while you repeatedly press up (▲) to increase or press down (▼) to decrease audio levels.
For technical support
In The Americas and Asia – Tel: +1.510.337.6600 or 1.800.462.4357 Menu option 1 • Hours: 8:00am-5:00pm Pacific Time • Email: SalesSupportUS@clearcom.com
In Europe, Middle East and Africa – Tel: +44.1223.815000 • Hours: 8:00am-5:00pm GMT • Email: SalesSupportEMEA@clearcom.com
Copyright © 2015 Clear-Com, LLC, an HM Electronics, Inc. company. All rights reserved.
Clear-Com, the Clear-Com logo and Clear-Com Concert are trademarks or registered trademarks of HM Electronics, Inc.
10
8
3
5
9
7
˄
)
˅
)
Quick Reference Guide
1
2
7
8
Belt Pack
1. Battery
2. Increase Volume button (
3. Decrease Volume button (
4. PWR (Power) button
5. Headset cable connector
6. Battery-release latch
7. Power/Mode lights
8. Channel A (Intercom 1) button - Includes 2-wire
and 4-wire connections
9. ISO (Isolate) button - To All Wireless Headsets
and Belt Packs, Base, ISO Relay and AUX OUT
(if activated)
10. Channel B (Intercom 2) button - Includes 2-wire
and 4-wire connections
DX410
4
3
5
6
9
10
7
▲
)
▼
)
Part Number: 399G164 Rev A
Date: 12/4/15
Advertisement
Table of Contents

Related Manuals for Clear-Com DX410


Summary of Contents for Clear-Com DX410
-
Page 1: Quick Reference Guide
In Europe, Middle East and Africa – Tel: +44.1223.815000 • Hours: 8:00am-5:00pm GMT • Email: SalesSupportEMEA@clearcom.com Copyright © 2015 Clear-Com, LLC, an HM Electronics, Inc. company. All rights reserved. Part Number: 399G164 Rev A Clear-Com, the Clear-Com logo and Clear-Com Concert are trademarks or registered trademarks of HM Electronics, Inc. Date: 12/4/15... - Page 2 Quick Reference Guide DX410 ® COMMUNICATOR Audio Channel and Local Headset Registration Auto-Null Controls Controls Power Switch STATUS AUTO NULL Register Belt Pack or All-In-One Headset • Make certain the Belt Pack or Headset is turned Off. • Press REG button on base station.
Need help?
Do you have a question about the DX410 and is the answer not in the manual?
Questions and answers