
Related Manuals for RS PRO RS-1340


Summary of Contents for RS PRO RS-1340
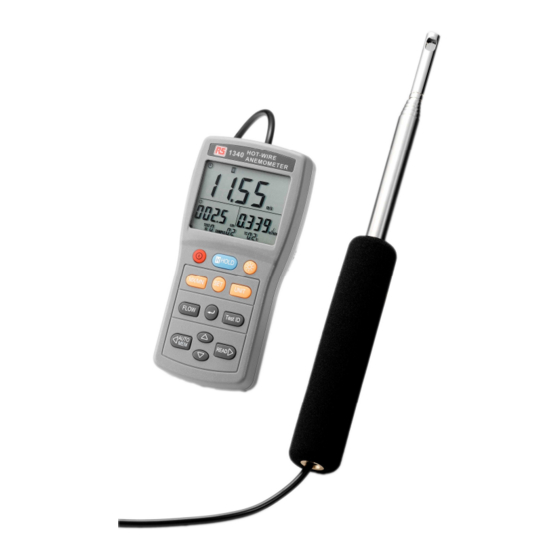
- Page 1 RS Stock No. 724-4207 Instruction Manual RS-1340 Hot Wire Anemometer...
-
Page 2: Table Of Contents
CONTENTS / EN CONTENTS Title Page 1. SAFETY INFORMATION.............1 2. INTRODUCTION................2 3. SPECIFICATIONS ...............3 4. PARTS & CONTROLS ..............4 4-1 Description of Parts & Control keys ........4 4-2 Description of Display.............6 5. MEASURING PROCEDURE ............8 5-1 Getting Started ...............8 5-2 Settings and Calibrations............8 5-3 Air Velocity Measurement.............10 5-4 Air Flow Measurement............10 5-5 MAX/MIN/AVG Recording Measurement ......11... -
Page 3: Safety Information
SAFETY INFORMATION / EN 1. SAFETY INFORMATION The following symbol may appear on the instrument and in this instruction manual: Refer to Instruction Manual CAUTION When using the meter to check air flow, make certain that you can safely raise and hold the meter while making measurements. -
Page 4: Introduction
INTRODUCTION / EN 2. INTRODUCTION The Portable Air Velocity Meter is a lightweight instrument that can be used anywhere to measure air velocity using the flexible telescoping probe, applications include ventilation hood air velocity, clean rooms, OSHA compliance, ventilation ducts and outlets, heating and air –... -
Page 5: Specifications
SPECIFICATIONS / EN 3. SPECIFICATIONS Display : Triple display, 4 digit LCD reading. Velocity Probe : Range : 0 to 30 m/s (0 to 600 ft/min) Resolution : 0.01 m/s (1 ft/min) Accuracy : ±3% of reading ±1%FS Duct Size : Range : 1 to 635 cm in increments of 0.1 cm. -
Page 6: Parts & Controls
PARTS & CONTROLS / EN 4. PARTS & CONTROLS 4-1 Description of Parts & Control keys 1. Air velocity sensor. (Measurement direction) 2. Flexible, telescoping probe. 3. Display. Power key : Press power key to turn the meter on or off. 5. - Page 7 PARTS & CONTROLS / EN • Choosing a time constant mode. • Choosing auto data memory interval time mode. • Auto power off time setting mode. • Backlight time setting mode. • Air velocity calibration mode. • Reset to factory default calibration value mode. 9.
-
Page 8: Description Of Display
PARTS & CONTROLS / EN 4-2 Description of Display AIR VELOCITY DISPLAY FLOW AIR FLOW SET UP DISPLAY DISPLAY MEMORY DISPLAY AIR VELOCITY DISPLAY : : Auto power off indication. H : Data hold indication. SET : Setting mode indication. REC : Record mode and current air velocity measured display indication. - Page 9 PARTS & CONTROLS / EN AIR FLOW DISPLAY : 2/3V MAX : 2/3V Maximum mode is selected indication. AVG : Average mode is selected indication. : Current mode is selected indication. x 10 : Multiply reading by ten. x 100 : Multiply reading by one hundred. x 1000 : Multiply reading by one thousand.
-
Page 10: Measuring Procedure
MEASURING PROCEDURE / EN 5. MEASURING PROCEDURE 5-1 Getting Started 1. Installing the Batteries Insert six AAA batteries as indicated by the diagram located on the inside of the battery compartment. 2. Extending the Probe To extend the probe, remove the sensor protection cap, hold the handle in one hand while pulling on the probe tip with the other hand. - Page 11 MEASURING PROCEDURE / EN If round duct is chosen, the “ ” symbol will displayed. keys to set the size (diameter) from 1.0 to 635.0 cm or 1.0 to 250.0 inches. Press “↵ ↵ ↵ ↵ ” key to store the value. If rectangle duct is chosen, the “...
-
Page 12: Air Velocity Measurement
MEASURING PROCEDURE / EN Press “ ” and “ ” keys to set the desired auto power off time from 1 to 50 minutes or to set to “– – m” to disable this function. Press “↵ ↵ ↵ ↵ ” key to store the setting. Press the “SET”... -
Page 13: Max/Min/Avg Recording Measurement
MEASURING PROCEDURE / EN 1. Press key to turn on the meter. 2. The display will show the air velocity reading directly on the air velocity display. 3. The flow type setting is displayed on the flow set up display. 4. -
Page 14: Air Flow Auto Data Memory And Read Mode
MEASURING PROCEDURE / EN 3. Press “READ” key to enter READ mode, the display will show “ R ” symbol and the memory address number. Press “ ” or “ ” key to select the desired memory address number data for display. 4. -
Page 15: Maintenance
MAINTENANCE / EN 6. MAINTENANCE 6-1 Cleaning : Periodically wipe the case with a damp cloth and mild detergent. Do not use abrasives or solvents. Clean and dry as required. 6-2 Battery Replacement : Note: The condition of the battery should be checked prior to use and changed if necessary.
Need help?
Do you have a question about the RS-1340 and is the answer not in the manual?
Questions and answers