Advertisement
Quick Links
Advertisement

Related Manuals for RS PRO RS-1260


Summary of Contents for RS PRO RS-1260
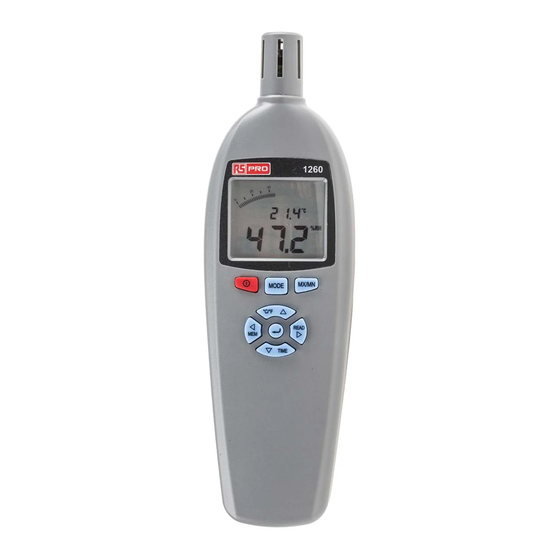
- Page 1 Instruction Manual RS-1260 Humidity Temperature Meter...
-
Page 2: Table Of Contents
Humidity Temperature Meter / EN TABLE OF CONTENTS TITLE PAGE 1. SAFETY INFORMATION........1 2. SPECIFICATIONS ..........2 3. FRONT PANEL DESCRIPTION ......3 4. MEASURING PROCEDURE ........6 5. MAINTENANCE............ 11 08/15/16 Version No. 01... -
Page 3: Safety Information
Humidity Temperature Meter / EN 1. SAFETY INFORMATION Read the following safety information carefully before attempting to operate or service the meter. Use the meter only as specified in this manual; otherwise, the protection provided by the meter may be impaired. Environment conditions Altitude up to 2000 metres Relatively humidity 99% max. -
Page 4: Specifications
Humidity Temperature Meter / EN 2. SPECIFICATIONS Display : LCD Dual display and Analogue scale display. Measurement Range : Humidity 1% to 99% RH Temperature -20 to +60°C / -4 to +140°F Resolution : 0.1% RH , 0.1°C, 0.1°F Accuracy ( after calibration ) : Humidity : ±3%RH ( at 25°C, 30 to 99% RH ). -
Page 5: Front Panel Description
Humidity Temperature Meter / EN 3. FRONT PANEL DESCRIPTION Second Display APO mark °C°F Main Display (1) Humidity & Temp. Sensor probe (2) Display key : Press key to power on the meter. 08/15/16 Version No. 01... - Page 6 Humidity Temperature Meter / EN Data hold function : Press key to enter the data hold mode, the H symbol is displayed. In H mode, press ↵ key to alternate the display the of %RH and °C/°F readings between the main display and the secondary display or press “MODE”...
- Page 7 Humidity Temperature Meter / EN (8) ↵ ENTER key : In the normal mode, press ↵ key to alternate the display the of %RH and °C/ °F readings between the main display and the secondary display. In the setting mode, press ↵ key to store the setting parameter.
-
Page 8: Measuring Procedure
Humidity Temperature Meter / EN 4. MEASURING PROCEDURE 4-1 Humidity Measurement : 1. Press key to power on the meter. 2. The display will show the humidity reading value (%RH) directly on the main display. 3. When the humidity value of the tested environment changes, please wait for few minutes to get the stable “%RH”... - Page 9 Humidity Temperature Meter / EN 4-5 Maximum and Minimum Recording Measurement : 1. Press “MX/MN” key to enter the recording mode, the “MX” symbol is displayed and the auto power off function will be disabled. 2. Press “MX/MN” key to cycle through the 6 sets of recorded data including main reading and subsidiary reading.
- Page 10 Humidity Temperature Meter / EN 4-6 Manual Data Memory and Read Mode : 1. Clear the manual memorized data Press key for 3 seconds to turn off the meter. Press and hold down “MEM” key, then press key to turn on the meter, the “CLr” and “no” symbols are displayed.
- Page 11 Humidity Temperature Meter / EN 4-7 Setting Auto Power Off Mode : The meter will Automatically power off if there is no further function in 30 minutes. The Auto power off function will be on every time the meter is switched on, but it will be disabled automatically when using the MX/MN mode.
- Page 12 Humidity Temperature Meter / EN 9. Press key to set the second of the real-time. 10. Press ↵ key to store the real-time. 4-9 User Calibration Procedure : Use standard humidity meter to verify the reading. 1. Press and hold down “° C/° F” key then press key to turn on the meter.
-
Page 13: Maintenance
Humidity Temperature Meter / EN 5. MAINTENANCE 5-1 Cleaning : Periodically wipe the case with a damp cloth and mild detergent. Do not use abrasives or solvents. Clean and dry as required. 5-2 Battery Replacement : Note: The condition of the battery should be checked prior to use and changed if necessary.
Need help?
Do you have a question about the RS-1260 and is the answer not in the manual?
Questions and answers