
Related Manuals for RS PRO RS-1361C


Summary of Contents for RS PRO RS-1361C
- Page 1 RS Stock No.712-6045 Instruction Manual RS-1361C Humidity / Temperature Meter Datalogger with RS-232 to USB Interface TEMP = - 20 C ~ 60 C ° ° - 4 F ~ 140 F ° ° HUMIDITY = 10 ~ 95 %RH...
-
Page 2: Table Of Contents
TABLE OF CONTENTS / EN TABLE OF CONTENTS TITLE PAGE 1. INTRODUCTION ............1 2. SPECIFICATIONS............2 3. FRONT PANEL LAYOUT .......... 4 4. LCD DISPLAY LAYOUT ..........6 5. OPERATING INSTRUCTIONS ........7 6. DATA RECORDING AND ERASING......8 7. -
Page 3: Introduction
INTRODUCTION / EN 1. INTRODUCTION Read the following information carefully before attempting to operate or service the meter. Environmental conditions: Altitude; 2000 meters max. Relatively humidity; 95% max. Operating temperature; 0 to 60°C Indoor use only. Complies with EMC Directive 89/336/EEC 10/15/10 Version No. -
Page 4: Specifications
SPECIFICATIONS / EN 2. SPECIFICATIONS Measurement range: Humidity; 10% to 95% RH Temperature: -20 to +60°C, -4 to +140°F Resolution: 0.1% RH, 0.1°C, 0.1°F Accuracy (after calibration): Humidity; 3%RH (at 25°C, 30 to 95% RH). 5%RH (at 25°C, 10 to 30% RH). Temperature;... - Page 5 SPECIFICATIONS / EN Operating temperature & humidity: 0 to 60°C, below 95% RH. Storage temperature & humidity: -10 to 60°C, below 70% RH. Power supply: Qty 1 x 9V Battery type 006P 9V, or IEC 6F22, or NEDA 1604. Battery life: Approximately 100 hours. Dimensions: 270x68x25mm Accessories: Instruction manual, Battery, Carry case, RS-232 to USB cable, Data download...
-
Page 6: Front Panel Layout
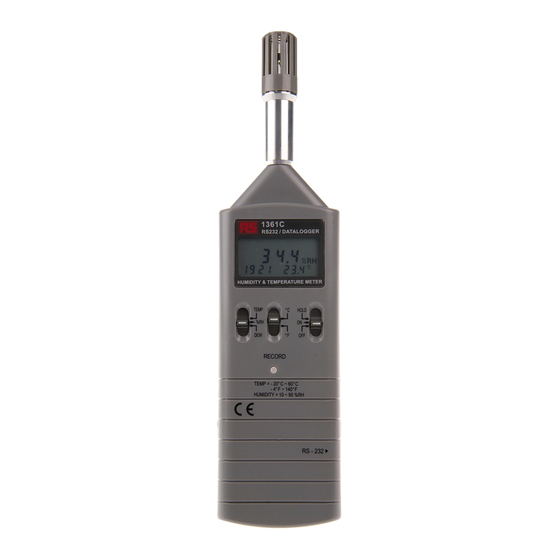
FRONT PANEL LAYOUT / EN 3. FRONT PANEL LAYOUT TEMP = - 20 C ~ 60 C ° ° - 4 F ~ 140 F ° ° HUMIDITY = 10 ~ 95 %RH RS - 232 OPEN EN-4 10/15/10 Version No. 00... - Page 7 FRONT PANEL LAYOUT / EN Humidity & Temp. sensor cap Display Power ON/OFF & HOLD function switch. Measurement units select switch. LCD main display and secondary display Data RECORD button RS-232 to USB socket (3.5mm jack) Battery cover 10/15/10 Version No. 00 EN-5...
-
Page 8: Lcd Display Layout
LCD DISPLAY LAYOUT / EN 4. LCD DISPLAY LAYOUT Minus Measuring value (main display) Time information Measured value (secondary display) Units “%RH” Unit “°C, °F” Memory full indicator Data recording indicator Hold function indicator Low-battery indicator EN-6 10/15/10 Version No. 00... -
Page 9: Operating Instructions
OPERATING INSTRUCTIONS / EN 5. OPERATING INSTRUCTIONS Push the power switch to the “ON” position. Set units to °C or °F as required. Change to main display or secondary display as required. The humidity and temperature values will be displayed. 10/15/10 Version No. -
Page 10: Data Recording And Erasing
DATA RECORDING AND ERASING / EN 6. DATA RECORDING AND ERASING To record one set of data: Press the “RECORD” button once. The “RECORD” will be displayed on the LCD screen for about 0.5 seconds. To record data continuously: Press and hold the “RECORD”... - Page 11 DATA RECORDING AND ERASING / EN To stop recording: Press the “RECORD” button again to stop recording Resetting the “Data-logger” To erase all logged data in memory, first turn the instrument off. Press and hold the “RECORD” button and then turn the power on. The LCD will show “CLr”...
-
Page 12: Exit Auto Power Off Function
EXIT AUTO POWER OFF FUNCTION / EN 7. EXIT AUTO POWER OFF FUNCTION Turn off the meter. Set “ TEMP / %RH / DEW ” switch to DEW position. Turn on the meter, then LCD shows “P OFF”. EN-10 10/15/10 Version No. 00... -
Page 13: Maintenance
MAINTENANCE / EN 8. MAINTENANCE Battery replacement: When the LCD display shows “ ”, the batteries have insufficient power to give accurate readings. Replace the battery with one new one as follows: Turn the instrument off and push the battery cover in the direction of the arrow to open.
Need help?
Do you have a question about the RS-1361C and is the answer not in the manual?
Questions and answers