
Related Manuals for METREL BetaPATPlus MI 3304


Summary of Contents for METREL BetaPATPlus MI 3304
- Page 1 BetaPATPlus MI 3304 OmegaPATPlus MI 3305 User Manual Ver. 2.1, Code no. 20 751 220...
- Page 2 Mark on your equipment certifies that this equipment meets the requirements of the EC (European Community) regulations concerning safety and electromagnetic compatibility. No part of this publication may be reproduced or utilized in any form or by any means without permission in writing from METREL.
-
Page 3: Table Of Contents
OmegaPATPlus / BetaPATPlus Table of contents General description....................6 Warnings ....................7 Warning markings on connector panel ............7 Standards applied ..................7 Instrument description...................8 Front panel ....................8 Meaning of symbols and messages on the instrument display ....9 Dual voltage operation (UK model only)...........14 Technical specifications ..................15 Earth bond resistance ................15 Insulation resistance.................15... - Page 4 OmegaPATPlus / BetaPATPlus Table of contents Polarity test ....................35 6.6.1 How to perform the measurement ............36 TRMS current measurement using clamp current adapter.......37 6.7.1 How to perform TRMS current measurement using clamp current adapter .........................37 RCD test....................38 6.8.1 RCD test on appliances................38 6.8.2 How to perform an RCD test ..............39 6.8.3...
- Page 5 OmegaPATPlus / BetaPATPlus Table of contents 9.1.2 Appliances submenu ................71 9.1.3 Test sites (UK model) / buildings (Aus/NZ model) submenu ....71 9.1.4 Locations (UK model) / rooms (Aus/NZ model) submenu ......72 Data upload / download................72 Setup menu....................73 9.3.1 Setting date and time ................73 9.3.2 Display contrast adjustment ..............74 9.3.3...
-
Page 6: General Description
METREL PATLink PRO PCSW package, best suited for periodic testing, fast testing with barcode identification systems, test data can be uploaded from PC, comparisons between old and new test results can be performed on site, enables printing of test labels on site. -
Page 7: Warnings
OmegaPATPlus / BetaPATPlus General description 1.1 Warnings In order to reach high level of operator safety while carrying out various measurements using OmegaPATPlus / BetaPATPlus instrument, as well as to keep the test equipment undamaged, it is necessary to consider the following general warnings: Read this user manual carefully, otherwise use of the instrument may be dangerous for the operator, for the instrument or for the equipment under test! -
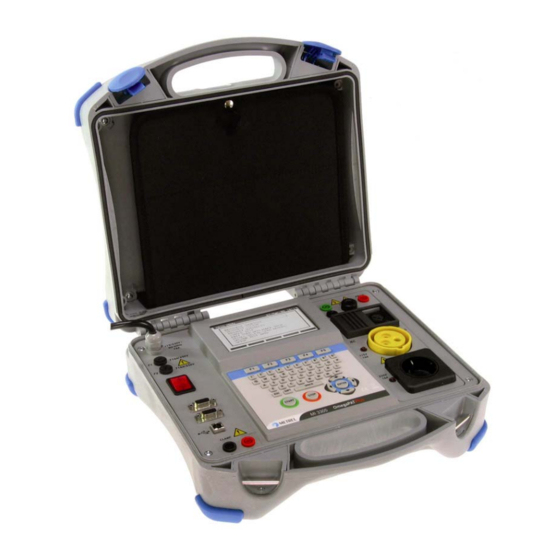
Page 8: Instrument Description
OmegaPATPlus / BetaPATPlus Instrument description 2 Instrument description 2.1 Front panel Front panel Legend: 1....Mains switch with indication lamp. 2....Two T16 A / 250 V fuses for instrument protection. 3....Mains supply cord. 4....240 × 128 dots graphic matrix display with backlight. 5....LN and PE sockets for testing the insulation resistance and substitute leakage current of fixed installed appliances. -
Page 9: Meaning Of Symbols And Messages On The Instrument Display
OmegaPATPlus / BetaPATPlus Instrument description 13....Alpha-numeric keyboard. 14....STOP key. 15....START key. 16....ESCAPE key. 17....Current clamp adapter input sockets. Warning! Do not connect any voltage source on this input. It is intended only for connection of current clamp with current output. Maximum input current is 30 mA! 18....Function keys. - Page 10 OmegaPATPlus / BetaPATPlus Instrument description L and N are crossed. The instrument works normally also in the case when L and N are interchanged. Check polarity of line and neutral Press START key to wires on test socket. continue. Improper supply voltage warning. Possible causes: Warning! no earth connection or other wiring problem on Mains voltage is not correct...
- Page 11 OmegaPATPlus / BetaPATPlus Instrument description An extremely low resistance of the appliance’ supply input was measured in the pre-test. It is likely that fuses will blow after applying power to the tested appliance. If the Resistance L – N too too high current is only of short duration (caused by a low.
- Page 12 OmegaPATPlus / BetaPATPlus Instrument description An exceptionally high leakage current (higher than about 5 Leakage test probe-PE mA) was measured through S test terminal during the pre- too high! test. DANGER! Voltage on test socket or LN/PE terminals is higher than 20 V (AC or DC) approximately! External voltage on test socket too high!
- Page 13 OmegaPATPlus / BetaPATPlus Instrument description Warning! More than 80 % of Instrument memory is almost full. Download stored results memory is occupated. to PC. Stored data should be downloaded to PC. Warning! Recalibration of the instrument is required. Contact your Calibration has been dealer.
-
Page 14: Dual Voltage Operation (Uk Model Only)
OmegaPATPlus / BetaPATPlus Instrument description Test failed. Some tests in the autotest sequence were skipped, but all performed tests passed. 2.3 Dual voltage operation (UK model only) The OmegaPATPlus / BetaPATPlus instrument will accept either a 115 V or 230 V, 50 or 60 Hz mains voltage input. -
Page 15: Technical Specifications
OmegaPATPlus / BetaPATPlus Technical specifications 3 Technical specifications 3.1 Earth bond resistance Earth bond resistance readout (10 A and 25 A) Range Resolution Accuracy 0.00 Ω ÷ 1.99 Ω 0.01 Ω ±(5 % of reading + 3 digits) 2.00 Ω ÷ 19.99 Ω 0.01 Ω... -
Page 16: Substitute Leakage Current
OmegaPATPlus / BetaPATPlus Technical specifications 3.3 Substitute leakage current Substitute leakage current readout Range Resolution Accuracy 0.00 mA ÷ 19.99 mA ±(5 % of reading + 5 digits) 0.01 mA Open circuit voltage .. < 50 V AC at mains voltage of 230 V AC Short circuit current... -
Page 17: Touch Leakage Current
OmegaPATPlus / BetaPATPlus Technical specifications 3.5 Touch leakage current Touch leakage current readout Range Resolution Accuracy 0.00 mA ÷ 3.99 mA ±(10 % of reading + 5 digits) 0.01 mA Pass levels ....0.25 mA, 0.50 mA, 1.00 mA, 3.50 mA Test duration..... -
Page 18: Trip-Out Time Of Portable Rcd
OmegaPATPlus / BetaPATPlus Technical specifications 3.8 Trip-out time of portable RCD Portable RCD trip-out time readout Range Resolution Accuracy 0 ms ÷ 1999 ms (½×I 1 ms ΔN ±3 ms 0 ms ÷ 300 ms (I 1 ms ΔN 0 ms ÷ 40 ms (5×I 1 ms ΔN Test currents (I... - Page 19 OmegaPATPlus / BetaPATPlus Technical specifications Degree of protection ......IP 50 (closed and locked cover) Case ..........shock proof plastic / portable Display..........240*128 dots graphic matrix display with backlight Dimensions (w×h×d)......33.5 cm × 16.0 cm × 33.5 cm Weight (with standard accessories) ...MI 3305 OmegaPAT Plus: 8.95 kg MI 3304 BetaPAT Plus: 7.85 kg Memory..........6500 memory locations RS232 interfaces ......
-
Page 20: Main Menu And Test Modes
OmegaPATPlus / BetaPATPlus Main menu and test modes 4 Main menu and test modes The OmegaPATPlus / BetaPATPlus instrument has a user-friendly manipulation. By pressing only a few keys most of the actions can be done. The menu tree of the instrument has been designed to be simple to understand and easy to operate. -
Page 21: Main Menu
OmegaPATPlus / BetaPATPlus Main menu and test modes 4.2 Main menu From the Main menu all the instrument functions can be selected. Main menu Select the function you want to perform by using cursor keys and press ENTER key to confirm. To return to the Main menu press the ESC key. Note: The ESC key has need to be pressed more than once to return to Main menu from any submenu or selected function. -
Page 22: Project Autotests Menu
OmegaPATPlus / BetaPATPlus Main menu and test modes Autotest custom menu See chapter 7 Autotest sequences for detailed description about this test mode. 4.5 Project autotests menu The Project autotest is a tool that simplifies and speeds up repeated (periodic) testing of appliances. -
Page 23: User / Appliance Data Menu
OmegaPATPlus / BetaPATPlus Main menu and test modes 4.7 User / appliance data menu In this menu lists of user and appliance data default names can be edited. An alternative is to upload the lists from PC. Aus/ NZ model UK model Users / appliance data main menu See chapter 9.1 User / appliance data menu for detailed description about this... -
Page 24: Setup Menu
OmegaPATPlus / BetaPATPlus Main menu and test modes Upload of test data menu See chapter 9.2 Data upload / download for detailed description about uploading/downloading data from PC. 4.10 Setup menu In this menu general instrument parameters can be set. Setup menu See chapter 9.3 Setup menu for detailed description. -
Page 25: Single Test Mode
OmegaPATPlus / BetaPATPlus Single test mode 5 Single test mode In single test mode, individual tests can be performed. This is especially helpful when the test engineer suspects that one or more faults are present in the appliance under test. Note: Test results cannot be saved in this mode! 5.1 How to perform measurements in single test mode... -
Page 26: Measurements
OmegaPATPlus / BetaPATPlus Measurements 6 Measurements 6.1 Earth bond resistance This test ensures that the connections between the protective conductor terminal in the mains plug of the appliance and any accessible conductive parts of the appliance (metal housing) are satisfactory and of sufficiently low resistance. This test has to be performed on Class 1 (earthed) appliances. -
Page 27: Insulation Resistance
OmegaPATPlus / BetaPATPlus Measurements To edit parameters, press the F1 function key first. Use cursor keys to select the parameter you want to edit. By using cursor keys adjust the selected parameter. Press F1 function key again to confirm settings. Once the settings have been set, press the START key to perform measurement. -
Page 28: Insulation Resistance On Class Ii Appliances
OmegaPATPlus / BetaPATPlus Measurements Measurement of insulation resistance of fixed installed appliances of Class I 6.2.2 Insulation resistance on class II appliances The instrument measures the insulation resistance between: (L+N) of the relevant test socket and S test terminals, LN and S test sockets. Measurement of insulation resistance of class II appliance Measurement of insulation resistance of accessible isolated conductive parts of fixed installed appliances... -
Page 29: How To Perform Single Insulation Resistance Measurement
OmegaPATPlus / BetaPATPlus Measurements 6.2.3 How to perform single insulation resistance measurement From the Main menu, select Single test and then select Insulation by using cursor keys and press ENTER key to confirm. Insulation menu is displayed. Insulation menu Measurement parameters are detailed in the top right corner of the display. The following parameters can be adjusted in this measurement: nominal test voltage, low limit resistance value,... -
Page 30: Substitute Leakage Current
OmegaPATPlus / BetaPATPlus Measurements Do not disconnect the appliance under test from the instrument during the measurement or before it is automatically discharged! 6.3 Substitute leakage current Leakage currents between live conductors and isolated accessible metal parts (housing, screws, handles etc.) are checked with this test. Capacitive leakage paths are included in the result too. -
Page 31: How To Perform Single Substitute Leakage Current Measurement
OmegaPATPlus / BetaPATPlus Measurements Measurement of substitute leakage current of class II appliance Measurement of substitute leakage of accessible isolated conductive parts of fixed installed appliances 6.3.3 How to perform single substitute leakage current measurement From the Main menu, select Single test and then select Sub leakage by using cursor keys and press ENTER key to confirm. -
Page 32: Leakage Current And Power
OmegaPATPlus / BetaPATPlus Measurements To edit parameters, press the F1 function key first. Use cursor keys to select the parameter you want to edit. By using cursor keys adjust the selected parameter. Press F1 function key again to confirm the selected settings. Press the START key to perform measurement. -
Page 33: How To Perform Single Leakage Current Measurement
OmegaPATPlus / BetaPATPlus Measurements 6.4.1 How to perform single leakage current measurement From the Main menu, select Single test and then select Leakage by using cursor keys and press ENTER key to confirm. Leakage menu is displayed. Leakage menu Measurement parameters are detailed in the upper right corner of the display. The following parameters can be adjusted for this measurement: high limit leakage value, measurement duration. -
Page 34: Touch Leakage Current
OmegaPATPlus / BetaPATPlus Measurements 6.5 Touch leakage current This test determines the current that would flow if a person touches the appliance. Measurement is based on a human body model with resistance of 2 kΩ. Both AC and DC components of touch leakage current are detected. The instrument measures the leakage current flowing through the S probe into earth. -
Page 35: Polarity Test
OmegaPATPlus / BetaPATPlus Measurements Measurement parameters are detailed in the top right corner of the display. The following parameters can be adjusted in this measurement: high limit leakage value, measurement duration. To edit parameters press F1 function key first. Use cursor keys to select the parameter you want to edit. -
Page 36: How To Perform The Measurement
OmegaPATPlus / BetaPATPlus Measurements Polarity test of IEC cord 6.6.1 How to perform the measurement From the Main menu, select Single test and then select Polarity test by using cursor keys and press ENTER key to confirm. Polarity test menu is displayed. Polarity test menu Connect the lead between the IEC port of the PAT tester and the mains test socket. -
Page 37: Trms Current Measurement Using Clamp Current Adapter
OmegaPATPlus / BetaPATPlus Measurements 6.7 TRMS current measurement using clamp current adapter This function enables the measurement of AC currents in a wide range from 1 mA up to 25 A. Typical applications are: measuring leakage currents through PE conductor in permanently installed appliances, measuring load currents through L or N conductor in permanently installed appliances,... -
Page 38: Rcd Test
Use test clamp supplied by METREL or other with similar characteristics (current output, ratio 1000:1, appropriate measurement range; consider error of test clamp when evaluating measured results)! 6.8 RCD test... -
Page 39: How To Perform An Rcd Test
OmegaPATPlus / BetaPATPlus Measurements Testing of portable RCD First connect portable RCD unit into the test socket. Then connect PRCD test probe to the portable RCD unit and the other end of PRCD probe to the PRCD socket of the instrument. -
Page 40: How To Perform Rcd Single Test
OmegaPATPlus / BetaPATPlus Measurements Test current size (multiplier) The RCD functional standards define maximal allowed trip out times (see chapter 3.8 Technical specifications) at current values I and 5×I . At ½×I the RCD must not ΔN ΔN ΔN trip out. Starting polarity The RCD test must be performed at two different residual current starting polarities (0º... -
Page 41: How To Perform Rcd Auto Test
OmegaPATPlus / BetaPATPlus Measurements properly between the PRCD socket of the instrument and the mains connections of the RCD (as illustrated in chapter 6.8.1 RCD test on appliance). The conditions for performing the test are fulfilled when the displayed voltage indication shows that a voltage is applied. - Page 42 OmegaPATPlus / BetaPATPlus Measurements Step 1 Instrument displays the message »Press START key for new test.«. After setting the parameters, press the START key to apply a voltage to the main test socket. Step 2 The instrument displays the message »RCD ON and press START key to proceed.«.
- Page 43 OmegaPATPlus / BetaPATPlus Measurements RCD auto test result example (5×I ΔN After resetting the RCD, the autotest sequence automatically proceeds with the next step. Step 5 Trip-out time measurement with the following measurement parameters: test current of ½×I ΔN test current started with the positive half-wave (from 0 Measurement does NOT normally trip an RCD.
-
Page 44: Flash Test (Mi 3305 - Omegapatplus Only)
OmegaPATPlus / BetaPATPlus Measurements 6.9 Flash test (MI 3305 – OmegaPATPlus only) The purpose of this test is to ensure that the insulation material of the appliance can withstand high voltage transients and short overvoltages. 6.9.1 Flash test on class I appliances For Class I appliances, a test voltage of 1.5 kV is applied between main test socket (L+N) and PE test terminals. - Page 45 OmegaPATPlus / BetaPATPlus Measurements Flash test menu The measurement parameters are detailed in the top right corner of the display. The following parameters can be adjusted in this measurement: output voltage value, current limit value, measurement duration. To edit parameters, press F1 function key first. Use cursor keys to select the parameter you want to edit.
-
Page 46: Autotest Sequences
All limits and tests are in compliance with currently valid standards and regulations. In case of any changes, new firmware will be available at your distributor or from Metrel directly. The Autotest shortcut sequences depend on the OmegaPATPlus / BetaPATPlus model. -
Page 47: How To View Autotest Shortcut Sequence Measurement Parameters
OmegaPATPlus / BetaPATPlus Autotest sequences Connecting barcode reader to the BetaPAT instrument The code read from the barcode label is accepted when two short beeps are emitted. All test parameters and limits can simply be viewed on the display. For more information refer to chapter 7.1.2 How to view autotest shortcut sequence measurement parameters. -
Page 48: How To Start Autotest Shortcut Sequence
OmegaPATPlus / BetaPATPlus Autotest sequences Visual test and polarity test can only be enabled or disabled. If enable mode is selected, visual test/polarity test can be performed. Press ESC key to return to the Autotest shortcut menu. 7.1.3 How to start autotest shortcut sequence An autotest can be started from the Autotest shortcut menu by following a simple procedure: In Autotest shortcut menu, select the test sequence to be executed (see 7.1.1... - Page 49 OmegaPATPlus / BetaPATPlus Autotest sequences Aus/NZ model UK model Autotest custom view menu Depending on the measurement the following measurement parameters can be set here: measurement mode, output test voltage or current (except in visual test and TRMS current measurement), pass level (except in visual test), measurement duration (except in visual test).
-
Page 50: How To Save The Autotest Custom Sequence
OmegaPATPlus / BetaPATPlus Autotest sequences 7.2.2 How to save the autotest custom sequence In the Autotest save menu, the following actions can be taken: an existing autotest sequence can be saved or renamed, a new autotest sequence can be added to the list. In Autotest custom view menu press F2 function key to save or rename the edited autotest sequence or press F3 function key to add a new autotest sequence to the list. -
Page 51: Project Autotests
OmegaPATPlus / BetaPATPlus Autotest sequences 7.3 Project autotests The Project autotests is a unique tool that dramatically simplifies and speeds up repeated (periodic) testing of appliances. The main idea is to re-use known stored data (either in instrument or on a PC) of the tested appliance. - Page 52 OmegaPATPlus / BetaPATPlus Autotest sequences Aus / NZ model UK model Project autotests main menu When searching for stored autotest results the following filters can be used to narrow the hits: UK model Aus / NZ model appliance number, appliance number, test site, building location...
-
Page 53: How To Start A Project Autotest
OmegaPATPlus / BetaPATPlus Autotest sequences While recalling stored results, the instrument shows a bargraph and a ratio of files found compared to files stored in memory (e.g. 7/11 implies 7 results have been found to meet the filter criteria out of a potential 11 results stored in the flash memory). By using cursor keys, the F1 and F2 function keys or barcode reader, select the appliance that should be retested. -
Page 54: Compare Of Results (Evaluation Of Result Trends)
OmegaPATPlus / BetaPATPlus Autotest sequences 7.3.3 Compare of results (evaluation of result trends) If an autotest sequence was performed from the Project autotests menu, an additional option TREND is offered in the View result menu after the autotest is finished. View Project autotest results menu In the Save results window, press the F4 (VIEW) key the results to enter the view results window. -
Page 55: Performing Autotest Sequences
OmegaPATPlus / BetaPATPlus Autotest sequences 7.4 Performing autotest sequences 7.4.1 Visual inspection During a visual inspection of an appliance damage to the following items should be identified: appliance plug, appliance mains fuse, appliance mains lead. Visual test menu In case that any damage on the appliance is identified, press F3 key (FAIL) in order to identify the visual test as failed. -
Page 56: Insulation Resistance Measurement
OmegaPATPlus / BetaPATPlus Autotest sequences 7.4.3 Insulation resistance measurement Notes: For class II appliances the test probe should be used (see chapter 6.2.2 Insulation resistance on class II appliances)! Consider the displayed warnings before starting measurement! If the insulation resistance measurement and all previous tests passes (except visual test), the instrument will automatically proceed onto the next test (in single measurement mode only). -
Page 57: Leakage Current And Apparent Power Measurement
OmegaPATPlus / BetaPATPlus Autotest sequences 7.4.5 Leakage current and apparent power measurement Notes: If any of the earth bond resistance tests, insulation resistance tests, or substitute leakage current tests fail in autotest sequence, the leakage current measurement will be prohibited from operating! Consider the displayed warnings before starting or proceeding with measurements! The autotest sequence stops when the leakage current measurement is performed and... -
Page 58: Polarity Test
OmegaPATPlus / BetaPATPlus Autotest sequences 7.4.7 Polarity test Note: This test is only for use on IEC cables and extension cables. When testing extension cables, a route back to the IEC port of the instrument must be made otherwise the test will fail. Consider the warnings on the display before starting measurement! The autotest sequence stops after the polarity test. - Page 59 OmegaPATPlus / BetaPATPlus Autotest sequences The autotest sequence stops after the RCD test. The following actions can be taken to continue or complete the autotest sequence: START...... Start the RCD test. Proceed to the next autotest sequence measurement. F2 function key...View help screens. F3 function key ..
-
Page 60: Working With Autotest Results
OmegaPATPlus / BetaPATPlus Working with autotest results 8 Working with autotest results After the autotest sequence is completed, measurement results can be: viewed, saved to the flash memory of the instrument, send to PC, test report can be printed out to serial printer, appliance label can be printed out. -
Page 61: Recalling Results
OmegaPATPlus / BetaPATPlus Working with autotest results By using F2 function key in the actual parameter line, parameter value can be reset to last accepted value. The new parameter value is accepted when the cursor is set to another parameter line. When 2 tag manipulation is enabled in the Setup menu, the 2 appliance number... - Page 62 OmegaPATPlus / BetaPATPlus Working with autotest results Aus / NZ model UK model Search results menu When searching for stored results the following filters can be used to narrow the hits: UK model Aus/ NZ model appliance number, appliance number, test site, building, location,...
-
Page 63: Deleting Results
OmegaPATPlus / BetaPATPlus Working with autotest results While recalling stored results, instrument shows a bargraph and a ratio of files found compared to files stored in memory (e.g. 17/89 implies 17 results have been found to meet the filter citeria out of a potential 89 results stored in the flash memory). Once the appliances have been found, the cursor keys and F1 and F2 function keys can be used to scrool through the list of appliances. -
Page 64: Downloading And Printing Results
OmegaPATPlus / BetaPATPlus Working with autotest results Delete results menu In this menu the following functions can be performed. DELETE: deletes the single file last highlited when the F5 function key was pressed, DELETE SELECTED: deletes all the files found from searching the memory of the instrument, DELETE ALL: clears all stored test data from the instrument. - Page 65 Use the F1 and F2 function keys to set the settings for selected activity, then press ENTER key to start selected activity. Refer to chapters 8.4.2 Settings for generic serial printer, 8.4.3 Settings for label printers and 9.3.6 Instrument settings for more information............. METREL METREL Testing laboratory Testing laboratory Horjul, Slovenia Horjul, Slovenia ......
-
Page 66: Communication Ports Settings For Communication With Pc
OmegaPATPlus / BetaPATPlus Working with autotest results 1 tag, barcode system: double 1 tag, barcode system: single 2 tags, barcode system: double 2 tags, barcode system: single Examples of appliance labels for Aus/NZ model Note: When working with serial printers, baud rate is set by default to 9600 bps. Printing appliance labels using label printers is password protected (Aus/NZ model). -
Page 67: Settings For Generic Serial Printer
OmegaPATPlus / BetaPATPlus Working with autotest results Communication ports settings By using the cursor keys, select communication port / baud rate you want to use for communication between instrument and PC. Once the communication port / baud rate have been selected, press ENTER key to confirm. The instrument returns to the Send results menu with new settings accepted. -
Page 68: Settings For Label Printer
OmegaPATPlus / BetaPATPlus Working with autotest results By using the cursor keys select communication port / printer protocol supported by used serial printer. Once the communication port / printer data transfer protocol is selected, press the F1 function key or ENTER key to confirm. The instrument will return to Send results menu with new settings accepted. - Page 69 OmegaPATPlus / BetaPATPlus Working with autotest results By using ESC key in Label printer menu, the instrument will return to Send results menu without any changes. UK model Press F4 function key in Send results menu to print one label. Press F5 function key in Send results menu to print two the same labels.
-
Page 70: Other Instrument Operations
OmegaPATPlus / BetaPATPlus Other instrument operations 9 Other instrument operations 9.1 User / appliance data menu In the User / appliance data menu, user selection and list information can be edited. In the Main menu, select User / appliance data cursor keys and pressing ENTER key to confirm. -
Page 71: Appliances Submenu
OmegaPATPlus / BetaPATPlus Other instrument operations 9.1.2 Appliances submenu In this menu, default lists of appliance names (up to 100) can be edited. An alternative is to upload the names from PC software. For more information refer to chapter 9.2 Data upload / download. Select Appliances in User / appliance data menu by cursor keys and press ENTER key to confirm. -
Page 72: Locations (Uk Model) / Rooms (Aus/Nz Model) Submenu
OmegaPATPlus / BetaPATPlus Other instrument operations How to rename a test site / building name To rename a selected test site / building name press F1 function key. Enter the new name and press F1 function key again to confirm or press ESC key to return to Test sites / Buildings menu without saving. -
Page 73: Setup Menu
OmegaPATPlus / BetaPATPlus Other instrument operations Downloading / uploading test data menu During the data transfer from the PC to the instrument, the transfer status will be displayed. Pressing ESC key instrument returns to Main menu. For detailed information on data uploading / downloading refer to help menus of PC software PATLink PRO. -
Page 74: Display Contrast Adjustment
OmegaPATPlus / BetaPATPlus Other instrument operations By using keys the date or time field can be selected. To set date and/or time cursor keys to change the date and time. Press the F1 function key to accept the new settings or press ESC key to return to Setup menu without saving. Notes: Date is attached to the saved autotest results! Date format is DD-MM-YYYY (day–month–year). -
Page 75: Language Selection
OmegaPATPlus / BetaPATPlus Other instrument operations 9.3.4 Language selection Select Language in Setup menu by using cursor keys and press ENTER key. The following menu is displayed: Language menu By using cursor keys select language you want to use. Press ENTER key to accept the new language or press ESC key to return to Setup menu without any change. - Page 76 OmegaPATPlus / BetaPATPlus Other instrument operations From the Main menu, select Setup and then select Instrument settings by using cursor keys and press ENTER key to confirm. The Instrument settings submenu will be displayed. Aus/ NZ model UK model Instrument settings menu The following data can be controlled between tests: UK model Aus/ NZ model...
-
Page 77: Password
OmegaPATPlus / BetaPATPlus Other instrument operations Special label printer (Printek MtP300 / MtP400, Intermec EasyCoder C4) is also supported by the instrument. When printing barcodes to the special printer, two different options can be set in Barcode systems submenu. If single option is selected, only appliance name is printed out as a barcode on appliance barcode label. -
Page 78: Communication Settings
OmegaPATPlus / BetaPATPlus Other instrument operations If the instrument is already password protected, then the instrument will request the old password before entering the new one twice, once to confirm. To disable the password protection, instead of entering a new password just press the ENTER key when asked for a new password and confirmation and the password will be disabled. -
Page 79: Reset Instrument Settings
OmegaPATPlus / BetaPATPlus Other instrument operations By using ESC key in the Communication port or Baud rate submenu, the instrument will return to Communication menu without any changes. Note: Only one port can be active at one time. 9.3.9 Reset instrument settings In this menu the following parameters can be set to their initial values: all measurement parameters in single test mode, user defined tests are cleared,... -
Page 80: Maintenance
OmegaPATPlus / BetaPATPlus Maintenance 10 Maintenance 10.1 Periodic calibration It is essential that all measuring instruments are regularly calibrated in order for the technical specification listed in this manual to be guaranteed. We recommend an annual calibration. The calibration should be done by an authorized technical person only. 10.2 Fuses There are two fuses available from front panel: F1 = F2 = T 16 A / 250 V (32 ×... -
Page 81: Instrument Set And Accessories
OmegaPATPlus / BetaPATPlus Instrument set and accessories 11 Instrument set and accessories Standard set of the instrument Instrument MI 3305 – OmegaPATPlus / MI 3304 – BetaPATPlus Additional bag for accessories inside carrying case Test probe (earth bond clip) Flash test probe (MI 3305 only) PRCD test probe Test lead (1.5 m, green) Test lead (1.5 m, black) - Page 82 OmegaPATPlus / BetaPATPlus Autotest shortcut parameters A Autotest shortcut parameters APPLIANCE TYPE portable or handheld appliances, heating and cooking appliances, IT (information technology) equipment (EN60950), extension leads, 3-phase (Aus / NZ model only), multibox (Aus / NZ model only), mineral insulated heating elements (Aus / NZ model only), RCD protected appliances (Aus / NZ model only).
- Page 83 OmegaPATPlus / BetaPATPlus Autotest shortcut parameters FUSE: 3 A (750 VA), 6 A (1.5 kVA), 10 A (2.5 kVA), 13 A (3.2 kVA), unknown SUPPLY CORD: short, middle (or low c.s.a.), long Nominal Appliance Earth bond Appliance Cord Power conuctor supply cord limit fuse...
- Page 84 OmegaPATPlus / BetaPATPlus Autotest shortcut codes B Autotest shortcut codes (Aus / NZ model) Code Visual Portable or handheld Code Class Visual Earth bond (1 test) Eart bond (2 test) Insulation Substitute Leakage Touch Polarity TRMS current leakage leakage test (current clamp adapter) Test Pass...
- Page 85 OmegaPATPlus / BetaPATPlus Autotest shortcut codes Heating and Cooking Code Class Visual Earth bond (1 test) Eart bond (2 test) Insulation Substitute Leakage Touch Polarity TRMS current leakage leakage test (current clamp adapter) Test Pass Test Test Pass Test current limit duration voltage...
- Page 86 OmegaPATPlus / BetaPATPlus Autotest shortcut codes IEC leads / Extension leads Code Class Visual Earth bond (1 test) Earth bond (2 test) Insulation Substitute Leakage Touch Polarity TRMS current Continuous mode leakage leakage test (current clamp adapter) Test Pass Test Pass Test current...
- Page 87 OmegaPATPlus / BetaPATPlus Autotest shortcut codes RCD protected appliances Code Class Visual Earth bond (1 test) Earth bond (2 test) Insulation Substitute Leakage Touch Polarity TRMS current (current Portable RCD test Continuous mode Continuous mode leakage leakage test clamp adapter) Test Pass Test...
- Page 88 OmegaPATPlus / BetaPATPlus Autotest shortcut codes C Autotest shortcut codes (UK model) Type Class Fuse Cord Earth Bond Insulation S. Leakage Leakage T. Leakage Code Limit Limit Limit Limit Limit Portable or Handheld short 0.10 Ω 10 A 1.00 MΩ 500 V 0.75 mA short 0.10 Ω...
- Page 89 OmegaPATPlus / BetaPATPlus Autotest shortcut codes Type Class Fuse Cord Earth Bond Insulation S. Leakage Leakage T. Leakage Code Limit Limit Limit Limit Limit IT equipment EN 60950 short 0.10 Ω 100 1.00 MΩ 500 V 3.5 mA midd 0.30 Ω 100 1.00 MΩ...
- Page 90 OmegaPATPlus / BetaPATPlus Autotest shortcut codes 15 m 0.70 Ω 10 A 1.00 MΩ 500 V 20 m 0.80 Ω 10 A 1.00 MΩ 500 V 30 m 1.00 Ω 10 A 1.00 MΩ 500 V 40 m 2.00 Ω 10 A 1.00 MΩ...
- Page 91 OmegaPATPlus / BetaPATPlus Autotest shortcut codes...
- Page 92 OmegaPATPlus / BetaPATPlus Autotest shortcut codes...
Need help?
Do you have a question about the BetaPATPlus MI 3304 and is the answer not in the manual?
Questions and answers