Table of Contents
Advertisement
Quick Links
Advertisement
Table of Contents

Related Manuals for TSI Instruments questemp 48n


Summary of Contents for TSI Instruments questemp 48n
-
Page 3: Table Of Contents
Contents Contents List of Figures Contents Contents ..............iii Powering ..............21 List of Figures ............iv 9-Volt Alkaline Battery Replacement ....21 List of Tables ............iv Approved 9-Volt Batteries ........21 Introduction ..............1 Appendix A: Specifications ........22 Measurements ............ - Page 4 Contents List of Figures List of Figures 1-1: QUESTempº 48N..........1 1-21: Index for ACGIH ..........13 1-2: Keypad keys identified ......... 3 1-22: Navy PHELs screen ........13 1-3: Start-up screens (A – indicates model and 1-23: Flag Conditions Navy/Marine Corp. Ashore ..14 type B- indicates revision and battery power) ..
-
Page 5: Introduction
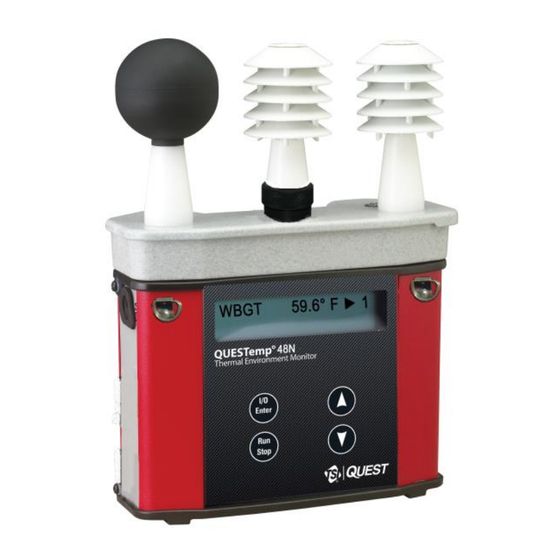
Introduction Introduction List of Tables Introduction The QUESTempº 48N offers traditional heat stress monitoring without the aggravation of maintaining a wet bulb. Through collaboration with Professor Dr. Thomas Bernard, from the College of Public Health at the University of South Florida, mathematical models were implemented to create a Waterless Wet Bulb calculation through a combination of dry bulb temperature, globe temperature, relative humidity, and air flow. -
Page 6: Getting Started
Getting Started Getting Started Up and Running Overview Getting Started Up and Running Overview 1. Place the QUESTemp 48N in the work area in a safe location approximately 3.5 feet º off the ground. 2. Turn the unit On. If the battery voltage displayed during the power-on sequence is less than or equal to 6.4 volts, replace or recharge the batteries. -
Page 7: Keypad Operation
Getting Started Keypad Operation Keypad Operation The unit operates using a keypad with four keys. The I/O Enter key responds when the key is released while all other keys respond when the key is pressed. Keys Explanation I/O Enter key The unit turns on with a single key press. -
Page 8: Turning On, Logging/Capture An Event, And Turning Off
Getting Started Turning on, Logging/Capture an Event, and Turning Off Turning on, Logging/Capture an Event, and Turning Off To quickly get you started with the QUESTemp 48N, the following section explains turning on º the instrument, data logging/event logging, and stopping. Press the I/O Enter key to turn on. - Page 9 Getting Started Turning on, Logging/Capture an Event, and Turning Off The main menu (navigational screen) will appear after the start-up screens. Press I/O Enter key. (This will open to the measurement screens.) Indicator arrow VIEW PRINT Indicates the selected menu option. Either press up/down arrows to select a new menu or press I/O SETUP RESET...
-
Page 10: Sensors
Sensors Sensors Globe Thermometer To power off, press and hold the I/O Enter key from the main menu. Sensors Globe Thermometer The globe thermometer (left position) gives an indication of the radiant heat exposure on an individual due to either direct sunlight or hot objects in the environment. This is accomplished by placing a temperature sensor inside a blackened copper sphere and measuring the temperature rise. -
Page 11: Measurements
Measurements Measurements WetBulb Globe Temperature (WBGT) Measurements The QUESTemp 48N data logging, with an event logging mode, heat stress monitor directly senses three parameters: dry bulb temperature (DB), globe temperature (G), and relative humidity (RH). It computes the Wet Bulb (WB), the Wet Bulb Globe Temperature (WBGT), and the Stay Times Indices for ACGIH, U.S. -
Page 12: Operating Questempº 48N
Operation Operating QUESTempº 48N View Operating QUESTempº 48N From a powered on mode, the main menu will VIEW PRINT appear (after the start-up screens are SETUP RESET displayed.) Use the Up Arrow and Down Arrow keys to move the marker in the display Figure 1-9: Main menu example in front of the desired mode. -
Page 13: Setup
Operating QUESTempº 48N Setup Setup The setup options are from the main menu when Setup is selected. At any time, to exit (or escape) a screen, press the Run/Stop key. Table 1-2 identifies the setup parameters. Settings Explanation Selectable: ºF/ºC Temperature units ... -
Page 14: Print
Operating QUESTempº 48N Print For the Language setting, once selected, press I/O Enter key. To select a language, press Up/Down Arrow keys. Once selected, press Run/Stop key to return to setup parameters. For the Log Rate, once selected, press I/O Enter key. Repeatedly press I/O Enter keys to select either the Log Rate Event or a Log Rate ... -
Page 15: Run
Operating QUESTempº 48N For Data Logging setup, the run mode begins a session in memory and logs the data. For Event Logging, each run/stop is stored as an event and a numeric counter displays the number of saved events. Begin a session by pressing the Run/Stop key from the view mode (or measurement view). -
Page 16: Displayed Items
Displayed Displayed Items Items Displayed Items For the QUESTemp 48N Heat Stress Monitor, the number in the upper right corner indicates the saved session or the saved event log. “1”indicates the sensor bar placed on (or attached to) the top of the instrument. Sensors ... -
Page 17: Stay Time/Index
Displayed Items Stay Time/Index Screen 5: BAT (Battery voltage) 09:04:13 05 MEM (Logging memory DATE 10.4 dy available in days) Figure 1-19: Battery & memory screen PHEL_5 3:10 05 Screen 6: Index (Navy PHEL stay times) PHEL_6 8:03 Figure 1-20: Navy PHEL stay times... -
Page 18: Data Logging
Data Logging Data Logging Stay Time/Index If Flag is selected, the Flag Conditions for Navy/Marines Corp. Ashore warning system screen will appear. There are five flag systems, no flag, yellow, green, red, and black, which provide heat exposure guidelines for acclimated individuals. (For more information, refer to the “Flag Conditions US Navy/Marine Corp. -
Page 19: Electronic Sensor Check
Electronic Electronic Sensor Check Sensor Check Performing an Electronic Sensor Check Electronic Sensor Check A verification module, TSI model 053-923, may be used to check the operation of the QUESTemp monitor’s wet bulb, dry bulb, and globe. The purpose is to verify that the electronic components are within a specific range with known values and a known source. -
Page 20: Sensor Alignment
Sensor Sensor Alignment Alignment RH Sensor Alignment Sensor Alignment For highly accurate measurement readings, you should align your QUESTempº 48N prior to data logging or event logging/recording. For the RH sensor, it is recommended to align with a High concentration level using the 75% sensor salt, NaCl (sodium chloride), or a Low concentration level using the, the 33% sensor salt, MgCl (magnesium chloride). - Page 21 Sensor Alignment RH Sensor Alignment Place a latex finger cot (user supplied) over the humidity sensor in order for the sensor to stabilize quicker about 15 minutes (or up to 60 minutes without). NOTE: Latex finger cots can be found at various hardware stores or online such as colepalmer.com.
- Page 22 Sensor Alignment RH Sensor Alignment In either the High/Low RH alignment screen, adjust the level to the percentage displayed on the salt container by using the Up/Down Arrow keys. Press I/O Enter key to save. (The instrument will state either “Successful” or “Failure” if it passed/did not pass. For “Failure” repeat the steps above.) Example of high RH percentage prior to Press Enter to save the alignment.
-
Page 23: Printing
Printing Printing Data/Communications Printing Printing options include to a RS-232 port or to a parallel printer. Serial transmission requires TSI cable #54-715. Parallel transmission requires TSI cable #56-875. With the applicable cable plugged in, select PRINT from the menu and press the I/O Enter key to enter the PRINT mode. -
Page 24: Parallel
Printing Parallel Parallel Data can be sent directly to parallel printers that accept direct ASCII test input without special drivers. Make sure the printer is powered on and is online, ready to accept data, prior to printing. TSI QUEST TECHNOLOGIES EVENT: 1 Page 2 Page 1... -
Page 25: Powering
Powering 9-Volt Alkaline Battery Replacement Powering The QUESTemp 48N Heat Stress Monitor uses a 9-volt º alkaline battery. A door on the back of the instrument allows the user access to the 9-volt battery. The 2-position switch located in the battery compartment is set by the user to the 9-volt battery. -
Page 26: Appendix A: Specifications
Appendix A: Appendix A: Specifications Specifications Measurements Appendix A: Specifications Measurements Globe Temperature, Dry Bulb Temperature, Wet Bulb Temperature, % Relative Humidity, and WBGT Index Temperatures given in Celsius or Fahrenheit Index (displayed stay time with selected index): ACGIH TLV, U.S. Navy PHEL Charts, Flag Conditions for U.S. -
Page 27: Size
Appendix A: Specifications Size Size Height 9.2 in. (23.5 cm); Width 7.2 in. (18.3 mm); Depth 3.0 in. (7.5 mm) Dimensions include mounted sensor assembly Weight 2.6 lbs. (1.2 kg) with mounted sensor assembly Remote Sensor Bar ... -
Page 28: Questemp° 48N Block Model
Appendix A: QUESTemp 48N Block Model Block Model Battery Life QUESTemp° 48N Block Model Sensors Gain Multiplexer 1, 2, & 3 Battery Power Controller Keypad Microprocessor RS232 Printer Data Memory Program Memory... -
Page 29: Appendix B: Heat Exposure Tables
Appendix B: Heat Exposure Appendix B ACGIH Tables Appendix B: Heat Exposure Tables ACGIH Screening Criteria for Heat Stress Exposure. WBGT values in C. NOTE: According to the ACGIH’s guidelines, the temperature values represent a work and rest process which is explained in the standards. Refer to the ACGIH TLVs and BEIs for specific details. -
Page 30: Acgih Clothing Corrections
Appendix B ACGIH Clothing Corrections ACGIH Clothing Corrections The following clothing corrections are in degrees Celsius. When a clothing correction is entered into the setup portion of the QUESTemp 48N Heat Stress Monitor, the value is added to the WBGT only for looking up the stay times. The WBGT value displayed by the unit does not reflect corrections. - Page 31 Appendix B United States Navy WBGT(F) 90.0 5:40 5:00 4:10 3:25 2:40 1:50 91.0 5:15 4:35 3:50 3:10 2:25 1:40 92.0 4:50 4:10 3:30 2:55 2:15 1:30 93.0 4:25 3:50 3:15 2:40 2:00 1:25 94.0 4:05 3:35 3:00 2:25 1:50 1:15 95.0 3:45...
-
Page 32: Flag Conditions For U.s. Navy/Marine Corp. Ashore
Appendix B Flag Conditions for U.S. Navy/Marine Corp. Ashore WBGT(F) 122.0 0:30 0:25 0:20 0:15 0:15 0:10 123.0 0:30 0:25 0:20 0:15 0:10 0:10 124.0 0:25 0:25 0:20 0:15 0:10 0:05 Flag Conditions for U.S. Navy/Marine Corp. Ashore The following chart details the heat stress monitoring Flag Conditions for U.S. Navy/Marine Corp. -
Page 33: Appendix C: Accessories (Sold Separately)
Appendix C: Appendix C: Accessories (sold separately) Accessories Appendix C: Accessories (sold separately) Replacement Relative humidity sensor (one included) ..........057-317 Sensor array with 2-inch Globe and removable RH sensor (one included) ....057-909 Sensor alignment salt at 75% [ NaCl (sodium chloride)] (one included) ...... 100-452 Sensor alignment salt at 33% [ MgCl (magnesium chloride)] (one included).... -
Page 34: Appendix D: Software
Appendix D: Appendix D: Software Software Appendix D: Software The QUESTemp 48N Heat Stress Monitor has the flexibility to be set up and controlled through computer software. The programmable start and stop time feature is only accessible through the computer. The instrument also has the capability of sending live data while measuring. -
Page 35: Data Finder And Quick Reports
Appendix D: Software Data Finder and Quick Reports Click on the button in the Instrument Communications page while Data Finder checkbox is checked (see ❶ below). NOTE: The Data Finder page will appear. See next section. ❶ Download Data Finder checkbox. When checked, this will automatically open to the downloaded data page. - Page 36 Appendix D: Software Data Finder and Quick Reports Quick Report: select the button to generate a report with basic information and a summary table of your downloaded data. Figure 1-35: Quick Report...
- Page 37 Appendix D: Software Data Finder and Quick Reports Analyze: allows you to add charts/graphs and customize how they will appear in a report. Tip: Add the panels by using the add a panel and dragging them into the appropriate location. ...
-
Page 38: Contact/Service Information
Return Material Authorization, or contact Customer Service. North America and Asia Pacific Europe, Middle East, and Africa TSI Incorporated TSI Instruments Ltd. 1060 Corporate Center Drive Stirling Road Oconomowoc, WI 53006-4828 Cressex Business Park High Wycombe, Bucks... -
Page 39: Returning For Service
Calibration Returning for Service Visit our website at http://rma.tsi.com and complete the on-line “Return Merchandise Authorization” form or call TSI at 1-800-680-1220 (USA) or (651) 490-2860, or 001 651 490 2860 (International) for specific return instructions. Customer Service will need the following information: ... -
Page 40: Warranty
Warranty Warranty (For country-specific terms and conditions outside of the USA, please visit www.tsi.com.) Seller warrants the goods, excluding software, sold hereunder, under normal use and service as described in the operator's manual, to be free from defects in workmanship and material for 12 months, or if less, the length of time specified in the operator's manual, from the date of shipment to the customer. - Page 41 TSI Incorporated – Visit our website www.tsi.com for more information. Tel: +1 800 874 2811 India Tel: +91 80 67877200 Tel: +44 149 4 459200 China Tel: +86 10 8219 7688 France Tel: +33 1 41 19 21 99 Singapore Tel: +65 6595 6388 Germany Tel: +49 241 523030...
Need help?
Do you have a question about the questemp 48n and is the answer not in the manual?
Questions and answers