
Related Manuals for NORDIC SEASON Florida 4


Summary of Contents for NORDIC SEASON Florida 4
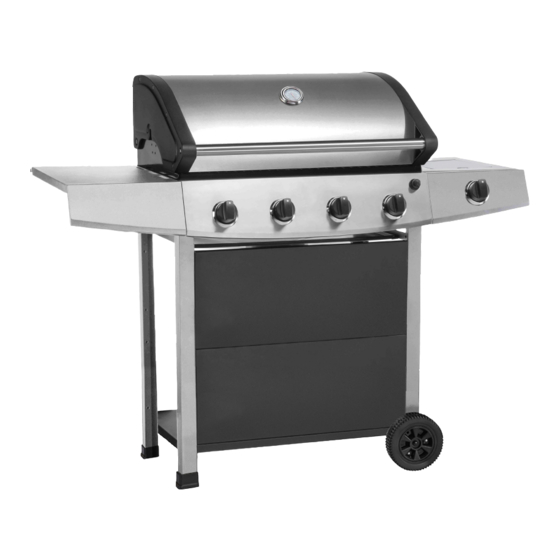
- Page 1 Florida 4 BURNER GAS BBQ GG201824 READ THE OPERATING INSTRUCTIONS BEFORE USING THE APPLIANCE. FOR OUTDOOR USE ONLY. INSTRUCTION AND USER MANUAL OUTDOOR USE ONLY!
-
Page 2: Table Of Contents
Parts list ....................6 Hardware ....................7 Assembly instructions ................8 Gas leak test ..................18 Connecting gas ..................19 Before using the grill ................20 Grilling tips ...................21 Lighting instructions ................22 Fat fire ....................23 Maintenance ..................24 Troubleshooting ..................25 Consumer Contact ................26 Florida 4... -
Page 3: Warnings
WARNINGS Failure to follow the instructions provided can imply a risk of serious injury to personnel and fixed installations. Some grill parts can be sharp, we recommend wearing gloves when assembling and lifting. Sharp edges can cause injury. The grill is intended for outdoor use only in well-ventilated areas. Never grill in enclosed spaces or under a roof, due to the danger of the lack of oxygen. -
Page 4: Technical Data
Grill burner: G30 (butane), 0.73 mm G31(propane) AT, CH, DE, SK I3B/P(50) Hotplate burner: and mixture of these, 0.66 mm LPG 50mbar This product is produced according to EUROPEAN GAS APPLIANCE STANDARD EN498 AND EN484 and is CE certified. Florida 4... -
Page 5: Explotion Drawing
Explotion Drawing... -
Page 6: Parts List
Knob bezel Knob Side burner Side burner holder Side burner grate Heat tent Cooking grate Warming rack Drip tray Grease cup Matchstick holder assy Thermometer When ordering spare parts, please use the code from parts list found here. Florida 4... -
Page 7: Hardware
Hardware The following screws and nuts are supplied with the grill and must be fitted. 1 pcs 1 pcs 1 pcs Small spanner Axle washer M6 screw 16 pcs 16 pcs M6x12 screw Lock washer 10 pcs M4x8 screw 9 pcs 9 pcs M6x16 screw M6 Lock washer... -
Page 8: Assembly Instructions
Attach the four legs to bottom panel Using M6x12 screws and M6 lock washers secure left leg assembly (part 2) to bottom panel (part 1) and right leg assembly (part 3) with corresponding screws. Assemble 2 additional legs in same manner (see illustration). Florida 4... - Page 9 Assembly M6 x12 screw, 8 pcs. M6 lock washer, 8 pcs. Install the front panel Insert the corresponding M6x12 screws with M6 lock washers into the pre drilled holes of the left and right legs located at the front of the cart. Do not tighten screws. Line up the slots in the front panel (part 4) to the screws.
- Page 10 Install left and right drip tray brackets M4 x 8 screw, Lock the drip tray bracket left (part 6) and drip tray bracket right 4 pcs (part 5) into the mounting hole at left and right leg assembly with corresponding M4x8 screws. Florida 4...
- Page 11 Assembly Install the firebox and hood assembly Place the knob (part 13) on the valve stem (see illustration). Set the firebox and hood assembly (part 9) on top of the cart panel. Secure the firebox and hood assembly with M6x16 screws and M6 washers at the top of each leg of the cart (see illustration).
- Page 12 Line up the holes in the right side burner table (part 11) with the pre-installed screws on right side of firebox and hood assembly. Slide right side table into place over the screws. Tighten the pre-instal- led screws to secure the side table. Florida 4...
- Page 13 Assembly M4 x8 screw, 2 pcs. Install the knob bezel and side burner gas line As shown in figure below, line up the holes on the side burner valve bracket (pre-assembled) to the holes on the back side of the right side table’s front panel.
- Page 14 (see illustration). M4 x8 screws, 2 pcs. Install the side burner grate Insert side burner grate (part 16) over the side burner making sure the tabs line up with corresponding holes (see illustration). Florida 4...
- Page 15 Assembly Install heat tents Place the 4 heat tents (part 17) over each burner inside the firebox. Vented end of heat tent is placed toward the back of the firebox (see illustration). Install the cooking grate Place the cast iron cooking grate (part 18) into the firebox.
- Page 16 Install the drip tray and grease cup Insert the drip tray (part 20) into the drip tray brackets from the back of the grill. Insert the grease cup (part 21) into the brackets on drip tray (see illustration). Florida 4...
- Page 17 Assembly Install matchstick holder assy. and igniter battery M6 x16 screw, 1 pcs. Install M6X16 screw and M6 lock washer M6 lock washer, 1 pcs. at the 2/3 position of back left leg of cart. Do not tighten screw. Hang the single loop end of matchstick holder (part 22) onto the screw.
-
Page 18: Gas Leak Test
IF BUBBLES APPEAR, SWITCH OFF THE GAS SUPPLY AND REPAIR THE PROBLEM. PERFORM A NEW LEAK TEST. DO NOT USE THE GRILL BEFORE YOU ARE SURE THAT THERE ARE NO LEAKS. If there are still gas leaks after repeated attempts, contact your dealer. Florida 4... -
Page 19: Connecting Gas
Connecting Gas ALWAYS perform a gas leak test before using the grill. Hose Gas bottle Check the gas hose regularly Connect the gas hose to the gas for cracks, damage and de- rail inlet on the left hand side of the cay. -
Page 20: Before Using The Grill
Check that the gas bottle and hose do not come into contact with hot objects. MAKE SURE THE DIAMETER OF THE SAUCEPAN NEVER EXCEED 24 CM, WHEN USING THE HOT BURNER PLATE. Florida 4... -
Page 21: Grilling Tips
Grilling tips A CLEAN GRILL WORKS BETTER, causes less smoke and prevents fat catching fire. Burn off the grill after use by opening the lid and burning all the burners at full power for 10 minutes. Allow the grill to cool, and then brush off ash from flame guards and grates. -
Page 22: Lighting Instructions
Turn all control valves to the “Off” position, then switch off the gas NEVER DOUSE THE supply at the bottle. GRILL WITH WATER Wait until the barbecue is sufficiently cool WHEN THE SURFACES before closing the hood. ARE HOT. Florida 4... -
Page 23: Fat Fire
WARNING Always keep an eye on the grill when in If storing the grill in a garage or use. Never allow children or others who require basement below ground level, do not store the supervision near the grill when in use. gas bottle the same place, as it must be stored above normal ground level. -
Page 24: Maintenance
When using a grill cover, the grill must be clean when they are dry. and dry and sufficient ventilation must beensured. If not, moisture will accumulate under the cover causing Check that the gas hose is not rust damage. damaged by mice or rats. Florida 4... -
Page 25: Troubleshooting
Troubleshooting... -
Page 26: Consumer Contact
Nordic Season Products AS 031 189095 +47 924 78600 support@nordicseason.no www.nordicseason.no Always attach your receipt and product serial number when making a warranty claim. Produced in China for Nordic Season Products AS. 2007 Kjeller, Norway...
Need help?
Do you have a question about the Florida 4 and is the answer not in the manual?
Questions and answers