Tait TB9100 Installation And Operation Manual
Hide thumbs
Also See for TB9100:
- Installation and operation manual (170 pages) ,
- Service manual (132 pages) ,
- Operation manual (54 pages)

Related Manuals for Tait TB9100


Summary of Contents for Tait TB9100
- Page 1 TB9100 base station Installation and Operation Manual MBA-00002-05 Issue 5 May 2006...
-
Page 2: Contact Information
The IMBE™ voice coding Technology embodied in this Limited. product is protected by intellectual property rights The word TAIT and the TAIT logo are trademarks of including patent rights, copyrights and trade secrets of Tait Electronics Limited. Digital Voice Systems, Inc. This voice coding... -
Page 3: Table Of Contents
Distress Frequencies ......... . . 30 TB9100 Installation and Operation Manual... - Page 4 Microphone Operation ........68 TB9100 Installation and Operation Manual...
- Page 5 12V PA Base Station ......... 129 TB9100 Installation and Operation Manual...
-
Page 6: Tait Electronics Limited May
Glossary ..........131 TB9100 Installation and Operation Manual... -
Page 7: Preface
Preface Scope of Manual Welcome to the TB9100 base station Installation and Operation Manual. This manual is intended for use by experienced technicians familiar with installing and operating base station equipment. It includes a technical description of the base station, maintenance and troubleshooting information. -
Page 8: Publication Record
Appendix D removed May 2006 General updates for version 2.1 release 1. Technical notes are only available in PDF format from the Tait support website. Consult your nearest Tait Dealer or Customer Service Organiza- tion for more information. TB9100 Installation and Operation Manual... -
Page 9: Description
Internet Protocol communications, and to add features such as encryption through software options ensures that P25 systems designed with the TB9100 are scalable in both size and functionality. The TB9100 combines industry-leading digital voice quality with rugged design specifications and intuitive user interfaces. -
Page 10: Modules
Applications such as a receive-only base station do not need them all. Each module is inserted into the TB9100 4U subrack from the front and is secured at the front with a metal clamp. Both clamp and module are easily removed for rapid module replacement. -
Page 11: Reciter
100W PA All three models are designed to operate on the 28VDC output provided by the TB9100 power management unit. In addition, variants of the 5W and 50W models are available for operation on 12VDC. These two 12V PAs are fitted with an internal boost regulator board, which converts the 12V nominal DC input to a 28VDC output to power the PA circuit boards. -
Page 12: Power Management Unit
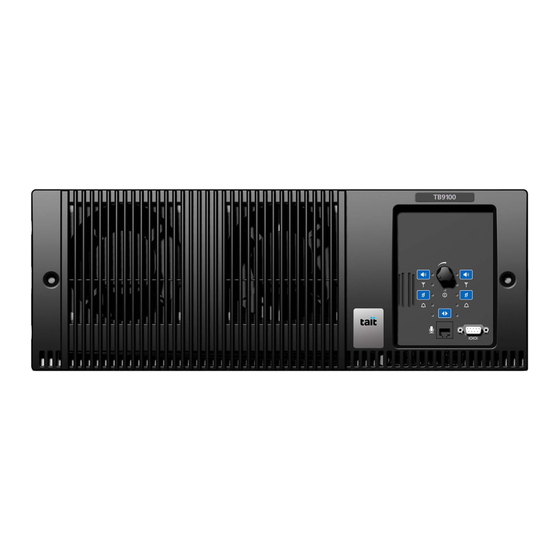
13.65VDC, 27.3VDC, or 54.6VDC. AC and DC PMU shown Front Panel The TB9100 front panel is mounted onto the subrack with two quick-release fasteners. It incorporates the cooling fans for the PA and PMU. Control Panel The TB9100 control panel is... -
Page 13: Subrack
Subrack The TB9100 4U subrack is made of passivated steel and is designed to fit into a standard 19 inch rack or cabinet. Frequency Bands and Sub-bands Much of the circuitry in the TB9100 base station is common to both frequency bands, and is therefore covered by a single description in this manual. -
Page 14: Theory Of Operation
Theory of Operation Typical Base Station System A typical TB9100 base station (shown in Figure 1.1) has a PMU that supplies power to the modules in the subrack. Figure 1.1 Base station system communication paths A system control bus interconnects the modules and carries alarm and... - Page 15 The digital board is responsible for the digital conversion of analog information and for controlling the maintainer’s access via the control panel. It performs the air interface signal processing for both analog FM and digital P25 modes. TB9100 Installation and Operation Manual Description © Tait Electronics Limited May 2006...
-
Page 16: 12V Pa Base Station System
For more detailed information, see “Technical Description” on page 12V PA Base Station System The TB9100 platform also supports the operation of a 12V PA base station. Figure 1.4 shows the main communication paths in a 12V PA base station system. -
Page 17: Power Management
A range of parameters is monitored and can trigger alarms that are sent via the reciter to the CSS and a syslog collector. When the PMU has an AC and a DC module, the TB9100 can be powered AC to DC Changeover by either the AC (mains) or the DC (battery) supply. -
Page 18: Power Distribution
The TB9100 can receive input power from either the AC or DC input. Internal seamless switching between the AC or DC input ensures there are no power interruptions should a changeover occur between the two inputs. -
Page 19: Front Panel Fan Operation
TB9100 power distribution high level block diagram Front Panel Fan Operation The TB9100 base station is equipped with three fans. One fan is for the PMU, one fan is for the PA, and the third fan is for the reciter. This section deals with the PMU and PA fans. -
Page 20: Run And Standby Modes
On two minutes, off one minute >167°F (75°C) Always on Run and Standby Modes The TB9100 normally operates in Run mode, but you can use the CSS to put it in Standby mode. In Run mode, the base station performs its normal functions. Run mode... - Page 21 P25 or analog FM mode using the microphone channel button. Refer to “Microphone Operation” on page 68 for further details. The destination of the signal is configured by the CSS. TB9100 Installation and Operation Manual Description © Tait Electronics Limited May 2006...
-
Page 22: Signal Voting And Switching
Signal Voting and Switching The TB9100 base station receives signals at its four interfaces: RF, analog line, digital line and control panel microphone. The signals travel along a path and are presented at the internal voter, as shown in Figure 1.6. -
Page 23: Base Station Options
Paths” on page Base Station Options The modular design of the TB9100 base station means that it is available in many variations. A range of features that can be enabled in software adds another level of configurability. Here are some of the different kinds of TB9100 base station that result from different module combinations. -
Page 24: Encryption
(DES) encryption license. Base Station Applications TB9100 base stations can be used as repeaters, as base stations, and they can be connected together to form a wide-area repeater or wide-area base station. For more information, see the white paper TaitNet P25 Networks. - Page 25 If the repeat function is disabled, the channel group acts as a wide-area line- connected base station. Calls received by any base station are sent to the dispatcher and calls from the dispatcher are transmitted via all the base stations. TB9100 Installation and Operation Manual Description © Tait Electronics Limited May 2006...
- Page 26 Description TB9100 Installation and Operation Manual © Tait Electronics Limited May 2006...
-
Page 27: General Safety And Regulatory Information
Refer to the ratings label on the rear of the module. The TB9100 base station must be installed so that the rear of the PMU is located in a service access area. The PMU must be connected to the mains supply source by trained personnel in accordance with local and national regulations. -
Page 28: Equipment Safety
PMU and PA can reach temperatures of up to +176°F (+80°C). Equipment Safety The TB9100 should be installed and serviced only by qualified personnel. Installation and Servicing Personnel Antenna Load... -
Page 29: Environmental Conditions
Seals must be replaced if they need to be disturbed during maintenance. Environmental Conditions The operating temperature range of the TB9100 is –22°F to +140°F Operating Temperature Range (–30°C to +60°C) ambient temperature. Ambient temperature is defined as the temperature of the air at the intake to the cooling fans. -
Page 30: Regulatory Information
If this happens the telephone company will provide advance notice in order for you to make necessary modifications to maintain uninterrupted service. General Safety and Regulatory Information TB9100 Installation and Operation Manual © Tait Electronics Limited May 2006... -
Page 31: Unauthorized Modifications
Unauthorized Modifications Any modifications you make to this equipment which are not authorised by Tait Electronics Ltd may invalidate your compliance authority’s approval to operate the equipment. Health, Safety and Electromagnetic Compatibility in Europe... - Page 32 You can download the formal Declaration of Conformity from http:// Declaration of Conformity eudocs.taitworld.com/. You can also obtain a signed and dated paper copy of the Declaration of Conformity from Tait Europe Ltd. General Safety and Regulatory Information TB9100 Installation and Operation Manual © Tait Electronics Limited May 2006...
-
Page 33: Maintenance
Maintenance The TB9100 is designed to be very reliable and should require little maintenance. However, performing regular checks will prolong the life of the equipment and prevent problems from happening. It is beyond the scope of this manual to list every check that you should perform on your base station. - Page 34 Maintenance TB9100 Installation and Operation Manual © Tait Electronics Limited May 2006...
-
Page 35: Installation
19inch rack or cabinet. If this is your first time installing a TB9100 base station, we recommend that you read the entire chapter before beginning the actual installation. -
Page 36: Equipment Ventilation
Cabinet and Rack Ventilation The cooling airflow for the TB9100 base station enters through the front panel and exits at the rear of the subrack. For optimum thermal performance, the heated air that has passed through a base station must not be allowed to re-enter the air intakes on the front panel. - Page 37 The maximum ambient temperature entering the cabinet must not exceed +140°F (+60°C). If the TB9100 base station is installed in a rack or cabinet with other equipment with different ventilation requirements, we recommend that the TB9100 be positioned below this equipment.
- Page 38 Figure 4.1 Typical cabinet ventilation requirements top view (20cm) side view front view ≥7in (≥17.5cm) ventilation slots airflow entry blanking panels airflow exit Installation TB9100 Installation and Operation Manual © Tait Electronics Limited May 2006...
-
Page 39: Installing And Setting Up The Css
Installing and Setting up the CSS To monitor and configure the base station, and to carry diagnostic tests on it, you need the CSS. Follow the instructions on the TB9100 CSS CD and install the CSS on a PC. To install the CSS, you need a registration key. You can obtain a key from Tait. -
Page 40: Minimum Pc Hardware Requirements For Running Css
Windows 2000/XP Unpacking the Base Station The TB9100 base station is packed in a strong corrugated cardboard carton with top and bottom foam cushions. To prevent personal injury and damage to the equipment, we recommend that two people unpack the base station. - Page 41 Figure 4.2 Unpacking the TB9100 base station Cut the tape securing the flaps at the top of the carton and fold them flat against the sides Rotate the carton carefully onto its side and then onto its top ensuring that none of the flaps is trapped underneath.
-
Page 42: Setting Up On The Bench
Make sure that the RF output is connected to a suitable attenuator or dummy load. Confirming Operation To ensure that the TB9100 is working correctly before site installation, you may want to apply power to check for proper operation. Before turning the TB9100 base station on, carry out the following... -
Page 43: Tuning
(adjust the speaker volume as required) Tuning Before the TB9100 is installed on site, you may need to tune the reciter. You can use the Calibration Software to carry out the following: adjust the switching range of the reciter flatten the response across the base station’s switching range... -
Page 44: Connecting To A Calibration And Test Unit
Connecting to a Calibration and Test Unit If you have a TB9100 Calibration and Test Unit (CTU), connect it to the base station as follows for testing base station operation: Figure 4.3 TB9100 to CTU connections 10-32 VDC Power Supply... -
Page 45: Setting The Base Station Ip Address
Alternatively, connect RF test equipment and use it. Note The CTU is common to TB8100 and TB9100 base stations: some of its connectors and controls are not used with a TB9100. Setting the Base Station IP Address Before the base station is installed on site, you need to provide it with a name and its proper IP address. -
Page 46: Finding A Lost Or Forgotten Ip Address
Select the following port settings: 57600 baud, 8 bits, no parity, 1 stop bit, no flow control. Press the ‘Enter’ key. A login prompt will appear displaying the base station’s IP address. Installation TB9100 Installation and Operation Manual © Tait Electronics Limited May 2006... -
Page 47: Customizing The Configuration
It is beyond the scope of this manual to list every piece of equipment that an installation technician should carry. However, the following tools are specifically required for installing the TB9100 base station: Pozidriv PZ3 screwdriver for the M6 screws used in the DC input terminals on the PMU;... -
Page 48: Mounting The Subrack
You can also obtain the TBA0ST2 tool kit from your nearest Tait Dealer or Customer Service Organization. It contains the basic tools needed to install, tune, and service the TB9100 base station. Mounting the Subrack Caution We recommend that you remove the modules from the subrack before lifting it (refer to “Replacing... - Page 49 Figure 4.5 shows a standard TBA2140 bracket fitted in a typical Tait Electronics cabinet . If you are not using a Tait cabinet, you may have to make your own brackets to suit your installation. Figure 4.5 Auxiliary support bracket Important...
- Page 50 (support bracket not shown in diagram). We recommend that you try to route all cables to and from the TB9100 base General Cabling station along the side of the cabinet so the cooling airflow is not restricted.
- Page 51 Figure 4.7 DC power cabling secure the cables to the cabinet to support their weight TB9100 Installation and Operation Manual Installation © Tait Electronics Limited May 2006...
-
Page 52: Connecting Up The Base Station
Connecting Up the Base Station This section provides information on the inputs and outputs available when connecting up the TB9100 base station. Base Station Connections The connections at the rear of a 5W or 50W base station are identified in Figure 4.8. - Page 53 5W or 50W 12 V PA base station inputs and outputs reciter serial RS-232 connector RF output digital line connector +12VDC input analog line connector RF input 1 pps input subrack ground connector external reference frequency input TB9100 Installation and Operation Manual Installation © Tait Electronics Limited May 2006...
-
Page 54: Control Panel Connections
(if fitted) Power Supply Connections The TB9100 PMU is designed to accept a mains input of 88 to 264VAC at AC Power 45 to 65Hz. We recommend that a 3-wire grounded outlet be used to supply the AC power. - Page 55 Figure 4.11 Recommended DC power connection The TB9100 12V PA is designed to accept a nominal 12VDC input with DC Power with 12 V negative ground. There is a minimum DC startup threshold to prevent damaging a battery which has little capacity left.
-
Page 56: Auxiliary Dc Power
Figure 4.12 below shows the standard Tait auxiliary DC power cables Auxiliary DC Power Supply Connections available. Details of the individual connector types are also provided in case you want to make up your own cables. -
Page 57: Rf Connections
The PA may be damaged if the load is removed or switched while the PA is transmitting. The RF input to the TB9100 is via the lower BNC/TNC connector on the rear panel of the reciter. The RF output is via the N-type connector on the rear panel of the PA (refer to Figure 4.8 on page... -
Page 58: Coaxial Relay
4 wire audio lines, it should also be limited to 150 mA. The nominal voltage should not exceed 48V and the peak voltage must never exceed 58V. Installation TB9100 Installation and Operation Manual © Tait Electronics Limited May 2006... - Page 59 The assignment of the serial interface pins does not interfere with the functions of the digital inputs and outputs. Refer to “Serial Interface Connection” on page 123 for a description of the pin allocations. TB9100 Installation and Operation Manual Installation © Tait Electronics Limited May 2006...
- Page 60 Installation TB9100 Installation and Operation Manual © Tait Electronics Limited May 2006...
-
Page 61: Base Station Operation
LEDs indicate its operational status. Control Panel The operating buttons and indicator LEDs on the left side of the control panel are used to control the TB9100 base station, as shown in Figure 5.1. Figure 5.1... - Page 62 The red alarm LED will flash at a rate of 2 to 5Hz when an alarm has been Alarm LED generated by any of the TB9100 modules. It will continue to flash until the alarm is canceled, the fault is fixed, or the base station is in standby mode.
-
Page 63: Reciter
- the reciter is powered up flashing red - one or more alarms have been generated; you can use the CSS to find out more details about the alarms. TB9100 Installation and Operation Manual Base Station Operation © Tait Electronics Limited May 2006... - Page 64 Network Board PowerPC LED PowerPC is functioning normally. The amber network board DSP LED will flash continuously when the DSP Network Board DSP is functioning normally. Base Station Operation TB9100 Installation and Operation Manual © Tait Electronics Limited May 2006...
- Page 65 CSS to download the firmware flashing red - one or more alarms have been generated; you can use the CSS to find out more details about the alarms. TB9100 Installation and Operation Manual Base Station Operation © Tait Electronics Limited May 2006...
-
Page 66: Pmu
You must disconnect the AC and DC supplies from the PMU before dismantling or carrying out any maintenance. Refer to the service manual for the correct servicing procedures. Base Station Operation TB9100 Installation and Operation Manual © Tait Electronics Limited May 2006... -
Page 67: Monitoring The Base Station
CSS to find out more details about the alarms. Monitoring the Base Station You can monitor the performance of your TB9100 remotely with the CSS. Use the Monitor option to view information about the current state of the base station. This option provides details about the PMU, PA and reciter modules. -
Page 68: Microphone Operation
Before using the microphone to make a call, make sure that the channel is clear, otherwise, any calls in progress on the channel, including emergency calls, will be terminated. Base Station Operation TB9100 Installation and Operation Manual © Tait Electronics Limited May 2006... -
Page 69: Monitoring Front Panel Fan Operation
PMU. The CSS will toggle the fan on for a set number of seconds, then the test will end and control of the fan will revert back to the base station. TB9100 Installation and Operation Manual Base Station Operation... - Page 70 Base Station Operation TB9100 Installation and Operation Manual © Tait Electronics Limited May 2006...
-
Page 71: Troubleshooting
Troubleshooting Check that all front and rear connectors and cables are in place, and that power switches are on. If problems persist, contact your nearest Tait Dealer or Customer Service Organization. Symptom Possible Cause Action Alarm LED red and steady... - Page 72 Ensure test tones are less than 400 Hz tones higher than 400 HZ Static on analog RX P25 call is being made on Check configuration on CSS an analog channel TB9100 Installation and Operation Manual © Tait Electronics Limited May 2006...
- Page 73 Disabling stream. repeat mode separates the voice stream into two; the inbound voice stream goes to the analog line and the outbound voice stream goes to the transmitter.) TB9100 Installation and Operation Manual © Tait Electronics Limited May 2006...
-
Page 74: 4 Tb9100 Installation And Operation Manual
TB9100 Installation and Operation Manual © Tait Electronics Limited May 2006... -
Page 75: Replacing Modules
Saving the Base Station’s Configuration Before replacing a module in the TB9100 base station, you should decide whether you need to save its configuration data. If you are unsure whether you have a record of the configuration, use the CSS to read the base station and save the configuration file before removing any modules. - Page 76 If you want to disconnect the power before working on the TB9100, carry out the instructions in “Disconnect the Power” on page Important Before removing a PA, disconnect the DC input and RF input first, followed by the RF output (and DC output on the 12V PA).
-
Page 77: Replacing The Control Panel
Pull the bottom of the control panel away from the subrack disconnect the D-range socket on the back of the panel from the plug on the subrack. TB9100 Installation and Operation Manual Replacing Modules © Tait Electronics Limited May 2006... -
Page 78: Replacing The Reciter
“Replacing the Control Panel” on page At the rear of the reciter, unplug the RF input cable , any system cables and the external reference cable (if fitted). Replacing Modules TB9100 Installation and Operation Manual © Tait Electronics Limited May 2006... - Page 79 Tighten the nut on the SMA connector to a torque of 8lbf·in (0.9N·m). Refit the control panel, as described in “Replacing the Control Panel” on page Carry out the instructions in “Final Reassembly” on page TB9100 Installation and Operation Manual Replacing Modules © Tait Electronics Limited May 2006...
-
Page 80: Replacing The Power Amplifier
At the front of the PA, connect the RF input cable, followed by the DC input cable (DC output cable on the 12V PA). Replacing Modules TB9100 Installation and Operation Manual © Tait Electronics Limited May 2006... -
Page 81: Replacing The Power Management Unit
Connect the DC power cables on the rear panel as shown in Figure 4.7 on page 51. Ensure the front panel cables are retained by the cable retaining clips in the top of the subrack. TB9100 Installation and Operation Manual Replacing Modules © Tait Electronics Limited May 2006... -
Page 82: Replacing The Front Panel Fans
Plug the power wires into the fan contact board and route the wires around the PA fan opening b. Refit the PA fan/duct assembly onto its mounting bosses. Note Replacing Modules TB9100 Installation and Operation Manual © Tait Electronics Limited May 2006... - Page 83 The module may then fold back and shut down. When you power-up the TB9100, check that the PMU fan runs first, followed by the PA fan. Each fan will run for about five seconds.
- Page 84 Figure 7.1 Replacing the front panel fans PA fan PMU fan PA fan PMU fan PA fan connector PMU fan connector 100W base station front panel shown Replacing Modules TB9100 Installation and Operation Manual © Tait Electronics Limited May 2006...
-
Page 85: Replacing The Module Guide Rails
Push the guide rail towards the front of the subrack until you hear the locking tab “click” into place. TB9100 Installation and Operation Manual Replacing Modules © Tait Electronics Limited May 2006... -
Page 86: Replacing The Subrack Interconnect Board
If you have fitted a 12V PA interconnect board, set the switches of S1 as described in “Switch settings” on page Reconnect the system control bus cables as shown in Figure 7.2. Replacing Modules TB9100 Installation and Operation Manual © Tait Electronics Limited May 2006... - Page 87 Switch settings Table 7.1 gives the switch settings for newer boards with the part number 220-02037-04 and later. These boards are used with 12V PA base stations. TB9100 Installation and Operation Manual Replacing Modules © Tait Electronics Limited May 2006...
-
Page 88: Final Reassembly
12 V PA Switch Function State CH1 select button active CH2 select button active independent CH1 and CH2 channels Tait use only - leave on channel 1 I C_CLK pullup channel 1 I C_DATA pullup channel 2 I C_CLK pullup... - Page 89 Secure the fastener at each end with a quarter turn clockwise. Align the slot horizontally, then press the fastener in and turn to lock. TB9100 Installation and Operation Manual Replacing Modules © Tait Electronics Limited May 2006...
- Page 90 Replacing Modules TB9100 Installation and Operation Manual © Tait Electronics Limited May 2006...
-
Page 91: Technical Description
PMU fan cable retaining clip PA fan subrack PMU fan duct reciter PA fan duct plastic guide rail module retaining clamp control panel TB9100 Installation and Operation Manual Technical Description © Tait Electronics Limited May 2006... - Page 92 100 W base station. Figure 8.2 Mechanical assembly - front of a 100W base station module retaining clamp plastic guide rail airflow duct subrack reciter cable retaining clip Technical Description TB9100 Installation and Operation Manual © Tait Electronics Limited May 2006...
-
Page 93: Reciter Module Operation
Reciter Module Operation The TB9100 reciter consists of an RF, a digital and a network board. Figure 8.3 on page 96 shows the configuration of the main circuit blocks, and the main inputs and outputs of the reciter. - Page 94 (FEC) encode/decode on P25 signal to/from the RF interface encoding P25 digital signals into IMBE speech packets encoding analog FM signals into G.711 speech packets Technical Description TB9100 Installation and Operation Manual © Tait Electronics Limited May 2006...
- Page 95 A ‘fan failed’ alarm is raised when the reciter reaches a temperature of 72.5 For monitoring purposes, the following information is displayed on the CSS Monitor Reciter screen: TB9100 Installation and Operation Manual Technical Description © Tait Electronics Limited May 2006...
- Page 96 28VDC I/P Digital I/Os & Audio/E&M Subsystem Power Power Power 3.3V DSP/RISC I/O Drivers & Memory 1.8V Supply Supply Supply RISC 1.6V RISC 13MHz Digital RF I/P Clock Receiver Receiver CODECs External DSP/RISC Reference 12.8MHz Reference Frequency Ref. 40MHz Frequency Clock (if used) Subsystem...
-
Page 97: Signal Paths
Figure 8.5 shows the signal path from the RF interface to the voter(s) for a From the RF interface (Digital digital P25 call. P25) TB9100 Installation and Operation Manual Technical Description © Tait Electronics Limited May 2006... - Page 98 P25 modem. The P25 modem extracts the digital bits from the received signal. Error correction is carried out and the IMBE packets are passed directly to the voter. Technical Description TB9100 Installation and Operation Manual © Tait Electronics Limited May 2006...
- Page 99 The current calling profile determines which type of call is made. Figure 8.7 shows a call being received on the analog line when the calling profile specifies digital P25 mode. TB9100 Installation and Operation Manual Technical Description © Tait Electronics Limited May 2006...
- Page 100 The packet switch routes the packets to the appropriate encoder; the IMBE encoder for digital P25 packets or the G.711 encoder for analog FM packets. The encoder passes the packets to the voter. Technical Description TB9100 Installation and Operation Manual © Tait Electronics Limited May 2006...
- Page 101 The packet switch routes the packets to the appropriate encoder; the IMBE encoder for digital P25 packets or the G.711 encoder for analog FM packets. The encoder passes the packets to the voter. TB9100 Installation and Operation Manual Technical Description © Tait Electronics Limited May 2006...
-
Page 102: Output Paths
The voter switches the signal to the P25 modem. The P25 modem adds forward error correction to the IMBE packets. The Modulator/Demodulator circuitry converts the audio frequency to the required RF frequency (VHF or UHF). Technical Description TB9100 Installation and Operation Manual © Tait Electronics Limited May 2006... - Page 103 The packet switch routes the resultant digital voice stream to the ADC for the analog line. The ADC converts the digital voice stream to analog audio, which is put on the analog line. TB9100 Installation and Operation Manual Technical Description © Tait Electronics Limited May 2006...
- Page 104 The voter sends the output to the appropriate decoder. The decoder sends its output via the packet switch to the control panel speaker. Technical Description TB9100 Installation and Operation Manual © Tait Electronics Limited May 2006...
-
Page 105: Voting
The channel group supports line interfaces at more than one base station: voice streams from different line interfaces are prioritized by IP address Control of channel group mode is by means of configuration, or tone remote/task manager TB9100 Installation and Operation Manual Technical Description © Tait Electronics Limited May 2006... -
Page 106: Switching And Voting Priorities
7. “Repeat” in the table means that this switching path will occur only if RF repeat is enabled. This may be via configuration or task manager. Technical Description TB9100 Installation and Operation Manual © Tait Electronics Limited May 2006... -
Page 107: Signaling Messages
The voting rules for switching messages are the same as the switching rules for a P25 terminal or line originated stream. TB9100 Installation and Operation Manual Technical Description © Tait Electronics Limited May 2006... -
Page 108: Re-Voting
With shared frequency, for the jitter buffer to work properly, it needs to be set to the network delay plus the network jitter allowance. Technical Description TB9100 Installation and Operation Manual © Tait Electronics Limited May 2006... -
Page 109: Pa Module Operation
PA Module Operation The TB9100 PA is a modular design with the circuitry divided among separate boards which are assembled in different configurations in different models. Interconnect boards are used in certain models to connect boards that are physically separated on the heatsink. The 5, 50 and 100W PAs are available for operation on 28VDC, while the 5 and 50W PAs are also available for operation on 12VDC. - Page 110 The startup voltage is 12VDC or higher. Once started, the boost regulator will operate down to 10.25VDC +0.25V before it shuts down to prevent deep discharge of the battery. Technical Description TB9100 Installation and Operation Manual © Tait Electronics Limited May 2006...
- Page 111 RF O/P Board Board Low-Pass Filter & Directional Control & Control & Monitor Monitor Coupler Control & System Board Monitor Control Control Board Ambient Air Temperature Sensor Board TB9100 Installation and Operation Manual Technical Description © Tait Electronics Limited May 2006...
-
Page 112: Pmu Module Operation
The leaded high-power components are situated on the DC converter board, while the plug-in cards have only SMD control components. Technical Description TB9100 Installation and Operation Manual © Tait Electronics Limited May 2006... - Page 113 Also, when battery capacity is low, it will maintain the power supply to the microprocessor and shut down the rest of the PMU. Refer to “Power Management” on page 17 for further details. TB9100 Installation and Operation Manual Technical Description © Tait Electronics Limited May 2006...
- Page 114 Each LED can be on, off, or flashing at two rates (fast or slow). The state of these LEDs can indicate a number of operating modes or fault conditions, as described in Table 8.3 on page 115. Technical Description TB9100 Installation and Operation Manual © Tait Electronics Limited May 2006...
-
Page 115: Pmu Operation On Dc Input
PMU over a range of DC input voltages. User-programmable alarms can be set for low or high battery voltage. The Alarms alarms will be triggered when the set voltage levels are reached. TB9100 Installation and Operation Manual Technical Description © Tait Electronics Limited May 2006... - Page 116 DC Input Voltage Overvoltage Shutdown (HW) Overvoltage Shutdown Reset (HW) High Battery Voltage Alarm (SW Alarm) Startup Voltage (SW) Startup Voltage (HW) Low Battery Voltage Alarm (SW Alarm) Shutdown Voltage (SW) Undervoltage Shutdown (HW) Time Hardware Behaviour Stop Software Control & Hardware Combined Stop 30s delay...
- Page 117 17.1V +0.3V 34.2V +0.5V 68.4V +1V a. The information in this table is extracted from the TB9100 Specifications Manual. Re- fer to the latest issue of this manual (MBA-00014-xx) for the most up-to-date and complete PMU specifications. b. Using the CSS c.
-
Page 118: Control Panel
Control Panel The control panel is designed to be the link between the user and the TB9100 base station. The circuitry for the operation of the control panel is located on a board mounted behind its front face. All communication between the base station and the control panel is via the system control bus. -
Page 119: System Control Bus
The PMU behaves in a similar way to the PA. The system control bus has been designed to operate only within the TB9100 subrack. It has not been designed for use outside the subrack or to interconnect two subracks. The TB9100 base station uses the I... - Page 120 ‘diode OR’ the power to the control panel, but not to backpower a reciter that does not have a power cable connected. The subrack interconnect board at the front of the TB9100 subrack provides Pin Allocations a parallel interconnection between all connectors on the board.
- Page 121 RS-232 Rx data ground (analog) control panel speaker control panel microphone PSU back-up (not used) +24V switched (PA fan) ground (PA fan) +24V switched (PMU fan) ground (PMU fan) TB9100 Installation and Operation Manual Technical Description © Tait Electronics Limited May 2006...
- Page 122 Technical Description TB9100 Installation and Operation Manual © Tait Electronics Limited May 2006...
-
Page 123: Appendix A - Interface Pin Assignments
1 2 3 4 5 6 7 8 audio output audio output audio input audio input E & M signaling output front view E & M signaling output TB9100 Installation and Operation Manual Appendix A – Interface Pin Assignments © Tait Electronics Limited May 2006... -
Page 124: Digital Interface Connection
DC Input to 12V PA The pin allocations for the 2-way DC input connector are shown below. Description +V output ground 2-pin connector - rear view Appendix A – Interface Pin Assignments TB9100 Installation and Operation Manual © Tait Electronics Limited May 2006... -
Page 125: Microphone Connection
1 2 3 4 5 6 7 8 not connected voice band (microphone) input microphone ground not connected front view not connected TB9100 Installation and Operation Manual Appendix A – Interface Pin Assignments © Tait Electronics Limited May 2006... - Page 126 Appendix A – Interface Pin Assignments TB9100 Installation and Operation Manual © Tait Electronics Limited May 2006...
-
Page 127: Appendix B - Inter-Module Connections
28VDC low current output for reciter RF output to PA system control bus 28VDC low current input from PMU RF input from reciter DC output for reciter fan TB9100 Installation and Operation Manual Appendix B – Inter-Module Connections © Tait Electronics Limited May 2006... -
Page 128: 100W Base Station
PTT, carrier, or speaker key, causing the base station to transmit or the speaker to be actuated incorrectly. Appendix B – Inter-Module Connections TB9100 Installation and Operation Manual © Tait Electronics Limited May 2006... -
Page 129: 12V Pa Base Station
12V PA base station internal connections 12V PA reciter system control bus 12VDC input from PA RF input from reciter DC output for reciter fan RF output to PA TB9100 Installation and Operation Manual Appendix B – Inter-Module Connections © Tait Electronics Limited May 2006... - Page 130 Appendix B – Inter-Module Connections TB9100 Installation and Operation Manual © Tait Electronics Limited May 2006...
- Page 131 Automatic Gain Control. A device that optimizes signal level. Alarm Center Alarm Center is the Tait name for a utility that receives, stores, and displays syslog messages from elements in the TaitNet P25 network.
- Page 132 A group of configuration settings that defines the properties of the TB9100 analog line, which can be regarded as equivalent to a radio on the network. channel A channel is: 1.
- Page 133 TB9100 Installation and Operation Manual Glossary133 © Tait Electronics Limited May 2006...
- Page 134 CRTP Compressed RTP. Customer Service Software. Tait PC-based software for monitoring, configuring, and diagnosing a Tait TB9100 base station. CTCSS CTCSS (continuous tone controlled squelch system), also known as PL (private line) is a type of signaling that uses subaudible tones to segregate groups of users.
- Page 135 National Standards Institute (ANSI) and responsible for developing telecommunications and electronics standards in the USA. Electromagnetic Compatibility. The ability of equipment to operate in its electromagnetic environment without creating interference with other devices. TB9100 Installation and Operation Manual Glossary135 © Tait Electronics Limited May 2006...
- Page 136 Number that indicates how many times a feature license has been Sequence Number enabled or disabled. Feature license key A set of digits purchased from Tait that is required to enable a feature license. Forward Error Correction. FFSK Fast Frequency Shift Keying. A modem encoding scheme for carrying data on FM radios.
- Page 137 A control command that can be sent across the CAI to inhibit a radio. An inhibited radio appears to the user as if it is powered off. TB9100 Installation and Operation Manual Glossary137 © Tait Electronics Limited May 2006...
- Page 138 When a mute is active, the radio’s speaker only unmutes under certain conditions, determined by the type of signaling operating on a channel and the squelch threshold. TB9100 Installation and Operation Manual 138Glossary © Tait Electronics Limited May 2006...
- Page 139 The speech processing area that deals with speech data that has been collected up into a packet. IP networks convey packets. The opposite of circuit domain. Printed Circuit Board TB9100 Installation and Operation Manual Glossary139 © Tait Electronics Limited May 2006...
- Page 140 Push To Talk. The button on a radio terminal that keys the transmitter. Quality Of Service. reciter The reciter is a module of a TB9100 base station that acts as receiver and exciter. repeater talkaround Repeater talkaround allows the radio user to bypass repeater operation and so communicate directly with other radios.
- Page 141 It is the ratio of (signal + noise + distortion) to (noise + distortion). A SINAD of 12 dB corresponds to a signal to noise ratio of 4:1. The TB9100 can provide an approximate SINAD value while in service by comparing the in-band audio against out-of-band noise.
- Page 142 Subaudible signaling is signaling that is at the bottom end of the signaling range of audible frequencies. The TB9100 base station supports CTCSS and DCS subaudible signaling. subtone A subtone (subaudible signaling tone) is a CTCSS tone or a DCS code.
- Page 143 A Tait TB9100 base station consists of the equipment necessary TB9100 Base Station to receive and transmit on one channel. Generally, this means a reciter, a PA, and a PMU. Often abbreviated to TB9100 or base station. Task action A task action is the second part of a Task Manager task. It specifies what the base station must do when the first part (the input) becomes true.
- Page 144 The TB9100 has an internal voter, which decides which base station input is passed to the switch for distribution to the configured and enabled outputs.
Need help?
Do you have a question about the TB9100 and is the answer not in the manual?
Questions and answers