Table of Contents
Advertisement
Quick Links
Download this manual
See also:
Manual
I N S T R U C T I O N
WARRANTY
Hobbico
guarantees this kit to be free from defects in both
®
material and workmanship at the date of purchase. This warranty
does not cover any component parts damaged by use or
modification. In no case shall Hobbico's liability exceed the
original cost of the purchased kit. Further, Hobbico reserves
the right to change or modify this warranty without notice.
In that Hobbico has no control over the final assembly or material
used for final assembly, no liability shall be assumed nor
accepted for any damage resulting from the use by the user of
the final user-assembled product. By the act of using the
user-assembled product, the user accepts all resulting liability.
If the buyer is not prepared to accept the liability associated
with the use of this product, the buyer is advised to return
READ THROUGH THIS MANUAL BEFORE STARTING CONSTRUCTION. IT CONTAINS IMPORTANT
INSTRUCTIONS AND WARNINGS CONCERNING THE ASSEMBLY AND USE OF THIS MODEL.
Entire Contents © Copyright 2009
M A N U A L
™
this kit immediately in new and unused condition to the
place of purchase.
To make a warranty claim send the defective part or item to
Hobby Services at the address below:
Hobby Services
3002 N. Apollo Dr. Suite 1
Champaign IL 61822 USA
Include a letter stating your name, return shipping address, as
much contact information as possible (daytime telephone
number, fax number, e-mail address), a detailed description of the
problem and a photocopy of the purchase receipt. Upon receipt of
the package the problem will be evaluated as quickly as possible.
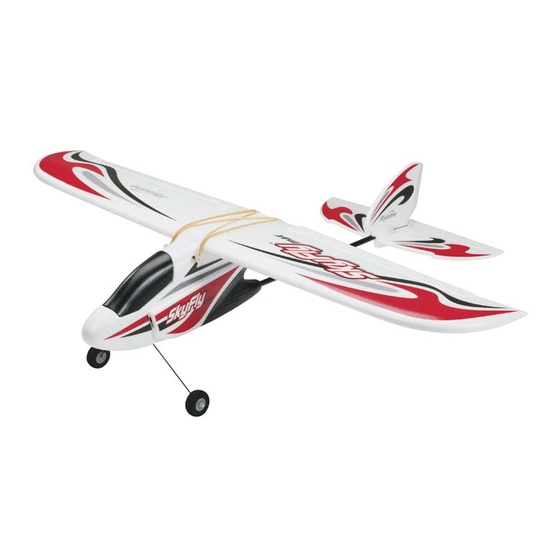
SPECIFICATIONS
47 in
Wingspan:
[1195 mm]
Wing
390 sq in
2
Area:
[25.2 dm
]
27 oz
Weight:
[770 g]
Wing
10 oz/sq ft
2
Loading:
[31 g/dm
]
39 in
Length:
[990 mm]
4-Channel
Radio:
Tactic
TTX404
™
2.4GHz (included)
with receiver &
4 micro servos
HCAA2511 Mnl
Advertisement
Table of Contents

Related Manuals for Flyzone skyfly max


Summary of Contents for Flyzone skyfly max
- Page 1 ™ SPECIFICATIONS 47 in Wingspan: [1195 mm] Wing 390 sq in Area: [25.2 dm 27 oz Weight: [770 g] Wing 10 oz/sq ft Loading: [31 g/dm 39 in Length: [990 mm] 4-Channel Radio: Tactic TTX404 I N S T R U C T I O N ™...
-
Page 2: Table Of Contents
2,500 AMA chartered clubs across the country. Contact the FLYING YOUR SKYFLY MAX ..... 16 AMA at the address or toll-free phone number below. -
Page 3: Additional Items Required
11.1V (3S) 2200mAh Power Series LiPo (GPMP0520) ADDITIONAL ITEMS REQUIRED ORDERING REPLACEMENT PARTS In order to build your SkyFly Max, you will need to purchase Replacement parts for the Flyzone SkyFly Max are available some regular (foam safe not required) CA and have a few using the order numbers in the Replacement Parts List that common household tools on hand. -
Page 4: Kit Contents
Brushless Motor factory-installed rudder HCAA3993 8x4 Propeller 7. Main landing gear & wheels HCAA3994 Electronic Speed Control 8. Flyzone 1800mAh 11.1V LiPo battery HCAA3995 Replacement Servo 9. Battery charger w/AC connector, DC connector HCAA3996 Rubber Band Set 10. Wing joiner... -
Page 5: Kit Inspection
KIT INSPECTION Before starting to build, take an inventory of this kit to make sure it is complete, and inspect the parts to make sure they are of acceptable quality. If any parts are missing or are not of acceptable quality, or if you need assistance with assembly, contact Product Support. -
Page 6: Hook Up The Controls
❏ 5. Remove the tape from the elevator and rudder pushrods. NOTE: If you ever have to re-route the pushrods (such as when replacing them), use CA debonder and a hobby knife to remove the inner wood pushrod support. This part can be discarded or reinstalled. - Page 7 ❏ 3. Turn the model back over and set it on a fl at table so that the wings are level. Take a few steps back and visually check the alignment of the horizontal tail. Adjust the horizontal tail until it is parallel with the wing. Small adjustments can be made by gently tapping the horizontal tail on the high side with your fi...
- Page 8 connection is made you will hear two beeps coming from the ESC. IMPORTANT: The beeping sound alerts you that the system has power and the motor is “armed.” This means whenever the throttle control stick is advanced, the propeller will turn. So later, when the propeller is mounted and you are ready to fl...
- Page 9 ❏ ❏ 15. Tighten the pushrod locking screw so that it just 18. Remove the servo arm from the rudder servo. Loosen contacts the pushrod. Back it off about 1/8 of a turn the pushrod locking screw and fi t it to the rudder pushrod. so that you can move the pushrod in the connector with Install the rudder servo arm as close to 90°...
-
Page 10: Final Assembly
❏ 23. Unplug the LiPo battery and turn off your transmitter. Final Assembly ❏ 1. Tuck the wires into the fuselage and fi t the wing. Install the wing using the four supplied 8" [203mm] rubber bands. Cross one pair as shown. Make sure that the wing is sitting correctly and that the servo wires are not caught between the wing saddle and the wing. - Page 11 ❏ 5. Turn on your transmitter and plug in the LiPo battery. Use the transmitter to move the elevator, aileron and rudder. ❏ Test to see that all of the controls respond smoothly and in 3. Separate the hook side from the loop side of the 4" the correct direction.
-
Page 12: Balance The Model (C.g.)
If you need to add weight to balance your model, please Balance the Model (C.G.) purchase Great Planes Segmented Lead Weights (GPMQ4485). The C.G. (Center of Gravity) is the location on the wings, measured back from the leading edge on both sides of PREFLIGHT the fuselage, where the model balances. -
Page 13: Motor Safety Precautions
will motor mounting screws and bolts loosen, possibly with LITHIUM BATTERY HANDLING disastrous effect, but vibration may also damage your radio receiver and radio gear. AND USAGE We use a Top Flite ® Precision Magnetic Prop Balancer (TOPQ5700) in the workshop and keep a Great Planes WARNING!! Read the entire instruction sheet included with Fingertip Prop Balancer (GPMQ5000) in our fl... - Page 14 If during a fl ight the Tx LED starts to fl ash, accompanied Tactic’s optional TACP1000 rechargeable battery and wall by the sounding of audible tones, it’s a warning that the charger kit includes four “AA” size rechargeable NiMH cells Tx batteries have become weak and the aircraft should be and 110V AC wall charger, which is compatible with this Tx landed as soon as possible!
- Page 15 the OFF position. This will terminate the wireless link between and do not stand the Tx upright on the ground. Carefully both transmitters. If additional training will be performed lay the Tx on its back on the ground to prevent it from falling again, return to step 1 above to re-establish the wireless link over and possibly dislodging the throttle stick from the low between the teacher and student’s transmitters.
-
Page 16: Flying Your Skyfly Max
Until you know how much area will be FAILSAFE FUNCTION required and have mastered fl ying your SkyFly Max, a site at least the size of two or three football fi elds should be This radio system includes a “failsafe” function which will adequate - a fl... -
Page 17: Take Off
Until you have become comfortable with fl ying your induce what is known as a “stall.” This is when airfl ow over SkyFly Max, do not fl y if the wind speed is greater than the wing breaks up and the wing loses lift drastically. By 10 mph [16 kilometers/hr]. -
Page 18: Landing
Avoid making turns that make the model fl y behind you – this Landing can be very diffi cult to track and you can lose control of the model while you’re turning to watch the model. Plan your maneuvers out so that you will always stay in the fl ying area. To land, fl... - Page 20 ™ Entire Contents © Copyright 2009 HCAA2511 Mnl...
Need help?
Do you have a question about the skyfly max and is the answer not in the manual?
Questions and answers