Table of Contents
Advertisement
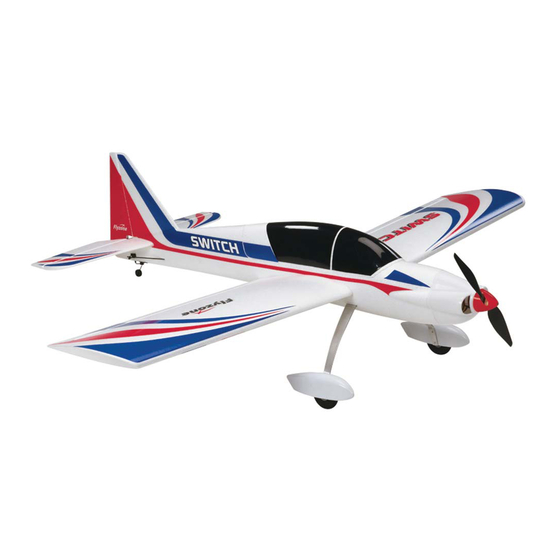
T R A I N E R E P R T F
SPECIFICATIONS
Wingspan:
45 in [1145 mm]
Wing Area:
419 sq in [27 dm
Wing Loading:
14 oz/sq ft [43 g/dm
WARRANTY
Hobbico guarantees this kit to be free from defects in both
material and workmanship at the date of purchase. This warranty
does not cover any component parts damaged by use or
modification. In no case shall Hobbico's liability exceed the
original cost of the purchased kit. Further, Hobbico reserves
the right to change or modify this warranty without notice.
In that Hobbico has no control over the final assembly or material
used for final assembly, no liability shall be assumed nor
accepted for any damage resulting from the use by the user of
the final user-assembled product. By the act of using the
user-assembled product, the user accepts all resulting liability.
If the buyer is not prepared to accept the liability associated
with the use of this product, the buyer is advised to return
READ THROUGH THIS MANUAL BEFORE STARTING CONSTRUCTION. IT CONTAINS IMPORTANT
INSTRUCTIONS AND WARNINGS CONCERNING THE ASSEMBLY AND USE OF THIS MODEL.
Entire Contents © 2010 Hobbico
, Inc.
®
INSTRUCTION MANUAL
Length:
2
Weight:
]
2
]
Battery:
™
42 in [1065 mm]
2.5 lbs [1130 g]
3S - 11.1V 1800mAh LiPo
this kit immediately in new and unused condition to the
place of purchase.
To make a warranty claim send the defective part or item to
Hobby Services at the address below:
Hobby Services
3002 N. Apollo Dr. Suite 1
Champaign IL 61822 USA
Include a letter stating your name, return shipping address, as
much contact information as possible (daytime telephone
number, fax number, e-mail address), a detailed description of
the problem and a photocopy of the purchase receipt. Upon
receipt of the package the problem will be evaluated as quickly
as possible.
Champaign, Illinois
E-mail: airsupport@hobbico.com
Radio:
4 Channel
Motor:
®
SuperTigre
ESC:
SuperTigre 30 ESC
(217) 398-8970
HCAA2530 Mnl 2.0
.10
Advertisement
Table of Contents

Related Manuals for Flyzone Switch


Summary of Contents for Flyzone Switch
-
Page 1: Instruction Manual
T R A I N E R E P R T F INSTRUCTION MANUAL SPECIFICATIONS Wingspan: Length: Radio: 45 in [1145 mm] 42 in [1065 mm] 4 Channel Wing Area: Weight: Motor: ® 419 sq in [27 dm 2.5 lbs [1130 g] SuperTigre Wing Loading: 14 oz/sq ft [43 g/dm... -
Page 2: Table Of Contents
Trainer is a revolutionary new concept in R/C airplane fl ight. may result in an unsafe or unfl yable model. In a few cases Learn to fl y with the Switch Trainer high wing confi guration, the instructions may differ slightly from the photos. In those then move the wings to the low wing confi... -
Page 3: Tools Required
fl y trainer available that we make this guarantee: You will some technically-minded modelers may wish to check successfully learn to fl y with the Switch or we will replace it these measurements anyway. To view this information visit with your choice of any Flyzone trainer of up to equal value. -
Page 4: Kit Contents
HCAA6328 High Wing Canopy adults (including the instructor) who can confi rm that HCAA6329 Low Wing Canopy the Switch was fl own in its high-wing confi guration. HCAA6330 Landing Gear ● Your replacement request must include your original HCAA6331 Wheels/Wheel Pants... -
Page 5: Assemble The Model
ASSEMBLE THE MODEL Install the Landing Gear ❏ 2. Install a 2.5×6mm self-tapping screw into the remaining holes in the pants and securely tighten them. ❏ 1. Thread a 2×12mm machine screw through the bottom hole of the landing gear leg and into the bottom hole of the wheel pant. -
Page 6: Install The Tail Section
Install the Tail Section ❏ 1. Insert the horizontal stabilizer joiner rod into the pocket ❏ in the right stabilizer half. 4. Insert the elevator pushrod into the adjustable clevis on the elevator control horn as shown. ❏ 2. Fit the right stabilizer half to the fuselage by sliding the joiner rod through the hole in the stabilizer mounting plate. -
Page 7: Setting Up The High Wing Confi Guration
Do not over-tighten. Setting Up the High Wing Confi guration We recommend fl ying the Switch Trainer EP fi rst in the high wing confi guration. The high wing position will provide some ❏... -
Page 8: Install The Propeller
When you have mastered the high wing confi guration and are ready for a more aerobatic fl ight experience, then it’s time to convert your Switch Trainer EP into the low wing confi guration. The low wing confi guration will be more agile in the air, roll more axially, and perform inverted fl... - Page 9 ❏ 4. Insert the wing joiner tube through the joiner tube holes in the fuselage. ❏ ❏ 5. Slide the wing panels onto the wing joiner. The aileron 2. Remove the screws that secure the aileron servo arms. servo leads should fi t through the slots in the fuselage sides. Pull the servo arms off the servos and move the pushrod Be sure the panels are fully seated against the fuselage.
-
Page 10: Get The Model Ready To Fly
2. Disconnect the battery from the ESC. Then, move the airplane. When it is time to balance the model, you may need throttle reversing switch on the transmitter. Confi rm that the to shift the battery forward or aft to achieve the balance point throttle stick is still in the idle position and reconnect the provided later in the manual. - Page 11 5. Moving the aileron control to the right (right stick) should cause the left aileron to move down and the right FULL ELEVATOR aileron to move up. Flip the aileron reversing switch on the THROTTLE MOVES DOWN transmitter if necessary.
-
Page 12: Supertigre Esc Manual Excerpts
2. Set the throttle trim and sub-trim to neutral or zero. except throttle, so you can maintain control of the aircraft. 3. Set the throttle channel’s reversing switch to reverse on SETTING UP THE BRAKE FUNCTION Futaba ®... -
Page 13: Check The Control Throws
Check the Control Throws The Switch Trainer EP RTF is setup from the factory with the recommended control throws for the high wing confi guration. If at any time you wish to return to the default control throws, or if you simply want to confi... -
Page 14: Balance The Model Laterally
❏ 4. If you found it necessary to move the battery or Range Check receiver, recheck the C.G. to confi rm the plane now balances between the tape lines. Do not fl y a plane that has not The “range” is the safe operating distance from the transmitter been properly balanced! to the receiver, and should be as far as you can clearly see the model. -
Page 15: Radio Control
❏ 3) Where established, I will abide by the safety rules for the 3. Balance your model laterally as explained in the fl ying site I use, and I will not willfully and deliberately fl y my instructions. models in a careless, reckless and/or dangerous manner. ❏... -
Page 16: Flight
Take it easy with the Switch Trainer EP for the fi rst few fl ights, are on the desired rates (high/low rates). A fl ight plan greatly gradually getting acquainted with it as you gain confi...
Need help?
Do you have a question about the Switch and is the answer not in the manual?
Questions and answers