Table of Contents
Advertisement
Quick Links
Advertisement
Table of Contents

Related Manuals for Digital Equipment DECserver 90L+


Summary of Contents for Digital Equipment DECserver 90L+
- Page 1 DECserver 90L+ Owner’s Manual Order Number: EK-DSRVG-OM.001...
- Page 2 January 1992 The information in this document is subject to change without notice and should not be construed as a commitment by Digital Equipment Corporation. Digital Equipment Corporation assumes no responsibility for any errors that may appear in this document.
-
Page 3: Table Of Contents
Contents About This Manual ........1 Overview Features . - Page 4 Disconnecting an Interrupted Terminal Session ... . 3–6 Using MOP Console Carrier ......3–6 Operating as a Console Requester .
- Page 5 A Specifications and Parts List Physical Dimensions ........A–1 Environmental Specifications .
- Page 6 5–1 DECserver 90L+ Troubleshooting ....5–1 MMJ Pin Out ....... . A–1 A–4 A–2...
-
Page 7: About This Manual
About This Manual This guide gives an overview of the DECserver 90L+ and describes how to install, operate, manage, and troubleshoot the DECserver 90L+. This guide also gives the specifications and related documentation for the DECserver 90L+. Organization This guide has five chapters and two appendices. Chapter Meaning Provides an overview of the DECserver 90L+ including its... - Page 8 Conventions Convention Meaning italic Indicates a new term or, in command syntax examples, italic words represent elements of a command for which you supply a value. For example: -> service Key names appear in a box. Return NOTE Provides general information. bold text Bold text represents user input.
-
Page 9: Overview
Overview This chapter describes the features of the DECserver 90L+ and provides a summary of the installation procedure. Features The DECserver 90L+ contains the following features: • Easy user interface • Eight ports – 1.2 K bits to 38.4 K bits per second •... -
Page 10: Quick Start
Overview Figure 1–1 Sample DECserver 90L+ Connection Personal Computer Terminal Terminal Printer Terminal Terminal Terminal Terminal DECserver 90L+ Terminal Server ThinWire Ethernet Computer 1 Computer 2 Computer 3 Computer N LJ-01099-TI0 Quick Start To install and begin using your DECserver 90L+ is simple. It does not require any programming or other assistance from system management. -
Page 11: Supported Terminal Characteristics
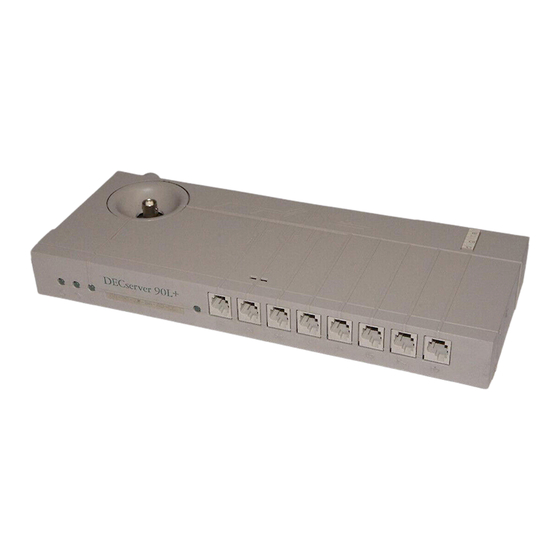
Overview 3. Connect a working terminal to one of the terminal ports. Refer to Table 1–1 for supported terminal characteristics. 4. Turn the power on to the terminal and press twice to get the Return DECserver 90L+ prompt (->). Pressing twice causes the green activity LED to blink and Return automatically sets the port’s baud rate. - Page 12 Overview Figure 1–2 shows the DECserver 90L+ and calls out its features. Figure 1–2 DECserver 90L+ L J - 0 0 0 7 2 - T I 0 1–4 Overview...
- Page 13 Overview Power Indicator - Turns on when +5 volts is supplied to the unit. Self-Test OK Indicator - Turns on when the unit has successfully completed its diagnostics. Network OK Indicator - Turns on when the unit is connected to a properly terminated network.
-
Page 15: Installing The Decserver 90L
Installing the DECserver 90L+ The DECserver 90L+ can be placed on a table, mounted to a wall, or installed in the DEChub 90 Ethernet backplane. Refer to the section Standalone Installation when installing the unit on a table or mounting it to a wall. Refer to the section Backplane Installation when installing the unit in the DEChub 90 Ethernet backplane. -
Page 16: Decserver 90L+ Standalone Installation
Installing the DECserver 90L+ Figure 2–1 DECserver 90L+ Standalone Installation 50 Ohm T er m i nato r T - C onnec t or International Power Supply North American Power Supply T er m i nal L J - 0 0 0 7 3 - T I 0 A . D G 2–2 Installing the DECserver 90L+... -
Page 17: Remove Cover (If Necessary)
Installing the DECserver 90L+ Remove Cover (if necessary). To remove the back cover of the DECserver 90L+ unit (Figure 2–2): 1. Insert a small screwdriver into the top mounting hole in the cover. 2. Lift up on the latch. 3. While lifting up on the latch, pull the top of the cover away and down from the unit. -
Page 18: Make Connections
Installing the DECserver 90L+ Make Connections. 1. Plug the power supply into the DECserver 90L+. 2. Attach the Ethernet T-connector to the BNC connector on the DECserver 90L+. Make sure the Ethernet segment is properly terminated at each end. 3. Attach the power cord to the power supply, if needed. 4. -
Page 19: Start Terminal Session
Installing the DECserver 90L+ Start Terminal Session. 1. Connect terminals to ports as needed. 2. To start a terminal session using a terminal connected to one of the ports: a. With the terminal turned on, press twice. This sets the baud rate Return of the port to that of the terminal. -
Page 20: Mount Decserver 90L
Installing the DECserver 90L+ Mount DECserver 90L+. 1. Place the lower mounting tab, located on the back of the DECserver 90L+, in the appropriate mounting slot on the backplane. Note The DECserver 90L+ can be installed in an operating DEChub 90 Ethernet backplane (hot-swap). -
Page 21: Decserver 90L+ Backplane Installation
Installing the DECserver 90L+ Figure 2–3 DECserver 90L+ Backplane Installation L J - 0 0 0 7 4 - T I 0 Installing the DECserver 90L+ 2–7... -
Page 22: Verify Ports
Installing the DECserver 90L+ Verify Ports. Verify the operation of each port by connecting a terminal to the port. Refer to Table 1–1 for supported terminal characteristics. Press twice (autobaud) Return to set the operating speed of the port. While watching the Activity LED, type a character on the terminal. -
Page 23: Start Terminal Session
Installing the DECserver 90L+ Start Terminal Session. 1. Connect terminals to ports as needed. 2. To start a terminal session using a terminal connected to one of the ports: a. With the terminal turned on, press twice. This sets the baud rate Return of the port to that of the terminal. -
Page 25: Operating The Decserver 90L
Operating the DECserver 90L+ Using the DECserver 90L+ terminal server is as easy as turning on your terminal, pressing twice, and entering the name of the service (nodename) Return you want to connect to at the -> prompt. You can also set a port for use by a printer. -
Page 26: Ending A Terminal Session
Operating the DECserver 90L+ 3. At the prompt (->), type your service name and press . The Return DECserver 90L+ indicates that it is attempting to connect by displaying a string of dots ".." on the screen. The following example shows the connection to a service named RED. ->... -
Page 27: Last Number Redial
Operating the DECserver 90L+ Last Number Redial Last number redial allows a port to connect to the last service accessed without entering the service or node name. This is done by entering the CONNECT command C[ONNECT] at the DECserver 90L+ prompt and pressing . - Page 28 Operating the DECserver 90L+ At this point you can issue a SHOW or SET command, resume the interrupted session, cycle forward or backward to other sessions, or end the session. The following is an example of displaying the sessions active for port 1. The asterisk next to the service name of session 1 shows it as the default session to which you are returned.
-
Page 29: Resuming An Interrupted Terminal Session
Operating the DECserver 90L+ Resuming an Interrupted Terminal Session To resume the current interrupted terminal session, type the connect command or RESU[ME] at the DECserver 90L+ prompt. To resume a specific session, > type the command and specify the session number. In the case of a MOP session, type M in place of the session number. -
Page 30: Disconnecting An Interrupted Terminal Session
Operating the DECserver 90L+ Disconnecting an Interrupted Terminal Session After you interrupt a terminal session, you might change your mind and decide not to resume the session. In this case, you can disconnect the session by typing the disconnect symbol or D[ISCONNECT] at the DECserver 90L+ prompt. -
Page 31: Operating As A Console Requester
Operating the DECserver 90L+ Operating as a Console Requester The DECserver 90L+ can operate as a console requester. As a console requester, the DECserver 90L+ establishes a MOP console carrier session with another console server on the same network. This is done by using the M[OP] command and the network device’s Ethernet address. -
Page 32: Decserver 90L+ Commands
Operating the DECserver 90L+ DECserver 90L+ Commands The commands used to establish and control a terminal session and to manage the DECserver 90L+ are described in Table 3–1. Chapter 4 provides a detailed description of the SET and SHOW commands and how they are used to manage the DECserver 90L+. - Page 33 Operating the DECserver 90L+ Table 3–1 (Cont.) DECserver 90L+ User Commands Symbol/Command Function B[ACKWARD] Cycles backward to the last session. Disconnects an interrupted terminal session or < disconnects the port, if no sessions are active. Disconnecting the port returns the port to the power-up state (non-autobaud).
-
Page 34: Decserver 90L+ Information And Error Codes
Operating the DECserver 90L+ DECserver 90L+ Information and Error Codes The DECserver 90L+ interface provides you with an informational message or an error message about any commands issued to the unit. Each message is made up of a message number and the message. Table 3–2 lists each message number and its message. - Page 35 Operating the DECserver 90L+ Table 3–2 (Cont.) DECserver 90L+ Information and Error Codes Message Number Message %DS90L–121 On-Demand Loading Disabled %DS90L–200 User requested halt %DS90L–204 This Port is not in Manager Mode %DS90L–205 Authorized Mode not Enabled %DS90L–206 Authorized Mode is Already Enabled %DS90L–207 Another Port is in Manager Mode %DS90L–208...
- Page 36 Operating the DECserver 90L+ Table 3–2 (Cont.) DECserver 90L+ Information and Error Codes Message Number Message %DS90L–311 Illegal message %DS90L–312 Protocol Error—Server Circuit Timer is Out of Range %DS90L–313 Protocol Error—Number of Virtual Circuits Exceeded %DS90L–314 Illegal Port Name %DS90L–315 Port Name is Used by Another Port %DS90L–316 Port In Use...
- Page 37 Operating the DECserver 90L+ Table 3–2 (Cont.) DECserver 90L+ Information and Error Codes Message Number Message %DS90L–341 Cannot Perform on Subject Port %DS90L–342 Target does not respond %DS90L–343 Cannot Set Dedicated/Preferred Service for Printer Operating the DECserver 90L+ 3–13...
-
Page 39: Managing The Decserver 90L
Managing the DECserver 90L+ The DECserver 90L+ requires very little in the way of management. It does not use or require the configuration of group codes. It requires that service ad timers be set to 60 seconds (the default) or less. Reducing the interval for service ad time improves the response of the DECserver 90L+ when making new connections. -
Page 40: Local Management
Managing the DECserver 90L+ Managing the DECserver 90L+ includes: • Examining port and server parameters and network counters • Setting port parameters • Setting server name, prompt, and zeroing counters • Security – Setting and clearing authorized mode – Enabling and disabling manager mode –... -
Page 41: Ethernet Circuit Names For Vms-Based Systems
Managing the DECserver 90L+ Table 4–1 Ethernet Circuit Names for VMS-Based Systems System Ethernet Circuit Name VAX 6000 and VAX 9000 XMI computers MNA-0 BI-based systems (VAX 6300 and VAX 6400 computers) BNA-0 VAX 4000 computers ISA-0 MicroVAX/3600/3900 computers QNA-0 VAXstation 2000 and 3000 computers SVA-0 VAX–11/780 and VAX–11/785 computers (UNIBUS) -
Page 42: Accessing Mop From Ultrix
Managing the DECserver 90L+ Accessing MOP from ULTRIX On ULTRIX operating systems, the console carrier is a separate utility included as part of the MOP option. The option is part of the regular distribution but is not selected by default and is not included in the basic installation. You can install MOP from the original distribution media by using the setld utility. -
Page 43: Security
Managing the DECserver 90L+ Security Security for the DECserver 90L+ is provided by a password protected management mode. This mode of operation is called authorized mode and can be set and cleared as required. When authorized mode is set, the following conditions exist: •... -
Page 44: Management Commands
Managing the DECserver 90L+ Management Commands The commands used to manage the DECserver 90L+ are the SET, SHOW, and RESET commands. The SET and SHOW commands can be used from the menu to show or set parameters. A command line mode is available for use by network management software or by users that want to bypass the menu interface. - Page 45 Managing the DECserver 90L+ Table 4–3 Port Parameters Field Description Port Name Maximum of six characters. You can use the hyphen (-), underscore (_), dollar sign ($), or alpha-numeric characters. Speed Sets the receive/transmit speed of the port. When a terminal is connected to a port, the DECserver 90L+ automatically sets the speed through autobaud.
- Page 46 Managing the DECserver 90L+ Setting Port Parameters from the Menu To set port parameters from the menu: 1. Enter SET at the DECserver 90L+ prompt and press . The asterisk (*) Return in the menu indicates the port to which you are connected. The following example shows how to set port 8 for use with a printer (user entries are bolded).
- Page 47 Managing the DECserver 90L+ The following example shows how to set port parameters from the menu. -> SET Return |1 PORT_1* |2 PORT_2 |3 PORT_3 |4 PORT_4 |5 PORT_5 |6 PORT_6 |7 PORT_7 |8 PORT_8 |AUTH Authorized |AUTO AutoConfigure Dedicated Service Manager On-Demand Loading Password...
-
Page 48: Setting And Clearing Authorized Operation
Managing the DECserver 90L+ The following example shows how to set port 8 for use with a printer (user entries are bolded). The following port parameters are set in this example. Port name: PRINT Speed: 9600 Input flow: Remains unchanged Output flow: Remains unchanged Device type: Printer Break: Remote... - Page 49 Managing the DECserver 90L+ The following example shows how to set the authorized operation from the menu. -> SET Return |1 PORT_1* |2 PORT_2 |3 PORT_3 |4 PORT_4 |5 PORT_5 |6 PORT_6 |7 PORT_7 |8 PRINT |AUTH Authorized |AUTO AutoConfigure Dedicated Service Manager On-Demand Loading...
- Page 50 Managing the DECserver 90L+ Clear Authorized Mode by Menu Clearing authorized mode disables the security on the DECserver 90L+. To clear authorized mode, your port must be in manager mode or you must have physical access to the unit. Physical access to the unit is required when the unit’s password is not known.
- Page 51 Managing the DECserver 90L+ The following example shows how to clear the authorized mode from the menu. -> SET Return |1 PORT_1* |2 PORT_2 |3 PORT_3 |4 PORT_4 |5 PORT_5 |6 PORT_6 |7 PORT_7 |8 PRINT |AUTH Authorized |AUTO AutoConfigure Dedicated Service Manager On-Demand Loading...
-
Page 52: Enabling And Disabling Autoconfigure
Managing the DECserver 90L+ Enabling and Disabling AutoConfigure Terminal ports on the DECserver 90L+ are set from the factory to support autobaud and AutoConfigure for flow control, break mode, and remote modification. While these parameters can be changed, only the port name for a terminal is saved in NVRAM. - Page 53 Managing the DECserver 90L+ The following example shows how to enable AutoConfigure from the menu. -> SET Return |1 PORT_1* |2 PORT_2 |3 PORT_3 |4 PORT_4 |5 PORT_5 |6 PORT_6 |7 PORT_7 |8 PRINT |AUTH Authorized |AUTO AutoConfigure Dedicated Service Manager On-Demand Loading Password...
- Page 54 Managing the DECserver 90L+ Disable AutoConfigure by Menu To disable AutoConfigure from the menu: 1. Enter SET at the DECserver 90L+ prompt and press . The asterisk (*) Return indicates the port to which you are connected. 2. Select AutoConfigure by entering AUTO and press Return 3.
- Page 55 Managing the DECserver 90L+ The following example shows how to disable AutoConfigure from the menu. -> SET Return |1 PORT_1* |2 PORT_2 |3 PORT_3 |4 PORT_4 |5 PORT_5 |6 PORT_6 |7 PORT_7 |8 PRINT |AUTH Authorized |AUTO AutoConfigure Dedicated Service Manager On-Demand Loading Password...
-
Page 56: Enabling And Disabling Dedicated Service
Managing the DECserver 90L+ Enabling and Disabling Dedicated Service The SET command is used to enable and disable dedicated service for a port. Dedicated service allows a system manager to create a captive account, which includes the option of defining a specific service, node, and port. This feature is useful in situations where it is best for the user to have direct access to a specific service, for example, shipping and receiving areas, clerical areas, and so on. - Page 57 Managing the DECserver 90L+ The following example shows how to enable dedicated service from the menu. -> SET Return |1 PORT_1* |2 PORT_2 |3 PORT_3 |4 PORT_4 |5 PORT_5 |6 PORT_6 |7 PORT_7 |8 PRINT |AUTH Authorized |AUTO AutoConfigure Dedicated Service Manager On-Demand Loading Password...
- Page 58 Managing the DECserver 90L+ Disable Dedicated Service by Menu To disable dedicated service from the menu: 1. Enter SET at the DECserver 90L+ prompt and press . The asterisk (*) Return indicates the port to which you are connected. 2. Select Dedicated Service by entering D and press Return 3.
- Page 59 Managing the DECserver 90L+ The following example shows how to disable dedicated service from the menu. -> SET Return |1 PORT_1* |2 PORT_2 |3 PORT_3 |4 PORT_4 |5 PORT_5 |6 PORT_6 |7 PORT_7 |8 PRINT |AUTH Authorized |AUTO AutoConfigure Dedicated Service Manager On-Demand Loading Password...
-
Page 60: Enabling And Disabling Manager Mode
Managing the DECserver 90L+ Enabling and Disabling Manager Mode Manager mode is used to modify server characteristics as well as characteristics of other ports. The SET command invokes Manager mode. The DECserver 90L+ password is required to invoke manager mode. Only one port can be in Manager mode at a time. - Page 61 Managing the DECserver 90L+ The following example shows how to enable manager mode from the menu. -> SET Return |1 PORT_1* |2 PORT_2 |3 PORT_3 |4 PORT_4 |5 PORT_5 |6 PORT_6 |7 PORT_7 |8 PRINT |AUTH Authorized |AUTO AutoConfigure Dedicated Service Manager On-Demand Loading Password...
- Page 62 Managing the DECserver 90L+ Disable Manager Mode by Menu To disable manager mode operation for a port, you must be attached to the port and use the SET command. To disable manager mode from the menu: 1. Enter SET at the DECserver 90L+ prompt and press .
- Page 63 Managing the DECserver 90L+ The following example shows how to disable manager mode from the menu. -> SET Return |1 PORT_1* |2 PORT_2 |3 PORT_3 |4 PORT_4 |5 PORT_5 |6 PORT_6 |7 PORT_7 |8 PRINT |AUTH Authorized |AUTO AutoConfigure Dedicated Service Manager On-Demand Loading Password...
-
Page 64: Enabling And Disabling On-Demand Loading
Managing the DECserver 90L+ Enabling and Disabling On-Demand Loading The On-Demand Loading option allows on-demand loading of fonts, composed of a large number of characters, for Asian terminals. The default for the option is disabled. When on-demand loading is enabled, the XON/XOFF processing and the detection of break characters can be affected. - Page 65 Managing the DECserver 90L+ The following example shows how to enable On-Demand Loading from the menu. -> SET Return |1 PORT_1* |2 PORT_2 |3 PORT_3 |4 PORT_4 |5 PORT_5 |6 PORT_6 |7 PORT_7 |8 PRINT |AUTH Authorized |AUTO AutoConfigure Dedicated Service Manager On-Demand Loading Password...
- Page 66 Managing the DECserver 90L+ Disable On-Demand Loading by Menu To disable On-Demand Loading from the menu: 1. Enter SET at the DECserver 90L+ prompt and press . The asterisk (*) Return indicates the port to which you are connected. 2. Select On-Demand Loading by entering O and press Return 3.
- Page 67 Managing the DECserver 90L+ The following example shows how to disable On-Demand Loading from the menu. -> SET Return |1 PORT_1* |2 PORT_2 |3 PORT_3 |4 PORT_4 |5 PORT_5 |6 PORT_6 |7 PORT_7 |8 PRINT |AUTH Authorized |AUTO AutoConfigure Dedicated Service Manager On-Demand Loading Password...
-
Page 68: Changing Password By Menu
Managing the DECserver 90L+ Changing Password by Menu The SET command is used to change the password of the DECserver 90L+. The password can be a maximum of eight characters. To change the password, the port you are using must be in manager mode. To change the password interactively: 1. - Page 69 Managing the DECserver 90L+ The following example shows how to set the password from the menu. -> SET Return |1 PORT_1* |2 PORT_2 |3 PORT_3 |4 PORT_4 |5 PORT_5 |6 PORT_6 |7 PORT_7 |8 PRINT |AUTH Authorized |AUTO AutoConfigure Dedicated Service Manager On-Demand Loading Password...
-
Page 70: Enabling And Disabling Ports
Managing the DECserver 90L+ Enabling and Disabling Ports The SET command is used to enable and disable a port from operation. If the system manager wants to disable a user’s port for security reasons, it can be done through software using the command line mode. The factory default is that all ports are enabled. - Page 71 Managing the DECserver 90L+ The following example shows how to enable a port from the menu. -> SET Return |1 PORT_1* |2 PORT_2 |3 PORT_3 |4 PORT_4 |5 PORT_5 |6 PORT_6 |7 PORT_7 |8 PRINT |AUTH Authorized |AUTO AutoConfigure Dedicated Service Manager On-Demand Loading Password...
- Page 72 Managing the DECserver 90L+ Disable a Port by Menu To disable a port from the menu: 1. Enter SET at the DECserver 90L+ prompt and press . The asterisk (*) Return indicates the port to which you are connected. 2. Select Port by entering PO and press Return 3.
- Page 73 Managing the DECserver 90L+ The following example shows how to disable a port from the menu. -> SET Return |1 PORT_1* |2 PORT_2 |3 PORT_3 |4 PORT_4 |5 PORT_5 |6 PORT_6 |7 PORT_7 |8 PRINT |AUTH Authorized |AUTO AutoConfigure Dedicated Service Manager On-Demand Loading Password...
-
Page 74: Enabling And Disabling Preferred Service
Managing the DECserver 90L+ Enabling and Disabling Preferred Service The SET command is used to enable and disable preferred service. A preferred service is a network service that is connected if a CONNECT command is issued without specifying the service name. If a preferred service is enabled for a port, you need only to type the CONNECT command to initiate a connection to the service name stored in NVRAM. - Page 75 Managing the DECserver 90L+ The following example shows how to enable preferred service from the menu. -> SET Return |1 PORT_1* |2 PORT_2 |3 PORT_3 |4 PORT_4 |5 PORT_5 |6 PORT_6 |7 PORT_7 |8 PRINT |AUTH Authorized |AUTO AutoConfigure Dedicated Service Manager On-Demand Loading Password...
- Page 76 Managing the DECserver 90L+ Disable Preferred Service by Menu To disable preferred service from the menu: 1. Enter SET at the DECserver 90L+ prompt and press . The asterisk (*) Return indicates the port to which you are connected. 2. Select Preferred Service by entering PR and press Return 3.
- Page 77 Managing the DECserver 90L+ The following example shows how to disable preferred service for a port from the menu. -> SET Return |1 PORT_1* |2 PORT_2 |3 PORT_3 |4 PORT_4 |5 PORT_5 |6 PORT_6 |7 PORT_7 |8 PRINT |AUTH Authorized |AUTO AutoConfigure Dedicated Service Manager...
-
Page 78: Setting Server Parameters
Managing the DECserver 90L+ Setting Server Parameters The following server parameters can be set: • Server name • Prompt • Zero counters • Reset server and ports to factory default settings Note: Resetting the server disconnects all sessions Table 4–4 describes each of the parameters that can be set. Server parameters can be set from a menu or by a command line entered at the prompt. - Page 79 Managing the DECserver 90L+ Setting Server Parameters from the Menu To set server parameters from the menu: 1. Enter SET at the DECserver 90L+ prompt and press . The asterisk (*) Return in the menu indicates the port to which you are connected. 2.
- Page 80 Managing the DECserver 90L+ The following example shows how to set the server name to MYSERVER, set the prompt to MYPROMPT>, and zero the counters (user entries are bolded). -> SET Return |1 PORT_1* |2 PORT_2 |3 PORT_3 |4 PORT_4 |5 PORT_5 |6 PORT_6 |7 PORT_7...
-
Page 81: Show Command
Managing the DECserver 90L+ SHOW Command The SHOW command allows you to show port or server parameters, status, and counters. SHOW PORTS The SHOW PORTS command displays the status for each of the eight ports of the DECserver 90L+. Table 4–5 describes each of the fields in the port status display. Table 4–5 Port Status Description Field Description... - Page 82 Managing the DECserver 90L+ Table 4–5 (Cont.) Port Status Description Field Description Frame Err A counter that gives the number of framing errors for a port. Queued Printer ports only. Lists jobs queued to the port (maximum of seven plus one active). The SHOW command allows you to examine the status of all ports or a selected port.
- Page 83 Managing the DECserver 90L+ SHOW PORTS by Menu The following example shows the SHOW PORTS command used to examine the status of all the ports. The example shows the command entered interactively. 1. Enter SHOW at the DECserver 90L+ prompt and press .
- Page 84 Managing the DECserver 90L+ Show Status of Selected Port by Menu The following example shows how to examine the status of a selected port using menu mode. 1. Enter SHOW at the DECserver 90L+ prompt and press . The asterisk Return (*) indicates the port to which you are connected, in this case Port 1.
-
Page 85: Show Server
Managing the DECserver 90L+ SHOW SERVER The SHOW SERVER command displays the server type, protocol it runs, Ethernet address, server name, network counters, current prompt, status of security, NVRAM, and the network connection. SHOW SERVER by Menu The SHOW SERVER command can be entered interactively or by a command line. - Page 86 Managing the DECserver 90L+ The following example shows how to show the server from the menu. -> SHOW Return |1 PORT_1* |2 PORT_2 |3 PORT_3 |4 PORT_4 |5 PORT_5 |6 PORT_6 |7 PORT_7 |8 PRINT |P Ports |S Server |D Dedicated/Preferred Service Return DECserver 90L+ V2.0 BL4.0 Address:...
-
Page 87: Show Dedicated/Preferred Service
Managing the DECserver 90L+ SHOW DEDICATED/PREFERRED SERVICE The SHOW DEDICATED/PREFERRED SERVICE command displays the dedicated and preferred services that have been enabled for each port. Show Dedicated/Preferred Service by Menu The SHOW DEDICATED/PREFERRED command can be entered interactively or by a command line. The following example shows the SHOW DEDICATED /PREFERRED command entered interactively. -
Page 88: Reset Command
Managing the DECserver 90L+ RESET Command The RESET command allows you to reset individual ports or server parameters to their power-up state and run the unit’s self-test. Resetting the server sets all port and server parameters to their power-up state, disconnects all sessions, and runs a self-test. -
Page 89: Command Line
Managing the DECserver 90L+ Command Line The DECserver 90L+ user interface provides a command line interpreter as an alternate means to set and show port and server parameters. The command line interpreter helps with the control of the DECserver 90L+ by network management software and by users who want to bypass the menu interface. - Page 90 Managing the DECserver 90L+ Set Authorized Mode: -> SET AUTH[orized],S[et],<password> Clear Authorized Mode: -> SET AUTH[orized],C[lear] Enable AutoConfigure Mode: -> SET AUTO[configure],<port>,E[nable] Disable AutoConfigure Mode: -> SET AUTO[configure],<port>,D[isable] Enable Dedicated Service Mode: -> SET D[edicated],<port>,E[nable],<service>[,<node>[,<port>]] Disable Dedicated Service Mode: -> SET D[edicated],<port>,D[isable] Enable Manager Mode: ->...
- Page 91 Managing the DECserver 90L+ Show Port Parameters: -> SHOW P[orts] Show Server Parameters: -> SHOW S[erver] Show Dedicated/Preferred Parameters: -> SHOW D[edicated] Reset Port Parameters: -> RESET <port> Reset Server Parameters: -> RESET S[erver] Command Line Recall and Editing The DECserver 90L+ supports command line recall and editing of the command line.
-
Page 92: Using A Printer
Managing the DECserver 90L+ Using a Printer The installation requirements for a printer are dependent on the system environment in which it is installed. However, there are three basic steps that need to be performed when setting a DECserver 90L+ port for use by a printer. 1. - Page 93 Managing the DECserver 90L+ 3. Set the LTA device to the same speed as the DECserver 90L+ port: $ SET TERM /NOBROAD/PERM/SPEED=9600 /WID=80 LTA1234: 4. Configure the print queue. For example, assuming that the queue manager has been started, the VMS commands to create a queue named LASER1 that is spooled to the system disk are as follows: $ SET DEVICE/SPOOL=(LASER1, SYS$SYSDEVICE:) LTA1234:...
-
Page 95: Troubleshooting The Decserver 90L
Troubleshooting the DECserver 90L+ This chapter describes how to troubleshoot the DECserver 90L+. To troubleshoot your unit: 1. Verify that the unit is properly installed. 2. Note the fault condition. 3. Isolate the problem. Use Table 5–1 as a guide to determine the probable cause and the suggested solution. - Page 96 Troubleshooting the DECserver 90L+ Table 5–1 (Cont.) DECserver 90L+ Troubleshooting If... Then... Do this... There is no response The port and terminal Shut off and turn on the terminal. from the terminal server baud rates are not Press twice to set the port Return compatible.
- Page 97 Troubleshooting the DECserver 90L+ Table 5–1 (Cont.) DECserver 90L+ Troubleshooting If... Then... Do this... The printer does not The port is not set for a Set the port for the printer. work printer. The baud rates are Check printer and port baud rates. incompatible.
-
Page 99: A Specifications And Parts List
Specifications and Parts List Specifications for the DECserver 90L+ are divided into the following categories: • Physical dimensions • Environmental specifications • Electrical specifications • LAT specifications Physical Dimensions The physical dimensions of the DECserver 90L+ are as follows: Dimension Value Height 3.18 cm ( 1.25 in) -
Page 100: Environmental Specifications
Specifications and Parts List Environmental Specifications The DECserver 90L+ is designed to operate in an office environment or equipment room environment such as, telephone closets or satellite equipment rooms. It is not intended to operate in an air plenum. Operating Environment The operating environment for the DECserver 90L+ is as follows: Item Value... -
Page 101: Power Specifications
Specifications and Parts List Power Specifications The following sections describe the power specifications for the DECserver 90L+. Power Supply Item Value Voltage (North American) 104 VAC to 128 VAC (nominal 120 VAC) Voltage (International) 208 VAC to 256 VAC (nominal 240 VAC) Current at 120 volts .25 A Current at 240 volts... -
Page 102: Port Circuit
Specifications and Parts List Table A–1 MMJ Pin Out Signal Name Ready-Out or DSR Transmit (TXA) Transmit return (RC) Receive return (RXB) Receive (RXA) Ready-In or DTR This signal is pulled high when power is applied to the DECserver 90L+. This signal is tied to ground through a 3K ohm resistor. -
Page 103: Lat Specifications
Specifications and Parts List LAT Specifications This section provides a description of the LAT implemented by the DECserver 90L+. Table A–2 lists the server characteristics. Table A–2 LAT Server Characteristics Characteristic Setting High protocol Low protocol Product type code Node type Master Keepalive timer Master circuit timer... -
Page 104: Parts List
Specifications and Parts List Table A–3 lists the port characteristics. Table A–3 LAT Port Characteristics Characteristic Setting Character size Flow control XON/XOFF or disabled Parity None Speed (Input = Output) 1.2K to 38.4K Name 6 characters (settable) Break Local, remote (settable) Session limit Parts List Table A–4 lists the kit contents for a standalone installation. -
Page 105: Dechub 90 Ethernet Backplane Installation Kit Contents
Specifications and Parts List Table A–5 lists the kit contents for the installation in a DEChub 90 Ethernet backplane. Table A–5 DEChub 90 Ethernet Backplane Installation Kit Contents Part Order Number DECserver 90L+ kit: DSRVG-MA • DECserver 90L+ • Owner’s Manual (EK-DSRVG-OM) Table A–6 lists the related parts for the DECserver 90L+. -
Page 107: Ordering Information
EK-DECSY-CG Ordering Information Customers can order documents by phone or mail. Continental USA and Puerto Rico Call 800-258-1710 or mail to: Digital Equipment Corporation Peripherals and Supplies Group P.O. Box CS2008 Nashua, NH 03061 New Hampshire, Alaska, and Hawaii Call 1-603-884-6660. - Page 108 Related Documentation Digital Personnel Digital personnel can order these documents from: Digital Equipment Corporation 444 Whitney Street Northboro, MA 01532 Attn: Publishing and Circulation Services (NRO2) Order Processing Section VMS mail to ORDER::NEST ALL–IN–1 mail to ORDER @NRO B–2 Related Documentation...
- Page 109 Index Commands (cont’d) user, 3–8 Connectors Activity indicator, 1–5 backplane, 1–5 Authorized operation MMJ pin out, A–3 clearing by command line, 4–12 network, 1–5 clearing by menu, 4–12 port, 1–5 set and clear, 4–10 power, 1–5 setting by command line, 4–10 Conventions, viii setting by menu, 4–10 Cover...
- Page 110 Error, fault conditions, 5–1 Error codes and information, 3–10 to 3–13 Maintenance operations protocol Ethernet address See MOP location of, 1–5 Management commands, 4–6 local, 4–2 Fault conditions, 5–1 remote, 4–2 Manager mode, 4–22 disable by command line, 4–24 disable by menu, 4–24 Getting started, 1–2 disabling, 4–18, 4–36 enable by command line, 4–22...
- Page 111 Printer (cont’d) Operating as a console server, 3–7 using a, 3–7, 4–54 Parts list, A–6 Redial, last number, 3–3 Password Remote management, 4–2 changing by command line, 4–30 Reset changing by menu, 4–30 by menu, 4–50 Personal Computer RESET command how to use the DECserver 90L+ with a, by command line, 4–50 3–1...
- Page 112 Terminal session (cont’d) resuming an interrupted session, 3–5 starting a session, 2–5, 2–9 Troubleshooting determining cause and solution, 5–1 to 5–3 Verification network, 2–4, 2–8 ports, 2–4, 2–8 Index–4...
Need help?
Do you have a question about the DECserver 90L+ and is the answer not in the manual?
Questions and answers