Table of Contents
Advertisement
Advertisement
Table of Contents
Troubleshooting

Related Manuals for Digital Equipment DECserver 90M


Summary of Contents for Digital Equipment DECserver 90M
- Page 1 DECserver 90M Owner’s Manual Part Number : EK-DSRVH-OM. A01...
- Page 2 –Geräten betrieben werden. ( Integrated Services Digital Network) ATTENTION Le DECserver 90M n’a pas été conçu pour fonctionner avec des réseaux de télécommunication ou des modules ISDN (Integrated Services Digital Network). A VISO El DECserver 90M no ha sido diseñado para su uso con redes...
- Page 3 DECserver 90M Owner’s Manual Part Number : EK-DSRVH-OM. A01...
- Page 4 ________________________________________________________________ The information in this document is subject to change without notice and should not be construed as a commitment by Digital Equipment Corporation. Digital Equipment Corporation assumes no responsi- bility for any errors that may appear in this document.
- Page 5 Für Bundesrepublik Deutschland For Federal Republic of Germany Pour la République féderale d’Allemagne Hochfrequenzgerätezulassung und Betriebsgenehmigung Bescheinigung des Herstellers/Importeurs Hiermit wird bescheinigt, daß die Einrichtung in Übereinstimmung mit den Bestimmungen der DBP–Verfügung 523/1969, Amtsblatt 113/1969, und Grenzwertklasse ”A” der VDE0871, funkentstört ist. Das Zentralamt für Zulassungen im Fernmeldewesen der Deutschen Bundespost (DBP), hat diesem Gerät eine...
- Page 6 Betreiberhinweis Das Gerät wurde funktechnisch sorgfältig entstört und geprüft. Die Kennzeichnung mit der Zulassungsnummer bietet Ihnen die Gewähr, daß dieses Gerät keine anderen Fernmeldeanlagen einschließlich Funkanlagen stört. Sollten bei diesen Geräten ausnahmsweise trotzdem, z.B. im ungünstigsten Fall beim Zusammenschalten mit anderen EDV–Geräten, Funkstörungen auftreten DIGITAL kann das im Einzelnenizusätzlichenal Funkentstörungsmaßnahmen durch den...
- Page 7 Kennzeichnung Die Geräte werden bereits in der Fertigung mit der Zulassungsnummer gekennzeichnet und mit einer Anmeldepostkarte versehen. Sollte Kennzeichnung und Anmeldepostkarte übergangsweise nicht mit ausgeliefert werden kontaktieren Sie bitte das nächstgelegene Digital Equipment Kundendienstbüro.
-
Page 9: Table Of Contents
Using Console Commands to Boot ....2–11 Verifying the Operation of the DECserver 90M Ports ..2–14... - Page 10 ........A–3 A–5 DECserver 90M Power Specifications ....A–3 A–6...
-
Page 11: About This Manual
DECserver 90M. Document Structure This manual contains the following three chapters and one appendix: Chapter 1 provides an overview of the DECserver 90M features. Chapter 2 describes selected methods of installing the DECserver 90M. Chapter 3 describes troubleshooting techniques. Appendix A lists DECserver 90M specifications. - Page 12 Related Documentation LAT Network Concepts Network Access Server Commands Network Access Server Management Network Access Server Problem Solving DECserver Network Access Software Installation (MS-DOS , OpenVMS , ULTRIX , or UNIX ) DEChub 90 Owner’s Manual OPEN DECconnect Applications Guide Conventions This manual uses the following conventions: Convention...
-
Page 13: Overview
This chapter provides an overview of the DECserver 90M and its features. 1.1 Description The DECserver 90M is a multisession network access server designed to operate in multivendor environments. The DECserver 90M can be configured as a standalone device or as a module in the DEChub 90 Ethernet backplane. -
Page 14: Decserver 90M Connection
Figure 1–1 shows a typical DECserver 90M configuration in a ThinWire Ethernet LAN. Figure 1–1: DECserver 90M Connection Personal TD/SMP Personal Printer computer terminal computer Terminal Terminal Terminal Terminal DECserver 90M ThinWire Ethernet DECnet OpenVMS ULTRIX host router host IP router/... -
Page 15: Features
1.2 Features In addition to the previously mentioned capabilities, the DECserver 90M sup- ports the following standard features and protocols: Rack mountable in the DEChub 90 Ethernet backplane Ready-in/ready-out or XON/XOFF flow control Manageable through remote console facility on OpenVMS... - Page 16 – Maintenance Operation Protocol (MOP) – Point-to-Point Protocol (PPP) – Serial Line Internet Protocol (SLIP) – Simple Network Management Protocol (SNMP) – Telnet – Terminal Device/Session Management Protocol (TD/SMP) – Trivial File Transfer Protocol (TFTP) 1–4 DECserver 90M Owner’s Manual...
-
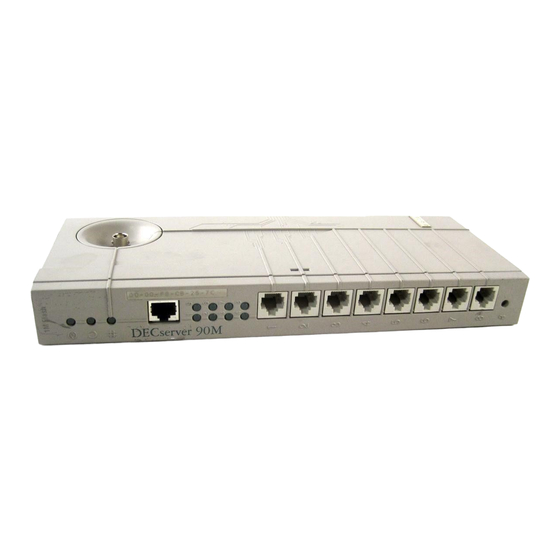
Page 17: Decserver 90M Hardware
Figure 1–2 calls out the DECserver 90M controls, indicators, and connectors. Table 1–1 provides a description of these features. Figure 1–2: DECserver 90M Hardware LKG–6736–92I Overview 1–5... -
Page 18: Controls, Indicators, And Connectors
Present on standalone units only. Reset Switch Resets the DECserver 90M to the factory-default characteristics. Network Connector (BNC) Connects the DECserver 90M to the ThinWire network. Not used when you install the DEC- server 90M in a DEChub 90 Ethernet backplane. 1–6... -
Page 19: Installation
Installation The DECserver 90M can be installed as a standalone device – on a tabletop or mounted to a wall – or added to the DEChub 90 Ethernet backplane. Before you begin the hardware installation –– if Flash RAM is not present ––... -
Page 20: Standalone Installation
4. Replace the back cover on the unit. Tabletop and Wallmount: 5. Connect the DECserver 90M BNC connector to a properly configured Thin- Wire network as shown in Figure 2–2. Connect the 10BaseT connector to a properly configured 10BaseT network as shown in Figure 2–3. - Page 21 6. Verify that the power LED is on and that the DECserver 90M is running the self-tests. NOTE Chapter 1 provides an illustration of the DECserver 90M hardware and descriptions of the LED indica- tors. 7. Optionally, attach a device configured with the following settings to the con- sole port (default is port 1) using a cable terminated with an MJ8-compatible (RJ45) plug.
-
Page 22: Removing The
Figure 2–1: Removing the Back Cover LKG–6739-92I 2–4 DECserver 90M Owner’s Manual... -
Page 23: Standalone Configuration - Thinwire Connection
Figure 2–2: Standalone Configuration – ThinWire Connection 50 ohm Terminator T-Connector International Power Supply North American Power Supply Reset Switch LKG-6738-92I Installation 2–5... -
Page 24: Backplane Installation
1. Remove the back cover (refer to Figure 2–1). 2. Place the lower mounting tab, located on the back of the DECserver 90M, in the appropriate mounting slot on the backplane (refer to Figure 2–4). 3. Rock the unit into place. You hear a click when the device is securely latched in place. - Page 25 5. Secure a ThinWire connection or terminator on the backplane BNC connec- tor. 6. Verify that the power LED is on and that the DECserver 90M is running the self-tests. 7. Optionally, attach a device configured with the following settings to the con- sole port (default is port 1) using a cable terminated with an MJ8-compatible (RJ45) plug.
-
Page 26: Backplane Installation
Figure 2–4: Backplane Installation LKG-6740-92I 2–8 DECserver 90M Owner’s Manual... -
Page 27: Running The Decserver 90M Self-Tests
2.2 Running the DECserver 90M Self-Tests The DECserver 90M runs a series of self-tests when you turn on the power and re- ports test status through the DECserver 90M LEDs (refer to Figure 1–1). If the DECserver 90M is not properly connected to an Ethernet LAN (refer to Section 2.1), the network loopback self-tests fail. -
Page 28: Loading The Decserver Network Access Software
90M is using to downline load the software. Port Activity LED 5 goes on to indi- cate that all attempts to find a load host have failed and that the DECserver 90M will remain in a wait state for a designated period of time before trying again. -
Page 29: Using Console Commands To Boot
A nonstandard boot image name is any name other than MNENG2. To allow booting of a nonstandard boot image name, perform the following steps: 1. During the boot sequence of the DECserver 90M initialization process, press Ctrl/B two times consecutively. -
Page 30: Interactive Boot Mode Commands
DECserver is unable to find an image in Flash RAM, then it loads from the network. The network load host defines this software and is typically based on the Ethernet MAC address of the DECserver. 2–12 DECserver 90M Owner’s Manual... - Page 31 B media:name –– The media name specifies which boot media to use. – FLA: –– Use Flash RAM. For example: B FLA:MNENG2 – ETH: –– Use the network to find a load host. For example: B ETH:MNENG2 – FLA:ETH: –– Use Flash RAM first, and if that does not work, then use the network to find a load host.
-
Page 32: Verifying The Operation Of The Decserver 90M Ports
2.4 Verifying the Operation of the DECserver 90M Ports To verify the operation of each port, perform the following steps: 1. Connect a terminal to the port you want to test. 2. Press the Return key two or three times to set the operating speed (autobaud) of the port. -
Page 33: Troubleshooting
3. Isolate the problem. 3.1 Operating Problems When troubleshooting self-test or boot problems, connect a terminal to the con- sole port on the DECserver 90M to view error messages. Port 1 is the default console port. NOTE For descriptions of error messages and tips on trouble- shooting DECserver 90M problems, refer to the Net- work Access Server Problem Solving manual. -
Page 34: Decserver 90M Troubleshooting
10BaseT connector does not go on. is not connected to a properly terminated network. A fatal hardware error Replace the DECserver 90M. occurred. The port activity LEDs Interface cable may be Secure or replace the cable. do not respond when disconnected or faulty. - Page 35 Table 3–1 (Cont.): DECserver 90M Troubleshooting Problems Possible Causes Action The network LED is not The network is down. Determine the network status. Check network Run MOP loopback or MOP connectivity. console carrier session tests. The Ethernet connection Reconnect the Ethernet cable.
- Page 36 Table 3–1 (Cont.): DECserver 90M Troubleshooting Problems Possible Causes Action Printer does not print or Printer port and baud Reset printer and port baud rates prints incorrectly. rate do not match. to match. The printer port LED The printer is Connect the printer.
-
Page 37: Physical Specifications
Specifications This appendix lists the specifications for the DECserver 90M. A.1 Physical Specifications Table A–1 lists the physical specifications for the DECserver 90M. Table A–1: Physical Specifications Dimension Value Height 3.18 cm (1.25 in) Width 27.31 cm (10.75 in) Depth 12.70 cm (5.0 in) -
Page 38: Environmental Specifications
A.2 Environmental Specifications The DECserver 90M is designed to operate in an office environment or in equip- ment room environments, such as telephone closets or satellite equipment rooms. The operating and shipping environments are described in Tables A–2 and A–3. -
Page 39: Power Specifications
A.3 Power Specifications Table A–4 lists the DECserver 90M power supply specifications and Table A–5 lists the DECserver 90M power specifications. Table A–4: Power Supply Item Value Voltage (North American) 104 Vac to 128 Vac (nominal 120 Vac) Voltage (International) -
Page 40: Port Circuit
A.4 DECserver 90M Connector Pin Out Pin out for the DECserver 90M was designed for compatibility with Open DECconnect. Figure A–1 shows the circuit connections for each port. Figure A–1: Port Circuit Recv’r Rcv Gnd Driver Tx Gnd Driver Recv’r LKG-6741–92I... -
Page 41: Cable Connector Pin Out
Figure A–2 shows the wiring configuration for the BN25G cable. This is the standard cable used to connect an asynchronous port on the DECserver 90M to an Open DECconnect wall plate. Figure A–2: BN25G Equipment Cabling Wiring Diagram Wall Plate DECserver 90M RXD GND RXD GND TXD GND TXD GND... -
Page 42: Bn24H Office Cable Wiring Diagram
6-pin modified modular plug on the other end. Use this cable to connect the DECserver 90M to an MMJ connector on an asynchronous device. You also use the BN24H when connecting an asynchronous device to a DECconnect wall plate. - Page 43 Digital’s local subsidiary or approved distributor Internal orders should be placed through Publishing and Circulation Services (P&CS), Digital Equipment Corporation, 10 Forbes Road, Northboro, Massachusetts 01532–2597 *Any prepaid order from Puerto Rico must be placed with the Local Digital Subsidiary:...
- Page 45 DECserver 90M Owner’s Manual EK-DSRVH-OM. A01 READER’S COMMENTS What do you think of this manual? Your comments and suggestions will help us to improve the quality and usefulness of our publications. Please rate this manual: Poor Excellent Accuracy Readability Examples...
- Page 46 DO NOT CUT – FOLD HERE AND TAPE NO POSTAGE NECESSARY IF MAILED IN THE UNITED STATES BUSINESS REPLY LABEL FIRST CLASS PERMIT NO. 33 MAYNARD MASS. POSTAGE WILL BE PAID BY ADDRESSEE Telecommunications and Networks Publications 550 King Street Littleton, MA 01460–1289 DO NOT CUT –...
- Page 48 Printed in U.S.A.
Need help?
Do you have a question about the DECserver 90M and is the answer not in the manual?
Questions and answers