
Related Manuals for Siemens DESIGO PX


Summary of Contents for Siemens DESIGO PX
- Page 1 DESIGO™ PX PXM10 operator unit User's guide Version 2.3 CM110397en Siemens Building Technologies 31.08.2004 Building Automation...
- Page 2 2/34 Siemens Building Technologies PXM10 operator unit CM110397en Building Automation 31.08.2004...
-
Page 3: Table Of Contents
Reading and editing values........ 17 Example: Setting a setpoint ....... 17 Alarms and events ..........19 Pop-up windows..........19 Displaying the alarm list ........20 Acknowledging alarms ........21 3/34 Siemens Building Technologies PXM10 operator unit CM110397en Building Automation Contents 31.08.2004... - Page 4 Editing an existing profile ........24 6.1.2 Adding a new entry ..........25 Special periods ..........26 6.2.1 Others ..............28 6.2.2 Adding a new entry ..........29 Index ..............31 4/34 Siemens Building Technologies PXM10 operator unit CM110397en Building Automation Contents 31.08.2004...
-
Page 5: About This Manual
Important The descriptions in this manual are intended as examples only, and are designed to clarify the basic operating principles of the PXM10 operator unit. 5/34 Siemens Building Technologies PXM10 operator unit CM110397en Siemens Building Automation 31.08.2004... -
Page 6: Printing Conventions
Important This indicates an important statement which requires your special attention. Note A "Note" qualifies an immediately preceding statement or statements. 6/34 Siemens Building Technologies PXM10 operator unit CM110397en Building Automation 31.08.2004... -
Page 7: Display And Control Elements
Display and control elements Layout INFO PXM10 Figure 2-1 Housing Key: Info button Display panel Push-dial Alarm button with alarm LED Esc button 7/34 Siemens Building Technologies PXM10 operator unit CM110397en Siemens Building Automation 31.08.2004... -
Page 8: Push-Dial And Buttons
Figure 2-3 Esc button Pressing the "Esc" button lets you abandon a process you have already started (e.g. editing a value), navigate to the next higher level or close a pop-up window. 8/34 Siemens Building Technologies PXM10 operator unit CM110397en Building Automation 31.08.2004... -
Page 9: Info Button
Pending alarm, acknowledged, and extended alarm, acknowledged but not reset (alarm list) No active alarms Note Alarms are operated by use of the push-dial (see Section 5). 9/34 Siemens Building Technologies PXM10 operator unit CM110397en Siemens Building Automation 31.08.2004... -
Page 10: Display Panel
These buttons are described in Section 2.2. Menu line Working area, with four lines of text, one of which is highlighted. Figure 2-7 Layout of display with one line of text highlighted 10/34 Siemens Building Technologies PXM10 operator unit CM110397en Building Automation 31.08.2004... -
Page 11: Menu Line
Note Graphs are only displayed in the Scheduler menu. If there are more lines than can be displayed at once, this is indicated by the scroll arrows. 11/34 Siemens Building Technologies PXM10 operator unit CM110397en Siemens Building Automation 31.08.2004... - Page 12 A "pop-up" is a dialog box used to display an alarm or an event. The alarm button provides direct access to the list of pending alarms. Figure 2-13 Pop-up display for an alarm Figure 2-14 Pop-up display for an event 12/34 Siemens Building Technologies PXM10 operator unit CM110397en Building Automation 31.08.2004...
-
Page 13: Symbols
Info window Info symbol Override Manually overwritten (forced) value Cursor Only used in Scheduler graphs. Wildcards Only used in Scheduler > Special period. Description in Section 6.2. 13/34 Siemens Building Technologies PXM10 operator unit CM110397en Siemens Building Automation 31.08.2004... -
Page 14: Commissioning The Pxm10
Commissioning the PXM10 The PXM10 is used for local operation of a compact or modular DESIGO PX automation station. No user login is required. The PXM10 allows you to work at the "Basic" and "Standard" operating levels. All the objects from these operating levels are mapped in the device. -
Page 15: Settings On The Device
Set individual values by rotating the dial and acknowledge the settings with OK. You can also use OK to move from one input field to the next within a value. 15/34 Siemens Building Technologies PXM10 operator unit CM110397en Siemens Building Automation 31.08.2004... - Page 16 Date Digital display, format: dd.mm.yy Event pop-up Active/inactive View Favorites / Both Both lets you display both the Favorite objects and all the objects in the "Standard user" view. 16/34 Siemens Building Technologies PXM10 operator unit CM110397en Building Automation 31.08.2004...
-
Page 17: Reading And Editing Values
A dialog box opens, in which you can set the value. Figure 4-3 Setting a manual setpoint, with one input field only Figure 4-4 Setting the time, with two input fields 17/34 Siemens Building Technologies PXM10 operator unit CM110397en Siemens Building Automation 31.08.2004... - Page 18 Confirm with OK or press Esc to cancel. Press the Esc button to return automatically to the Setpoints screen (Figure 4-2). 18/34 Siemens Building Technologies PXM10 operator unit CM110397en Building Automation 31.08.2004...
-
Page 19: Alarms And Events
Figure 5-2 Activate event pop-up window A pop-up window contains the main information about the event or alarm concerned: Figure 5-3 Pop-up window with event Figure 5-4 Pop-up window with unacknowledged alarm 19/34 Siemens Building Technologies PXM10 operator unit CM110397en Siemens Building Automation 31.08.2004... -
Page 20: Displaying The Alarm List
Each line contains the object name and the alarm symbol. All the associated information can be displayed by use of the Info button. 20/34 Siemens Building Technologies PXM10 operator unit CM110397en Building Automation 31.08.2004... -
Page 21: Acknowledging Alarms
(see Section 5.4). Acknowledge the next alarm Press Esc to close the alarm list. Note Basic alarms disappear when the fault has been cleared: they do not require acknowledgement. 21/34 Siemens Building Technologies PXM10 operator unit CM110397en Siemens Building Automation 31.08.2004... -
Page 22: Resetting Extended Alarms
Select the required alarm and confirm with OK. Figure 5-8 Resetting an alarm Use the push-dial to select No or Yes Confirm with OK to reset the alarm. The alarm disappears from the alarm list. 22/34 Siemens Building Technologies PXM10 operator unit CM110397en Building Automation 31.08.2004... -
Page 23: Scheduler
Day profile In the Day profile you can define separate switching periods for each day of the week, which are then repeated week after week.. Figure 6-1 23/34 Siemens Building Technologies PXM10 operator unit CM110397en Siemens Building Automation 31.08.2004... -
Page 24: Editing An Existing Profile
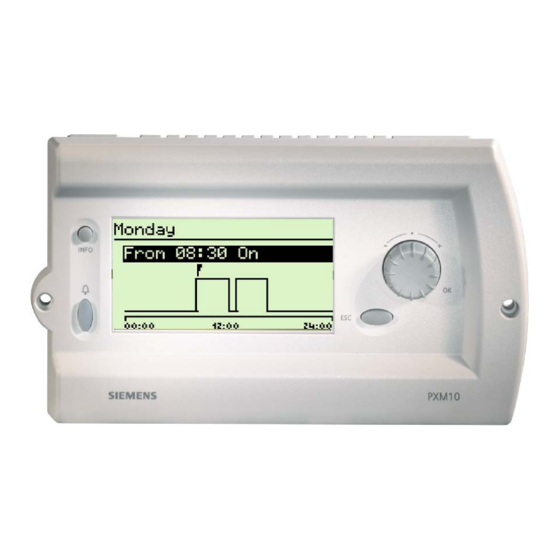
In the Day profile menu, highlight the required day and click OK to open it. Figure 6-3 A screen appears with a graph representing the day profile. Figure 6-4 Day profile 24/34 Siemens Building Technologies PXM10 operator unit CM110397en Building Automation 31.08.2004... -
Page 25: Adding A New Entry
Adding a new entry Step Procedure Highlight the Day Profile option and click OK to open it Figure 6-6 Highlight the required day and open it with OK. Figure 6-7 25/34 Siemens Building Technologies PXM10 operator unit CM110397en Siemens Building Automation 31.08.2004... -
Page 26: Special Periods
The Special period option is used to define individual days which deviate from those defined in the "Day profile". Step Procedure Highlight the Special period option and open it with Figure 6-10 Special period 26/34 Siemens Building Technologies PXM10 operator unit CM110397en Building Automation 31.08.2004... - Page 27 Define a new special period • Others Edit an existing special period Figure 6-11 Special period screen Continue as described in Section 6.2.1 Others as in Section 6.2.1, Adding a new entry 27/34 Siemens Building Technologies PXM10 operator unit CM110397en Siemens Building Automation 31.08.2004...
-
Page 28: Others
Edit the individual values as required and confirm with OK. Figure 6-13 Individual entries Caution The date type and priority should be modified only STOP by a fully trained person. 28/34 Siemens Building Technologies PXM10 operator unit CM110397en Building Automation 31.08.2004... -
Page 29: Adding A New Entry
Each wildcard represents any value in the day, month or year. To enter wildcards, rotate the push-dial anticlockwise until the wildcard "stars" appear. Wildcards 29/34 Siemens Building Technologies PXM10 operator unit CM110397en Siemens Building Automation 31.08.2004... - Page 30 A new special period is to be defined, which is to take effect on New Year's Day, i.e. on 1 January of every year. The calendar year values change annually. You should therefore enter the date as follows: 01.01. *** 30/34 Siemens Building Technologies PXM10 operator unit CM110397en Building Automation 31.08.2004...
-
Page 31: Index
Enable pop-up ............16 Popup ............... 19 Events................. 19 Graphs ................13 Housing.................7 Info button ................9 Interruption................15 Keys Esc................8 LED..................9 Logout ................. 15 Menu line ................11 31/34 Siemens Building Technologies PXM10 operator unit CM110397en Siemens Building Automation 31.08.2004... - Page 32 New entry..............29 Others ............... 28 Symbol Alarm ................ 13 Favorite objects ............13 Forced value ............. 13 Info window............... 13 Pop-up window ............13 Wildcard..............13 Wildcards ................29 32/34 Siemens Building Technologies PXM10 operator unit CM110397en Building Automation 31.08.2004...
- Page 33 33/34 Siemens Building Technologies PXM10 operator unit CM110397en Siemens Building Automation 31.08.2004...
- Page 34 Siemens Building Technologies Ltd. Building Automation Gubelstrasse 22 CH-6301 Zug, SWITZERLAND Tel. +41 41-724 24 24 © 2004 Siemens Building Technologies Ltd. Fax +41 41-724 35 22 Subject to alteration www.sbt.siemens.com 34/34 Siemens Building Technologies PXM10 operator unit CM110397en Building Automation...
Need help?
Do you have a question about the DESIGO PX and is the answer not in the manual?
Questions and answers