Circutor CVM-B100 Instruction Manual
Power analyzer
Hide thumbs
Also See for CVM-B100:
- Instruction manual (330 pages) ,
- Instruction manual (18 pages) ,
- Instruction manual (322 pages)
Table of Contents
Advertisement
Quick Links
Download this manual
See also:
Instruction Manual
Advertisement
Table of Contents

Related Manuals for Circutor CVM-B100


Summary of Contents for Circutor CVM-B100
- Page 1 Power analyzer CVM-B100 CVM-B150 INSTRUCTION MANUAL (M010B01-03-18A) MEASURING EQUIPMENT E237816...
- Page 2 CVM-B100 - CVM-B150 Instruction Manual...
-
Page 3: Safety Precautions
CIRCUTOR, SA reserves the right to modify features or the product manual without prior notifi cation. DISCLAIMER CIRCUTOR, SA reserves the right to make modifi cations to the device or the unit specifi ca- tions set out in this instruction manual without prior notice. -
Page 4: Table Of Contents
5�4�1�- ALARM LOG������������������������������������������������������������������������������������������������������������������������������������ 116 5�4�2�- EVENT LOG ������������������������������������������������������������������������������������������������������������������������������������ 118 5�5�- INFORMATION MENU �������������������������������������������������������������������������������������������������������������������������� 119 5�5�1�- SYSTEM INFORMATION� ��������������������������������������������������������������������������������������������������������������� 120 5�5�2�- INTEGRATED FUNCTIONS� ����������������������������������������������������������������������������������������������������������� 121 5�5�3�- EXPANSION MODULES� ���������������������������������������������������������������������������������������������������������������� 122 5�5�4�- CIRCUTOR S�A� ������������������������������������������������������������������������������������������������������������������������������ 133 5�6�- SETUP MENU ��������������������������������������������������������������������������������������������������������������������������������������� 134 Instruction Manual... - Page 5 CVM-B100 - CVM-B150 5�6�1�- DATE AND TIME� ���������������������������������������������������������������������������������������������������������������������������� 137 5�6�2�- TIME ZONE� ������������������������������������������������������������������������������������������������������������������������������������� 138 5�6�3�- LANGUAGE� ������������������������������������������������������������������������������������������������������������������������������������ 139 5�6�4�- ACCESS KEY� �������������������������������������������������������������������������������������������������������������������������������� 140 5�6�6�- RATIO OF VOLTAGE TRANSFORMERS� �������������������������������������������������������������������������������������� 142 5�6�7�- RATIO OF CURRENT TRANSFORMERS� ������������������������������������������������������������������������������������� 143 5�6�8�- INSTALLATION DATA� �������������������������������������������������������������������������������������������������������������������� 145 5�6�9�- DISPLAY OF VARIABLES�...
- Page 6 CVM-B100 - CVM-B150 7�6�3�- CONFIGURATION ��������������������������������������������������������������������������������������������������������������������������� 263 7�6�4�- MODBUS COMMUNICATIONS ������������������������������������������������������������������������������������������������������� 265 7�6�5�- LIST OF LONWORKS LOGS ���������������������������������������������������������������������������������������������������������� 265 7�7�- PROFIBUS COMMUNICATIONS MODULE������������������������������������������������������������������������������������������� 273 7�7�1�- CONNECTION TERMINALS ����������������������������������������������������������������������������������������������������������� 273 7�7�2�- LEDs ����������������������������������������������������������������������������������������������������������������������������������������������� 273 7�7�3�- CONNECTION DIAGRAM ��������������������������������������������������������������������������������������������������������������� 274 7�7�4�- CONFIGURATION ��������������������������������������������������������������������������������������������������������������������������� 275 7�7�5�- VARIABLES PROFIBUS GSD FILE ����������������������������������������������������������������������������������������������...
-
Page 7: Revision Log
CVM-B100 - CVM-B150 REVISION LOG Table 1: Revision log� Date Revision Description 06/14 M010B01-03-14A Initial Version Introduction of expansion modules: M-CVM-AB-Modbus TCP (Bridge), M-CVM-AB-LON M-CVM-AB-Profibus 05/15 M010B01-03-15A M-CVM-AB-MBus M-CVM-AB-Datalogger Changes in the following sections: 3.5. - 4.4.1.- 5.1. - 5.3. - 5.4.- 5.5.3.3. - 5.6.- 6.3. - 6.4. - 7.5.4. - 7.5.5. - 7.8. -
Page 8: 1�- Verification Upon Reception
MC1 and MC3 series. It is a modular device that can be expanded using expansion modules with different functions. There are 2 device models: CVM-B100, with a 3.5’’ display. CVM-B150, with a 5.6’’ display. The device features: - 3 keys that allow you to browse between the various screens and program the device. - Page 9 CVM-B100 - CVM-B150 - 2 transistor digital outputs, fully programmable. - 2 relay digital outputs, fully programmable. - RS-485 communications, with two serial protocols: MODBUS RTU ® and BACnet. The CVM-B can be expanded with the following expansion modules: M-CVM-AB-8I-8OTR, expansion module with 8 transistor digital inputs and 8 tran- ...
-
Page 10: 3�- Device Installation
CVM-B100 - CVM-B150 3�- DEVICE INSTALLATION 3.1.- PRIOR RECOMMENDATIONS In order to use the device safely, it is critical that individuals who handle it follow the safety measures set out in the standards of the country where it is being used, use the necessary personal protective equipment, and pay attention to the vari- ous warnings indicated in this instruction manual. -
Page 11: 3�2�- Installation
CVM-B100 - CVM-B150 3.2.- INSTALLATION The device is installed on a panel. All connections are located inside the electric panel. Table 2: Panel drill holes for installation� Model Panel drill hole (according to DIN 43700) CVM-B100 x 92 +0.8 +0.8... -
Page 12: 3�3�- Device Terminals
CVM-B100 - CVM-B150 3.3.- DEVICE TERMINALS The CVM-B terminals are distributed between the upper and lower face of the device. 3�3�1�- TERMINALS ON THE UPPER FACE Table 3:List of terminals on the upper face of the CVM-B� Terminals of the top side of the device... -
Page 13: 3�3�2�- Terminals On The Lower Face
CVM-B100 - CVM-B150 3�3�2�- TERMINALS ON THE LOWER FACE Table 4:List of terminals on the lower face of the CVM-B� Device terminals 20 : Auxiliary power supply. , CVM-Bxxx-ITF 25: S2, Current input L2 , CVM-Bxxx-ITF-SDC 21: Auxiliary power supply. -
Page 14: 3�4�- Connection Diagrams
CVM-B100 - CVM-B150 3.4.- CONNECTION DIAGRAMS 3�4�1�- THREE-PHASE NETWORK MEASUREMENT WITH A 4-WIRE CONNECTION� Measurement system: Secondary winding of the current transformer: (MC1 type transformer) Secondary winding of the neutral current transformer: P2 P1 POWER SUPPLY S1 S2 S1 S2 S1 S2... - Page 15 CVM-B100 - CVM-B150 Measurement system: Secondary winding of the current transformer: (MC3 type transformer) Secondary winding of the neutral current transformer: P2 P1 POWER SUPPLY S1 S2 S1 S2 S1 S2 S1 S2 Power Supply LOAD Figure 4: Three-phase measuring with a 4-wire connection (MC3 type transformer (/0�250))�...
-
Page 16: 3�4�2�- Three-Phase Network Measurement With A 3-Wire Connection
CVM-B100 - CVM-B150 3�4�2�- THREE-PHASE NETWORK MEASUREMENT WITH A 3-WIRE CONNECTION� Measurement system: Secondary winding of the current transformer: (MC1 type transformer) P2 P1 POWER SUPPLY S1 S2 S1 S2 S1 S2 S1 S2 Power Supply P2 S1 P2 S1 LOAD Figure 5: Three-phase measuring with a 3-wire connection (transformer secondary: /1A, /5A or MC1 (/0�250))�... - Page 17 CVM-B100 - CVM-B150 Measurement system: Secondary winding of the current transformer: (MC3 type transformer) P2 P1 POWER SUPPLY S1 S2 S2 S1 S2 S1 S2 Power Supply LOAD Figure 6: Three-phase measuring with a 3-wire connection (MC3 type transformer (/0�250))�...
-
Page 18: Transformers
CVM-B100 - CVM-B150 3�4�3�- THREE-PHASE NETWORK MEASUREMENT WITH A 3-WIRE CONNECTION AND 3 VOLTAGE TRANSFORMERS Measurement system: Secondary winding of the current transformer: (MC1 type transformer) P2 P1 POWER SUPPLY S1 S2 S1 S2 S1 S2 S1 S2 Power Supply... -
Page 19: 3�4�4�- Three-Phase Network Measurement With A 3-Wire Connection And Trans
CVM-B100 - CVM-B150 3�4�4�- THREE-PHASE NETWORK MEASUREMENT WITH A 3-WIRE CONNECTION AND TRANSFORMERS WITH AN ARON CONNECTION� Measurement system: Secondary winding of the current transformer: (MC1 type transformer) P2P1 POWER SUPPLY S1 S2 S1 S2 S1 S2 S1 S2 Power... -
Page 20: 3�4�5�- Two-Phase Network Measurement With A 3-Wire Connection
CVM-B100 - CVM-B150 3�4�5�- TWO-PHASE NETWORK MEASUREMENT WITH A 3-WIRE CONNECTION� Measurement system: Secondary winding of the current transformer: (MC1 type transformer) Secondary winding of the neutral current transformer: P2 P1 POWER SUPPLY S1 S2 S1 S2 S1 S2 S1 S2... -
Page 21: 3�4�6�- Single-Phase Network Measurement, Phase To Phase, With A 2-Wire Connec
CVM-B100 - CVM-B150 3�4�6�- SINGLE-PHASE NETWORK MEASUREMENT, PHASE TO PHASE, WITH A 2-WIRE CONNECTION� Measurement system: Secondary winding of the current transformer: (MC1 type transformer) P2 P1 POWER SUPPLY S1 S2 S1 S2 S1 S2 S1 S2 Power Supply LOAD Figure 10: Phase to phase single-phase measuring with a 2-wire connection (transformer secondary: /1A, /5A or MC1 (/0�250))�... -
Page 22: 3�4�7�- Single-Phase Network Measurement, Phase To Neutral, With A 2-Wire Connec
CVM-B100 - CVM-B150 3�4�7�- SINGLE-PHASE NETWORK MEASUREMENT, PHASE TO NEUTRAL, WITH A 2-WIRE CONNECTION� Measurement system: Secondary winding of the current transformer: (MC1 type transformer) P2 P1 POWER SUPPLY S1 S2 S1 S2 S1 S2 S1 S2 Power Supply LOAD Figure 11: Phase to neutral single-phase measuring with a 2-wire connection (transformer secondary: /1A, /5A or MC1 (/0�250))�... -
Page 23: 3�5�- Starting Up The Device
CVM-B100 - CVM-B150 3.5.- STARTING UP THE DEVICE When the CVM-B has been powered up, the display will show the following screen , Figure 12 while the device’s software is loading. Figure 12:Loading screen� If there has been an error in the start-up process, the device displays an error message. The... - Page 24 CVM-B100 - CVM-B150 When the graphic resources have loaded, the following screen appears, , appears on Figure 13 the display and checks the integrity of the device and detects the expansion modules. Figure 13: Initial check screen of the CVM-B�...
- Page 25 CVM-B100 - CVM-B150 If this is the first time the device is switched on, the screen in appears to select the Figure 15 language. Figure 15: Language selection screen� The following options appear in the lower area: Con guration values >...
- Page 26 CVM-B100 - CVM-B150 After selecting the language, select the current date ( Format: dd/mm/yyyy) and time Figure 17 Figure 17: Current date and time selection screen� The digit selected is indicated in white. The following options appear in the lower area: >...
- Page 27 CVM-B100 - CVM-B150 Finally, select the corresponding time zone for the device, Figure 19 Figure 19: Time zone selection screen� The following options appear in the lower area: > > < < Con guration values Con rm Previous and save Next >...
- Page 28 CVM-B100 - CVM-B150 The screen shown in will then be displayed for a few seconds, Figure 21 Figure 21: Start-up screen, CVM-B� The device completes its start-up and the main screen is shown on the display, Figure 22 Figure 22: Main screen, CVM-B�...
-
Page 29: 4�- Operation
CVM-B100 - CVM-B150 4�- OPERATION 4.1.- OPERATING PRINCIPLE The CVM-B is a four-quadrant power analyzer (consumption and generation). 90º kW + kW - kvarL PF + PF - kvarC kvar + Cos φ + Cos φ - kvar - 180º... -
Page 30: 4�2�- Measurement Parameters
CVM-B100 - CVM-B150 4.2.- MEASUREMENT PARAMETERS The device displays the electrical parameters shown in Table 6 Table 6: CVM-Bx measurement parameters� Phases Total Parameter Units L1-L2-L3 Phase-neutral voltage Vph-N Phase-phase voltage Vph-ph Current ... -
Page 31: 4�3�- Keypad Functions
CVM-B100 - CVM-B150 Table 6 (Continuation): CVM-Bx measurement parameters� Phases Total Parameter Units L1-L2-L3 Maximum Apparent Power Demand, Tariff 1 Maximum Current Demand, Tariff 2 Maximum Active Power Demand, Tariff 2 Maximum Apparent Power Demand, Tariff 2 ... -
Page 32: 4�4�- Display
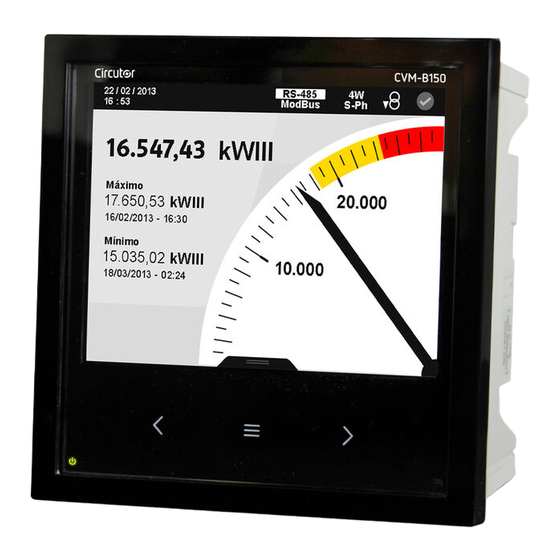
CVM-B100 - CVM-B150 4.4.- DISPLAY The device has a colour TFT display which displays all the parameters indicated in Table 6. The display is divided into three areas ( Figure 24 Upper area 20 / 09 / 2014 RS-485 ModBus... -
Page 33: 4�4�2�- Lower Area
CVM-B100 - CVM-B150 Depending on the protocol selected you will view: MODBUS RTU protocol. BACnet protocol. Type of installation Use the setup menu to select the type of installation to which the device is connected, ( “5.6.5.- MEASUREMENT CONNECTION MODE.”) Depending on the installation selected, you will view: Single-phase installation. -
Page 34: 4�4�3�- Central Area
CVM-B100 - CVM-B150 On the display screens the lower area disappears after 3 seconds without pressing any key. It reappears by pressing the key 4�4�3�- CENTRAL AREA The different display and setup menus for the device are accessed from the central area. - Page 35 CVM-B100 - CVM-B150 Phase-phase voltage L = Primary rated voltage* 0.9 * √3 H = Primary rated voltage * 1.1 * √3 Min = L * 0.8 Max = H * 1.2 = L + (( H - L) * 0.1) = H - (( H - L) * 0.1)
-
Page 36: 4�5�- Led Indicators
CVM-B100 - CVM-B150 4.5.- LED INDICATORS The CVM-B device features: - A CPU LED, which indicates that the device is working correctly with a 1 second flash- ing. A flashing of 0.5 seconds indicates that an error has occurred. - An ALARM LED, which indicates that an alarm has been activated with the LED flash- ing. -
Page 37: 4�6�- Inputs
CVM-B100 - CVM-B150 4.6.- INPUTS The CVM-B has two programmable digital inputs (terminals 7 and 8 in ) for working as: Figure 1 Logic input. Impulse input. Tariff selection. to configure the inputs. “5.6.17.- DIGITAL INPUTS.” and in you can see “5.1.7.- INTEGRATED FUNCTIONS.”... -
Page 38: 5�- Display And Configuration
CVM-B100 - CVM-B150 5�- DISPLAY AND CONFIGURATION On the main screen, , you can access the various menus of the device: Figure 30 Figure 30:Main screen� > < > > < < Set Up Measure & View Billing Information closings Alarms >... -
Page 39: 5�1�-Measurement Display Menu
CVM-B100 - CVM-B150 5.1.-MEASUREMENT DISPLAY MENU The screen in is the home screen for the measurement display menu. Figure 32 Figure 32: Main screen of the measurement display menu� The display options appear in the lower area: > > >... -
Page 40: 5�1�1�- Display 1 Parameter
CVM-B100 - CVM-B150 5�1�1�- DISPLAY 1 PARAMETER� By selecting this option, you want to view a single parameter on the display. Figure 34: 1 parameter display screen� > > < < Default parameters Customize Main parameters menu Back > >... - Page 41 CVM-B100 - CVM-B150 5�1�1�1�- Default parameters� This menu allows you to view the following types of parameters: Figure 36:Default parameters display screen (display 1 parameter)� > > < > < < Main Instantaneous menu parameters Incremental Back parameters Demand parameters >...
- Page 42 CVM-B100 - CVM-B150 5�1�1�1�1�- Instantaneous parameters� On this screen, you can view all the parameters indicated in Figure 38, Table 9 Figure 38: Instantaneous parameters (display 1 parameter)� ph-n > > < < Display parameters Main varh Back menu >...
- Page 43 CVM-B100 - CVM-B150 For each of the instantaneous parameters you can view: The maximum and minimum value, with the date and time when it occurred. A bar chart with the indications of the instantaneous value, maximum and minimum values and alarms, see “4.4.3.
- Page 44 CVM-B100 - CVM-B150 5�1�1�1�1�1�- Instantaneous parameters display menu� For each instantaneous parameter, this menu enables ( Figure 40 Figure 40:Instantaneous parameters, display menu (display 1 parameter)� Ph-n > > < > < < Main Graphic menu view Analog Back view...
- Page 45 CVM-B100 - CVM-B150 5�1�1�1�1�1�1�- Graphic view shows the graphical display screen. Figure 42 Figure 42: Instantaneous parameters, graphic view (displays 1 parameter)� The menu in the lower area disappears after 3 seconds. Press the key to display the lower area again.
- Page 46 CVM-B100 - CVM-B150 5�1�1�1�1�1�2�- Analog view� The analogue display screen is shown in Figure 44 Figure 44:Instantaneous parameters, analog view(display 1 parameter)� The menu in the lower area disappears after 3 seconds. Press the key to display the lower area again.
- Page 47 CVM-B100 - CVM-B150 The alarm status: not activated, pre-alarm activated, alarm activated. icon flashes during the delay time in the alarm connection (ON) and disconnection (OFF). 5�1�1�1�2�- Incremental parameters� On this screen, , you can view all the parameters indicated in...
- Page 48 CVM-B100 - CVM-B150 Table 10:Incremental parameters (display 1 parameter)� Display 1 parameter Icon Incremental parameters Active energy (1) (2)(3) Inductive reactive energy (1) (2) (3) Capacitive reactive energy (1) (2) (3) Total reactive energy (1) (2) (3) Apparent energy (1) (2) (3)
- Page 49 CVM-B100 - CVM-B150 5�1�1�1�2�1�- Incremental parameters display menu� For each incremental parameter, this menu enables the following: The value generated and consumed, The value for each tariff, T1, T2 and T3 and the total value of the 3 tariffs.
- Page 50 CVM-B100 - CVM-B150 5�1�1�1�2�1�1�- Tariff selection� The screen for selecting the tariff to be displayed is shown in Figure 52 Figure 51:Incremental parameters, tariff selection (display 1 parameter)� ∑ > > < < Tari Main varh Back menu > <...
- Page 51 CVM-B100 - CVM-B150 5�1�1�1�2�1�2�- Graphic view The graphical representation of the energy closes is shown for all the incremental energy parameters, Figure 53 Figure 53:Incremental parameters, graphic view (displays 1 parameter)� > > < > < < Main Closes menu...
- Page 52 CVM-B100 - CVM-B150 The menu in the lower area disappears after 3 seconds. Press the key to display the lower area again. The device shows 59 energy closes for each display period. The energy close values are reset when the device is disconnected from the auxiliary power supply.
- Page 53 CVM-B100 - CVM-B150 If you press the key while selecting a display parameter, you will enter the parameter display menu. For each of the demand parameters you can view: The maximum and minimum value, with the date and time of the event.
- Page 54 CVM-B100 - CVM-B150 5�1�1�1�3�1�- Demand parameters display menu� For each demand parameter, this menu enables ( Figure 57 Graphical representation of the parameter. The analogue representation of the parameter. The value for each tariff, T1, T2 and T3.
- Page 55 CVM-B100 - CVM-B150 5�1�1�1�3�1�1�- Graphic view� shows the graphical display screen. Figure 59 Figure 59:Demand parameters, graphic view (displays 1 parameter)� 120m > > < < Integration time Main varh Back menu > < Figure 60: Graphic view menu� The integration time ( X-axis ) on the graph can be set to 120 minutes or 48 hours.
- Page 56 CVM-B100 - CVM-B150 5�1�1�1�3�1�2�- Analogue view� The analogue display screen is shown in Figure 61 Figure 61:Demand parameters, analog view (display 1 parameter)� > < Main varh Back menu > < Figure 62: Analog view menu� Use the keys to browse the different options.
- Page 57 CVM-B100 - CVM-B150 icon flashes during the delay time in the alarm connection (ON) and disconnection (OFF). 5�1�1�1�3�1�3�- Tariff selection� The screen for selecting the tariff to be displayed is shown in Figure 63 Figure 63: Demand parameters, tariff selection (display 1 parameter)�...
- Page 58 CVM-B100 - CVM-B150 5�1�1�2�- Customise parameters On this screen, Figure 65, you can view the five custom screens with 1 parameter. Figure 65: Custom parameters screen (display 1 parameter)� > > < < Custom screens Main varh Back menu >...
- Page 59 CVM-B100 - CVM-B150 5�1�1�2�1�- Customisation screens shows the screen used to customise 1 parameter. Figure 67 These screens can also be configured for communications. See “6.- INTEGRATED COMMUNICATIONS”. Figure 67: Custom parameters screen (displays 1 parameter)� > > < <...
- Page 60 CVM-B100 - CVM-B150 5�1�1�2�1�1�- Parameter selection shows the screen for selecting the parameter for display. Figure 69 Figure 69: Custom parameters screen, parameter selection (displays 1 parameter)� > > > < < < Instantaneous Main parameters menu Incremental Back parameters...
- Page 61 CVM-B100 - CVM-B150 5�1�1�2�1�1�1�- Selecting an instantaneous parameter� shows the screen for selecting the Instantaneous parameters. Figure 71 Figure 71: Custom parameters screen, selecting an instantaneous parameter (displays 1 parameter)� ph-n > > < < Parámetros instantáneos Menú varh Volver principal >...
- Page 62 CVM-B100 - CVM-B150 Table 12: Instantaneous parameters that can be selected on the customisation screens� Customisation screen Icon Instantaneous parameter Icon Instantaneous parameter Phase-Neutral Voltage Total reactive power Phase-Phase Voltage Apparent power Current Power factor Frequency Cosine phi Active power...
- Page 63 CVM-B100 - CVM-B150 5�1�1�2�1�1�2�- Selecting an incremental parameter� shows the screen for selecting an incremental parameter. Figure 73 Figure 73: Custom parameters screen, selecting an incremental parameter (displays 1 parameter)� > > < < Incremental parameters Main varh Back menu >...
- Page 64 CVM-B100 - CVM-B150 Table 13: Incremental parameters that can be selected on the customisation screens� Customisation screen Icon Incremental parameter Icon Incremental parameter Active energy Apparent energy Inductive reactive energy Active tariff hours Capacitive reactive energy Emissions Total reactive energy...
- Page 65 CVM-B100 - CVM-B150 5�1�1�2�1�1�3�- Selecting a demand parameter� shows the screen for selecting a demand parameter. Figure 75 Figure 75: Custom parameters screen, selecting a demand parameter (displays 1 parameter)� > > < < Demand parameters Main varh Back menu >...
- Page 66 CVM-B100 - CVM-B150 Table 14: Demand parameters that can be selected on the customisation screens� Customisation screen Icon Demand parameter Current Active power Apparent power To select a parameter, press the button to open the menu at the bottom for selecting the...
-
Page 67: 5�1�2�- Display 3 Parameters
CVM-B100 - CVM-B150 5�1�2�- DISPLAY 3 PARAMETERS� By selecting this option, you can view the three parameters at the same time on the display. Figure 77: 3 parameter display screen� The following options appear in the lower area: > >... - Page 68 CVM-B100 - CVM-B150 5�1�2�1�- Default parameters� This menu allows you to view the following types of parameters: Figure 79:Default parameters display screen (display 3 parameters)� > > < > < < Main Instantaneous menu parameters Incremental Back parameters Demand parameters >...
- Page 69 CVM-B100 - CVM-B150 5�1�2�1�1�- Instantaneous parameters� On this screen, you can view all the parameters indicated in Figure 81, Table 15� Figure 81: Instantaneous parameters (display 3 parameters)� ph-n > > < < Display parameters Main varh Back menu >...
- Page 70 CVM-B100 - CVM-B150 For each of the instantaneous parameters you can view: The maximum and minimum value, with the date and time when it occurred. A bar chart with the indications of the instantaneous value, maximum and minimum values and alarms, see “4�4�3�...
- Page 71 CVM-B100 - CVM-B150 5�1�2�1�1�1�- Instantaneous parameters display menu� For each instantaneous parameter, this menu allows ( Figure 83 Figure 83: Instantaneous parameters, display menu (displays 3 parameters)� Ph-n > > < < Graphic view Main varh Back menu > <...
- Page 72 CVM-B100 - CVM-B150 5�1�2�1�1�1�1�- Graphic view� shows the graphical display screen. Figure 85 Figure 85: Instantaneous parameters, graphical representation (displays 3 parameters)� The menu in the lower area disappears after 3 seconds. Press the key to display the lower area again.
- Page 73 CVM-B100 - CVM-B150 5�1�2�1�2�- Incremental parameters� On this screen, , you can view all the parameters indicated in Figure 87 Table 16 Figure 87: Incremental parameters (display 3 parameters)� > > < < Display parameters Main varh Back menu >...
- Page 74 CVM-B100 - CVM-B150 Table 16: Instantaneous parameters (display 3 parameters)� Display 3 parameters Icon Incremental parameters Active energy L1 (1) (2) Active energy L2 (1) (2) Active energy L3 (1) (2) Inductive reactive energy L1 (1) (2) Inductive reactive energy L2...
- Page 75 CVM-B100 - CVM-B150 5�1�2�1�2�1�- Incremental parameters display menu� For each incremental parameter ( ), you can view: Figure 89 The value generated and consumed, The value for each tariff, T1, T2 and T3 and the total value of the 3 tariffs.
- Page 76 CVM-B100 - CVM-B150 5�1�2�1�2�1�1�- Tariff selection� The screen for selecting the tariff to be displayed is shown in Figure 91 Figure 91:Incremental parameters, tariff selection (display 3 parameters)� ∑ > > < < Tari Main varh Back menu > <...
- Page 77 CVM-B100 - CVM-B150 5�1�2�1�2�1�2�- Graphic view� The graphical representation of the energy closes is shown for all the incremental energy parameters, Figure 93 Figure 93:Incremental parameters, graphic view (displays 3 parameters)� > > < > < < Main Closes menu...
- Page 78 CVM-B100 - CVM-B150 The menu in the lower area disappears after 3 seconds. Press the key to display the lower area again. The device shows 59 energy closes for each display period. The energy close values are reset when the device is disconnected from the auxiliary power supply.
- Page 79 CVM-B100 - CVM-B150 The maximum value, with the date and time when it occurred. A bar chart with the indications of the instantaneous value, maximum and minimum values and alarms, see “4.4.3. CENTRAL AREA”� Table 17:Demand parameters (display 3 parameters)�...
- Page 80 CVM-B100 - CVM-B150 5�1�2�1�3�1�- Demand parameters display menu� For each demand parameter, you can view: The graphic view. The value for each tariff, T1, T2 and T3. Figure 97:Demand parameters, display menu (display 3 parameters)� > > < < Graphic...
- Page 81 CVM-B100 - CVM-B150 5�1�2�1�3�1�1�- Graphic view� shows the graphical display screen. Figure 99 Figure 99: Demand parameters, graphical representation (displays 3 parameters)� 120m > > < < Integration time Main varh Back menu > < Figure 100: Graphic view menu�...
- Page 82 CVM-B100 - CVM-B150 5�1�2�1�3�1�2�- Tariff selection� The screen for selecting the tariff to be displayed is shown in Figure 101 Figure 101:Demand parameters, tariff selection (display 3 parameters)� ∑ > > < < Tari Main varh Back menu > <...
- Page 83 CVM-B100 - CVM-B150 5�1�2�2�- Customise parameters On this screen, , you can view the five custom screens with 3 parameters. Figure 103 Figure 103: Custom parameters screen (display 3 parameter)� > > < < Custom screens Main varh Back menu >...
- Page 84 CVM-B100 - CVM-B150 5�1�2�2�1�- Customisation screens shows the screen used to customise 3 parameters. Figure 107 These screens can also be configured for communications. See “6.- INTEGRATED COMMUNICATIONS” Figure 105: Custom parameters screen (displays 3 parameter)� > > < <...
-
Page 85: 5�1�3�- Display 4 Parameters
CVM-B100 - CVM-B150 5�1�3�- DISPLAY 4 PARAMETERS� By selecting this option, you can view the four parameters at the same time on the display. Figure 107: 4 parameter display screen� The following options appear in the lower area: > >... - Page 86 CVM-B100 - CVM-B150 5�1�3�1�- Default parameters� This menu allows you to view the following types of parameters: Figure 109:Default parameters display screen (display 4 parameters)� > > < > < < Main Instantaneous menu parameters Incremental Back parameters Demand parameters >...
- Page 87 CVM-B100 - CVM-B150 5�1�3�1�1�- Instantaneous parameters� On this screen, you can view all the parameters indicated in Figure 111, Table 18 Figure 111: Instantaneous parameters (display 4 parameters)� ph-n > > < < Display parameters Main varh Back menu >...
- Page 88 CVM-B100 - CVM-B150 A bar chart with the indications of the instantaneous value, maximum and minimum values and alarms, see “4.4.3. CENTRAL AREA”� Table 18:Instantaneous parameters (display 4 parameters)� Display 4 parameters Display 4 parameters Icon Icon Instantaneous parameters...
- Page 89 CVM-B100 - CVM-B150 icon flashes during the delay time in the alarm connection (ON) and disconnection (OFF). 5�1�3�1�1�1�- Instantaneous parameters display menu� For each instantaneous parameter, this menu allows ( Figure 113 Figure 113: Instantaneous parameters, display menu (display 4 parameters)�...
- Page 90 CVM-B100 - CVM-B150 5�1�3�1�1�1�1�- Graphic view� shows the graphical display screen . Figure 115 Figure 115: Instantaneous parameters, graphical representation (displays 4 parameters)� The menu in the lower area disappears after a few seconds. Press the key to display the lower area again.
- Page 91 CVM-B100 - CVM-B150 5�1�3�1�2�- Incremental parameters� On this screen, , you can view all the parameters indicated in Figure 117 Table 19 Figure 117: Incremental parameters (display 4 parameters)� > > < < Display parameters Main varh Back menu >...
- Page 92 CVM-B100 - CVM-B150 Table 19:Incremental parameters (display 4 parameters)� Display 4 parameters Icon Incremental parameters Active energy L1 (1) (2) Active energy L2 (1) (2) Active energy L3 (1) (2) Active energy III (1) (2) Inductive reactive energy L1 (1) (2)
- Page 93 CVM-B100 - CVM-B150 5�1�3�1�2�1�- Incremental parameters display menu� For each incremental parameter, this menu enables the following ( Figure 119 The value generated and consumed. The value for each tariff, T1, T2 and T3 and the total value of the 3 tariffs.
- Page 94 CVM-B100 - CVM-B150 5�1�3�1�2�1�1�- Tariff selection� The screen for selecting the tariff to be displayed is shown in Figure 121 Figure 121:Incremental parameters, tariff selection (display 4 parameters)� ∑ > > < < Tari Main varh Back menu > <...
- Page 95 CVM-B100 - CVM-B150 5�1�3�1�2�1�2�- Graphic view� The graphical representation of the energy closes is shown for all the incremental energy parameters, Figure 123 Figure 123: Incremental parameters, graphic view (displays 4 parameters)� > > < > < < Main Closes...
- Page 96 CVM-B100 - CVM-B150 The energy close values are reset when the device is disconnected from the auxiliary power supply. 5�1�3�1�3�- Demand parameters� On this screen, , you can view all the maximum demand parameters indicated in Figure 125 Table 20.
- Page 97 CVM-B100 - CVM-B150 A bar chart with the indications of the instantaneous value, maximum and minimum values and alarms, see “4�4�3� CENTRAL AREA”� Table 20:Demand parameters (display 4 parameters)� Display 4 parameters Icon Demand parameters Current L1 Current L2...
- Page 98 CVM-B100 - CVM-B150 5�1�3�1�3�1�- Demand parameters display menu� For each demand parameter, you can view: The graphic view. The value for each tariff, T1, T2 and T3. Figure 127: Demand parameters, display menu (display 4 parameters)� > > < <...
- Page 99 CVM-B100 - CVM-B150 5�1�3�1�3�1�1�- Graphic view� shows the graphical display screen . Figure 129 Figure 129: Demand parameters, graphic view (displays 4 parameters)� 120m > > < < Integration time Main varh Back menu > < Figure 130:Graphic view menu�...
- Page 100 CVM-B100 - CVM-B150 5�1�3�1�3�1�2�- Tariff selection� The screen for selecting the tariff to be displayed is shown in Figure 131 Figure 131:Demand parameters, tariff selection (display 4 parameters)� ∑ > > < < Tari Main varh Back menu > <...
- Page 101 CVM-B100 - CVM-B150 5�1�3�2�- Customise parameters On this screen, , you can view the five custom screens with 4 parameters. Figure 133 Figure 133: Custom parameters screen (display 4 parameter)� > > < < Custom screens Main varh Back menu >...
- Page 102 CVM-B100 - CVM-B150 5�1�3�2�1�- Customisation screens shows the screen used to customise 4 parameters. Figure 135 These screens can also be configured for communications. See “6.- INTEGRATED COMMUNICATIONS” Figure 135: Custom parameters screen (displays 4 parameter)� > > < <...
-
Page 103: 5�1�4�- Phasors
CVM-B100 - CVM-B150 5�1�4�- PHASORS� By selecting this option, you can view the phase sequence ( Figure 137 Figure 137: Phasor display screen� > > < < Phasors Phase Main varh Back menu > < Figure 138: Phasor menu� phase L1,... -
Page 104: 5�1�5�- Standard Phasors
CVM-B100 - CVM-B150 5�1�5�- STANDARD PHASORS� By selecting this option, you can view the phase sequence with the standard values Figure 140 Figure 139: Standardised phasor display screen� > > < < Phasors Phase Main varh Back menu > <... -
Page 105: 5�1�6�- Harmonics
CVM-B100 - CVM-B150 5�1�6�- HARMONICS� On this screen, , you can view the harmonics of the parameters indicated in Figure 141 Table 21 Figure 141: Harmonics screen� > > > < < > < < Harmonics Even / Odd Main... - Page 106 CVM-B100 - CVM-B150 Table 21: Harmonics� Icon Harmonics Current harmonics L1 Current harmonics L2 Current harmonics L3 Neutral current harmonics Harmonics of phase-neutral voltage L1 Harmonics of phase-neutral voltage L2 Harmonics of phase-neutral voltage L3 Neutral voltage harmonics 5�1�6�1�- Table display�...
-
Page 107: 5�1�7�- Integrated Functions
CVM-B100 - CVM-B150 5�1�7�- INTEGRATED FUNCTIONS� On this screen, , you can view the status of the digital inputs integrated in the device. Figure 145 Figure 145: Display screen of digital inputs integrated in the device� > < Main varh... -
Page 108: 5�1�8�- Expansion Modules
CVM-B100 - CVM-B150 5�1�8�- EXPANSION MODULES� Note: This option only appears when the device is connected to an expansion module of Transistor Digital Inputs/Outputs (M-CVM-AB-8I-8OTR), Relay Digital Inputs/Outputs (M-CVM-AB-8I-8OR) or Analogue Inputs/Outputs (M-CVM-AB-4AI-8AO). On the main screen, Figure 147, of this option, select the expansion module for which you want to display the status of the inputs. - Page 109 CVM-B100 - CVM-B150 Figure 149: Display screen of digital inputs of an expansion module� > > < < Next Main Previous menu > Back > < < Figure 150: Display menu of an expansion module� Use the keys to select the different options.
-
Page 110: 5�2�- Energy Closes Menu
CVM-B100 - CVM-B150 5.2.- ENERGY CLOSES MENU The screen in is the home screen for the energy close menu. Figure 151 Figure 151: Main screen of the energy closes menu� Energy closes menu: > > < < Active Energy Total... -
Page 111: Total Tariff
CVM-B100 - CVM-B150 5�2�1�- ACTIVE ENERGY CLOSES III OF THE TOTAL TARIFF AND OF REACTIVE ENERGY III OF THE TOTAL TARIFF� This screen displays the graphical representation of the closes of consumed active energy III of the total tariff (the sum of the three tariffs) after selecting the option. - Page 112 CVM-B100 - CVM-B150 The menu in the lower area disappears after a few seconds. Press the key to display the lower area again. The device shows 29 energy closes for each display period. When a given close is selected the display shows: The value of the selected energy close.
-
Page 113: 5�3�- Alarm Menu
CVM-B100 - CVM-B150 5.3.- ALARM MENU The screen in is the alarm display menu screen. Where all the alarms programmed Figure 155 in the device and in the connected expansion modules are displayed, indicating a brief description and the date and time of the alarm activation. - Page 114 CVM-B100 - CVM-B150 To confirm the selection, press the key If no key is pressed for 5 minutes, the display screen changes automatically to the default screen. Figure 157: Alarm menu description table� The programmed alarms description table, , is made up of 4 columns: Figure 157 Cd�...
-
Page 115: 5�4�- Log Menu
CVM-B100 - CVM-B150 5.4.- LOG MENU The screen in is the home screen of the menu log, which shows the log of the Figure 158 alarms and events that have occurred in the device. Figure 158: Main screen log menu�... -
Page 116: 5�4�1�- Alarm Log
CVM-B100 - CVM-B150 5�4�1�- ALARM LOG This screen shows the log of the last 50 alarms occurring in the device and installed expansion modules, including a brief description and the date and time of the last alarm activation. Figure 160:Alarm log >... - Page 117 CVM-B100 - CVM-B150 Figure 162: Details of the alarm log� The alarm log, , has 4 columns: Figure 162 Cd� : indicates the code of the alarm that occurred (in hexadecimal) Description: Description of the alarm. Example: Alarm M0_S3 act with latch M0, Indicates the module where the alarm was activated: M0, is an alarm triggered in the device.
-
Page 118: 5�4�2�- Event Log
CVM-B100 - CVM-B150 5�4�2�- EVENT LOG This screen shows the log of the last 50 events occurring in the device and the installed expansion modules, including a brief description and the date and time of the event. Figure 163:Event log�... -
Page 119: 5�5�- Information Menu
CVM-B100 - CVM-B150 5.5.- INFORMATION MENU The screen in , is the home screen of the information menu. Figure 165 Figure 165: Main screen of information menu� In the information menu you can view: > > < > < <... -
Page 120: 5�5�1�- System Information
CVM-B100 - CVM-B150 5�5�1�- SYSTEM INFORMATION� On the system information screen, , you will view the model, serial number and Figure 167 firmware version of the device. Figure 167: System information screen� > < Main varh Back menu > <... -
Page 121: 5�5�2�- Integrated Functions
CVM-B100 - CVM-B150 5�5�2�- INTEGRATED FUNCTIONS� On the integrated functions screen, , you will view the configuration of the Figure 169 communications and digital inputs and outputs. Figure 169: Integrated functions screen� > > < > < < Main Communications 1... -
Page 122: 5�5�3�- Expansion Modules
CVM-B100 - CVM-B150 5�5�3�- EXPANSION MODULES� On the expansion modules screen, , you will view the model, serial number and Figure 171 firmware version of each of the expansion modules. Figure 171: Expansion modules information screen� > > < >... - Page 123 CVM-B100 - CVM-B150 5�5�3�1�- Expansion modules of Transistor and Relay digital inputs/outputs The screen in , is one of the information display screens for the expansion module. Figure 173 Figure 173: Digital inputs information screen (Transistor Digital Inputs/Outputs Module)� This screen displays the configuration of the digital inputs of the module.
- Page 124 CVM-B100 - CVM-B150 If no key is pressed for 5 minutes, the display screen changes automatically to the default screen. When selecting the digital outputs option, , you will view the screen in , with the Figure 175 configuration information for the digital outputs.
- Page 125 CVM-B100 - CVM-B150 > > < < Analog Inputs Main Analog menu Outputs Back > > < < Figure 177: Analogue Inputs/Outputs Module menu� Use the keys to select the different options. If no key is pressed for 5 minutes, the display screen changes automatically to the default screen.
- Page 126 CVM-B100 - CVM-B150 5�5�3�3�- Modbus TCP (Bridge) communications expansion modules The screen in , is a screen that displays the information of the Modbus TCP Figure 179 communications module. Figure 179: Information screen of the Modbus TCP ( Bridge ) module (TCP communications)�...
- Page 127 CVM-B100 - CVM-B150 If no key is pressed for 5 minutes, the display screen changes automatically to the default screen. On selecting the RS-485 option, , the screen in , appears with information on the Figure 181 configuration of the RS-485 gateway.
- Page 128 CVM-B100 - CVM-B150 > < Main varh Back menu > < Figure 183: LonWorks module menu� Use the keys to select the different options. To confirm the selection, press the key If no key is pressed for 5 minutes, the display screen changes automatically to the default screen.
- Page 129 CVM-B100 - CVM-B150 > < Main varh Back menu > < Figure 185: Profibus module menu. Use the keys to select the different options. To confirm the selection, press the key If no key is pressed for 5 minutes, the display screen changes automatically to the default screen.
- Page 130 CVM-B100 - CVM-B150 > < Main varh Back menu > < Figure 187: MBus module menu� Use the keys to select the different options. To confirm the selection, press the key If no key is pressed for 5 minutes, the display screen changes automatically to the default screen.
- Page 131 CVM-B100 - CVM-B150 > > < < Main Port menu > Back > < < Figure 189: Datalogger module menu� Use the keys to select the different options. If no key is pressed for 5 minutes, the display screen changes automatically to the default screen.
- Page 132 CVM-B100 - CVM-B150 5�5�3�8�- Modbus TCP (Switch) communications expansion modules The screen in , is a screen that displays the information of the Modbus TCP (Switch) Figure 191 communications module. Figure 191: Information screen of the Modbus TCP ( Switch ) module (TCP communications)�...
-
Page 133: 5�5�4�- Circutor S�A
CVM-B100 - CVM-B150 5�5�4�- CIRCUTOR S�A� This screen, , shows all the Circutor contact information. Figure 193 Figure 193: Circutor screen� > < Main varh Back menu > < Figure 194: Circutor menu� Use the keys to browse the various menus. -
Page 134: 5�6�- Setup Menu
CVM-B100 - CVM-B150 5.6.- SETUP MENU If the setup menu is protected by an access password there is an icon on the main menu screen, see Figure 195 Figure 195:Protected setup menu� A screen will appear when accessing the menu to enter the access password ). - Page 135 CVM-B100 - CVM-B150 > > < > < < Main menu Con guration values Con rm Previous and save Next > > < < Figure 197: Access password menu� Use the keys to select the different options. To confirm the selection, press the key If no key is pressed for 5 minutes, the display screen changes automatically to the default screen.
- Page 136 CVM-B100 - CVM-B150 Note: If no key is pressed for 5 minutes in the setup menu, the display screen changes auto- matically to the default screen. Figure 199: Configuration menu. Instruction Manual...
-
Page 137: 5�6�1�- Date And Time
CVM-B100 - CVM-B150 5�6�1�- DATE AND TIME� The current date and time are selected on this screen, Figure 200 Figure 200: Date and time configuration screen. The digit selected is indicated in white. > > < > < < Main menu... -
Page 138: 5�6�2�- Time Zone
CVM-B100 - CVM-B150 5�6�2�- TIME ZONE� The time zone is selected on this screen Figure 202 Figure 202: Time zone configuration screen. > > < > < < Main menu Con guration values Back Previous Con rm and save Next >... -
Page 139: 5�6�3�- Language
CVM-B100 - CVM-B150 5�6�3�- LANGUAGE� The device language is selected on this screen Figure 204 Figure 204: Device language configuration screen. > > < < Con guration values Main Con rm menu and save > Back > < < Figure 205: Setup menu : Language�... -
Page 140: 5�6�4�- Access Key
CVM-B100 - CVM-B150 5�6�4�- ACCESS KEY� The access key to the device setup menu is selected on this screen Figure 206 Figure 206: Access key configuration screen. The digit selected is indicated in white. > > < > < <... - Page 141 CVM-B100 - CVM-B150 Use the keys to select the different options. To confirm the selection, press the key 5�6�5�- MEASUREMENT CONNECTION MODE� This screen, , is for selecting the measurement connection mode. Figure 208 Figure 208: Measurement connection mode configuration screen.
-
Page 142: 5�6�6�- Ratio Of Voltage Transformers
CVM-B100 - CVM-B150 To confirm the selection, press the key 5�6�6�- RATIO OF VOLTAGE TRANSFORMERS� The voltage transformer ratio is selected on this screen, Figure 210 Figure 210: Voltage transformer ratio configuration screen. The parameter selected is indicated in white. -
Page 143: 5�6�7�- Ratio Of Current Transformers
CVM-B100 - CVM-B150 Secondary voltage: Maximum value: 999,9 Minimum value: 10. Rated Phase-Neutral Voltage: Maximum value: (Rated Phase-Neutral Voltage / Voltage Ratio) ≤ 1000 Minimum value: (Rated Phase-Neutral Voltage / Voltage Ratio) ≥ 50 Maximum possible voltage ratio: 9999. Note: The voltage ratio is the ratio between the primary and secondary voltage. - Page 144 CVM-B100 - CVM-B150 > > > < < > < < Con guration Previous Main values menu Next Back Con rm Delete Delete and save parameter character > > < < > > < < Figure 213: Setup menu : Current transformer ratio�...
-
Page 145: 5�6�8�- Installation Data
CVM-B100 - CVM-B150 5�6�8�- INSTALLATION DATA� The following installation features are selected on this screen Figure 214 Rated frequency. Number of quadrants. Figure 214: Installation features configuration screen. The parameter selected is indicated in white. > > <... -
Page 146: 5�6�9�- Display Of Variables
CVM-B100 - CVM-B150 Use the keys to select the different options. To confirm the selection, press the key 5�6�9�- DISPLAY OF VARIABLES� The parameters to be displayed for each type of instantaneous, incremental and demand value are selected on this screen, Figure 216 Figure 216: Variable display configuration screen. -
Page 147: 5�6�10�- Demand
CVM-B100 - CVM-B150 5�6�10�- DEMAND� The maximum demand configuration parameters are selected on this screen Figure 218 The type of integration of the demand. The integration time in minutes. Figure 218: The maximum demand parameters configuration screen. The parameter selected is indicated in white. -
Page 148: 5�6�11�- Energy Consumption Costs
CVM-B100 - CVM-B150 ● When programming the integration time: Maximum value: 60 minutes. Minimum value: 1 minute. Use the keys to select the different options. To confirm the selection, press the key 5�6�11�- ENERGY CONSUMPTION COSTS� The energy consumption costs are selected on this screen Figure 220 ... -
Page 149: 5�6�12�- Energy Generation Costs
CVM-B100 - CVM-B150 Use the keys to select the different options. To confirm the selection, press the key Cost of the tariffs: Maximum value: 100.000 Minimum value: 0.00000 5�6�12�- ENERGY GENERATION COSTS� The energy generation costs are selected on this screen Figure 222 ... -
Page 150: 5�6�13�- Co
CVM-B100 - CVM-B150 Use the keys to select the different options. To confirm the selection, press the key Cost of the tariffs: Maximum value: 100.000 Minimum value: 0.00000 5�6�13�- CONSUMPTION EMISSIONS� The carbon consumption emission ratios are selected on this screen... -
Page 151: 5�6�14�- Co
CVM-B100 - CVM-B150 > > > < < > < < Con guration Previous Main values menu Next Back Con rm Delete Delete and save parameter character > > < < > > < < Figure 225: Setup menu: The C02 consumption emissions Use the keys to select the different options. - Page 152 CVM-B100 - CVM-B150 Figure 226: The C0 generation emissions configuration screen. The parameter selected is indicated in white. > > > < < > < < Con guration Previous Main values menu Next Back Con rm Delete Delete and save...
-
Page 153: 5�6�15�- Relay Digital Outputs
CVM-B100 - CVM-B150 5�6�15�- RELAY DIGITAL OUTPUTS� Select the output to configure on the main configuration screen of the relay digital outputs, Figure 228 Figure 228: Main configuration screen of relay digital outputs. > > < < Output 1 Main... - Page 154 CVM-B100 - CVM-B150 After selecting the output to configure, , the following parameters can be configured: Figure 230 The variable code that controls the relay. The Pre-alarm value. The minimum value below which the relay is activated.
- Page 155 CVM-B100 - CVM-B150 ● When programming the variable code which controls the relay digital output, you need the Table 22 Note: To cancel the operation of a digital output, the 0 code must be programmed. Table 22: Code of variables for programming the digital outputs and transistor�...
- Page 156 CVM-B100 - CVM-B150 Table 22 (Continuation): Code of variables for programming the digital outputs and transistor� Variable Total Reactive Energy Generated Total Total Total Total Total Reactive Energy Consumed Total Total Total Total Apparent Energy Generated Total Total Total Total...
- Page 157 CVM-B100 - CVM-B150 The integrated variables are those that the device has as standard. If in the device there is more than one module connected with the same type of inputs, the module with the lowest number is the one with the lowest serial number.
- Page 158 CVM-B100 - CVM-B150 Table 23(Continuation):Units and maximum and minimum values of the programming variables of the digital outputs� Variable Units Maximum Minimum Maximum Demand of Active power 180000 Maximum Demand of Apparent Power The voltage ratio is the ratio between the primary and secondary voltage.
-
Page 159: 5�6�16�- Transistor Digital Outputs
CVM-B100 - CVM-B150 5�6�16�- TRANSISTOR DIGITAL OUTPUTS� Select the output to configure on the main configuration screen of the transistor digital outputs, Figure 232 Figure 232: Main configuration screen of transistor digital outputs. > > < < Output 1 Main... - Page 160 CVM-B100 - CVM-B150 After selecting the output to configure, you can configure the transistor output mode, Alarm or Impulse output, and the parameters for each mode. Alarm, to select the alarm mode of the transistor digital output. Impulses, to select the impulse mode of the transistor digital output.
- Page 161 CVM-B100 - CVM-B150 > > > < < > < < Con guration Previous Main values menu Next Back Con rm Delete Delete and save parameter character > > < < > > < < Figure 235: Setup menu: transistor digital outputs (alarm mode)�...
- Page 162 CVM-B100 - CVM-B150 ● When programming the disconnection delay (OFF) of the transistor digital output: Maximum value: 999s. Minimum value: 0s. ● When programming the latch: Enable the latch, Disable the latch. The latch is selected in this parameter, i.e., the transistor digital output will be locked after it has been tripped, even when the condition that triggered it has disappeared.
- Page 163 CVM-B100 - CVM-B150 calculating the number of output pulses according to the generated energy so that the pulses do not accumulate. 3600 * PE / PT > MP → PE = MP * TP / 3600 Where: MP : Maximum power of the installation in W.
-
Page 164: 5�6�17�- Digital Inputs
CVM-B100 - CVM-B150 Minimum value: 1. ● When programming the high period: The high period is the time that the pulse is at its maximum value. The programmed value is a multiple of 10 ms, i.e., when programming 1 the impulse will be at its maximum value of 10 ms. - Page 165 CVM-B100 - CVM-B150 Using the keys firstly select the operating mode. To confirm the selection, press the key The possible operating modes are: Tariff, the various tariffs are selected with the digital inputs. Impulses, to select the inputs as impulse inputs.
- Page 166 CVM-B100 - CVM-B150 The units. The decimals. The energy meter factor. Figure 241: Digital inputs configuration screen (impulse mode). The parameter selected is indicated in white. > > > < < > < < Con guration Previous...
- Page 167 CVM-B100 - CVM-B150 ● When programming the decimals: Here you program the number of decimals that the digital input will have. ● When programming the meter factor: The energy meter factor is the number of times the value of the digital input will be increased for each impulse detected by said input.
-
Page 168: 5�6�18�- Integrated Communications
CVM-B100 - CVM-B150 > > < > < < Main Con guration menu values Back Previous Con rm and save Next > > < < > < Figure 244: Setup menu: Digital inputs (logic state mode)� ● The configuration values are: Positive, the digital input logic is positive �... - Page 169 CVM-B100 - CVM-B150 5�6�18�1�- Configuration parameters, Modbus protocol. When selecting the Modbus communications protocol, , you can program the Figure 245 following parameters: The peripheral number. The transmission speed, Baud Rate. The parity. The number of stop bits.
- Page 170 CVM-B100 - CVM-B150 ● When programming the ID: The ID is the peripheral number assigned to the device in the Modbus network. Maximum value: 255. Minimum value: 0. ● When programming the transmission speed, Baud rate, the configuration values are: The possible transmission speeds: 9600, 19200, 38400, 57600, 76800 or 115200�...
-
Page 171: 5�6�19�- Parameter Reset
CVM-B100 - CVM-B150 > > > < < > < < Con guration Previous Main values menu Next Back Con rm Delete Delete and save parameter character > > < < > > < < Figure 248: Setup menu: BACnet protocol�... - Page 172 CVM-B100 - CVM-B150 Figure 249: Parameter reset screen� > > < > < < Main menu Con guration values Previous Back Con rm Next and save > > < < > < Figure 250:Setup menu: Parameter reset� ● The configuration values are: Enable reset, enable reset of selected parameter.
-
Page 173: 5�6�20�- User Interface
CVM-B100 - CVM-B150 5�6�20�- USER INTERFACE Select the time to off back for the display, keyboard sensitivity, display decimal and date format on the user interface screen, Figure 251 Figure 251:User interface screen� > > > < < > <... -
Page 174: 5�6�21�- Expansion Modules
CVM-B100 - CVM-B150 ● When programming the sensitivity of the keyboard, the configuration values are: Low, Normal, High. ● When programming the display decimal, the configuration values are: Coma, Point. ● When programming the date format, the configuration values are: Format dd/mm/yyyy, Format dd/mm/yyyy. -
Page 175: 6�- Integrated Communications
CVM-B100 - CVM-B150 6�- INTEGRATED COMMUNICATIONS The CVM-B devices have one RS-485 communications port. The device has as standard two communications protocols: MODBUS RTU ® and BACnet. The protocol and configuration parameters are selected on the setup menu. ( “5.6.18.- TEGRATED COMMUNICATIONS.”... -
Page 176: 6�2�- Modbus Protocol
CVM-B100 - CVM-B150 6.2.- MODBUS PROTOCOL The MODBUS protocol is a communication standard in the industry that enables the network connection of multiple devices, where there is a master and multiple slaves. It allows individual master-slave dialogue and also enables commands in broadcast format. -
Page 177: 6�2�1�- Example Of Modbus Query
CVM-B100 - CVM-B150 6�2�1�- EXAMPLE OF MODBUS QUERY Query: Instantaneous value of the L1 phase voltage Initial No� of Address Function register registers 0000 0002 70B0 Address: 0A, Peripheral number: 10 in decimal. Function: 04, Read function. Initial Register: 0000, register from which to start reading. - Page 178 CVM-B100 - CVM-B150 Table 25: Modbus memory map: measurement variables Parameter Symbol Instantaneous Maximum Minimum Units Phase voltage L1 00-01 100-103 300-303 157C Current L1 02-03 104-107 304-307 157D Active Power L1 04-05 108-10B 308-30B 1580 Inductive Reactive Power L1...
-
Page 179: 6�3�2�- Current Energy Variables
CVM-B100 - CVM-B150 Table 25 (Continuation) : Modbus memory map: measurement variables Parameter Symbol Instantaneous Maximum Minimum Units Current THD % In THDIN 5C-5D 1B8-1BB 3B8-3BB 1582 Reactive Power L1 kvar 5E-5F 1BC-1BF 3BC-3BF 1580 Reactive Power L2 kvar 60-61... - Page 180 CVM-B100 - CVM-B150 Table 26 (Continuation) : Modbus memory map: current energy variables� Address Parameter Symbol Apparent energy consumed L2 kVAh L2 547-548 Apparent energy consumed L3 kVAh L3 54A-54B Apparent energy consumed LIII kVAh LIII 54D-54E Active energy generated L1...
- Page 181 CVM-B100 - CVM-B150 Table 26 (Continuation) : Modbus memory map: current energy variables� Address Parameter Symbol Active energy generated L2 kWh L2 (-) 5CB-5CC Active energy generated L3 kWh L3 (-) 5CE-5CF Active energy generated LIII kWh LIII (-) 5D1-5D2...
- Page 182 CVM-B100 - CVM-B150 Table 26 (Continuation) : Modbus memory map: current energy variables� Address Parameter Symbol Inductive reactive energy generated L2 kvarhL L2 (-) 64F-650 Inductive reactive energy generated L3 kvarhL L3 (-) 652-653 Inductive reactive energy generated LIII kvarhL LIII (-)
-
Page 183: 6�3�3�- Maximum Demand Variables
CVM-B100 - CVM-B150 Table 26 (Continuation) : Modbus memory map: current energy variables� Address Parameter Symbol Capacitive reactive energy generated L2 kvarhC L2 (-) 6D3-6D4 Capacitive reactive energy generated L3 kvarhC L3 (-) 6D6-6D7 Capacitive reactive energy generated LIII kvarhC LIII (-) -
Page 184: 6�3�4�- Voltage And Current Harmonics
CVM-B100 - CVM-B150 6�3�4�- VOLTAGE AND CURRENT HARMONICS� The first two registers are the RMS value of the fundamental harmonic, followed by the 50 harmonics, each one of 1 register size. For these variables Function 0x04 is implemented: reading registers. - Page 185 CVM-B100 - CVM-B150 Table 28 (Continuation) : Modbus memory map: Voltage and current harmonics� Parameter Voltage L1 Voltage L2 Voltage L3 Neutral Voltage Units 41st Order harmonic 1285 12B9 12ED 1321 1581 42nd Order harmonic 1286 12BA 12EE 1322 1581...
-
Page 186: 6�3�5�- Cost Variables
CVM-B100 - CVM-B150 Table 28 (Continuation) : Modbus memory map: Voltage and current harmonics� Parameter Voltage L1 Voltage L2 Voltage L3 Neutral Voltage Units 36th Order harmonic 1352 1386 13BA 13EE 1581 37th Order harmonic 1353 1387 13BB 13EF 1581... -
Page 187: 6�3�7�- Device Configuration Variables
CVM-B100 - CVM-B150 6�3�7�- DEVICE CONFIGURATION VARIABLES The following functions are implemented for these variables: Function 0x04: reading registers. Function 0x10: Writing multiple registers. Note: The programming values must be written in hexadecimal. It is necessary to change the screen when a setup change is made for communi- cations in order for the changes take effect in the display. - Page 188 CVM-B100 - CVM-B150 Table 33: Configuration of local time Local time parameter Local time Value Local time Value UTC+1 0x0000 UTC-11 0x000C UTC+2 0x0001 UTC-10 0x000D UTC+3 0x0002 UTC-9 0x000E UTC+4 0x0003 UTC-8 0x000F UTC+5 0x0004 UTC-7 0x0010 UTC+6 0x0005...
- Page 189 CVM-B100 - CVM-B150 6�3�7�5�- Measurement connection mode This parameter occupies 1 register. Table 36: Modbus memory map: Configuration variables (Measurement connection mode). Measurement connection mode Configuration variable Address Valid data window Default value 0: Single-phase 1: Two-phase 2: Two-phase with Neutral...
- Page 190 CVM-B100 - CVM-B150 6�3�7�7�- Display of variables This parameter occupies 1 register. Table 38:Modbus memory map: Configuration variables (Display of variables). Selection of variables to be displayed Configuration variable Address Valid data window Default value Selection of variables to be displayed 2A94 –...
- Page 191 CVM-B100 - CVM-B150 6�3�7�9�- Installation data These parameters occupy 1 register each. Table 41: Modbus memory map: Configuration variables (Installation data) Installation data Configuration variable Address Valid data window Default value Nominal Frequency 2720 5000 or 6000 5000 2 or 4...
- Page 192 CVM-B100 - CVM-B150 6�3�7�12�- Relay digital outputs The Maximum Value and Minimum Value configuration variables occupy 2 registers each. All other variables occupy 1 register each. Table 44:Modbus memory map: Relay digital outputs� Configuration of the digital outputs of the relay...
- Page 193 CVM-B100 - CVM-B150 Table 45 ( Continuation): Units and maximum and minimum values of the programming variables of the digital outputs� Variable Units Maximum Minimum Maximum Demand of Active Power 180 000 000 Maximum Demand of Apparent Power The voltage ratio is the ratio between the primary and secondary voltage.
- Page 194 CVM-B100 - CVM-B150 6�3�7�14�- Digital inputs The Input Name configuration variable occupies 4 registers. The Units configuration variable occupies 3 registers. All other variables occupy 1 register each. Table 47:Modbus memory map: Configuration variables (Digital Inputs). Configuration of Digital Inputs...
- Page 195 CVM-B100 - CVM-B150 6�3�7�16�- User interface These parameters occupy 1 register each. Table 49:Modbus memory map: Configuration variables (user interface) User interface Configuration variable Address Valid data window Default value Sensitivity 280C 0: low, 1: medium, 2: high 1-99 (minutes)
- Page 196 CVM-B100 - CVM-B150 Example: Query: Reading the position of input channels. Initial No� of Address Function register registers 2850 0001 XXXX Address: 0A, Peripheral number: 10 in decimal. Function: 04, Read function. Initial Register: 2850, register address. No� of registers: 0001, number of registers to be read.
- Page 197 CVM-B100 - CVM-B150 Table 53 (Continuation): Modbus memory map: Configuration variables (Configuration of the parameter customisation screens) Configuration of the parameter customisation screens Valid data Configuration variable Address margin Not used 2971 2981 2991 29A1 29B1 Not used 2972 2982...
- Page 198 CVM-B100 - CVM-B150 Table 55: Modbus memory map: Configuration variables (Configuration of the parameter customisation screens) Configuration of the parameter customisation screens Valid data Configuration variable Address margin Screen 1 Screen 2 Screen 3 Screen 4 Screen 5 4 parameter screens...
- Page 199 CVM-B100 - CVM-B150 Table 56 (Continuation) : Configuration of custom screens: Variables� Variables parameter Variable Value Variable Value Apparent Power 0x000A Emissions 0x0018 Cost Power Factor 0x000B 0x0019 φ 0x000C Empty (no parameters) 0x001A Cosine Voltage THD 0x000D Table 57: Configuration of custom screens: Phases.
-
Page 200: 6�3�8�- Other Device Variables
CVM-B100 - CVM-B150 6�3�8�- OTHER DEVICE VARIABLES 6�3�8�1�- Firmware version These parameters occupy 6 registers. Table 60: Modbus memory map: Firmware version� Firmware version Configuration variable Address Example Version 2AF8 – 2AFD “010102” For this variable only Function 0x04 is implemented: reading registers. - Page 201 CVM-B100 - CVM-B150 6�3�8�5�- Alarm status 6�3�8�5�1�- Relay digital outputs The Latch variable occupies 2 registers. All other variables occupy 1 register each. Table 64: Modbus memory map: Alarm status: Relay digital outputs: Alarm status Relay digital outputs Address Configuration variable...
- Page 202 CVM-B100 - CVM-B150 6�3�8�5�2�- Transistor digital outputs The Latch variable occupies 2 registers. All other variables occupy 1 register each. Table 65: Modbus memory map: Alarm status: Transistor digital outputs� Alarm status: Transistor digital outputs Configuration variable Address Valid data window...
-
Page 203: 6�3�9�- Deleting Parameters
CVM-B100 - CVM-B150 6�3�8�6� Energy closes The Energy variables occupy 90 registers. All other variables occupy 1 register each. Table 66:Modbus memory map: Energy closes Energy closes Variable Address 1 day active energy close 2BC0 - 2C19 1 day reactive energy close total... -
Page 204: 6�4�- Bacnet Protocol
CVM-B100 - CVM-B150 Table 67 (Continuation) : Modbus memory map: Deleting parameters Deleting parameters Address Value to be sent Deleting the alarm logs 0840 0x00FF Deleting the event logs 0841 0x00FF Deleting the energy closes 0842 0x00FF Full deletion 0848... -
Page 205: 6�5�- Pics Map
CVM-B100 - CVM-B150 6.5.- PICS MAP PICS Vendor Name: CIRCUTOR Product Name: CVM-B100 CVM-B150 Product Model Number: 0823 Application Software Version: Firmware Revision: BACnet Protocol Revision: 10 Product Description: Electrical energy meter BACnet Standardised Device Profile (Annex L) BACnet Application Specific Controller (B-ASC) - Page 206 CVM-B100 - CVM-B150 DESCRIPTION SYMBOL ID OBJECTS OBJECT NAME UnitS Potencia reactiva Reactive power kvar 2 ReactPwrPh2 kvar Factor de potencia Power factor PF 2 PwrFactPh2 Tensión fase-neutro Voltage phase to AI10 Ph2NU3 neutral Corriente Current AI11 Ph3Current Potencia activa...
- Page 207 CVM-B100 - CVM-B150 DESCRIPTION SYMBOL ID OBJECTS OBJECT NAME UnitS Potencia aparente Three phase aparent kVAIII AI43 AppPw3Ph trifásica power Máxima demanda I1 Maximum demand I1 Md (A1) AI44 MaxDemand_A1 Máxima demanda I2 Maximum demand I2 Md(A2) AI45 MaxDemand_A2 Máxima demanda I3...
-
Page 208: 7�- Expansion Modules
CVM-B100 - CVM-B150 7�- EXPANSION MODULES The device has following expansion modules that can be connected to it. The modules are: Transistor Digital Inputs/Outputs (M-CVM-AB-8I-8OTR), Relay Digital Inputs/Outputs (M-CVM-AB-8I-8OR) Analogue Inputs/Outputs (M-CVM-AB-4AI-8AO) Modbus TCP Bridge communications module (M-CVM-AB-Modbus-TCP(Bridge)) ... - Page 209 CVM-B100 - CVM-B150 A�- Protective cove version 1 To install, firstly remove the protective cover of the expansion connector located at the rear of the device, Figure 254� Figure 254: Remove the expansion connector cap� connect the expansion module to the device, Figure 255 Figure 255: Connect the expansion module�...
- Page 210 CVM-B100 - CVM-B150 B- Protective cove version 2 To install, firstly remove the protective cover of the expansion connector located at the rear of the device. To do so: a�- Remove the two fastening pins that secure the protective cover with a flat tip screwdriver,...
- Page 211 CVM-B100 - CVM-B150 and secure it by inserting the 4 fastening pins into the corresponding slots, Figure 261: Insert the fastening pins into the corresponding slots� Instruction Manual...
-
Page 212: 7�2�- Relay Digital Inputs/Outputs
CVM-B100 - CVM-B150 7.2.- RELAY DIGITAL INPUTS/OUTPUTS This expansion module features 8 relay digital inputs and 8 relay digital outputs. 7�2�1�- CONNECTION TERMINALS A�- Terminals on the upper face Table 68: List of terminals on the upper face, Relay digital inputs/outputs module�... -
Page 213: 7�2�2�- Connection Diagrams
CVM-B100 - CVM-B150 7�2�2�- CONNECTION DIAGRAMS A�- Relay digital outputs Relay 1 2 3 4 5 6 7 8 9 10 External power Figure 264: Connection diagram, relay digital outputs� B�- Digital inputs 12 V DC COMM Free voltage input Figure 265: Connection diagram, digital inputs�... -
Page 214: 7�2�3�- Configuration
CVM-B100 - CVM-B150 7�2�3�- CONFIGURATION Access the configuration menu, as described in , and enter the configura- “5.6.- SETUP MENU” tion icon of the expansion modules, The main screen of the expansion modules is shown in Figure 266 Figure 266: Main screen of expansion modules�... - Page 215 CVM-B100 - CVM-B150 The following options appear in the lower area: > > < < Digital input Digital Main Relay menu outputs > Back > < < Figure 268: Setup menu : relay digital inputs/outputs� Use the keys to select the different options.
- Page 216 CVM-B100 - CVM-B150 Figure 269: Main configuration screen for relay digital inputs. > > < > < < Main Mode menu Back Impulsos Digital inputs 1...8 > > < < Figure 270: Setup menu: digital inputs� Use the keys to select the different options.
- Page 217 CVM-B100 - CVM-B150 Configuration of digital inputs, impulse mode.” 7�2�3�1�2�- Configuration of a digital input, logic state mode. When selecting the configuration of digital inputs in logic state mode, you can program the input logic as positive or negative. The configuration of a digital input in logic state mode in the expansion modules is the same as the configuration of the digital inputs in logic state mode integrated in the device, see “5.6.17.3.-...
-
Page 218: 7�2�4�- Modbus Communications
CVM-B100 - CVM-B150 To confirm the selection, press the key After selecting the output to configure, you can configure the following parameters: The variable code that controls the relay. The pre-alarm value. The minimum value below which the relay is activated. - Page 219 CVM-B100 - CVM-B150 Table 71: Modbus memory map: Relay digital outputs, expansion modules (Table 2)� Configuration of relay digital outputs: Slot 1 Address Configuration variable Output Output Output Output Output Output Output Output Maximum value C350 C364 C378 C38C C3A0...
- Page 220 CVM-B100 - CVM-B150 Table 73:Modbus memory map: Relay digital outputs, expansion modules (Table 4)� Configuration of the relay digital outputs: Slot 3 Address Configuration variable Output Output Output Output Output Output Output Output Maximum value CB20 CB34 CB48 CB5C CB70...
- Page 221 CVM-B100 - CVM-B150 Table 75: Modbus memory map: Manual programming of outputs, expansion modules (Table 1)� Manual programming of relay digital outputs Configuration variable Valid data window Default value 0: Automatic Programming status 1:Manual 0: Open Value 1:Closed When programming the Programming status manually set the output for the relays manually, using the Value parameter.
- Page 222 CVM-B100 - CVM-B150 Note: The 2 registers must be written at once (as a group), otherwise it will respond with an error. 7�2�4�3�- Programming the digital inputs The Modbus memory map for the digital inputs of the relay digital inputs/outputs module is the same as the transistor digital inputs/outputs module, see “7.3.4.3.- Programming the digital...
- Page 223 CVM-B100 - CVM-B150 Table 81: Modbus memory map: Status of relay digital outputs (Table 2)� Status of relay digital outputs: Slot 1 Address Configuration variable Output Output Output Output Output Output Output Output Latch C670 C684 C698 C6AC C6C0 C6D4...
- Page 224 CVM-B100 - CVM-B150 Table 83: Modbus memory map: Status of relay digital outputs (Table 4)� Status of relay digital outputs: Slot 3 Address Configuration variable Output Output Output Output Output Output Output Output Latch CE40 CE54 CE68 CE7C CE90 CEA4...
-
Page 225: 7�3�- Transistor Digital Inputs/Outputs
CVM-B100 - CVM-B150 7.3.- TRANSISTOR DIGITAL INPUTS/OUTPUTS This expansion module contains 8 transistor digital inputs and 8 transistor digital outputs. 7�3�1�- CONNECTION TERMINALS A�- Terminals on the upper face Table 85:List of terminals on the upper face, Transistor digital inputs/outputs module�... -
Page 226: 7�3�2�- Connection Diagrams
CVM-B100 - CVM-B150 7�3�2�- CONNECTION DIAGRAMS A�- Transistor digital outputs Optocoupler 1 2 3 4 5 6 7 8 9 10 External power Figure 275:Connection diagram, transistor digital outputs� B�- Digital inputs 12 V DC COMM Free voltage input Figure 276:Connection diagram, digital inputs�... -
Page 227: 7�3�3�- Configuration
CVM-B100 - CVM-B150 7�3�3�- CONFIGURATION Access the configuration menu, as described in , and enter the configura- “5.6.- SETUP MENU” tion icon of the expansion modules, The main screen of the expansion modules is shown in Figure 277 Figure 277: Main screen of expansion modules�... - Page 228 CVM-B100 - CVM-B150 > > < < Digital inputs Digital Main Transistor menu outputs > Back > < < Figure 279: Setup menu : transistor digital inputs/outputs� Use the keys to select the different options. To confirm the selection, press the key 7�3�3�1�-...
-
Page 229: 7�3�4�- Comunicaciones Modbus
CVM-B100 - CVM-B150 The following options appear in the lower area: > > < < Output 1...8 Main varh Back menu > < Figure 281: Setup menu : transistor digital outputs Use the keys to select the different options. To confirm the selection, press the key... - Page 230 CVM-B100 - CVM-B150 Table 87: Modbus memory map: Transistor digital outputs, expansion modules (Table 1)� Configuration of Transistor Digital Outputs Valid data window Default Configuration variable value Variable code Table 22 Alarm Impulse output 0 to 100% Pre-alarm value Table 45...
- Page 231 CVM-B100 - CVM-B150 Table 89: Modbus memory: Transistor digital outputs, expansion modules (Table 3)� Transistor Digital Outputs configuration: Slot 2 Configuration variable Address Impulse Output Output Output Output Output Output Output Output Alarm output Energy Maximum value C738 C74C C760...
- Page 232 CVM-B100 - CVM-B150 Table 91: Modbus memory map: Transistor digital outputs, expansion modules (Table 5)� Transistor Digital Outputs configuration: Slot 4 Configuration variable Address Impulse Output Output Output Output Output Output Output Output Alarm output Energy Maximum value CF08 CF1C...
- Page 233 CVM-B100 - CVM-B150 Table 94: Modbus memory map: Manual programming of outputs, expansion modules (Table 3)� Manual programming of transistor digital outputs: Slot 2 Address Configuration variable Output Output Output Output Output Output Output Output Programming status C810 C824 C838...
- Page 234 CVM-B100 - CVM-B150 Table 98: Modbus memory map: Digital inputs, expansion modules (Table 2)� Configuration of digital inputs: Slot 1 Address Configuration variable Input 1 Input 2 Input 3 Input 4 Input 5 Input 6 Input 7 Input 8 Mode...
- Page 235 CVM-B100 - CVM-B150 Table 101:Modbus memory map: Digital inputs, expansion modules (Table 5)� Configuration of digital inputs: Slot 4 Address Configuration variable Input 1 Input 2 Input 3 Input 4 Input 5 Input 6 Input 7 Input 8 Mode D098...
- Page 236 CVM-B100 - CVM-B150 Table 104: Modbus memory map: Status of digital inputs (Table 3)� Status of digital inputs: Slot 3 Configuration variable Address Valid data window Input Status 1 CD78 - CD79 0 to 1 Input Status 2 CD7A - CD7B...
- Page 237 CVM-B100 - CVM-B150 Table 106 (Continuation): Modbus memory map: Status of transistor digital outputs (Table 1)� Status of transistor digital outputs Configuration variable Valid data window Impulse Impulse Alarm Alarm output output Not used 0: No alarm, Status 1: Active alarm,...
- Page 238 CVM-B100 - CVM-B150 Table 108: Modbus memory map: Status of transistor digital outputs (Table 3)� Transistor digital outputs: Slot2 Configuration variable Address Impulse Output Output Output Output Output Output Output Output Alarm output Latch kWh o Wh CA58 CA6C CA80...
- Page 239 CVM-B100 - CVM-B150 Table 109 (Continuation):Modbus memory map: Status of transistor digital outputs (Table 4)� Transistor digital outputs: Slot3 Configuration variable Address Not used CE4B CE5F CE73 CE87 CE9B CEAF CEC3 CED7 Status CE4C CE60 CE74 CE88 CE9C CEB0 CEC4...
-
Page 240: 7�4�- Analogue Inputs/Outputs
CVM-B100 - CVM-B150 7.4.- ANALOGUE INPUTS/OUTPUTS This expansion module contains 8 analogue outputs and 4 analogue inputs. 7�4�1�- CONNECTION TERMINALS A�- Terminals on the upper face Table 111: List of terminals on the upper face, Analogue inputs/outputs module� Device terminals... - Page 241 CVM-B100 - CVM-B150 B�- Terminals on the lower face Table 112: List of terminals on the lower face, Analogue inputs/outputs module� Device terminals 10: I +, Analogue input 1 14: I +, Analogue input 3 11: I -, Analogue input 1...
-
Page 242: 7�4�2�- Connection Diagrams
CVM-B100 - CVM-B150 7�4�2�- CONNECTION DIAGRAMS A�- Analogue outputs External load Figure 284:Connection diagram, analogue outputs� B�- Analogue inputs 150Ω 150Ω Sensor Sensor 0/4 ...20 mA 0/4 ...20 mA Figure 285: Connection diagram, analogue inputs� Instruction Manual... -
Page 243: 7�4�3�- Configuration
CVM-B100 - CVM-B150 7�4�3�- CONFIGURATION Access the configuration menu, as described in , and enter the configura- “5.6.- SETUP MENU” tion icon of the expansion modules, The main screen of the expansion modules is shown in Figure 286 Figure 286: Main screen of expansion modules�... - Page 244 CVM-B100 - CVM-B150 The following options appear in the lower area: > > < < Analog inputs Main Analog menu Outputs Volver > > < < Figure 288: Setup menu : analogue inputs/outputs� Use the keys to select the different options.
- Page 245 CVM-B100 - CVM-B150 > > < < Input1...4 Main varh Back menu > < Figure 290: Setup menu :Analogue inputs� Use the keys to select the different options. To confirm the selection, press the key When selecting the input to configure,...
- Page 246 CVM-B100 - CVM-B150 > > > < < > < < Con guration Previous Main values menu Next Back Con rm Delete Delete and save parameter character > > < < > > < < Figure 292: Setup menu : Analogue inputs Use the keys to select the different options.
- Page 247 CVM-B100 - CVM-B150 7�4�3�2�- Analogue outputs� Select the output to configure on the main configuration screen for the analogue outputs, Figure 293 Figure 293: Main configuration screen for analogue outputs. > > < < Output 1...8 Main varh Back menu >...
- Page 248 CVM-B100 - CVM-B150 Figure 295: Analogue outputs configuration screen. The parameter selected is indicated in white. > > > < < > < < Con guration Previous Main values menu Next Back Con rm Delete Delete and save parameter character >...
-
Page 249: 7�4�4�- Modbus Communications
CVM-B100 - CVM-B150 ● When programming the Zero and the Full-scale value: Zero is the value for which you have the start of the analogue output, 0 or 4mA. The Full-scale is the value for which you have the end of the analogue output, 20mA. - Page 250 CVM-B100 - CVM-B150 Note: The 7 registers must be written and read at once (as a group), otherwise it will respond with an error. Table 115: Modbus memory map: Analogue outputs, expansion modules (Table 3)� Configuration of analogue outputs: Slot 2...
- Page 251 CVM-B100 - CVM-B150 7�4�4�2�- Programming analogue inputs The following functions are implemented for these variables: Function 0x04: reading registers. Function 0x10:Writing multiple registers. Table 118:Modbus memory map: Analogue inputs, expansion modules (Table 1)� Configuration of analogue inputs Valid data window...
- Page 252 CVM-B100 - CVM-B150 Table 121: Modbus memory map: Analogue inputs, expansion modules (Table 4)� Configuration of analogue inputs: Slot 3 Address Configuration variable Input 1 Input 2 Input 3 Input 4 Zero DAC0 DAD4 DAE8 DAFC Full-scale DAC1 DAD5 DAE9...
- Page 253 CVM-B100 - CVM-B150 Table 125: Modbus memory map: Analogue inputs, expansion modules (Table 8)� Status of the analogue inputs: Slot 3 Configuration variable Address Valid data margin Status Input 1 DB60 - DB61 Status Input 2 DB62 - DB63 Status Input 3...
-
Page 254: 7�5�- Modbus/Tcp Bridge Communications Module
CVM-B100 - CVM-B150 7.5.- MODBUS/TCP BRIDGE COMMUNICATIONS MODULE The M-CVM-AB-Modbus TCP (Bridge) is a communications module for connecting the CVM-B devices to a Modbus/TCP network and as an Ethernet to RS-485 gateway. Modbus/TCP is a communications protocol designed for enabling industrial devices to communicate with each other on Ethernet networks using TCP/IP protocols. -
Page 255: 7�5�3�- Connection Diagram
CVM-B100 - CVM-B150 7�5�3�- CONNECTION DIAGRAM B(-) B(-) A(+) A(+) RS-485 Ethernet CVM MINI OUTPUTS S0- S0+ S0+ RS485 INPUTS A(+) B(-) I1 I2 POWER SUPPLY Rc R2 R1 Tc T2 T1 CVM B-1xx CVM C10 M-CVM-AB-Modbus TCP (Bridge) Ph-Ph... - Page 256 CVM-B100 - CVM-B150 Note : If in the device there is more than one module of the same type connected, a number will appear in the icon to differentiate; the module with the lowest number has the lowest serial number.
- Page 257 CVM-B100 - CVM-B150 7�5�4�1�- Configuration of DHCP activation/deactivation On this screen you select whether or not the IP is automatically assigned. Figure 303 Figure 303: Configuration screen of the Modbus TCP (Bridge) module ( TCP Auto) > > < <...
- Page 258 CVM-B100 - CVM-B150 7�5�4�2�- Configuration of the TCP parameters manually. Note: If DHCP is activated, you will not be able to modify the parameters on this screen. This is indicated by a * next to each value. The configuration parameters of the TCP communication are, Figure 305 IP address.
- Page 259 CVM-B100 - CVM-B150 7�5�4�3�- Configuration of the RS-485 gateway parameters The configuration parameters of the RS-485 gateway are, Figure 307 The transmission speed, Baud rate. The parity. The number of stop bits. Figure 307: Configuration screen of the Modbus TCP (Bridge) module (RS-485 Gateway) The parameter selected is indicated in white.
-
Page 260: 7�5�5�- Modbus Communications
CVM-B100 - CVM-B150 ● When programming the transmission speed, Baud rate, the configuration values are: Possible transmission speeds: 9600, 19200, 38400, 57600, 76800 or 115200� ● When programming the parity: Even parity, Odd parity, No parity. ● When programming the number of stop bits: Possible numbers of stop bits: 1 or 2�... - Page 261 CVM-B100 - CVM-B150 7.5.5.3.- Configuration of the RS-485 gateway parameters Table 131:Modbus memory map: Modbus TCP (Bridge) communications module (Table 3) Configuration of the Modbus TCP parameters Configuration variable Address Valid data margin Default value 0: 1200 - 1: 2400 - 2: 4800 -...
-
Page 262: 7�6�- Lonworks Communications Module
CVM-B100 - CVM-B150 7.6.- LONWORKS COMMUNICATIONS MODULE The LonWorks communications module, M-CVM-AB-LON, enables communicating the CVM-B on a LonWorks network. 7�6�1�- CONNECTION TERMINALS Table 133: List of terminals, LonWorks communications module� Terminals in the device 1, 4: A, Bus connection ( without polarity ) -
Page 263: 7�6�3�- Configuration
CVM-B100 - CVM-B150 7�6�3�- CONFIGURATION Access the configuration menu, as described in , and enter the configura- “5.6.- SETUP MENU” tion icon of the expansion modules, The main screen of the expansion modules is shown in Figure 311. Figure 311: Main screen of expansion modules�... - Page 264 CVM-B100 - CVM-B150 This screen can be used for connecting the device to a LonWorks network. To do so, select the confirm option . The device will then send to the network all the information needed to establish the connection.
-
Page 265: 7�6�4�- Modbus Communications
The following functions are implemented for this variable: Function 0x04: reading registers. Function 0x10: Writing multiple registers. For this variable Function 0x04 is implemented. 7�6�5�- LIST OF LONWORKS LOGS Note: The binary files and setup file can be downloaded from Circutor’s website. Variable Name Variable type Unit... - Page 266 CVM-B100 - CVM-B150 Variable Name Variable type Unit nvo_Ph2NU3 SNVT_volt_ac (138) Phase-Neutral Voltage L3 Code Resolution Values 0..65,534 Name Variable type Unit nvo_Frequency SNVT_freq_hz (76) Frequency Code Resolution Values 0..6553.5 Name Variable type Unit nvo_ActPwrPh1 SNVT_power_kilo (28) kW L1 Active Power L1...
- Page 267 CVM-B100 - CVM-B150 Variable Name Variable type Unit nvo_PwrFactPh2 SNVT_pwr_fact (98) PF L2 Power factor L2 Code Resolution Values 0.00005 -1.00000..1.00000 Name Variable type Unit nvo_PwrFactPh3 SNVT_pwr_fact (98) PF L3 Power factor L3 Code Resolution Values 0.00005 -1.00000..1.00000 Name Variable type...
- Page 268 CVM-B100 - CVM-B150 Variable Name Variable type Unit nvo_AppPwOn3Ph SNVT_power_kilo (28) kVA III Apparent Power III Code Resolution Values 0..6553.5 Name Variable type Unit nvo_PwFactOn3Ph SNVT_pwr_fact (98) PF III Power Factor III Code Resolution Values 0.00005 -1.00000..1.00000 Name Variable type Unit cos φ...
- Page 269 CVM-B100 - CVM-B150 Variable Name Variable type Unit nvo_CapEnergy SNVT_elec_kwh_I (146) kVArC.h(+) Capacitive Reactive Energy (+) Code Resolution Values -214,748,364.8.. 214,748,364.6 Name Variable type Unit nvo_AppEnergy SNVT_elec_kwh_I (146) kVA.h(+) Apparent Energy (+) Code Resolution Values -214,748,364.8.. 214,748,364.6 Name Variable type...
- Page 270 CVM-B100 - CVM-B150 Arrray 1 tipo NVT ( SNVT_str_int (37)), Unit (N/A), Resolution (1), Values (0...65,565), Bytes (31) typedef struct { unsigned short char_set ; unsigned long wide_char [15] ; } SNTV_str_int; Name Variable type Unit nvo_Ph2PhU23 SNVT_volt_ac (138) V 23...
- Page 271 CVM-B100 - CVM-B150 Arrray 2 tipo NVT ( SNVT_str_int (37)), Unit (N/A), Resolution (1), Values (0...65,565), Bytes (31) typedef struct { unsigned short char_set ; unsigned long wide_char [15] ; } SNTV_str_int; Name Variable type Unit nvo_CapEnergy SNVT_elec_kwh_I (146) kVArC.h(+)
- Page 272 CVM-B100 - CVM-B150 Arrray 3 tipo NVT ( SNVT_str_int (37)), Unit (N/A), Resolution (1), Values (0...65,565), Bytes (31) typedef struct { unsigned short char_set ; unsigned long wide_char [15] ; } SNTV_str_int; Name Variable type Unit nvo_PwFactOn3Ph SNVT_pwr_fact (98) PF III...
-
Page 273: 7�7�- Profibus Communications Module
CVM-B100 - CVM-B150 7.7.- PROFIBUS COMMUNICATIONS MODULE The Profibus communications module, M-CVM-AB-Profibus, enables communicating the CVM-B with a Profibus network. 7�7�1�- CONNECTION TERMINALS Table 135: List of terminals, Profibus communications module. Connection terminals 1: Shield 6: P5, 5V supply voltage... -
Page 274: 7�7�3�- Connection Diagram
CVM-B100 - CVM-B150 7�7�3�- CONNECTION DIAGRAM Master Profibus Red Profibus / Network Profibus CVM-B1xx CVM-B1xx M-CVM-AB-Pro bus M-CVM-AB-Pro bus Figure 317:Connection diagram, Profibus. Instruction Manual... -
Page 275: 7�7�4�- Configuration
CVM-B100 - CVM-B150 7�7�4�- CONFIGURATION Access the configuration menu, as described in , and enter the configura- “5.6.- SETUP MENU” tion icon of the expansion modules, The main screen of the expansion modules is shown in Figure 318 Figure 318: Main screen of expansion modules�... -
Page 276: 7�7�5�- Variables Profibus Gsd File
To confirm the selection, press the button. 7�7�5�- VARIABLES PROFIBUS GSD FILE Note: Profibus drivers for Scada can be downloaded from Circutor’s website. The configurations of the GSD modules are given in Figure 244� The table shows the module number, content (variable) and the total size of the module. - Page 277 CVM-B100 - CVM-B150 Table 137 (Continuation): GSD modules� Module Name Bytes ∑ Mod 13 Mod 13 Cos φ Module 1 Table 138: GSD modules (Module 1 - Mod 1�1) Mod 1�1 Phase-neutral voltage Symbol Bytes Address Units Voltage phase 1...
- Page 278 CVM-B100 - CVM-B150 Module 2 Table 143: GSD modules (Module 2) Mod 2 Powers Symbol Bytes Address Units Active powers Active power Kw 1 04-05 Active power Kw 2 14-15 Active power Kw 3 24-25 Inductive reactive powers Inductive reactive power...
- Page 279 CVM-B100 - CVM-B150 Module 4 Table 147: GSD modules (Module 4) Mod 4 Address Address Total tariff Symbol Bytes Units Tariff 1 Active Energy kwh III 500-501 Active Energy wh III Inductive Reactive Energy kvarhL III 503-504 Inductive Reactive Energy...
- Page 280 CVM-B100 - CVM-B150 Table 149 (Continuation) : GSD modules (Module 8) Mod 8 Odd harmonics voltage Symbol Bytes Address Units 13th Order Harmonic v1 H13 0A35 %x100 15th Order Harmonic v1 H15 0A37 %x100 Fundamental Harm. V2_fund 0A5B-0A5C Vx100 3rd Order Harmonic...
- Page 281 CVM-B100 - CVM-B150 Table 150 (Continuation) : GSD modules (Module 9) Mod 9 Odd harmonics current Symbol Bytes Address Units I2 3rd Order Harmonic i2 H3 0B8A %x100 I2 5th Order Harmonic i2 H5 0B8C %x100 I2 7th Order Harmonic...
-
Page 282: 7�8�- Mbus Communications Module
CVM-B100 - CVM-B150 7.8.- MBUS COMMUNICATIONS MODULE The MBus communications module, M-CVM-AB-MBus, enables communicating the CVM-B with a M-Bus network. 7�8�1�- CONNECTION TERMINALS Table 152: List of terminals, MBus communications module� Connection terminals 1, 4: MBus + 3: Not use 2, 5: MBus - Figure 321: MBus communications module terminals�... -
Page 283: 7�8�3�- Configuration
CVM-B100 - CVM-B150 7�8�3�- CONFIGURATION Access the configuration menu, as described in , and enter the configura- “5.6.- SETUP MENU” tion icon of the expansion modules, The main screen of the expansion modules is shown in Figure 323 Figure 323: Main screen of expansion modules�... - Page 284 CVM-B100 - CVM-B150 The configuration parameters are: The primary address The transmission speed, Baud rate. The parameter selected is indicated in white. The following options appear in the lower area: > > > < < > < <...
-
Page 285: 7�8�4�- Modbus Communications
CVM-B100 - CVM-B150 7�8�4�- MODBUS COMMUNICATIONS The following functions are implemented for this variable: Function 0x04: reading logs. Function 0x10: Writing multiple logs. Table 153:Modbus memory map: MBus communications module Configuration of the MBus parameters Configuration variable Address Valid data margin... - Page 286 CVM-B100 - CVM-B150 7�8�5�1�- TABLE OF “RSP_UD” TELEGRAM VARIABLES Variables arranged by order of appearance in the telegram. Table 154: Table of “RSP_UD” telegram variables� Variable Format Type Units Notes Date/time of the Date / Time 4 bytes type F...
-
Page 287: 7�9�- Data Storage Module, Datalogger
Refer to the PowerStudio manual and tutorials found on CIRCUTOR’s website for more information about additional configurations, sending emails, generation of additional calculations, etc. -
Page 288: 7�9�3�- Connection Diagram
CVM-B100 - CVM-B150 7�9�3�- CONNECTION DIAGRAM Con navegador Web With a browser compatible con HTML5 compatible with HTML5 With a browser compatible with HTML5 Con navegador Web compatible con HTML5 Opcional / Optional INTERNET SERVIDOR/ SERVER ROUTER Ethernet CVM B-1xx... -
Page 289: 7�9�4�- Configuration
CVM-B100 - CVM-B150 7�9�4�- CONFIGURATION Access the configuration menu, as described in , and enter the configura- “5.6.- SETUP MENU” tion icon of the expansion modules, The main screen of the expansion modules is shown in Figure 329 Figure 329: Main screen of expansion modules�... - Page 290 CVM-B100 - CVM-B150 > > < > < < Main TCP auto menu Back manual Port > > < < Figure 331: Setup menu : Datalogger module� Use the buttons to select the different options. To confirm the selection, press the button.
- Page 291 CVM-B100 - CVM-B150 > > < < Con guration values Main Con rm menu and save > Back > < < Figure 333:Setup menu : Datalogger module� (TCP Auto)� Use the buttons to select the different options. To confirm the selection, press the button.
- Page 292 CVM-B100 - CVM-B150 The parameter selected is indicated in white. > > > < < > < < Con guration Previous Main values menu Next Back Con rm Delete Delete and save parameter character > > < < > >...
-
Page 293: 7�9�5�- Modbus Communications
CVM-B100 - CVM-B150 > > < > < < Main menu Con guration values Delete Back character Con rm Delete and save parameter > > < < > < Figure 337: Setup menu : Datalogger module (Port)� Use the buttons to select the different options. -
Page 294: 7�10�- Modbus/Tcp Switch Communications Module
CVM-B100 - CVM-B150 7.10.- MODBUS/TCP Switch COMMUNICATIONS MODULE The M-CVM-AB-Modbus TCP (Switch) is a communications module for connecting the CVM-B devices to a Modbus/TCP network and as an Ethernet to Ethernet gateway. Modbus/TCP is a communications protocol designed for enabling industrial devices to communicate with each other on Ethernet networks using TCP/IP protocols. -
Page 295: 7�10�3�- Connection Diagram
CVM-B100 - CVM-B150 7�10�3�- CONNECTION DIAGRAM Ethernet Ethernet B(-) B(-) A(+) A(+) RS-485 Ethernet Ethernet CVM MINI OUTPUTS S0- S0+ S0+ RS485 INPUTS A(+) B(-) I1 I2 POWER SUPPLY Rc R2 R1 Tc T2 T1 CVM B-1xx CVM B-1xx CVM B-1xx... - Page 296 CVM-B100 - CVM-B150 Select the Modbus TCP (Switch) communications icon, Figure 342� Figure 342: Main configuration screen of the Modbus TCP communications module. > > < < TCP auto Main menu manual > Back > < < Figure 343: Setup menu : Modbus TCP (Switch) communications�...
- Page 297 CVM-B100 - CVM-B150 7�10�4�1�- Configuration of DHCP activation/deactivation On this screen you select whether or not the IP is automatically assigned. Figure 344 Figure 344: Configuration screen of the Modbus TCP (Switch) module (TCP Auto) > > < < Con guration...
- Page 298 CVM-B100 - CVM-B150 7�10�4�2�- Configuration of the TCP parameters manually. Note: If DHCP is activated, you will not be able to modify the parameters on this screen. This is indicated by a * next to each value. The configuration parameters of the TCP communication are, Figure 346 IP address.
-
Page 299: 7�10�5�- Modbus Communications
CVM-B100 - CVM-B150 7�10�5�- MODBUS COMMUNICATIONS The following functions are implemented for these variables: Function 0x04: reading registers. Function 0x10: Writing multiple registers. 7.10.5.1.- Configuration of DHCP activation/deactivation Table 161:Modbus memory map: Modbus TCP (Switch) communications module (Table 1) Configuration of DHCP activation/deactivation... -
Page 300: 8�- Software Update
The update files, which can be found on the Circutor web site. Select the update files according to the model of the device, CVM-B100 or CVM-B150. A PC so as to update the files in the microSD card. -
Page 301: 8�1�- Device Software Update
CVM-B100 - CVM-B150 8.1.- DEVICE SOFTWARE UPDATE. The update files depend on the model of the device: Table 164:Display software update files. Model Display software update file firmware_cpu.bin CVM-B100 resources_CVM_B100.pbr resources_CVM_B100_cp.pbr firmware_cpu.bin CVM-B150 resources_CVM_B150.pbr resources_CVM_B150_cp.pbr Follow the steps below to update the device software: 1�- Copy the 3 files,... -
Page 302: 8�3�- Upgrading The Firmware Of The Datalogger Module
CVM-B100 - CVM-B150 The device scans the modules connected to it and looks to see whether there is a new update for each of them. If there is, the updating process may take around 7 minutes. The updated information on the modules is displayed in the expansion modules section of the information menu, “5.5.3.-... - Page 303 Figure 351: Datalogger module upgrade screen� Note: The upgrade files can be found on Circutor’s website. Select the upgrade files according to the model of the device, CVM-B100 or CVM-B150. 4�- Do not turn off the device during the upgrade process.
-
Page 304: 9�- Technical Features
CVM-B100 - CVM-B150 9�- TECHNICAL FEATURES AC power supply ( CVM-B100-ITF, CVM-B150-ITF ) Rated voltage 100 ... 240 V ~ Frequency 50 ... 60Hz CVM-B100 CVM-B150 Consumption max. 23.9 VA max. 29.4 VA Installation category CAT III 300 V DC Power supply... - Page 305 CVM-B100 - CVM-B150 (Continuation) Accuracy of measurements (in accordance with the IEC 61557-12 standard for PMD SD/SS) ���/5A ���/1A ���/0�250A Measurement of active and apparent Class 0.5 ± 1 digit Class 0.5 ± 1 digit Class 0.5 ± 1 digit power (Vn 230/110 V~) (0.05 ...6 A)
- Page 306 This pollution degree hasn’t been tested by UL. Mechanical features CVM-B100 CVM-B150 Dimensions Figure 352 (mm) Figure 353 (mm) Weight 500 gr 698 gr Enclosure Self-extinguishing V0 plastic Attachment (DIN 43700) 92x92 panel 138x138 panel 103.5 98,7 Figure 352: CVM-B100 dimensions� Instruction Manual...
- Page 307 CVM-B100 - CVM-B150 8.25 Figure 353:CVM-B150 dimensions� Standards Safety requirements for electrical equipment for measurement, control IEC/EN 61010-1:2010 and laboratory use -- Part 1: General requirements (Third Edition) Electromagnetic compatibility (EMC) -- Part 6-2: Generic standards - Im- UNE-EN 61000-6-2:2006...
-
Page 308: 10�- Technical Features Of Expansion Modules
CVM-B100 - CVM-B150 10�- TECHNICAL FEATURES OF EXPANSION MODULES 10.1.- TRANSISTOR DIGITAL INPUTS/OUTPUTS General features Maximum power of the module Transistor digital outputs Quantity Type Maximum voltage 48 V Maximum current 130 mA Maximum frequency 1 MHz Pulse width 3 ms... -
Page 309: 10�2�- Relay Digital Inputs/Outputs
CVM-B100 - CVM-B150 10.2.- RELAY DIGITAL INPUTS/OUTPUTS General features Maximum power of the module Relay digital outputs Quantity Maximum voltage, open contacts 250 V~ Maximum current Maximum switching power 750 VA Electrical working life (250 VAC / 3A) cycles Mechanical working life... -
Page 310: 10�3�- Digital Analogue Inputs/Outputs
CVM-B100 - CVM-B150 10.3.- DIGITAL ANALOGUE INPUTS/OUTPUTS General features Maximum power of the module Analogue outputs Quantity Maximum internal voltage 12 V Linearity <1% DAC resolution 4096 dots Analogue outputs in current mode Nominal output range 0-20 mA or 4-20 mA (Programmable) 300 Ω... -
Page 311: 10�4�- Modbus Tcp (Bridge) Communications
CVM-B100 - CVM-B150 (Continuation) Standards Safety Requirements for Electrical Equipment for Measurement, Control CAN/CSA-C22.2 No. and Laboratory Use - Part 1: General Requirements (Adopted IEC 1010- 61010-1, 3rd edition, 2012- 1:1990 with modifications) 10.4.- MODBUS TCP (Bridge) COMMUNICATIONS General features... -
Page 312: 10�5�- Lonworks Communications
CVM-B100 - CVM-B150 10.5.- LONWORKS COMMUNICATIONS General features Maximum power of the module 1.2 W Communications Protocol LonTalk Environmental features Operating temperature -10ºC ... +50ºC Storage temperature -20ºC ... +80ºC Relative humidity(without condensation) 5 ... 95% Maximum altitude 2000 m... -
Page 313: 10�6�- Profibus Communications
CVM-B100 - CVM-B150 10.6.- PROFIBUS COMMUNICATIONS General features Maximum power of the module Communications Connector Protocol Profibus Identifier Baud rate 19,2 kbs - 93,75 kbs - 187,5 kbs - 500 kbs - 1500 kbs - 3000 kbs - 6000 kbs - 12000 kbs... -
Page 314: 10�7�- Mbus Communications
CVM-B100 - CVM-B150 10.7.- MBUS COMMUNICATIONS General features Maximum power of the module Communications Wired M-Bus Protocol Slave M-Bus compatible to EN 13757-2 and EN 13757-3 Baud rate 1200 - 2400 - 4800 - 9600 Primary address 1 ... 250... -
Page 315: 10�8�- Data Storage, Datalogger
CVM-B100 - CVM-B150 10.8.- DATA STORAGE, DATALOGGER General features Maximum power of the module Communications : XML communications Connector RJ-45 Protocol Baud rate Ethernet 10BT / 100BT Environmental features Operating temperature -10ºC ... +50ºC Storage temperature -20ºC ... +80ºC Relative humidity (without condensation) 5 ... -
Page 316: 10�9�- Modbus Tcp (Switch) Communications
CVM-B100 - CVM-B150 10.9.- MODBUS TCP (Switch) COMMUNICATIONS General features Maximum power of the module Communications : Modbus TCP Connector RJ-45 Protocol Modbus/TCP Baud rate Ethernet 10BT / 100BT Environmental features Operating temperature -10ºC ... +50ºC Storage temperature -20ºC ... +80ºC Relative humidity (without condensation) 5 ... - Page 317 CVM-B100 - CVM-B150 89.5 89.5 Figure 354: Expansion module dimensions ( Protective cove version 1)� 89.5 Figure 355: Expansion module dimensions ( Protective cove version 2)� 89.5 Instruction Manual...
-
Page 318: 11�- Maintenance And Technical Service
• CIRCUTOR accepts no liability due to the possible damage to the unit or other parts of the installation, nor will it cover any possible sanctions derived from a pos- sible failure, improper installation or “improper usage”... -
Page 319: 13�- Ce Certificate
CVM-B100 - CVM-B150 13�- CE CERTIFICATE Instruction Manual... - Page 320 CVM-B100 - CVM-B150 Instruction Manual...
- Page 321 CVM-B100 - CVM-B150 Instruction Manual...
- Page 322 CIRCUTOR, SA Vial Sant Jordi, s/n 08232 -Viladecavalls (Barcelona) Tel.: (+34) 93 745 29 00 - Fax: (+34) 93 745 29 14 www.circutor.com central@circutor.com...
Need help?
Do you have a question about the CVM-B100 and is the answer not in the manual?
Questions and answers