Table of Contents
Advertisement
LIGHT METER
Model : LM-81LX
OPERATION MANUAL
Your
purchase
LIGHT METER marks a
step forward for you into
the
field
of
measurement.
this METER is a complex
and delicate instrument,
its durable structure will
allow many years of use if
p r o p e r
o p e r a t i n g
techniques are developed.
Please read the following
instructions carefully and
always keep this manual
within easy reach.
of
this
precision
Although
Advertisement
Chapters
Table of Contents

Related Manuals for Lutron Electronics LM-81LX


Summary of Contents for Lutron Electronics LM-81LX
- Page 1 LIGHT METER Model : LM-81LX Your purchase this LIGHT METER marks a step forward for you into field precision measurement. Although this METER is a complex and delicate instrument, its durable structure will allow many years of use if p r o p e r o p e r a t i n g techniques are developed.
-
Page 2: Table Of Contents
TABLE OF CONTENTS 1. FEATURES..............1 2. SPECIFICATIONS............1 3. FRONT PANEL DESCRIPTION........3 3-1 Power Button............3 3-2 Hold Button............3 3-3 Max. / Min. Button..........3 3-4 Zero Button............3 3-5 Lux/Ft-cd button..........3 3-6 Light Sensor............3 3-7 LCD display............ -
Page 3: Features
1. FEATURES * Tiny bone shape with lightweight and small size case design are suitable for handling with one hand. * Wristlet design provides extra protection to the instrument especially for user one hand operation. * Exclusive photo diode and color correction filter light sensor, spectrum meets C.I.E. - Page 4 Over Input Indication of "- - - - " Display Power Supply 006P DC 9V battery (Heavy duty type) Power Approx. DC 6.2 mA Consumption Weight 160g (battery included) Dimension HWD 156x60x33 mm (6.14x2.36x1.29 inch). Standard Instruction Manual Accessory Optional Carrying case.
-
Page 5: Front Panel Description
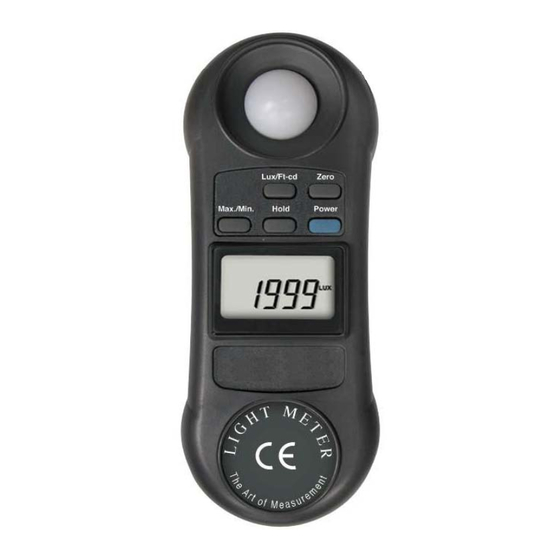
3. FRONT PANEL DESCRIPTION Fig. 1 3-1 Power Button 3-2 Hold Button 3-3 Max. / Min. Button 3-4 Zero Button 3-5 Lux/Ft-cd button 3-6 Light Sensor 3-7 LCD display 3-8 Battery Compartment / Cover 3-9 Wristlet... -
Page 6: Measuring Procedures
4. MEASURING PROCEDURE 1) Power on the instrument by pressing the " Power Button " ( 3-1, Fig. 1 ). 2) Position the " Light Sensor " ( 3-6, Fig. 1 ) directly under the light source. At the mean time the light reading value will be displayed on the LCD display. - Page 7 5-2 Data Record Function 1) The Data Record function records & displays the maximum and minimum reading values. To start the Data Record function by pressing the " Max./Min. Button " ( 3-3, Fig. 1 ) once. There will be a " REC " symbol on the display. 2) With the REC symbol on the display : (a) Press the "...
-
Page 8: Battery Replacement
3) Install a 9V battery (Alkaline or Heavy duty type) and then reinstate the cover. 7. OPTIONAL CARRYING CASE Carrying case * High quality carrying case with sash. * Size : 200 x 80 x 50 mm. CA-52A 0210-LM-81LX... - Page 9 LIGHT METER Model : LM-81LX...
- Page 10 TABLE OF CONTENTS 1. FEATURES..............1 2. SPECIFICATIONS............1 3. FRONT PANEL DESCRIPTION........3 3-1 Power Button............3 3-2 Hold Button............3 3-3 Max. / Min. Button..........3 3-4 Zero Button............3 3-5 Lux/Ft-cd button..........3 3-6 Light Sensor............3 3-7 LCD display............
-
Page 11: Features
1. FEATURES * Tiny bone shape with lightweight and small size case design are suitable for handling with one hand. * Wristlet design provides extra protection to the instrument especially for user one hand operation. * Exclusive photo diode and color correction filter light sensor, spectrum meets C.I.E. - Page 12 Over Input Indication of "- - - - " Display Power Supply 006P DC 9V battery (Heavy duty type) Power Approx. DC 6.2 mA Consumption Weight 160g (battery included) Dimension HWD 156x60x33 mm (6.14x2.36x1.29 inch). Standard Instruction Manual Accessory Optional Carrying case.
-
Page 13: Front Panel Description
3. FRONT PANEL DESCRIPTION Fig. 1 3-1 Power Button 3-2 Hold Button 3-3 Max. / Min. Button 3-4 Zero Button 3-5 Lux/Ft-cd button 3-6 Light Sensor 3-7 LCD display 3-8 Battery Compartment / Cover 3-9 Wristlet... -
Page 14: Measuring Procedures
4. MEASURING PROCEDURE 1) Power on the instrument by pressing the " Power Button " ( 3-1, Fig. 1 ). 2) Position the " Light Sensor " ( 3-6, Fig. 1 ) directly under the light source. At the mean time the light reading value will be displayed on the LCD display. - Page 15 5-2 Data Record Function 1) The Data Record function records & displays the maximum and minimum reading values. To start the Data Record function by pressing the " Max./Min. Button " ( 3-3, Fig. 1 ) once. There will be a " REC " symbol on the display. 2) With the REC symbol on the display : (a) Press the "...
-
Page 16: Battery Replacement
3) Install a 9V battery (Alkaline or Heavy duty type) and then reinstate the cover. 7. OPTIONAL CARRYING CASE Carrying case * High quality carrying case with sash. * Size : 200 x 80 x 50 mm. CA-52A 0210-LM-81LX...
Need help?
Do you have a question about the LM-81LX and is the answer not in the manual?
Questions and answers