Advertisement
Quick Links
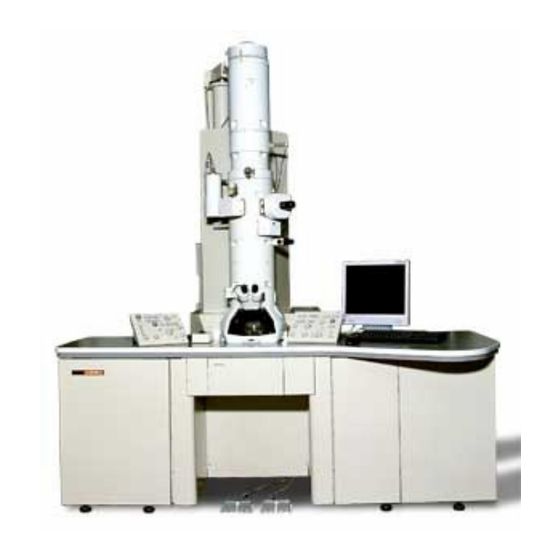
STANDARD OPERATING PROCEDURE
T
RANSMISSION
20 November 2010, R. Ubic
JEOL JEM-2100 HR
E
LECTRON
(TEM)
EDS Chemical analysis
Post column annular dark field detector
Tomography unit for 3D images
Cryogenic temperature control down to 77 K
Point Resolution:
Line Resolution:
STEM resolution:
Magnetic imaging resolution:
M
ICROSCOPE
2.3 Å
1.4 Å
10 Å
22 Å
1
Advertisement

Related Manuals for JEOL JEM-2100 HR


Summary of Contents for JEOL JEM-2100 HR
- Page 1 STANDARD OPERATING PROCEDURE JEOL JEM-2100 HR RANSMISSION LECTRON ICROSCOPE (TEM) EDS Chemical analysis Post column annular dark field detector Tomography unit for 3D images Cryogenic temperature control down to 77 K Point Resolution: 2.3 Å Line Resolution: 1.4 Å STEM resolution: 10 Å...
- Page 2 Emergencies Power failure The microscope will shut down safely. When power is restored, it is necessary to restart the microscope manually (see below). Cooling Water Suspension The high voltage power and lens power will shut down, and the vacuum system will go into the protected state.
-
Page 3: Start-Up Procedure
Start-Up Procedure Preliminaries Under normal circumstances, the microscope should be switched on and ready for use. Check to make sure that SF gas pressure > 0.01 MPa (round dial gauge on left-hand unit behind microscope). Check to make sure that the air pressure is > 0.4 MPa (top round dial gauge behind grill at base of column on left-hand side). - Page 4 Raising the Voltage All references to the screen refer to the left-hand monitor unless otherwise stated. If the “Controller for JEM-2100/HR” software is not currently running, double click on the TEMCON icon on the desktop of the left-hand monitor. The beam current should be zero and the high voltage (HT) switched off unless the microscope has recently been used, in which case the HT will be left on and beam current non-zero.
- Page 5 Sample Insertion Always wear gloves when handling specimen holders. Single-Tilt Holder Insert cartridge handling tool into hole at end of holder and open clamp by tilting the tool. Carefully remove the cartridge from the holder with tweezers, lifting it over the retaining pin.
- Page 6 Inserting Specimen Holder into Microscope See diagram. Ensure that there is no dust or lint on the holder O-rings. If there is, wipe gently with lint-free tissue. Ensure that there is sufficient vacuum grease on the O-rings (they should be shiny but have no noticeable white traces of grease).
-
Page 7: Alignment Procedure
Filament Ramping Make sure the Normal Setup button is selected in the Filament Control Speed. The filament should be set to ramp to some percentage (typically 60% - 70%) less than the maximum limit. Do not alter this number or the filament maximum limit. Press the filament ON button in the High Voltage Control window (or the Beam button on the top left of the left-hand control panel). - Page 8 Condenser Aperture Centering Insert a condenser aperture. Set the magnification to 100k. Focus the beam with the BRIGHTNESS knob and center it with the SHIFT knobs. Turn the BRIGHTNESS knob clockwise. If the illumination shifts, re-center it with the condenser aperture X and Y knobs. Repeat until the illumination no longer moves off center.
- Page 9 Voltage Axis Centering Try to find a pointed spot on the sample and center it Press STD FOCUS button (right-hand panel) and focus on the sample using the Z controls. Adjust the magnification to about 100k Finely focus the image using OBJ FOCUS. Select Maintenance from the Controller for JEM-2100/HR software menu bar and click on Alignment.
- Page 10 Shift Purity Adjustment Press SA DIFF (right-hand panel) and set the camera length to 200cm with the MAG/CAM L knob on right-hand panel. Turn the BRIGHTNESS knob fully clockwise. Use DIFF FOCUS knob (right-hand panel) if you cannot see the edge of the beam. Use the DIFF FOCUS knob (right-hand panel) to reduce the caustic spot.
- Page 11 Objective Lens Astigmatism Correction Find the amorphous edge of the sample and increase magnification to ≈300k - 500kX, adjusting the BRIGHTNESS knob for optimum viewing conditions and using the ShiftX and ShiftY knobs to center the beam (ensure that the BRIGHT TILT button is illuminated).
- Page 12 Obtaining a Selected Area Diffraction Pattern (SADP) Insert a Selected Area Aperture (aka Field Limiting Aperture). It is recommended that the largest one possible which still excludes extraneous parts of the sample be used. Use the X and Y positioning knobs on the aperture to center it on the region of interest. Press the SA DIFF button (right-hand panel).
- Page 13 Scanning Transmission Electron Microscopy (STEM) Focus the beam with the Brightness knob. Make sure the BRIGHT TILT button is illuminated and move the beam to the center of the screen using the ShiftX and ShiftY knobs. Click on the Dialogue option in the TEMCON menu bar, then select ASID Control. The axis alignment procedure is not normally necessary.
- Page 14 Ronchigram pattern. Insert an objective aperture and adjust it so that its center coincides with the center of the Ronchigram pattern. Insert the JEOL camera (left of column above viewing chamber) and cover the viewing window. To correct for astigmatism: Slightly defocus a STEM image.
- Page 15 Tomography Insert the holder and bring up the beam at 3000x. Make sure the beam is spread out but don't go all the way to fully overfocus with CL3. Acquire a trial image with SerialEM. If what you see looks contrast-rich and has many features, start 'eucentric - rough' from the task menu.
-
Page 16: End Of Session
End of Session Set magnification to ≈50,000X. Spread illumination to fill the screen. Double click on the Stage Neutral button Remove all apertures. Turn off the filament by pressing OFF in the Filament section of the High Voltage Control window (press the HT button at the top of the screen if this window is not still open).
Need help?
Do you have a question about the JEM-2100 HR and is the answer not in the manual?
Questions and answers