
Related Manuals for Thermo Scientific Sorvall LYNX 4000


Summary of Contents for Thermo Scientific Sorvall LYNX 4000
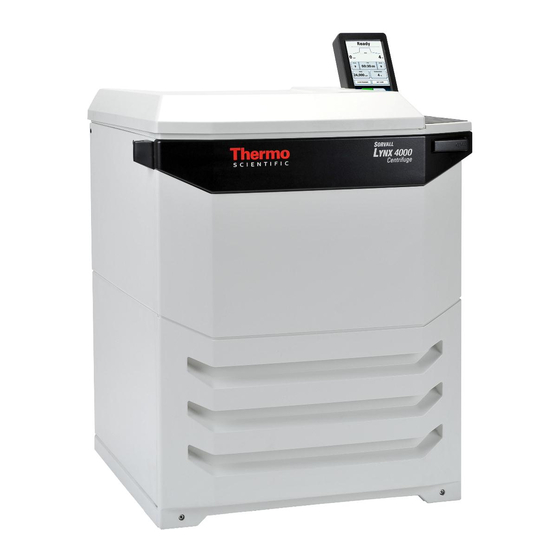
- Page 1 Thermo Scientific Sorvall L 4000 Sorvall L 6000 Superspeed Centrifuge Instruction Manual 50136519-01 October 2012 Visit us online to register your warranty. www.thermoscientific.com/labwarranty...
- Page 2 © 2012 Thermo Fisher Scientific Inc. All rights reserved. Delrin, TEFLON, and Viton are registered trademarks of DuPont. Noryl is a registered trademark of SABIC. POLYCLEAR is a registered trademark of Hongye CO., Ltd. Hypaque is a registered trademark of Amersham Health As. RULON A and Tygon are registered trademarks of Saint-Gobain Performance Plastics.
- Page 4 WEEE Conformity This product is subject to the regulations of the EU Waste Electrical & Electronic Equipment (WEEE) Directive 2002/96. It is marked by the following symbol: Thermo Fisher Scientific has entered into agreements with recycling and disposal companies in all EU Member States for the recycling and disposal of this device.
-
Page 5: Table Of Contents
Scope of Supply ........................iii Intended Purpose ........................iv Precautions ..........................iv Chapter 1 Introduction and Description ....................1 Characteristics of the Sorvall Lynx 4000 / 6000 Centrifuge .........1 Technical Data ......................2 Directives, Standards and Guidelines ..................3 Functions and Features ........................3 Mains Supply .......................4 Rotor Selection ......................4... - Page 6 Troubleshooting by User ...................38 When to contact a Service Technician ...............39 Rotor Care Guide .......................41 Routine Evaluation and Care of Your Rotor ..............42 Rotor Maintenance ....................43 Chemical Compatibility Chart .................47 Contact Information ....................53 Sorvall L 4000 / 6000 Thermo Scientific...
-
Page 7: Preface
WARNING means that injuries or material damage or contamination could occur. This symbol refers to biological hazards. Observe the information contained in the instruction manual to keep yourself and your environment safe. This symbol refers to electrical hazards. Thermo Scientific Sorvall L 4000 / 6000... -
Page 8: Intended Purpose
In case of rotor failure the centrifuge can be damaged. The coolant can escape. Ventilate the room well and leave it. Inform customer service. Note Not following these instruction can cause damage. Sorvall L 4000 / 6000 Thermo Scientific... - Page 9 • Do not touch the mechanical components of the rotor and do not make any changes to the mechanical components. • Use only with rotors which have been properly installed. Follow the instructions on the Thermo Scientific Auto-Lock rotor exchange in section “Rotor Installation”...
- Page 10 • Highly corrosive substances which can cause material damage and impair the mechanical stability of the rotor, should only be centrifuged in corresponding protective tubes. WARNING In case of rotor failure the centrifuge is not aerosol-tight. Sorvall L 4000 / 6000 Thermo Scientific...
-
Page 11: Introduction And Description
Introduction and Description Contents “Characteristics of the Sorvall Lynx 4000 / 6000 Centrifuge” page 1 • • “Technical Data” page 2 “Directives, Standards and Guidelines” page 3 • • “Functions and Features” page 3 “Mains Supply” page 4 • •... -
Page 12: Technical Data
Height with Door open 1531 mm 1531 mm Width 700 mm 700 mm Depth 805 mm 805 mm Weight without Rotor 285 kg 295 kg Measures at 1 m distance and at 1.6 m height Sorvall L 4000 / 6000 Thermo Scientific... -
Page 13: Directives, Standards And Guidelines
Component / Function Description / Features Structure / Housing Galvanized Steel Chassis with Armoured Plating Rotor Chamber Stainless Steel Drive Induction Drive without Carbon Brushes Touchscreen and Display Easy-to-clean Touchscreen and Display Surface Thermo Scientific Sorvall L 4000 / 6000... -
Page 14: Mains Supply
4850 4900 5000 4850 4800 Rotor Selection The Sorvall L 4000 / 6000 centrifuge is supplied with a rotor. Various Thermo Scientific rotors are available to choose from. BIOFlex HC 75003000 BIOFlex HS 75003002 TH13-6x50 75003010 Sorvall L 4000 / 6000... - Page 15 The technical data of the rotors and the corresponding adapters and reduction sleeves for various commercially available containers can be found in the corresponding rotor operating manuals. For more information visit our website at www.thermoscientific.com/rotors Thermo Scientific Sorvall L 4000 / 6000...
-
Page 16: Before Use
(yellow area), when the centrifuge is bolted down (Optional Seismic Bolt-down Kit 75006500). People and hazardous substances must be kept out of the safety zone while centrifuging. • Behind the centrifuge a 30 cm clearance is necessary for ventilation. Thermo Scientific Sorvall L 4000 / 6000... - Page 17 • The centrifuge should not be exposed to heat and strong sunlight. CAUTION UV rays reduce the stability of plastics. Do not subject the centrifuge, rotors and plastic accessories to direct sunlight. The set-up location must be well-ventilated at all times. Sorvall L 4000 / 6000 Thermo Scientific...
-
Page 18: Bolting Down The Centrifuge (Optional)
If the centrifuge is bolted down to the floor the safety zone is reduced to 10 cm (Optional Seismic Bolt-down Kit 75006500). Contact a Thermo Scientific service technician if you desire to bolt down the centrifuge. - Page 19 The centrifuge has four steering casters that must be parallel to the rails so the centrifuge cannot roll of the pallet to the side. Sorvall L 4000 / 6000 Thermo Scientific...
-
Page 20: Leveling The Centrifuge
1. Place the enclosed bubble level on the top surface of the Auto-Lock adapter in the rotor chamber. 2. Adjust the centrifuge feet until the bubble inside the level is completely inside the marked circle. 3. Turn the Auto-Lock adapter with the bubble level around a full 360°. Thermo Scientific Sorvall L 4000 / 6000... -
Page 21: Mains Connection
CAUTION If the centrifuge is not level, imbalances can occur and the centrifuge can be damaged. Do not place anything under the centrifuge feet to level the centrifuge. Mains Connection Main Power Switch Mains Plug Figure 7. Mains Connection Sorvall L 4000 / 6000 Thermo Scientific... -
Page 22: Storage
Note Store the centrifuge packaging. Contact a shipping company for the transport. Inform customer service. Always remove the rotor before moving the centrifuge. If you do not remove the rotor you might damage the centrifuge drive or centrifuge spindle. Thermo Scientific Sorvall L 4000 / 6000... - Page 23 The control panel is a touchscreen that contains the centrifuge display. All parameters can be selected and changed during operation. The main screen is divided into the following sections: Status Parameters Control and Configuration Thermo Scientific Sorvall L 4000 / 6000...
-
Page 24: Chapter 3 Control Panel
No rotor is being used in the centrifuge. Idle The centrifuge is in idle operation. Initialization The centrifuge is being prepared for operation. Timeout It was not possible to reach the target temperature for pretempering in the defined time period. Sorvall L 4000 / 6000 Thermo Scientific... - Page 25 You Rotor: can change the parameters once you have selected a The rotor currently in use is displayed program. Changing a parameter will cancel the program. here (in this case: F12-6X500 LEX). Thermo Scientific Sorvall L 4000 / 6000...
- Page 26 When an element is selected in the centrifugation is in progress. for selecting other Tooltip mode a field is displayed with operators. information about that particular element. If you press the Tooltip button again, this mode is canceled. Sorvall L 4000 / 6000 Thermo Scientific...
-
Page 27: Operation
Contact a service technician when the performance of the gas pistons diminishes. Check the gas pistons as described below: • Press on the touchscreen or the big key on the right corner of the centrifuge. Thermo Scientific Sorvall L 4000 / 6000... -
Page 28: Rotor Installation
The rotors are equipped with an Auto-Lock rotor exchange. This system is used to automatically lock the rotor to the centrifuge spindle. The rotor does not have to be bolted on to the centrifuge spindle. Proceed as follows: Sorvall L 4000 / 6000 Thermo Scientific... - Page 29 4. Close the rotor with the rotor lid. WARNING Be sure to check all sealings before starting any aerosol-tight applications. See the information in the rotor instruction manual. 5. Close the centrifuge door. Thermo Scientific Sorvall L 4000 / 6000...
-
Page 30: Entering Parameters
The profile with the lowest number has the shallowest incline marked with min; profile number 9 is the steepest incline which is marked with max. Preselecting Speed / RCF-Value 1. Press The following screen appears: Screen for Speed and RCF-Value Figure 10. Sorvall L 4000 / 6000 Thermo Scientific... - Page 31 Y: Decimal numbers (2 input field) duration hh:mm:00 value: 00:00:00 Z: Power (3 input field) Enter the desired value using the numeric pad. The digits show in sequential order. 2. Confirm your entry by pressing Confirm. Thermo Scientific Sorvall L 4000 / 6000...
- Page 32 2. Enter the desired temperature using the numeric pad. The digits show in sequential order. 3. Confirm your entry by pressing Confirm. Pre-warming or Pre-cooling the Centrifuge To pre-temp the centrifuge, proceed as follows: Screen for Pre-Temp Figure 12. Sorvall L 4000 / 6000 Thermo Scientific...
-
Page 33: Programmed Operation
The centrifuge will be decelerated at the designated rate. The message Complete will illuminate, and after pressing the key, the centrifuge door will open and you can remove the centrifuged material. Thermo Scientific Sorvall L 4000 / 6000... -
Page 34: Removing The Rotor
Turn off the power supply switch located on right side (pull the switch handle towards the front of the centrifuge). Additional Features Rotor Landing Pad Rotor Lid Holder Additional Features of the Sorvall L 4000 / 6000 Figure 14. Sorvall L 4000 / 6000 Thermo Scientific... - Page 35 Note Some rotors lids have a mandrill that is part of the Auto-Lock. Use the rotor lid holder to store the rotor lid. Auto-Lock Rotor Lid Figure 15. CAUTION Mind the Auto-Lock mandrill inside the rotor lid. Do not touch the mandrill. Thermo Scientific Sorvall L 4000 / 6000...
-
Page 36: Maintenance And Care
CAUTION Refrain from using any other cleaning or decontamination procedure than those recommended here, if you are not entirely sure that the intended procedure is safe for the equipment. Use only approved cleansers. If in doubt, contact Thermo Fisher Scientific. Thermo Scientific Sorvall L 4000 / 6000... -
Page 37: Cleaning
7. Dry all of the rotors and accessories after cleaning with a cloth or in a warm air cabinet at a maximum temperature of 50°C. • After cleaning, treat the entire surface of aluminum parts with corrosion protection oil (70009824). Also treat the cavities with oil. Sorvall L 4000 / 6000 Thermo Scientific... -
Page 38: Cleaning The Touchscreen
2. Remove the venting grids and the filter mats (75000014). 3. Use a vacuum cleaner on both sides of both filter mats. 4. Inserting the filter mats again. 5. Reinstall the venting grids. Thermo Scientific Sorvall L 4000 / 6000... -
Page 39: Disinfect
4. Grab the rotor handle with one or both hands and press against the Auto-Lock button. At the same time, pull the rotor directly upwards it from the centrifuge spindle. 5. Remove the centrifuge tubes and adapters and dispose of them or disinfect them. Sorvall L 4000 / 6000 Thermo Scientific... -
Page 40: Decontamination
Note Adhere strictly to the given application times. 7. Be sure the decontamination solution can drain off the rotor. 8. Rinse the rotor and accessories thoroughly with water. 9. Dispose of the decontamination solution according to the applicable guidelines. Thermo Scientific Sorvall L 4000 / 6000... -
Page 41: Autoclaving
Thermo Fisher Scientific offers inspection and service contracts for this work. Any necessary repairs are performed for free during the warranty period and afterwards for a charge. This is only valid if the centrifuge has only been maintained by a Thermo Scientific service technician. Shipping and Deposing of Accessories Contact the Thermo Scientific customer service before returning any item. - Page 42 WARNING Before shipping or deposing centrifuges and accessories you have to cleanand if necessary disinfect or decontaminate everything. Before storing the centrifuge and the accessories it must be cleaned and if necessary disinfected and decontaminated. Thermo Scientific Sorvall L 4000 / 6000...
-
Page 43: Troubleshooting
Pull the release cords attached to it at the same time to trigger the mechanical centrifuge door release. The centrifuge door will open and the samples can be removed. Thermo Scientific Sorvall L 4000 / 6000... -
Page 44: Troubleshooting By User
7. Press on the touchscreen or the big key on the right corner of the centrifuge. Troubleshooting by User Error message appear in a red screen. Figure 18. Example for an error message Sorvall L 4000 / 6000 Thermo Scientific... -
Page 45: When To Contact A Service Technician
To identify the software version, proceed as follows: 1. Switch on the centrifuge. 2. Open the configuration menu. 3. Select Configuration. 4. Select Device. Now you can read all required data. 5. Communicate the software version to the service technician. Thermo Scientific Sorvall L 4000 / 6000... -
Page 46: Rotor Care Guide
• Damage to contact points, such as thread, hubs and screws. Over time, stress observed in a typical fixed angle rotor will cause metal fatigue. Heavy corrosion can result in premature rotor failure. Thermo Scientific Sorvall L 4000 / 6000... -
Page 47: Routine Evaluation And Care Of Your Rotor
Dropped Rotors Deformation caused by dropping a metal rotor cannot be repaired, requiring that the rotor be replaced. In some cases, carbon fiber rotors are repairable if damaged. Sorvall L 4000 / 6000 Thermo Scientific... -
Page 48: Rotor Maintenance
Cracked or de-laminated rotor • Avoid sharp impact. Return rotor to manufacturer for evaluation. • Avoid harsh chemicals • Clean the surface of rotor and coat with a thin layer of oil to prevent corrosion. Thermo Scientific Sorvall L 4000 / 6000... - Page 49 • Do not use strong alkaline laboratory detergent on aluminum rotors; if encrusted material is present, remove it with a soft, twisted-bristle brush and the 1% non-alkaline soap solution. • For benchtop, lowspeed and superspeed swinging bucket rotors, keep the bucket trunnion pins clean and lubricated. Sorvall L 4000 / 6000 Thermo Scientific...
- Page 50 • Rinse with ethanol, followed by water and dry with a soft cloth. • Do not immerse Thermo Scientific Fiberlite rotors; spin rotor to remove liquid. • Fiberlite composite rotors are not compatible with ethylene oxide.
-
Page 51: Chemical Compatibility Chart
M S M - Boric Acid U S S M S S U S S S S S S S S S U S S S S S S S S S S Thermo Scientific Sorvall L 4000 / 6000... - Page 52 S S S S S S S M S S S Ficoll-Hypaque U U U M - U U S - S M U S S S S M S U U U - Hydrofluoric Acid (10%) Sorvall L 4000 / 6000 Thermo Scientific...
- Page 53 S S U U S S M S S U U S U S U U U S S U U S S S S U U Methyl Ethyl Ketone M S S - S S S - S S S S - S S - S S S S S S M S S S Metrizamide Thermo Scientific Sorvall L 4000 / 6000...
- Page 54 S S S S S S M S S S Rubidium Bromide M S S - S S S - S S S S S S S - S S S S S S M S S S Rubidium Chloride Sorvall L 4000 / 6000 Thermo Scientific...
- Page 55 S S S S S S S S S S S S S S S S S S S S S S S Citric Acid (10%) M S S M S S M S S S S S S S S S M S S S S S S S S S S Polyethyleneterephthalate Thermo Scientific Sorvall L 4000 / 6000...
- Page 56 Chemical resistance data is included only as a guide to product use. No organized chemical resistance data exists for materials under the stress of centrifugation. When in doubt we recommend pretesting sample lots. Sorvall L 4000 / 6000 Thermo Scientific...
-
Page 57: Contact Information
1800 22 8374 +91 22 6716 2200 Japan +81 45 453 9220 Other Asian Countries +852 2885 4613 Australia +61 39757 4300 New Zealand +64 9 980 6700 Other Countries +49 6184 90 6940 Thermo Scientific Sorvall L 4000 / 6000... - Page 58 Entering Parameters ......... 22 Removing the Rotor ......... 26 Error Messages ..........38 Rotor Installation ..........20 Explanation of RCF Value ....... 23 Rotor Landing Pad ........... 27 Rotor Lid Holder ..........27 Thermo Scientific Sorvall L 4000 / 6000...
- Page 59 Starting Centrifuge Program ......25 Status ............... 16 Stopping the Centrifugation Program ....25 Storage ............. 13 Switch on ............19 Technical Data ........... 2 Transport ............13 Troubleshooting ..........37 Turning off the Centrifuge ....... 26 Sorvall L 4000 / 6000 Thermo Scientific...
Need help?
Do you have a question about the Sorvall LYNX 4000 and is the answer not in the manual?
Questions and answers