Table of Contents
Advertisement
Advertisement
Table of Contents

Related Manuals for TES TES-1362


Summary of Contents for TES TES-1362
- Page 1 Printing Humidity/Temperature Meter 1362 INSTRUCTION MANUAL...
-
Page 2: Table Of Contents
TABLE OF CONTENTS TITLE PAGE SAFETY INFORMATION ..........1 SPECIFICATIONS............2 III. LOCATION OF PARTS ..........4 GENERAL PRECAUTIONS AND PREPARATIONS FOR MEASUREMENT ..........8 OPERATING PROCEDURE ........8 SETTING MODE............10 VII. INTERVAL PRINTING SET-UP .......14 VIII. BATTERY REPLACEMENT ........15 RECALIBRATION PROCEDURE......15... -
Page 3: Safety Information
SAFETY INFORMATION Read the following information carefully before attempting to operate or service the meter. Use the meter only as specified in this manual, otherwise the protection provided by the meter may be impaired. Environmental conditions Altitude up to 2000 metres Indoor use only Relatively humidity;... -
Page 4: Specifications
SPECIFICATIONS 2-1 General information Display: Triple 4-digit LCD. Over range indication : - - appears on the LCD. Low battery indication: symbol appears on the LCD when the battery voltage falls below the operating voltage. Sampling rate: approximately 1 per second Power requirements: Qty 6, 1.5V size AAA alkaline batteries, or AC adaptor;... - Page 5 2-2 Electrical specifications Humidity: Range: 10%RH to 95%RH Resolution: 0.1%RH Accuracy: ±3%RH from 30%RH to 95%RH ±5%RH from 10%RH to 30%RH Temperature T1 (Integral sensor): Range: -20 ℃ to +60 ℃ (-4 ℉ to +140 ℉ ) Resolution: 0.1 ℃ / 0.1 ℉ Accuracy: ±0.8 ℃...
-
Page 6: Location Of Parts
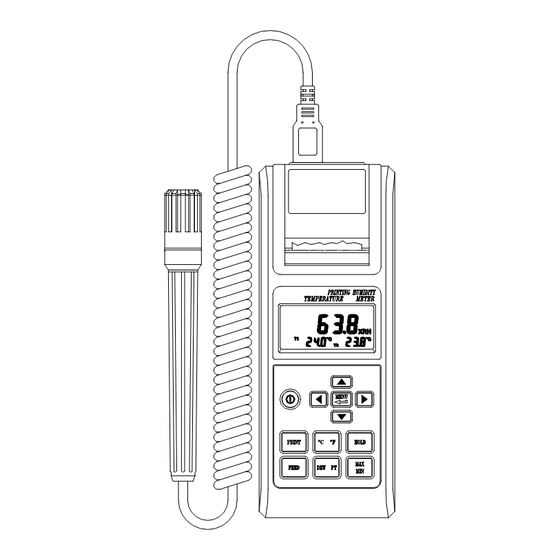
III. LOCATION OF PARTS Fig-1 1. LCD: Measured values, units, symbols, and decimal points are displayed on the screen. : Power on/off button 3. ℃ ℉: Button for selecting temperature units ℃ or ℉ . 4. PRINT : Press this button to start printing the current data. The data format is as follows: 20 :... - Page 7 Line 1: Time: hours; minutes; seconds; month-day. Line 2: Humidity value. Line 3: Dew-point value. Line 4: T1 temperature value (integral sensor). Line 5: T2 temperature value (K-type thermocouple). Press this button for 2 seconds and the printer will enter interval printing mode.
- Page 8 MENU : Press this button to enter parameter set-up mode. The following parameters appear in sequence: ON/OFF (interval printing; enable or disable). TIME INTV (printing interval ranging from 00m:06s to 59m:59s). INTV (Interval printing start time, ranging from 00h:00m to 23h:59m).
- Page 9 Personal Computer or peripheral. Irrepairable damage may be caused to the instrument, probe, PC or peripheral. LCD DISPLAY: 3 2 1 19 18 Fig-3 1. Dew point measurement indicator. 2. Preset interval printing function ON indicator. 3. Low battery indicator 4.
-
Page 10: General Precautions And Preparations For Measurement
16. Minimum measurement value indicator. 17. Maximum measurement value indicator. 18. Data-hold indicator. 19. Humidity and dew-point temperature measured value. GENERAL PRECAUTIONS AND PREPARATIONS FOR MEASUREMENT 1. Before operating the instrument, examine it to make sure it is not damaged. 2. - Page 11 K-type thermocouple probe and insert the plug into the miniature thermocouple socket. 2. Press the button to turn the meter on. The current date and time will appear on the display for approximately 3 seconds. If “- - -” appears on the display, it indicates no probe is connected, or the connected probe is open circuit.
-
Page 12: Setting Mode
10 : 55 : 31 08-16 62.7 %RH 19.8 ℃ 27.6 ℃ 26.5 ℃ 10 : 55 : 37 08-16 62.7 %RH 19.8 ℃ 27.6 ℃ 26.5 ℃ Press the PRINT or FEED button to exit continuous printing mode. When the meter is on, if the continuous printing function setting is “ON”, and the current time is the interval printing start time, the instrument will start continuous interval printing mode and begin printing. - Page 13 MENU Press the “ ” button to enter function setting mode. Each subsequent press of this button selects setting parameters in sequence (printer on or off, interval printing time, start printing time, stop printing time and calendar setting). When in setting mode, the adjustable parameter will flicker until setting is finished.
- Page 14 Setting the interval printing start time “minutes” value. fig-7 Setting the printing start time “hours” value. fig-8 Setting the printing stop time “minutes” value. fig-9 Setting the printing stop time “hours” value. fig-10 Setting the current time “minutes”.
- Page 15 fig-11 Setting the current time “hours”. fig -12 10. Setting the calendar “date”. fig –13 11. Setting the calendar “month”. fig -14 12. Setting the last two digits of the calendar year.
-
Page 16: Interval Printing Set-Up
fig –15 MENU When all the settings have been entered, press the “ ” button to return to normal measurement mode. VII. INTERVAL PRINTING SET-UP To setup interval printing with a 24 hours limitation. MENU 1. Press the button to enter setting mode; setting print operation is turned ON. -
Page 17: Battery Replacement
VIII. BATTERY REPLACEMENT When the battery power is not sufficient to provide accurate measurements, the symbol will appear on the LCD. Replace the exhausted batteries with qty. 6 x 1.5V AAA size cells. 1. Turn the instrument off and then disconnect the temperature/humidity probe and any K-type thermocouple.
Need help?
Do you have a question about the TES-1362 and is the answer not in the manual?
Questions and answers