Table of Contents
Advertisement
Quick Links
MODEL W1836
12" X 15" BENCHTOP WOOD LATHE
OWNER'S MANUAL
(FOR MODELS MANUFACTURED SINCE 04/15)
Phone: (360) 734-3482 • Online Technical Support: techsupport@woodstockint.com
COPYRIGHT © MAY, 2015 BY WOODSTOCK INTERNATIONAL, INC.
WARNING: NO PORTION OF THIS MANUAL MAY BE REPRODUCED IN ANY SHAPE OR FORM WITHOUT
THE WRITTEN APPROVAL OF WOODSTOCK INTERNATIONAL, INC.
#17402BB Printed in China
Advertisement
Table of Contents

Related Manuals for Shop fox W1836


Summary of Contents for Shop fox W1836
- Page 1 MODEL W1836 12" X 15" BENCHTOP WOOD LATHE OWNER'S MANUAL (FOR MODELS MANUFACTURED SINCE 04/15) Phone: (360) 734-3482 • Online Technical Support: techsupport@woodstockint.com COPYRIGHT © MAY, 2015 BY WOODSTOCK INTERNATIONAL, INC. WARNING: NO PORTION OF THIS MANUAL MAY BE REPRODUCED IN ANY SHAPE OR FORM WITHOUT THE WRITTEN APPROVAL OF WOODSTOCK INTERNATIONAL, INC. #17402BB Printed in China...
- Page 2 This manual provides critical safety instructions on the proper setup, operation, maintenance, and service of this machine/tool. Save this document, refer to it often, and use it to instruct other operators. Failure to read, understand and follow the instructions in this manual may result in fire or serious personal injury—including amputation, electrocution, or death.
-
Page 3: Table Of Contents
Contents INTRODUCTION........2 ACCESSORIES........31 Contact Info ........2 Wood Lathe Accessories ....... 31 Manual Accuracy ........2 MAINTENANCE........32 Identification ........5 General .......... 32 Controls & Features ......6 Cleaning & Protecting ......32 SAFETY..........7 Lubrication ........32 Standard Machinery Safety Instructions ..7 SERVICE.......... -
Page 4: Introduction
Model W1836 (For Machines Mfd. Since 04/15) INTRODUCTION Contact.Info Manual.Accuracy We are committed to customer satisfaction. If We are proud to provide a high-quality owner’s you have any questions or need help, use the manual with your new machine! information below to contact us. - Page 5 Swing Over Tool Rest Base................9 in. Distance Between Centers................15 in. Max. Distance Tool Rest to Spindle Center............5—1/2 in. No of Spindle Speeds..................2 Spindle Speed Range................500—3800 RPM Floor to Center Height................13‐1/2 in. Model W1836 Machine Specifications, Page 1 of 2...
- Page 6 15 deg. spindle indexing Spindle lock pin Tool holder Work lamp Transit handles Paddle switch with removable safety key Heavy‐Duty Cast‐Iron Bed Non‐skid rubber feet Accessories Live center Spur center 3" Faceplate Knockout bar Model W1836 Machine Specifications, Page 2 of 2...
-
Page 7: Identification
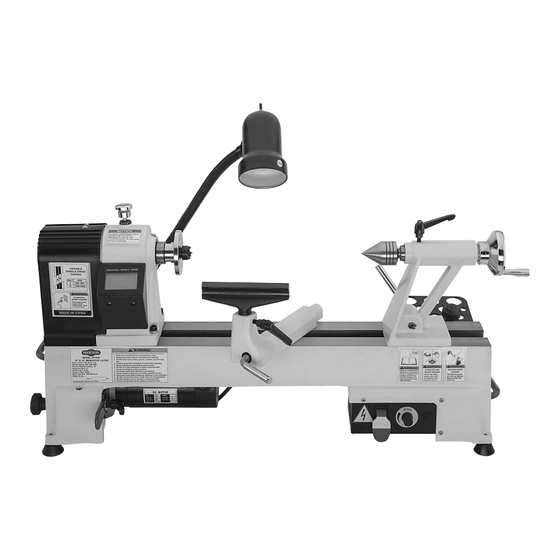
Model W1836 (For Machines Mfd. Since 04/15) Identification A. Access Door Release Knob N. Quill Lock Handle B. Lathe Carrying Handle O. Tailstock C. Belt Cover Quill Handwheel D. Spindle Lock Knob Q. Tool Holder Headstock R. Variable-Speed Control Knob... -
Page 8: Controls & Features
Model W1836 (For Machines Mfd. Since 04/15) Controls.&.Features Use descriptions and following figures to become familiar with basic controls of your lathe. Belt Tension Lever Access Door Release Knob: Spring loaded knob that opens access door when pulled. Belt Tension Lock Handle: Releases tension on belt to change speeds or replace belt. -
Page 9: Safety
Model W1836 (For Machines Mfd. Since 04/15) SAFETY SAFETY For.Your.Own.Safety, Read.Manual.Before.Operating.Machine The. purpose. of. safety. symbols. is. to. attract. your. attention. to. possible. hazardous. conditions.. This. manual.uses.a.series.of.symbols.and.signal.words.intended.to.convey.the.level.of.importance.of.the. safety.messages..The.progression.of.symbols.is.described.below..Remember.that.safety.messages.by. themselves. do. not. eliminate. danger. and. are. not. a. substitute. for. proper. accident. prevention. mea- sures—this.responsibility.is.ultimately.up.to.the.operator! - Page 10 Model W1836 (For Machines Mfd. Since 04/15) WEARING.PROPER.APPAREL..Do not wear FORCING.MACHINERY..Do not force machine. It clothing, apparel, or jewelry that can become will do the job safer and better at the rate for entangled in moving parts. Always tie back which it was designed.
-
Page 11: Additional Safety For Wood Lathes
Model W1836 (For Machines Mfd. Since 04/15) Additional.Safety.for.Wood.Lathes MAIN.INJURY.HAZARDS:.Death.or.crushing.injury.from.getting.entangled.in.rotating.spindle.or. workpiece;.death,.blindness,.or.broken.bones.from.being.struck.by.a.workpiece.that.breaks. apart.or.comes.loose.during.rotation,.turning.tool.kickback,.or.flying.wood.chips..To.minimize. your.risk.of.these.hazards,.always.heed.the.following.warning.information: INTEGRITY.OF.STOCK. Verify each workpiece is EYE/FACE.PROTECTION. Always wear a face free of knots, splits, nails, or foreign material shield and safety glasses when operating lathe. to ensure it can safely rotate on spindle without breaking apart or causing turning tool PROPER.APPAREL. -
Page 12: Electrical
Model W1836 (For Machines Mfd. Since 04/15) ELECTRICAL Circuit.Requirements This machine must be connected to the correct size and type of power supply circuit, or fire or electrical damage may occur. Read through this section to determine if an The. machine. must. be. properly. set. up. -
Page 13: Grounding Requirements
Model W1836 (For Machines Mfd. Since 04/15) Grounding.Requirements This machine MUST be grounded. In the event of certain types of malfunctions or breakdowns, grounding provides GROUNDED 110V 5-15 RECEPTACLE a path of least resistance for electric current to travel—in order to reduce the risk of electric shock. -
Page 14: Setup
Shop Fox dealer immediately. Inventory The following is a description of the main components shipped with the Model W1836. Lay the components out to inventory them. Keep. machine. disconnected. from. power.until.instructed.otherwise. Note: If you can't find an item on this list, check the mounting location on the machine or examine the packaging materials carefully. -
Page 15: Machine Placement
Model W1836 (For Machines Mfd. Since 04/15) Machine.Placement Cleaning.Machine \•. Working.Clearances: Consider existing and The table and other unpainted parts of your anticipated needs, size of material to be machine are coated with a waxy grease that protects them from corrosion during shipment. -
Page 16: Bench Mounting
Model W1836 (For Machines Mfd. Since 04/15) Bench.Mounting Number of Mounting Holes ........4 Dia. of Mounting Hardware Needed ....6mm Bolt The base of this machine has mounting holes that allow it to be fastened to a workbench or other mounting surface... -
Page 17: Assembly
Model W1836 (For Machines Mfd. Since 04/15) Assembly The Model W1836 comes mostly assembled from the factory. The quill handwheel handle, tool holder, and cord Quill holders must be attached to complete assembly. Handwheel Handle To.complete.assembly,.do.these.steps: Attach quill handwheel handle to quill handwheel with (1) M6-1 X 10, 7 X 44 shoulder bolt (see Figure 10). -
Page 18: Test Run
Model W1836 (For Machines Mfd. Since 04/15) Test.Run Once assembly is complete, test run the machine to make sure it runs properly and is ready for regular operation. If, during the test run, you cannot easily locate the source of an unusual noise or vibration, stop using the machine immediately, then review Troubleshooting on Page 35. -
Page 19: Operations
Model W1836 (For Machines Mfd. Since 04/15) OPERATIONS General This machine will perform many types of operations that are beyond the scope of this manual. Many of these operations can be dangerous or deadly if performed incorrectly. The instructions in this section are written with the understanding that the operator has the necessary knowledge and skills to operate this machine. -
Page 20: Operation Overview
Model W1836 (For Machines Mfd. Since 04/15) Operation.Overview Stock.Inspection.&. Requirements The purpose of this overview is to provide the novice machine operator with a basic Some workpieces are not safe to turn or may understanding of how the machine is used... -
Page 21: Engaging/Releasing Spindle Lock
Model W1836 (For Machines Mfd. Since 04/15) Engaging/Releasing. Spindle.Lock This lathe is equipped with a spindle lock that can be engaged to aid in installing and removing the faceplate. The spindle lock must be released before turning lathe Always unlock spindle lock knob before operating. -
Page 22: Changing Spindle Speeds
Model W1836 (For Machines Mfd. Since 04/15) Changing.Spindle.Speeds This lathe has two overlapping speed ranges to ensure maximum spindle torque within each range. These ranges are selected by changing belt positions on the motor and Always choose correct spindle speed spindle pulleys (see Figure 15). - Page 23 Model W1836 (For Machines Mfd. Since 04/15) 5. Push down on belt tension lever, then tighten belt tension lock handle. Pulley Note: When properly tensioned, the belt should Deflection deflect about ⁄ " when moderate pressure is applied to the belt mid-way between upper and lower pulleys, as shown in Figure 17.
-
Page 24: Adjusting Tool Rest
Model W1836 (For Machines Mfd. Since 04/15) Adjusting.Tool.Rest The tool rest is equipped with a cam-action clamping Tool Rest system to secure it to the lathe bed. When the tool rest Base lock lever is engaged, a locking plate lifts up and secures the tool rest base to the bed. -
Page 25: Adjusting Tailstock Position
Model W1836 (For Machines Mfd. Since 04/15) Adjusting.Tailstock. Position Lock Lever The tailstock is equipped with a cam-action clamping system to secure it to the lathe bed. When the lever is tightened, a locking plate lifts up and secures the tool rest to the bed. -
Page 26: Installing/Removing Headstock Center
Model W1836 (For Machines Mfd. Since 04/15) Installing/Removing. Headstock.Center The included MT#2 spur center installs into the headstock spindle with a taper fit. Clean the mating surfaces of the center and spindle carefully to ensure a proper fit. Installing.Headstock.Center 1. DISCONNECT MACHINE FROM POWER! 2. -
Page 27: Installing/Removing Tailstock Center
Model W1836 (For Machines Mfd. Since 04/15) Installing/Removing. Tailstock.Center The included MT#2 live center installs into the tailstock quill with a tapered fit. Clean the mating surfaces of the Quill Lock Handle center and spindle carefully to ensure a proper fit. -
Page 28: Selecting Turning Tools
Model W1836 (For Machines Mfd. Since 04/15) Selecting.Turning.Tools Lathe tools come in a variety of shapes and sizes and usually fall into five major categories. Gouges—Mainly used for rough cutting, detail • cutting, and cove profiles. The rough gouge is a... -
Page 29: Spindle Turning
Model W1836 (For Machines Mfd. Since 04/15) Spindle.Turning Spindle turning is the operation performed when a workpiece is mounted between the headstock and the tailstock, as shown in Figure 30. To set up a spindle turning operation, do these steps: 1. - Page 30 Model W1836 (For Machines Mfd. Since 04/15) 10. Properly adjust tool rest to workpiece (see Adjusting Tool Rest on Page 22). Do not press workpiece too firmly 11. Before beginning lathe operation, rotate workpiece with tailstock or the bearings will bind by hand at least one full rotation to ensure safe and overheat.
-
Page 31: Faceplate Turning
Model W1836 (For Machines Mfd. Since 04/15) Faceplate.Turning Faceplate turning (see Figure 33) is when a workpiece is mounted to the faceplate, which is mounted to the headstock spindle. This type of turning is usually done with open-faced workpieces, such as bowls. -
Page 32: Sanding/Finishing
Model W1836 (For Machines Mfd. Since 04/15) Sanding/Finishing After the turning operations are complete, the workpiece can be sanded and finished before removing it from the lathe, as shown in Figure 36. Sandpaper ENTANGLEMENT.HAZARD! Wrapping sandpaper completely around workpiece could pull your hands into moving workpiece and cause serious injury. -
Page 33: Accessories
The D4562 Bed Extension for W1836 Lathe.will get you the capac- ity of a much larger lathe at a fraction of the price. This extension bed increases the capacity of your W1836 Shop Fox 12" Wood Lathe to handle pieces up to 38" long. -
Page 34: Maintenance
Cleaning.&.Protecting Cleaning the Model W1836 is relatively easy. Vacuum excess wood chips and sawdust, and wipe off the remain- ing dust with a dry cloth. If any resin has built up, use a resin dissolving cleaner to remove it. -
Page 35: Service
Model W1836 (For Machines Mfd. Since 04/15) SERVICE General This section covers the most common service adjustments or procedures that may need to be made during the life of your machine. If you require additional machine service not included in this section, please contact Woodstock International Technical Support at (360) 734-3482 or send e-mail to: techsupport@woodstockint.com. -
Page 36: Changing Motor Brushes
Model W1836 (For Machines Mfd. Since 04/15) Replacing.Belt Belt 1. DISCONNECT MACHINE FROM POWER! Cover Belt Tension Lock Handle 2. Open belt cover and access door (see Figure 40). 3. Release belt tension, then remove belt from pulleys. Access Door 4. -
Page 37: Troubleshooting
Model W1836 (For Machines Mfd. Since 04/15) Troubleshooting Review the troubleshooting and procedures in this section if a problem develops with your machine. If you need replacement parts or additional help with a procedure, call our Technical Support. Note: Please gather the serial number and manufacture date of your machine before calling. - Page 38 Model W1836 (For Machines Mfd. Since 04/15) Operation and Work Results Symptom Possible Cause Possible Solution Bad surface finish. 1. Spindle speed is incorrect for workpiece 1. Adjust for appropriate spindle speed. size/type. 2. Dull tooling or wrong tool selection.
-
Page 39: Electrical Safety Instructions
Model W1836 (For Machines Mfd. Since 04/15) Electrical.Safety.Instructions These pages are current at the time of printing. However, in the spirit of improvement, we may make changes to the electrical systems of future machines. Compare the manufacture date of your machine to the one stated in this manual, and study this section carefully. -
Page 40: Electrical Component Connections
Model W1836 (For Machines Mfd. Since 04/15) Electrical.Component.Connections Work Digital Lamp Readout Electrical Box Lathe Motor Read Page 37 STOP Figure 42. Electrical component locations. Figure 44. Electrical box wiring. Before Wiring Sensor Digital Readout Figure 43. Digital readout and RPM sensor wiring. -
Page 41: Wiring Diagram
Model W1836 (For Machines Mfd. Since 04/15) Wiring.Diagram Digital Readout (Viewed from Behind) DRO P0-0022-02 Read RPM SENSOR Page 37 STOP Before Wiring Lathe Headstock MOTOR 110VDC 110 VAC 5-15 Plug Neutral Circuit Breaker RU L2 50VDC Potentiometer KEDU HY18... -
Page 42: Parts
Model W1836 (For Machines Mfd. Since 04/15) PARTS Main -40-... - Page 43 Model W1836 (For Machines Mfd. Since 04/15) Main.Parts.List REF PART # DESCRIPTION REF PART # DESCRIPTION X1836001 FLAT WASHER 4MM X1836055 TAP SCREW M3 X 8 X1836002 PHLP HD SCR M4-.7 X 8 X1836057 HINGE PIN X1836003 SET SCREW M6-1 X 12 X1836058 ACCESS DOOR X1836004 HANDWHEEL 59MM, HOLE: M20-1.5 LH...
-
Page 44: Labels & Cosmetics
W1836 Machine Labels B • 1:1 Sizing (Labels are actual size) Model W1836 (For Machines Mfd. Since 04/15) (1/27/15) • Labels must be made of NOTICE chemical-resistant material VARIABLE To prevent short circuit, unlock SPINDLE SPEED spindle lock knob before Labels.&.Cosmetics... - Page 45 Model W1836 (For Machines Mfd. Since 04/15)
- Page 46 Fold along dotted lIne place stamp Here Woodstock international inc. p.o. box 2309 bellingham, Wa 98227-2309 Fold along dotted lIne tape along edges--please do not staple...
-
Page 47: Warranty
Woodstock International, Inc. will repair, replace, or arrange for a dealer refund, at its expense and option, the Shop Fox machine or machine part proven to be defective for its designed and intended use, provided that the original owner returns the product prepaid to an authorized warranty or repair facility as designated by our Bellingham, Washington office with proof of their purchase of the product within two years, and provides Woodstock International, Inc. - Page 48 High Quality Machines and Tools Woodstock International, Inc. carries thousands of products designed to meet the needs of today's woodworkers and metalworkers. Ask your dealer about these fine products:...
Need help?
Do you have a question about the W1836 and is the answer not in the manual?
Questions and answers