
Related Manuals for Stirling SORHP1-CT


Summary of Contents for Stirling SORHP1-CT
- Page 1 Cooktop, Oven & Rangehood Pack Cooktop Model Number SORHP1-CT Oven Model Number SORHP1-O Rangehood Model Number SORHP1-RH INSTALLATION MANUAL After Sales Support Telephone: 1300 886 649 Email: info@tempo.org N13275...
-
Page 2: Table Of Contents
Contents Warranty Details Welcome General Safety Instructions Ceramic Cooktop Section Product Overview Cooktop Installation Electric Oven Section Product Overview Oven Installation Rangehood Section Product Overview Rangehood Installation Repair and Refurbished Goods or Parts Notice After Sales Support Telephone: 1300 886 649 Email: info@tempoaustralia.com.au... -
Page 3: Warranty Details
Cooktop, Oven & Rangehood Pack Warranty Details The products are guaranteed to be free from defects in workmanship and parts for a period of 36 months from the date of purchase. Defects that occur within this warranty period, under normal use and care, will be repaired, replaced or refunded at our discretion, solely at our option with no charge for parts and labour. -
Page 4: Welcome
Welcome Congratulations on choosing to buy a STIRLING ® product. All products brought to you by STIRLING ® are manufactured to the highest standards of performance and safety and, as part of our philosophy of customer service and satisfaction, are backed by our comprehensive 3 Year Warranty. -
Page 5: General Safety Instructions
General Safety Instructions This Installation Manual for the Cooktop, Oven & Rangehood Pack is intended for the electrician who installs the equipment. It is divided into three sections: for the cooktop, oven and rangehood. The general safety instructions below and on the following pages apply to all three products. - Page 6 General Safety Instructions (Cont.) General usage conditions and restrictions • Domestic use only: This equipment is designed for indoor domestic use only. It can be built into a standard kitchen cabinet or housing unit. • Intended purpose: Only use this equipment for its intended purpose, in its intended environment and as described in this manual.
-
Page 7: Personal Safety
General Safety Instructions (Cont.) Personal safety • Supervise children: Young children do not recognise the risks involved when using electrical appliances. Therefore, use or keep the equipment only under supervision of adults and out of reach of children. Do not allow babies and young children to touch the cooktop or oven at any time. - Page 8 This page has been left blank intentionally. After Sales Support Telephone: 1300 886 649 Email: info@tempo.org...
-
Page 9: Ceramic Cooktop Section
Cooktop, Oven & Rangehood Pack Ceramic Cooktop Model Number SORHP1-CT INSTALLATION MANUAL After Sales Support Telephone: 1300 886 649 Email: info@tempo.org N13275... -
Page 10: Product Overview
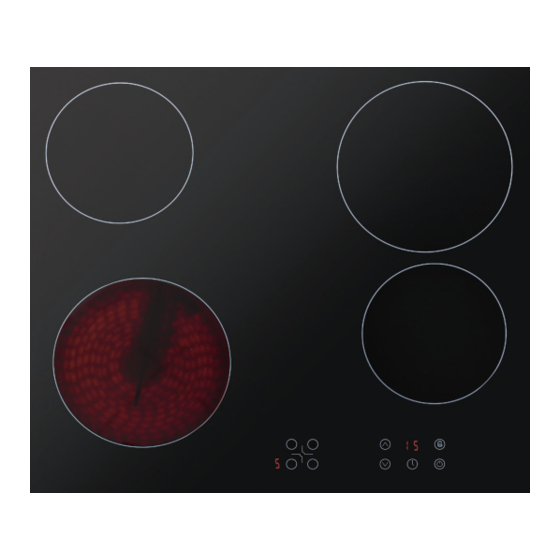
Product Overview Ceramic cooktop layout 1200W Cooking zone (14cm Ø diameter) 1800W Cooking zone (18cm Ø diameter) Control panel (see page 12 for details) After Sales Support Telephone: 1300 886 649 Email: info@tempo.org... -
Page 11: Control Panel Layout
Product Overview (Cont.) Control panel layout Rear left heat level display Up button Front left heat level display 10 Down button Rear left cooking zone selector 11 Timer display Front left cooking zone selector 12 Timer button Rear right cooking zone selector 13 Safety lock button Front right cooking zone selector 14 ON/OFF button... -
Page 12: Cooktop Installation
Cooktop Installation Important installation advice • Kitchen area: Before starting with the installation, make sure the kitchen area is dry and there is sufficient ventilation and easy access to all control elements. • Adjacent furniture: This is a Y-type design built-in ceramic cooktop, which means that its back wall and one side wall can be placed next to a high piece of furniture or a wall. - Page 13 Cooktop Installation (Cont.) IMPORTANT! Fig. 2 • You must observe the ventilation requirements as illustrated in Fig. 2. • There are ventilation holes around the outside of the cooktop. When you put the cooktop into position, you must ensure that these holes are not blocked by the worktop.
- Page 14 Cooktop Installation (Cont.) Fitting guidelines • The ceramic cooktop is manufactured to work with three-phase alternating current Fig. 5 (400V 3N~50Hz).The voltage rating of the ceramic cooktop heating elements is 230V. Adapting the ceramic cooktop to operate with one-phase current is possible by appropriate bridging in the connection box according to the connection diagram below.
-
Page 15: Connection Diagram
Cooktop Installation (Cont.) Connection diagram • CAUTION! Voltage of heating elements 230V Recommended type • CAUTION! ln the event of connection lead of any connection the earth wire must be connected to the PE terminal For 230V earthed one- phase connection, bridges connect 1-2 H05VV-F 3G2.5 terminals, earth wire... -
Page 16: Replacing The Mains Supply Cable
Cooktop Installation (Cont.) Replacing the mains supply cable If the mains supply cable is damaged, then it must be replaced with an appropriate replacement in accordance with the following instructions: • Switch the appliance off at the control switch. • Open the terminal block on the underside of the cooktop. -
Page 17: Electric Oven Section
Cooktop, Oven & Rangehood Pack Electric Oven Model Number SORHP1-O INSTALLATION MANUAL After Sales Support Telephone: 1300 886 649 Email: info@tempo.org N13275... -
Page 18: Product Overview
Product Overview Oven cavity Oven rack Baking/drip tray Oven light Side rack supports for four shelf positions: 1 (lowest) 2 (medium low) 3 (medium high) 4 (highest) Fan cover Also included, but not pictured, is installation hardware (ST4*26 screw and bracket). -
Page 19: Control Panel
Product Overview (Cont.) Control panel Oven function selector knob Oven programmer/timer display Thermostat control knob Power indicator light Oven operating light Timer buttons Oven programmer/timer display Auto function symbol Minute minder symbol Manual operation symbol After Sales Support Telephone: 1300 886 649 Email: info@tempo.org... -
Page 20: Oven Installation
Oven Installation Dimensions Dimensions Fig. 1 Height 590mm Width of Face 595mm Width of Back 516mm Depth of Face 22mm Depth of Back 550mm Specifications Oven chamber capacity Shelf positions Oven door Triple glazed, removable Oven light bulb 25W, 300°C, screw type pigmy Accessories 1 x Baking/drip tray 1 x Oven rack... - Page 21 Oven Installation (Cont.) Important installation advice This built-in oven must be installed by a suitably qualified person, in accordance with all applicable Australian standards and regulations. • Before connecting the appliance, make sure that the supply voltage marked on the Rating Plate corresponds with your mains supply voltage. •...
- Page 22 Oven Installation (Cont.) Installing the oven into the kitchen cabinet Space requirements Fig. 2 Fig. 3 After Sales Support Telephone: 1300 886 649 Email: info@tempo.org...
-
Page 23: Positioning The Appliance
Oven Installation (Cont.) Positioning the appliance • Ensure that the aperture that you will be fitting the oven into is of the size given in the above diagram. • The oven must be fitted into an oven housing with the ventilation cut-outs shown in Fig. - Page 24 Oven Installation (Cont.) Fig. 5 Fig. 5: Ventilation and cut-out requirements for the installation of the appliance into a tall housing unit After Sales Support Telephone: 1300 886 649 Email: info@tempo.org...
- Page 25 Oven Installation (Cont.) Fig. 6 Ensure that the oven has been securely fixed into the housing unit. To fix the oven into the housing, use the four screws and screw them through the oven cabinet into the housing unit. After Sales Support Telephone: 1300 886 649 Email:...
- Page 26 This page has been left blank intentionally. After Sales Support Telephone: 1300 886 649 Email: info@tempo.org...
- Page 27 Cooktop, Oven & Rangehood Pack Rangehood Model Number SORHP1-RH INSTALLATION MANUAL After Sales Support Telephone: 1300 886 649 N13275 Email: info@tempo.org...
-
Page 28: Product Overview
Product Overview Rangehood housing Slide out front panel Inner aluminium mesh filter Outer alumininium mesh filter Light switch Operation switch Light Installation kit includes: 1 L-shaped bracket 1 Ducting pipe 1 Air outlet 1 set (2 pcs) Charcoal filter 6 Screws (4mm x 35mm) 4 Screws (4mm x 30mm) 2 Screws (3mm x 12mm) 2 Screws (4mm x 10mm) -
Page 29: Rangehood Installation
Rangehood Installation Important installation advice • Air discharge: The exhaust air must not be discharged into a flue which is used for exhausting fumes from appliances burning gas or other fuels. • External air evacuation: Make sure to follow your local laws that apply to external air evacuation when installing and using the rangehood. - Page 30 Rangehood Installation (Cont.) Installation in ducted mode • Drill 4 holes of Ø8mm on a suitable place 38mm down from the top of the unit, as illustrated in Fig. 2 below. • Insert the wall plugs into the holes, then insert two ST4x30mm screws into the lower wall plugs and tighten the screws.
- Page 31 Rangehood Installation (Cont.) Installation in recirculating mode • Drill 6 holes of Ø4mm diameter at the bottom of the hanging cupboard, as illustrated in Fig. 4 below. • Put the air outlet on the rangehood, then install the rangehood on the bottom of the cupboard and secure it in place with the six M4x35mm screws and washers (Fig.
-
Page 32: Repair And Refurbished Goods Or Parts Notice
Cooktop, Oven & Rangehood Pack Repair and Refurbished Goods or Parts Notice Unfortunately, from time to time, faulty products are manufactured which need to be returned to the supplier for repair. Please be aware that if your product is capable of retaining user-generated data (such as files stored on a computer hard drive, telephone numbers stored on a mobile telephone, songs stored on a portable media player, games saved on a games console or files stored on a USB memory stick) during the process of...
Need help?
Do you have a question about the SORHP1-CT and is the answer not in the manual?
Questions and answers