
Related Manuals for Stirling SORHP1-CT


Summary of Contents for Stirling SORHP1-CT
- Page 1 Cooktop, Oven & Rangehood Pack Cooktop Model Number SORHP1-CT Oven Model Number SORHP1-O Rangehood Model Number SORHP1-RH USER MANUAL After Sales Support Telephone: 1300 886 649 Email: info@tempo.org N13275...
-
Page 2: Table Of Contents
Contents Warranty Details Welcome General Safety Instructions Cooktop Section Specific Safety Instructions Product Overview Getting Started Instructions Other Useful Information Oven Section Specific Safety Instructions Product Overview Getting Started Instructions Cooking Guidelines Other Useful Information Rangehood Section Specific Safety Instructions Product Overview Getting Started Instructions... -
Page 3: Warranty Details
Cooktop, Oven & Rangehood Pack Warranty Details The products are guaranteed to be free from defects in workmanship and parts for a period of 36 months from the date of purchase. Defects that occur within this warranty period, under normal use and care, will be repaired, replaced or refunded at our discretion, solely at our option with no charge for parts and labour. -
Page 4: Welcome
Welcome Congratulations on choosing to buy a STIRLING ® product. All products brought to you by STIRLING ® are manufactured to the highest standards of performance and safety and, as part of our philosophy of customer service and satisfaction, are backed by our comprehensive 3 Year in Home Warranty. -
Page 5: General Safety Instructions
General Safety Instructions This Cooktop, Oven & Rangehood Pack comes with a User Manual and a separate Installation Manual (for the electrician who installs the equipment). Read this User Manual thoroughly before first use; the safety precautions enclosed herein reduce the risk of fire, electric shock and injury when correctly adhered to. - Page 6 General Safety Instructions (Cont.) General usage conditions and restrictions • Domestic use only: This equipment is designed for indoor domestic use only. It can be built into a standard kitchen cabinet or housing unit. • Intended purpose: Only use this equipment for its intended purpose, in its intended environment and as described in this manual.
- Page 7 General Safety Instructions (Cont.) Personal safety • Supervise children: Young children do not recognise the risks involved when using electrical appliances. Therefore, use or keep the equipment only under supervision of adults and out of reach of children. Do not allow babies and young children to touch the cooktop or oven at any time.
- Page 8 This page has been left blank intentionally. After Sales Support Telephone: 1300 886 649 Email: info@tempo.org...
- Page 9 Cooktop, Oven & Rangehood Pack Ceramic Cooktop Model Number SORHP1-CT USER MANUAL After Sales Support Telephone: 1300 886 649 N13275 Email: info@tempo.org...
-
Page 10: Specific Safety Instructions
Specific Safety Instructions Important warnings and safety advice specific to the cooktop • Keep items off hot surfaces: Ensure that small items of household equipment, including connection leads, do not touch the cooktop as the insulation material of this equipment is usually not resistant to high temperatures. -
Page 11: Product Overview
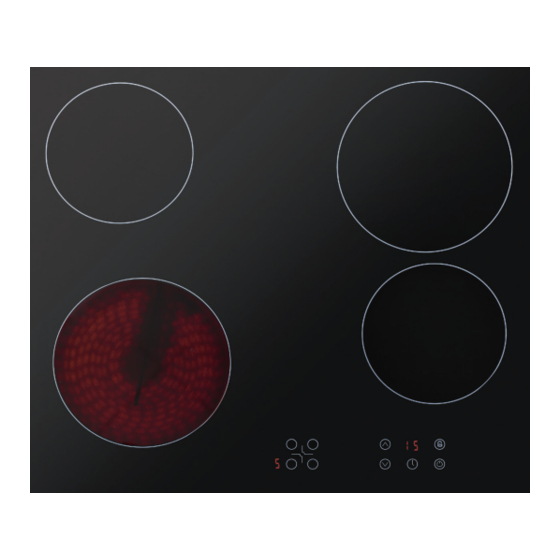
Product Overview Ceramic cooktop layout 1200W Cooking zone (14cm Ø diameter) 1800W Cooking zone (18cm Ø diameter) Control panel (see page 12 for details) After Sales Support Telephone: 1300 886 649 Email: info@tempo.org... - Page 12 Product Overview (Cont.) Control panel layout Rear left heat level display Up button Front left heat level display 10 Down button Rear left cooking zone selector 11 Timer display Front left cooking zone selector 12 Timer button Rear right cooking zone selector 13 Safety lock button Front right cooking zone selector 14 ON/OFF button...
-
Page 13: Getting Started
Getting Started Before first use • Unpack the appliance but keep all packaging materials until you have made sure your new cooktop is undamaged and in good working order. • Plastic wrapping can be a suffocation hazard for babies and young children, so ensure all packaging materials are out of their reach. -
Page 14: Instructions
Instructions Switching on the ceramic cooktop • Press the ON/OFF button to switch on the appliance (Fig. 1). • The cooktop will beep once and all cooking zone indicators will light up briefly. They will then go out, indicating that the cooktop has entered stand-by Fig. - Page 15 Instructions (Cont.) Switching off the ceramic cooktop • Once you have switched off all the cooking zones you had in use, you should turn off the cooktop. • Press the ON/OFF button, (Fig. 5). The cooktop will switch off automatically after 2 minutes, if Fig.
- Page 16 Instructions (Cont.) Locking the ceramic cooktop • To lock the ceramic cooktop, press the Fig. 7 safety lock button while the appliance is switched on (Fig. 7). The timer display will show “L0” to indicate that the safety lock feature has been activated. •...
- Page 17 Instructions (Cont.) The minute minder The cooktop timer can also be used as a “minute minder”: an alarm you can set at any time without affecting the heat level of any cooking zone that may be in use. At the end of the countdown time, only a buzzer will sound; this alarm WILL NOT SWITCH OFF any cooking zones that may be in use.
- Page 18 Instructions (Cont.) Cooktop guidelines Cooking zones • The cooktop is fitted with cooking zones of different diameter and power. The areas from where the heat radiates are clearly marked on the cooktop. • For efficient heating it is important that you position your saucepans exactly on the marked cooking zones, and that your pots and pans have the same diameter as the selected cooking zone.
-
Page 19: Other Useful Information
Other Useful Information Cleaning and maintenance CAUTION! • Always allow the cooktop surface to cool before cleaning the cooktop. • You may find it easier to clean some deposits while the cooktop surface is still warm. However, take care not to burn yourself if cleaning the cooktop surface when it is still warm. - Page 20 Other Useful Information (Cont.) Service and repair CAUTION! If your cooktop appears not to be operating correctly, contact our after sales support line for advice. Do not attempt to repair the appliance yourself! Technical Data Rated Voltage 220–240V AC 50Hz Supply Connection 30A (double pole switched fused outlet with 3mm contact gap)
- Page 21 Cooktop, Oven & Rangehood Pack Electric Oven Model Number SORHP1-O USER MANUAL After Sales Support Telephone: 1300 886 649 N13275 Email: info@tempo.org...
-
Page 22: Specific Safety Instructions
Specific Safety Instructions Important warnings and safety advice specific to the oven • Usage restriction: The oven is not intended for use by persons (including children) with reduced physical sensory or mental capabilities, or lack of experience and knowledge, unless they have been given supervision or instruction concerning use of the appliance by a person responsible for their safety. -
Page 23: Product Overview
Product Overview Oven cavity Oven rack Baking/drip tray Oven light Side rack supports for four shelf positions: 1 (lowest) 2 (medium low) 3 (medium high) 4 (highest) Fan cover Also included, but not pictured, is installation hardware (ST4*26 screw and bracket). - Page 24 Product Overview (Cont.) Control panel Oven function selector knob Oven programmer/timer display Thermostat control knob Power indicator light Oven operating light Timer buttons Oven programmer/timer display Auto function symbol Minute minder symbol Manual operation symbol After Sales Support Telephone: 1300 886 649 Email: info@tempo.org...
-
Page 25: Getting Started
Getting Started Unpacking the appliance Unpack the appliance and remove all packaging materials from around the oven and from inside the oven cavity. Keep all packaging materials until you have made sure your new oven is undamaged and in good working order. Plastic wrapping can be a suffocation hazard for babies and young children, so ensure all packaging materials are out of their reach. -
Page 26: Instructions
Instructions Setting and using the oven programmer/timer Selecting manual operation mode Your new electric oven has a digital timer with an easy to read LED display and six control buttons for easy operation (Fig. 1). Timer buttons Fig. 1 Minute minder button Duration button End cook button Manual operation button... - Page 27 Instructions (Cont.) • Once your set countdown time appears on the display, let go of the “minus” and “plus” buttons. The minute minder symbol will appear on the timer display. (To adjust the set time, use the “minus” or “plus” buttons.) •...
- Page 28 Instructions (Cont.) Setting the end cook function This function is similar to the duration function. However, instead of setting the period of time that you wish the oven to remain on before switching off, you select the point of time (the time of day) at which you wish the oven to switch off.
- Page 29 Instructions (Cont.) Setting the start and end time function This function will allow you to set a time in the future at which the oven will switch on and switch off. • Use the thermostat control knob to set the temperature that you require. The manual operation symbol will appear on the display.
- Page 30 Instructions (Cont.) Selecting a cooking function and temperature Selecting manual operation mode After your appliance is connected to your mains supply for the first time, the numbers on the timer display will flash. Before you can select a cooking function or set a temperature, you must set the appliance into “manual operation”...
- Page 31 Instructions (Cont.) Functions / cooking modes Defrost: On this setting the fan runs without heat to reduce the defrosting time of frozen foods. It is particularly suitable for defrosting fruit and cakes. The time required for defrosting food will depend on the room temperature and the quantity and type of food.
- Page 32 Instructions (Cont.) Thermostat control knob • Use the oven thermostat control knob to set the required temperature for cooking or baking in the oven. The temperature can be regulated within a range of 50–250°C (Fig. 3). • Turn the control knob clockwise to the required temperature. Fig.
- Page 33 Instructions (Cont.) Oven cooking guidelines • Before switching on: Before cooking, check that any accessories that are not required are removed from the oven. • Preheating: Always preheat the oven and wait until the oven operating light has gone off before placing food inside the oven chamber. You can choose not to preheat when using a fan oven mode;...
-
Page 34: Cooking Guidelines
Cooking Guidelines Cooking guidelines: conventional mode (Top heating element + bottom heating element) Shelf position Preheat Temperature Cooking Type of Weight Time setting time lowest position: 1 Food (kg) (mins) (°C) (mins) highest position: 4 Beef 50-60 Pork 50-60 Chicken 50-60 Duck 50-60... - Page 35 Cooking Guidelines (Cont.) Cooking guidelines: intensive bake mode (Fan + top heating element + bottom heating element) Shelf position Preheat Temperature Cooking Weight Type of Food Time setting time lowest: 1 (kg) (mins) (°C) (mins) highest: 4 Pizza Vegetable pie Apple turnover Lasagne Chicken pieces...
-
Page 36: Other Useful Information
Other Useful Information In case of an emergency In the event of an emergency, switch off all working units of the oven, disconnect the mains plug and call our after sales support line for advice. FAQs If you experience problems with your oven, or it appears not to be operating correctly, check in the list below and opposite for solutions to common problems. - Page 37 Other Useful Information (Cont.) My food is not cooking evenly. • Check that the oven has been installed correctly and is level. • Ensure that the correct temperatures and shelf positions are being used. • Ensure that your dishes are placed centrally on the oven rack. •...
- Page 38 Other Useful Information (Cont.) Cleaning and maintenance CAUTION! • Before cleaning any part of the oven, make sure it is switched off and has cooled down sufficiently. • Never use a steam cleaner to clean any part of the oven. •...
- Page 39 Other Useful Information (Cont.) Removing the oven door To make cleaning easier, you can remove the oven door and the glass panel inside the door. • Place some soft, padded material on the floor or benchtop. • Open the oven door completely and raise Fig.
- Page 40 Other Useful Information (Cont.) Removing the door’s glass panel While you have the oven door removed for cleaning, you may wish to remove the glass panel for cleaning. Proceed as follows: • While the oven door is laying flat on a secure surface, remove the two screws at each side of the top of the door with a Phillips head screwdriver (Fig.
- Page 41 Other Useful Information (Cont.) Replacing the oven light bulb IMPORTANT! To avoid the possibility of electric shock, make sure the oven is switched off before attempting to remove or replace the oven light bulb. When the lamp in the oven fails and needs replacement, proceed as follows (Fig.
- Page 42 Other Useful Information (Cont.) Dimensions Height 590mm Width of Face 595mm Width of Back 516mm Depth of Face 22mm Depth of Back 550mm Specifications Oven chamber capacity Shelf positions Oven door Triple glazed, removable Oven light bulb 25W, 300°C, screw type pigmy Accessories 1 x Baking/drip tray 1 x Oven rack...
- Page 43 Cooktop, Oven & Rangehood Pack Rangehood Model Number SORHP1-RH USER MANUAL After Sales Support Telephone: 1300 886 649 N13275 Email: info@tempo.org...
-
Page 44: Specific Safety Instructions
Specific Safety Instructions Important warnings and safety advice specific to the rangehood • CAUTION: Take care when the rangehood is operating simultaneously with an open fireplace or burner that depend on air from the environment and are supplied by other than electrical energy, as the rangehood removes air from the environment which a burner or fireplace needs for combustion. -
Page 45: Product Overview
Product Overview Rangehood housing Slide out front panel Inner aluminium mesh filter Outer alumininium mesh filter Light switch Operation switch Light After Sales Support Telephone: 1300 886 649 Email: info@tempo.org... -
Page 46: Getting Started
Getting Started Unpacking • Unpack the appliance but keep all packaging materials until you have made sure your new rangehood is undamaged and in good working order. • Plastic wrapping can be a suffocation hazard for babies and young children, so ensure all packaging materials are out of their reach. •... -
Page 47: Instructions
Instructions Switching on/off • Make sure the rangehood is properly connected to the power supply and the power is switched on at the outlet. • Pull out the front panel to reveal the switches at the front right hand corner of the rangehood (Fig. -
Page 48: Other Useful Information
Other Useful Information Cleaning and maintenance CAUTION! • Before cleaning the rangehood or carrying out maintenance, make sure the operation and light switches are set to the “ 0 ” position and the rangehood is disconnected from the power supply. •... - Page 49 Other Useful Information (Cont.) A carbon filter absorbs cooking odours and must be changed regularly. How often you need to change the filters depends on your usage. We recommend changing them every three to six months. An activated carbon filter cannot be washed or recycled;...
- Page 50 Other Useful Information (Cont.) Troubleshooting guide If you experience problems with your rangehood, or it appears not to be operating correctly, check in the list below for solutions to common problems. If none of the solutions offered help you solve your problem, please contact our after sales support line for advice.
- Page 51 Other Useful Information (Cont.) Responsible disposal At the end of their working life, do not throw any of these appliances out with your household rubbish. Electrical and electronic products contain substances that can have a detrimental effect on the environment and human health if disposed of inappropriately.
-
Page 52: Repair And Refurbished Goods Or Parts Notice
Cooktop, Oven & Rangehood Pack Repair and Refurbished Goods or Parts Notice Unfortunately, from time to time, faulty products are manufactured which need to be returned to the supplier for repair. Please be aware that if your product is capable of retaining user-generated data (such as files stored on a computer hard drive, telephone numbers stored on a mobile telephone, songs stored on a portable media player, games saved on a games console or files stored on a USB memory stick) during the process of...
Need help?
Do you have a question about the SORHP1-CT and is the answer not in the manual?
Questions and answers