Advertisement
Quick Links
Installation Instructions
Trektop PRO Defrost Harness
Installation Tips
Before you begin installing your new Trektop PRO Defrost Harness,
please read all the instructions thoroughly.
Failure to switch off the defrost grid when the vehicle key is turned off will
cause the battery to drain.
Tools
1/4" drive
Safety
7mm Socket
Glasses
1" Holesaw
Drill-Driver
1/4" Nut Driver
P1 - 54857 - Rev. A 0415
Trim
Qty. 14
Fasteners
Zip Ties
Trim
Utility
Removal Tool
Knife
Installation Instructions - Trektop PRO Defrost Harness
Installation Time
2 Hours
Skill Level
3 - Moderately Difficult
Vehicle Application:
Bestop Trektop PRO
2007- current
Part Number 54857
Support
We're here to help!
Go to www.Bestop.com and
click "Contact Us"
See a video showing
installation of this top at
www.bestop.com/video
© 2015 Bestop, Inc.
Advertisement

Related Manuals for Bestop Trektop PRO


Summary of Contents for Bestop Trektop PRO
- Page 1 Trektop PRO Defrost Harness Part Number 54857 Installation Tips Before you begin installing your new Trektop PRO Defrost Harness, please read all the instructions thoroughly. Failure to switch off the defrost grid when the vehicle key is turned off will cause the battery to drain.
- Page 2 Un defaut d’extinction du dégivrage lorsque le contact du véhicule est coupé entrainera le déchargement de la batterie. P1B - 54857 - Rev. A 0415 Installation Instructions - Trektop PRO Defrost Harness © 2015 Bestop, Inc.
-
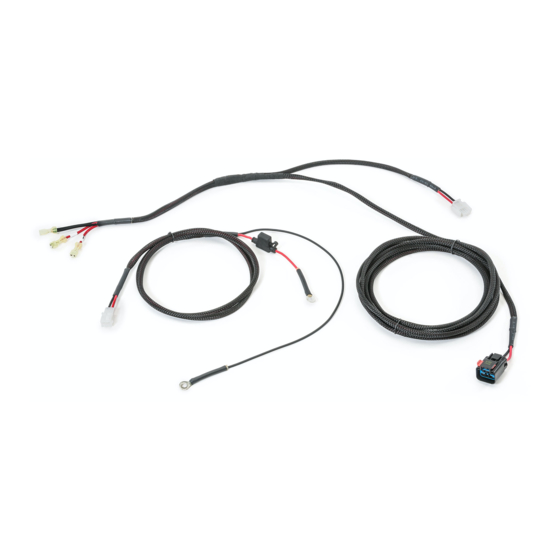
Page 3: Parts List
Attaches to existing wiring harness at Qty. 14 rear of vehicle Zip Ties P2 - 54857 - Rev. A 0415 Installation Instructions - Trektop PRO Defrost Harness © 2015 Bestop, Inc. - Page 4 Zip tie the wiring harness in place with 4 zip ties. Zip tie the new wiring harness to the existing vehicle harness. P3 - 54857 - Rev. A 0415 Installation Instructions - Trektop PRO Defrost Harness © 2015 Bestop, Inc.
- Page 5 You may use a knife to make small cuts in the grommet to allow the connector to fit through the opening. P4 - 54857 - Rev. A 0415 Installation Instructions - Trektop PRO Defrost Harness © 2015 Bestop, Inc.
- Page 6 Be sure to inspect and select wiring harness under the dashboard. a location that will not interfere with any components behind the panel. P5 - 54857 - Rev. A 0415 Installation Instructions - Trektop PRO Defrost Harness © 2015 Bestop, Inc.
- Page 7 Snap the switch into the 1” hole. up behind the dashboard and through the 1” hole you drilled earlier. Power Switch Step 2 P6 - 54857 - Rev. A 0415 Installation Instructions - Trektop PRO Defrost Harness © 2015 Bestop, Inc.
- Page 8 Tuck the wiring harness under the trim panels, passing the connector around the door pillar and underneath the trim panel. P7 - 54857 - Rev. A 0415 Installation Instructions - Trektop PRO Defrost Harness © 2015 Bestop, Inc.
- Page 9 Push the trim panel and the carpet back just far enough to tuck the harness underneath the door sill. P8 - 54857 - Rev. A 0415 Installation Instructions - Trektop PRO Defrost Harness © 2015 Bestop, Inc.
- Page 10 Failure to switch off the defrost grid when the vehicle key is turned off will cause the battery to drain. P9 - 54857 - Rev. A 0415 Installation Instructions - Trektop PRO Defrost Harness © 2015 Bestop, Inc.
- Page 11 4-Door Vehicles: Replace the rear door carpet and trim panel. Replace the trim fasteners. Use new fasteners as necessary to replace damaged ones. Step 2 P10 - 54857 - Rev. A 0415 Installation Instructions - Trektop PRO Defrost Harness © 2015 Bestop, Inc.
-
Page 12: Limited Warranty
Care and Maintenance of your Bestop Product Fabric: The fabric should be washed often using soap, warm water and a soft bristle brush. Rinse with clear water to remove all traces of soap. Bestop recommends using Bestop Cleaner (part no. 11201-00) and Bestop Twill Protectant (part no. 11207-00) which are specially formulated to provide a total cleaning and protection system Windows: Keep windows clean to avoid scratching. - Page 13 Cleaner (pièce no 11201-00) et Bestop Twill Protectant (pièce no 11207-00) which qui sont spécialement formulés pour fournir un système complet de nettoyage et de protection. Vitres : Maintenir les vitres propres pour éviter de les égratigner. NE PAS utiliser une brosse sur les fenêtres. Laver avec un chiffon ou une éponge imbibée d’eau et d’un savon à vaisselle doux. Bestop recom- mande Bestop Vinyl Window Cleaner (no de pièce 11203-00), lequel nettoie et protégé...
- Page 14 (núm. de parte 11201-00) y BestopTwill Protectant (núm. de parte 11207-00) que están formulados especialmente para proporcionar un sistema de limpieza y protección total. Ventanas: mantenga las ventanas abiertas para evitar que se rayen. ¡NO use cepillo para lavar las ventanas! Lave con un paño o esponja empapado de agua y un detergente suave para lavar platos. Bestop recomienda usar el limpiador de ventanas de vinilo Bestop (número de parte 11203-00), que limpia de manera segura y protege las ventanas de vinilo, además de ayudar a prevenir daños causados por los...
Need help?
Do you have a question about the Trektop PRO and is the answer not in the manual?
Questions and answers