Table of Contents
Advertisement
WT05310X01
CITY MULTI R410A SERIES HOT WATER SUPPLY,
AIR TO WATER, and FLOW TEMP. CONTROLLER
Remote Controller
PAR-W21MAA
Instruction Book
Please read these instructions carefully and take care to use this equipment
correctly. Store these instructions safely for future reference.
Be sure to pass these instructions and the corresponding installation instructions
to anyone subsequently appointed to maintain this equipment. Installation and
relocation of this equipment should be carried out by qualified persons only.
Attempts by end users to install or move this equipment may lead to unsafe
conditions or improper operation.
Contents
1. Safety Precautions ......................................................................... 2
2. Parts Names................................................................................... 4
3. Screen Configuration...................................................................... 6
4. Setting the Day of the Week and Time........................................... 6
5. Using the Remote Controller .......................................................... 7
(1) How to Start, Stop, Change the Mode, and Adjust the Water
Temperature.................................................................................... 7
(2) Using the Timer............................................................................... 9
1 Using the Weekly Timer ............................................................ 9
2 Using the Simple Timer ........................................................... 11
3 Using the Auto Off Timer ......................................................... 13
(3) Locking the Remote Controller Buttons
(Operation function limit controller) ............................................... 15
(4) Other Indications ........................................................................... 16
6. Function Selection........................................................................ 18
7. Initial Setting................................................................................. 22
8. Specifications ............................................................................... 25
English
Deutsch
Français
Español
Italiano
Nederlands
Nederlan
Svenska
Dansk
Português
Advertisement
Table of Contents

Related Manuals for Mitsubishi Electric PAR-W21MAA


Summary of Contents for Mitsubishi Electric PAR-W21MAA
-
Page 1: Table Of Contents
WT05310X01 English CITY MULTI R410A SERIES HOT WATER SUPPLY, Deutsch AIR TO WATER, and FLOW TEMP. CONTROLLER Français Remote Controller Español PAR-W21MAA Instruction Book Italiano Contents Nederlands Nederlan 1. Safety Precautions ................. 2 2. Parts Names................... 4 Svenska 3. Screen Configuration..............6 4. -
Page 2: Safety Precautions
Safety Precautions Precautions are classified as follows, according to the level of potential danger. WARNING Denotes a condition or operation which, if handled incorrectly, may lead to serious injury or death. CAUTION Denotes a condition or operation which, if handled incorrectly, may lead to bodily injury or property damage. WARNING Do not attempt to install this equipment yourself. - Page 3 CAUTION Keep hazardous materials away from this equipment. Do not use sharp-tipped objects to press the buttons. Do not install this equipment in locations where there is risk of Use of sharp tips may lead to electric shock or equipment failure. combustible gas leakage.
-
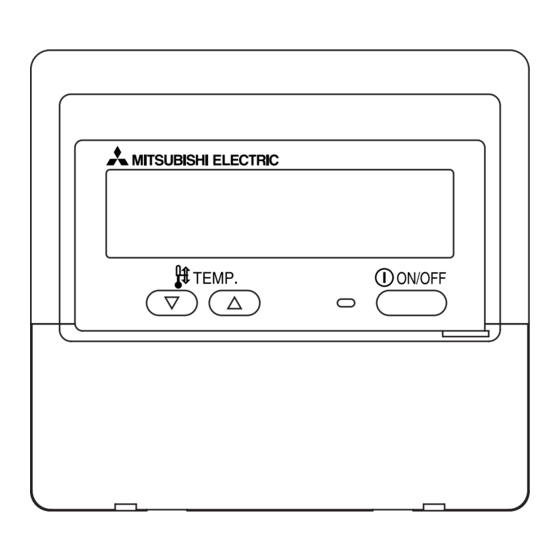
Page 4: Parts Names
Parts Names Display Section Day-of-Week For purposes of this explanation, all parts of the display are shown as lit. Shows the current day of the week. During actual operation, only the relevant items will be lit. Time/Timer Display “Locked” indicator Shows the current time, unless the simple or Auto Indicates that remote controller Off timer is set. - Page 5 Operation Section ON/OFF button Set Temperature buttons Down INITIAL SETTING button Timer Menu button Down (Monitor/Set button) Mode button (Return button) CIR.WATER Enter button) Not available Set Time buttons Test Run button Back Ahead Check button (Clear button) Timer ON/OFF button (Set Day button) Opening the lid.
-
Page 6: Screen Configuration
Screen Configuration Setting the Day of the Week and Time Use this screen to change the current day of the week and time setting. <Screen Types> Function Selection of remote controller: Note: Set the functions and ranges available to the remote The day and time will not appear if clock use has been disabled at Function Selection controller (timer functions, operating restrictions, etc.). -
Page 7: Using The Remote Controller
Note: Using the Remote Controller Your new entries at Steps 2 and 3 will be cancelled if you press the Mode (Return) button 2 before pressing the CIR.WATER button 4. (1) How to Start, Stop, Change the Mode, and Adjust the Water 5. - Page 8 <Selecting the Mode> <Water Temperature Display> With the unit running, press the Mode button 2 as many times as necessary. During operation, the water temperature is shown at 4. • Each press switches operation to the next mode, in the sequence shown below. Note: The currently selected mode is shown at 2.
-
Page 9: Using The Timer
(2) Using the Timer This section explains how to set and use the timer. You can use Function Selection of remote controller to select which of three types of timer to use: 1 Weekly timer, 2 Simple timer, or 3 Auto Off timer. For information about how to set the Function Selection of remote controller, refer to section 6, item [4]-3 (3). - Page 10 <Setting the Weekly Timer> <How to View the Weekly Timer Settings> Shows the time setting Shows the selected operation (ON or OFF) Timer Settings * Does not appear if operation is not set. Shows the temperature setting * Does not appear if temperature is not set. 1.
-
Page 11: Using The Simple Timer
2 Using the Simple Timer <How to Set the Simple Timer> You can set the simple timer in any of three ways. Timer Settings • Start time only : The unit starts when the set time has elapsed. • Stop time only : The unit stops when the set time has elapsed. - Page 12 <Viewing the Current Simple Timer Settings> Examples If ON and OFF times have both been set at the simple timer, operation and display are as Timer Settings indicated below. Example 1: Start the timer, with ON time set sooner than OFF time ON Setting: 3 hours OFF Setting: 7 hours 1.
-
Page 13: Using The Auto Off Timer
3 Using the Auto Off Timer <How to Set the Auto Off Timer> This timer begins countdown when the unit starts, and shuts the unit off when the Timer Settings set time has elapsed. Available settings run from 30 minutes to 4 hours, in 30-minute intervals. Note: *1 Weekly Timer/Simple Timer/Auto Off Timer cannot be used at the same time. - Page 14 <To Turn Off the Auto Off Timer...> Hold down the Timer ON/OFF button 9 for 3 seconds, so that “Timer Off” appears (at 6) and the timer value (at 7) disappears. Alternatively, turn off the unit itself. The timer value (at 7) will disappear from the screen.
-
Page 15: (Operation Function Limit Controller)
(3) Locking the Remote Controller Buttons (Operation function limit <How to Lock the Buttons> 1. While holding down the CIR.WATER button 4, press and hold down the ON/ controller) OFF button 1 for 2 seconds. The “Locked” indication appears on the screen (at If you wish, you can lock the remote controller buttons. -
Page 16: Other Indications
(4) Other Indications <Centrally Controlled> <Flashing Mode Indicator> will be displayed when operation is controlled by central controller, etc. When flashes continuously Restricted operations are shown below. Displayed when another unit connected to the outdoor unit is already operating in •... - Page 17 <Flashing Error Codes> HOT WATER SUPPLY AIR TO WATER Models FLOW TEMP. CONTROLLER Models ON lamp ON lamp (Flashing) (Flashing) Error Code Error Code FLOW TEMP. CONTROLLER unit No. HOT WATER SUPPLY Refrigerant Address AIR TO WATER unit No. Alternating Display If you have entered contact number to be called in the event of a problem, the screen displays this number.
-
Page 18: Function Selection
Function Selection Function selection of remote controller The setting of the following remote controller functions can be changed using the remote controller function selection mode. Change the setting when needed. Item 1 Item 2 Item 3 (Setting content) 1. Change Language Language setting to display •... - Page 19 [Function selection flowchart] [1] Stop the unit to start remote controller function selection mode. [2] Select from item 1. [3] Select from item 2. [4] Make the setting. (Details are specified in item 3) [5] Setting completed. [6] Change the display to the normal one. (End) Normal display (Display when the unit is not running) (Hold down the E button and press the D...
- Page 20 [Detailed setting] (3) Temperature range limit setting After this setting is made, the temperature can be changed within the set [4]–1. CHANGE LANGUAGE setting range. • To switch the setting, press the [ ON/OFF] button. The language that appears on the dot display can be selected. 1 LIMIT TEMP HEATING MODE: •...
- Page 21 [4]–3. Mode selection setting [4]–4. Display change setting (1) Remote controller main/sub setting (1) Temperature display °C/°F setting • To switch the setting, press the [ ON/OFF] button D. • To switch the setting, press the [ ON/OFF] button D. 1 Main : The controller will be the main controller.
-
Page 22: Initial Setting
Initial Setting The initial operation mode can be set. Change the setting when needed. (1) Water temperature initial setting mode 1 Stop the unit by pressing the [ ON/OFF] I button. 2 To enter the water temperature initial setting, press and hold down the [INITIAL SETTING ( )] J button for three seconds or longer. - Page 23 1. Water Temp Heating : Sets the water temperature to 1°C when starting operation in Heating mode. 2. Water Temp Heating ECO No.1 : Sets the water temperature to 2°C for an outside air temperature of 3°C when operating in Heating ECO mode. 3.
- Page 24 (2) Interface (I/F) Option Setting mode The upper and lower limit values for the “water temperature switching by analog input (4-20 mA/0-10 V)” used by the interface (I/F) can be set. Change the setting when needed. 1 Stop the unit by pressing the [ ON/OFF] I button.
-
Page 25: Specifications
Specifications Item Details Dimensions (H × W × D): 120 × 130 × 19 (mm) / 4- × 5- × (in) Weight 0.2 kg ( Power Source 10 to 13V DC (Supplied from unit) Power Consumption 0.3 W Ambient Usage Environment 0 to 40°C (32 to 104°F), 30% to 90% relative humidity Composition –... - Page 26 This product is designed and intended for use in the residential, commercial and light-industrial environment. The product at hand is • Low Voltage Directive 2006/95/EC based on the following • Electromagnetic Compatibility Directive EU regulations.: 2004/108/EC Please be sure to put the contact address/telephone number on this manual before handing it to the customer. HEAD OFFICE: TOKYO BLDG., 2-7-3, MARUNOUCHI, CHIYODA-KU, TOKYO 100-8310, JAPAN WT05310X01...
Need help?
Do you have a question about the PAR-W21MAA and is the answer not in the manual?
Questions and answers