Mitsubishi Electric PAR-21MAA Instruction Book
City multi control system and mitsubishi mr. slim air conditioners ma remote controller
Hide thumbs
Also See for PAR-21MAA:
- Installation manual (104 pages) ,
- Technical manual (76 pages) ,
- Manual (68 pages)
Table of Contents
Advertisement
Available languages
Available languages
WT04474X01
CITY MULTI Control System
and Mitsubishi Mr. SLIM Air Conditioners
MA Remote Controller
PAR-21MAA
Instruction Book
TEMP.
Please read these instructions carefully and take care to use this equipment
correctly. Store these instructions safely for future reference.
Be sure to pass these instructions and the corresponding installation instructions
to anyone subsequently appointed to maintain this equipment. Installation and
relocation of this equipment should be carried out by qualified persons only.
Attempts by end users to install or move this equipment may lead to unsafe
conditions or improper operation.
1. Safety Precautions ........................................................................ 2
2. Parts Names .................................................................................. 4
3. Screen Configuration ..................................................................... 6
4. Setting the Day of the Week and Time .......................................... 6
5. Using the Remote Controller ......................................................... 7
ON/OFF
(2) Fan Speed, Airflow Direction, and Ventilation ................................ 9
(3) Using the Timer ............................................................................ 11
1 Using the Weekly Timer .......................................................... 11
2 Using the Simple Timer .......................................................... 13
3 Using the Auto Off Timer ........................................................ 15
(4) Locking the Remote Controller Buttons
(Operation function limit controller) .............................................. 17
(5) Other Indications .......................................................................... 18
6. Function Selection ....................................................................... 20
7. Specifications .............................................................................. 24
Contents
English
Deutsch
Français
Español
Italiano
Nederlands
Advertisement
Chapters
Table of Contents

Related Manuals for Mitsubishi Electric PAR-21MAA


Summary of Contents for Mitsubishi Electric PAR-21MAA
-
Page 1: Table Of Contents
WT04474X01 English Deutsch CITY MULTI Control System and Mitsubishi Mr. SLIM Air Conditioners Français MA Remote Controller Español PAR-21MAA Italiano Instruction Book Contents Nederlands 1. Safety Precautions ................ 2 2. Parts Names .................. 4 3. Screen Configuration ..............6 4. Setting the Day of the Week and Time .......... 6 5. -
Page 2: Safety Precautions
Safety Precautions G Precautions are classified as follows, according to the level of potential danger. WARNING Denotes a condition or operation which, if handled incorrectly, may lead to serious injury or death. CAUTION Denotes a condition or operation which, if handled incorrectly, may lead to bodily injury or property damage. WARNING Do not attempt to install this equipment yourself. - Page 3 Pulling or twisting a cable may result in fire or equipment failure. Do not use this equipment for purposes for which it was not intended. This equipment is for use with Mitsubishi Building Air Control systems. Do not disassemble. Please do not use it with any other systems, or for any other purpose, as Attempted disassembly may result in injury from contact with internal parts, such usage may result in improper operation.
-
Page 4: Parts Names
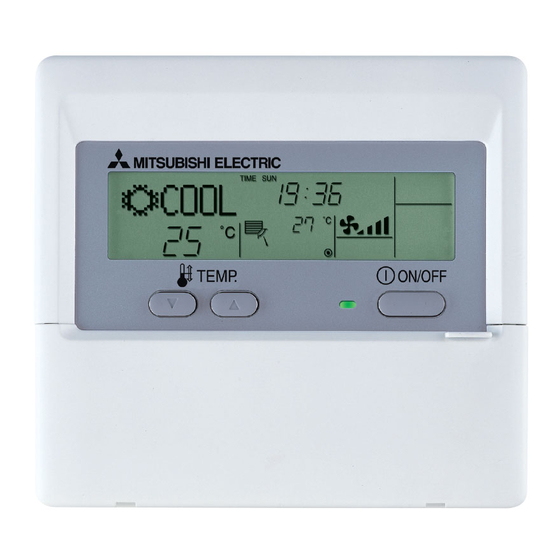
Parts Names “Sensor” indication Display Section Displayed when the remote controller sensor is used. Day-of-Week For purposes of this explanation, Shows the current day of the week. all parts of the display are shown as lit. During actual operation, only Time/Timer Display the relevant items will be lit. - Page 5 Check button (Clear button) Back MENU ON/OFF FILTER Ahead BACK MONITOR/SET CHECK TEST Airflow Up/Down button OPERATION PAR-21MAA CLOCK CLEAR Timer On/Off button (Set Day button) Louver button Operation button) To preceding operation Opening the number. door. Ventilation button Operation button) To next operation number.
-
Page 6: Screen Configuration
Function Selection of remote controller Set Day/Time MENU ON/OFF FILTER TIME SUN BACK MONITOR/SET CHECK TEST PAR-21MAA CLOCK OPERATION CLEAR <How to Set the Day of the Week and Time...> Standard Control Screens Day of the Week Setting ˚F˚C ˚C TIME SUN... -
Page 7: Using The Remote Controller
ON/OFF MENU ON/OFF FILTER BACK MONITOR/SET CHECK TEST PAR-21MAA CLOCK OPERATION CLEAR <To Start Operation> <To Stop Operation> I Press the ON/OFF button 1. I Press the ON/OFF button 1 again. • The ON lamp 1 and the display area •... - Page 8 <Selecting the Mode> <Room Temperature Display> I With the unit running, press the Mode button 2 as many times as necessary. During operation, the intake temperature is shown at 4. • Each press switches operation to the next mode, in the sequence shown below. Note: The currently selected mode is shown at 2.
-
Page 9: Fan Speed, Airflow Direction, And Ventilation
(2) Fan Speed, Airflow Direction, and Ventilation <To Change the Fan Speed...> <To Change the Airflow’s Up/Down Direction> I Press the Fan Speed button 5 as many times as necessary while the system is I With the unit running, press the Airflow Up/Down button 6 as necessary. running. - Page 10 <Using Ventilation> On Mr. Slim models On CITY MULTI models G To run the ventilator together with the indoor unit: G To run the ventilator together with the indoor unit: I Press the ON/OFF button 1. I Press the ON/OFF button 1. •...
-
Page 11: Using The Timer
• 10:00 • 10:00 • 10:00 • 10:00 No. 2 <Operation 2 settings for every • OFF • OFF • OFF • OFF PAR-21MAA CLOCK OPERATION CLEAR day> … Turn off the air conditioner at 10:00. No. 8 Note: By setting the day to “Sun Mon Tues Wed Thurs Fri Sat”, you can set the same operation to be carried out at the same time every day. - Page 12 <Setting the Weekly Timer> <How to View the Weekly Timer Settings> Shows the selected operation (ON or OFF) Shows the time setting Timer Settings * Does not appear if operation is not set. TIMER ˚C WEEKLY Shows the temperature setting ˚C WEEKLY * Does not appear if temperature is not set.
-
Page 13: Using The Simple Timer
7. After completing steps 3 to 6 above, press the Filter BACK MONITOR/SET CHECK TEST Note: PAR-21MAA CLOCK OPERATION CLEAR Your new settings will be cancelled if you press the Mode (Return) button 2 before button 4. pressing the Filter 8. - Page 14 <Viewing the Current Simple Timer Settings> Examples If ON and OFF times have both been set at the simple timer, operation and display are as Timer Setting indicated below. Example 1: TIMER Start the timer, with ON time set sooner than OFF time AFTER ON Setting: 3 hours SIMPLE...
-
Page 15: Using The Auto Off Timer
BACK MONITOR/SET CHECK TEST TIMER AFTER PAR-21MAA OPERATION CLOCK CLEAR AUTO OFF 1. Be sure that the “Auto Off” is visible on the screen (at 1). 2. Hold down the Timer Menu button B for 3 seconds, so that “Monitor” is indicated on the screen (at 4). - Page 16 <To Turn Off the Auto Off Timer...> G Hold down the Timer On/Off button 9 for 3 seconds, so that “Timer Off” appears (at 6) and the timer value (at 7) disappears. ˚C ˚C AUTO OFF G Alternatively, turn off the air conditioner itself. The timer value (at 7) will disappear from the screen.
-
Page 17: (Operation Function Limit Controller)
1. While holding down the Filter button 4, press and hold down the ON/OFF button 1 TIME SUN for 2 seconds—so that the “Locked” indication disappears from the screen (at 1). FUNCTION ˚C ˚C TEMP. ON/OFF ˚C ˚C MENU ON/OFF FILTER BACK MONITOR/SET CHECK TEST PAR-21MAA CLOCK OPERATION CLEAR – 17 –... -
Page 18: Other Indications
(5) Other Indications <Centrally Controlled> <Flashing Mode Indicator> ˚C ˚C ˚C ˚C TEMP. TEMP. ON/OFF ON/OFF G Displayed when operation is controlled by central controller, etc. I When flashes continuously Restricted operations are shown below. Displayed when another indoor unit connected to the outdoor unit is already operating •... - Page 19 <Flashing Error Codes> On CITY MULTI Models On Mr. Slim Models ERROR CODE ERROR CODE ON lamp ON lamp ON/OFF ON/OFF (Flashing) (Flashing) Error Code Error Code Indoor Unit No. Indoor Unit’s Refrig- Indoor Unit No. erant Address Alternating Display If you have entered contact number to be called in the event of a problem, the screen displays this number.
-
Page 20: Function Selection
Function Selection Function selection of remote controller The setting of the following remote controller functions can be changed using the remote controller function selection mode. Change the setting when needed. Item 1 Item 2 Item 3 (Setting content) 1. Change Language Language setting to display •... - Page 21 See [4]–3. (3) MENU ON/OFF FILTER Timer function setting (“WEEKLY TIMER”) SELECTION”) BACK MONITOR/SET CHECK TEST PAR-21MAA CLOCK OPERATION See [4]–3. (4) CLEAR Contact number setting for error situation (“CALL.”) Press the E button. Press the D button. → Temperature display °C/°F setting (“TEMP MODE °C/°F”) See [4]–4.
- Page 22 [Detailed setting] • To increase or decrease the temperature, press the [ TEMP. ( ) or ( button F. [4]–1. CHANGE LANGUAGE setting • To switch the upper limit setting and the lower limit setting, press the [ button H. The selected setting will flash and the temperature can be set. The language that appears on the dot display can be selected.
- Page 23 (4) Contact number setting for error situation ON/OFF] button D. • To switch the setting, press the [ 1 CALL OFF : The set contact numbers are not displayed in case of error. 2 CALL **** *** **** : The set contact numbers are displayed in case of error. CALL_ : The contact number can be set when the display is as shown on the left.
-
Page 24: Specifications
Specifications Item Details 120 (H) × 130 (W) × 19 (D) mm Dimensions Weight 0.2 kg Power Source 10 to 13V DC (Supplied from indoor unit) Power Consumption 0.3 W Ambient Usage Environment 0° to 40°C, 30% to 90% relative humidity Composition –... - Page 25 Deutsch CITY MULTI Steuersystem und Mitsubishi Mr. SLIM Klimaanlagen MA-Fernbedienung PAR-21MAA Bedienungshandbuch INHALT 1. Sicherheitsvorkehrungen ............. 26 2. Bezeichnungen der Teile ............. 28 3. Bildschirmkonfiguration ............... 30 4. Einstellen des Wochentags und der Zeit ........30 5. Verwenden der Fernbedienung ........... 31 TEMP.
-
Page 26: Sicherheitsvorkehrungen
Sicherheitsvorkehrungen G Vorsichtsmaßnahmen werden wie folgt gemäß der potentiellen Gefahrenstufe klassifiziert: Kennzeichnet eine Bedingung oder einen Betrieb, die/der bei falschem Umgang zu schweren Verletzungen oder zu WARNUNG Todesfällen führen kann. Kennzeichnet eine Bedingung oder einen Betrieb, die/der bei falschem Umgang zu Verletzungen oder zu Vermögensschäden VORSICHT führen kann. - Page 27 Ziehen Sie nicht an den Kommunikationskabeln und verdrehen Sie ist. sie nicht. Das Gerät ist für die Verwendung mit den Mitsubishi Air-Control-Systemen Ziehen an oder Verdrehen der Kabel kann zu Bränden oder einem Ausfall für Gebäude gedacht. Verwenden Sie es nicht mit anderen Systemen oder des Geräts führen.
-
Page 28: Bezeichnungen Der Teile
Bezeichnungen der Teile Anzeige “Sensor” Display-Bereich Wird angezeigt, wenn die Fernbedie- nung verwendet wird. Wochentag Für diese Erklärung werden alle Zeigt den aktuellen Wochentag an. Teile des Displays als beleuchtet dargestellt. Während dem tatsäch- Zeit-/Timer-Anzeige lichen Betrieb sind nur die rele- Anzeige “Locked”... - Page 29 Zurück MENU ON/OFF FILTER Vorwärts BACK MONITOR/SET CHECK TEST Taste Luftstrom nach oben/ nach unten OPERATION PAR-21MAA CLOCK CLEAR Taste Timer Aus/Ein (Taste Tag einstellen) Taste Luftklappe (Taste Betrieb Zur vorherigen Betriebs- Öffnen der nummer. Tür. Taste Belüftung (Taste Betrieb Zur nächsten Betriebs-...
-
Page 30: Bildschirmkonfiguration
Timer, einfacher Timer oder Auto-Off-Timer). TEMP. ON/OFF Funktionsauswahl Tag/Zeit einstellen MENU ON/OFF FILTER BACK MONITOR/SET CHECK TEST TIME SUN PAR-21MAA CLOCK OPERATION CLEAR <So stellen Sie den Wochentag und die Zeit ein…> Standardkontrollbildschirme Einstellung des Wochentags ˚F˚C TIME SUN ˚C Zeit-Einstellung Timer-Monitor Timer-Setup 1. -
Page 31: Verwenden Der Fernbedienung
ON/OFF MENU ON/OFF FILTER BACK MONITOR/SET CHECK TEST PAR-21MAA CLOCK OPERATION CLEAR <So starten Sie den Betrieb> <So stoppen Sie den Betrieb> I Drücken Sie die Taste Start/Stop 1. I Drücken Sie die Taste Start/Stop • Die Lampe EIN 1 und der Anzeige- 1 erneut. - Page 32 <Auswählen des Modus> <Anzeige der Umgebungstemperatur> I Drücken Sie, während das Gerät läuft, die Taste Modus 2 so oft wie nötig. Während dem Betrieb wird die Einlaßtemperatur unter 4 angezeigt. • Mit jedem Drücken wird in den nächsten Modus in der unten dargestellten Hinweis: Reihenfolge umgeschaltet.
-
Page 33: Lüftergeschwindigkeit, Richtung Des Luftstroms Und Belüftung
(2) Lüftergeschwindigkeit, Richtung des Luftstroms und Belüftung <So ändern Sie die Lüftergeschwindigkeit...> <So ändern Sie die Richtung des Luftstroms (nach oben/nach unten)> I Drücken Sie die Taste Lüftergeschwindigkeit 5 so oft wie nötig, während das System I Drücken Sie, während das Gerät läuft, die Taste Luftstrom nach oben/nach unten 6 läuft. - Page 34 <Verwenden der Belüftung> Bei Mr.Slim-Modellen Bei CITY MULTI-Modellen G So betreiben Sie den Ventilator zusammen mit dem Innengerät: G So betreiben Sie den Ventilator zusammen mit dem Innengerät: I Drücken Sie die Start/Stop-Taste 1. I Drücken Sie die Taste Start/Stop 1. •...
-
Page 35: Verwenden Des Timers
• 10:00 • 10:00 • 10:00 • 10:00 No. 2 <Einstellung von Betrieb 2 für • OFF • OFF • OFF • OFF PAR-21MAA CLOCK OPERATION CLEAR jeden Tag> … Klimaanlage um 10.00 Uhr ausschalten. No. 8 Hinweis: Durch Einstellen des Tags auf “Sun Mon Tues Wed Thurs Fri Sat”, können Sie festlegen, daß... - Page 36 <Einstellen des wöchentlichen Timers> <So zeigen Sie den wöchentlichen Timer an> Zeigt die ausgewählte Betriebsart an (EIN oder AUS) Zeigt die Zeiteinstellung Timer-Einstellungen * Erscheint nicht, wenn die Betriebsart nicht eingestellt ist. TIMER ˚C WEEKLY Zeigt die Temperatureinstellung an ˚C WEEKLY * Erscheint nicht, wenn die Temperatur nicht eingestellt ist.
-
Page 37: Verwenden Des Einfachen Timers
BACK MONITOR/SET CHECK TEST Hinweis: Ihre neuen Einstellungen werden storniert, wenn Sie die Taste Modus (Zurück) 2 PAR-21MAA CLOCK OPERATION CLEAR drücken, bevor Sie die Taste Filter 4 drücken. 8. Drücken Sie die Taste Modus (Zurück) 2, um zum Standardkontrollbildschirm zurückzukehren. - Page 38 <Anzeigen der aktuellen Einstellungen des einfachen Timers> Beispiele Falls die EIN- und AUS-Zeiten beide im einfachen Timer eingestellt wurden, werden der Betrieb Timer-Einstellung und die Anzeige wie unten dargestellt. Beispiel 1: TIMER Starten Sie den Timer, wobei die EIN-Zeit früher als die AUS-Zeit eingestellt ist. AFTER EIN-Einstellung: 3 Stunden SIMPLE...
-
Page 39: Verwenden Des Auto-Off-Timers
BACK MONITOR/SET CHECK TEST TIMER AFTER PAR-21MAA CLOCK OPERATION CLEAR AUTO OFF 1. Achten Sie darauf, daß “Auto Off” auf dem Bildschirm sichtbar ist (unter 1). 2. Halten Sie die Taste Timer-Menü B 3 Sekunden lang gedrückt, so daß “Monitor” auf dem Bildschirm angegeben wird (unter 4). - Page 40 <So schalten Sie den Auto-Off-Timer aus...> G Halten Sie die Taste Timer Ein/Aus 9 3 Sekunden lang gedrückt, so daß “Timer Off” erscheint (unter 6) und der Timer-Wert (unter 7) verschwindet. ˚C ˚C AUTO OFF G Oder schalten Sie die Klimaanlage selbst aus. Der Timer-Wert (unter 7) verschwin- det vom Bildschirm.
-
Page 41: Sperren Der Fernbedienungstasten (Beschränkung Der Betriebsfunktionen)
1. Halten Sie die Taste Filter 4 zusammen mit der Taste EIN/AUS 1 2 Sekunden lang ˚C ˚C gedrückt – die Anzeige “Locked” verschwindet vom Bildschirm (unter 1). TEMP. ON/OFF ˚C MENU ON/OFF FILTER ˚C BACK MONITOR/SET CHECK TEST PAR-21MAA CLOCK OPERATION CLEAR – 41 –... -
Page 42: Weitere Anzeigen
(5) Weitere Anzeigen <Zentral gesteuert> <Blinkende Modus-Anzeige> ˚C ˚C ˚C ˚C TEMP. TEMP. ON/OFF ON/OFF G Angezeigt, wenn der Betrieb von der Zentralsteuerung usw. kontrolliert wird. I Bei Dauerblinken Nachfolgend werden eingeschränkte Operationen gezeigt. Wird angezeigt, wenn eine andere Innenanlage an eine Außenanlage angeschlos- •... - Page 43 <Blinkende Fehlercodes> Bei CITY MULTI-Modellen Bei Mr.Slim-Modellen ERROR CODE ERROR CODE Lampe EIN Lampe EIN ON/OFF ON/OFF (blinkt) (blinkt) Fehlercode Fehlercode Innengerät-Nr. Kältemitteladresse Innengerät-Nr. des Innengeräts Wechselnde Anzeige Wenn Sie eine Telefonnummer eingegeben haben, die bei Auftreten eines Problems angerufen werden sollte, zeigt der Bildschirm diese Nummer an.
-
Page 44: Funktionsauswahl
Funktionsauswahl Funktionsauswahl an der Fernbedienung Die Einstellung der folgenden Fernbedienungsfunktionen kann mit dem Auswahlmodus der Fernbedienungsfunktion geändert werden. Ändern Sie die Einstellung nach Bedarf. Eintrag 1 Eintrag 2 Eintrag 3 (Inhalt der Einstellungen) 1. Sprache ändern Einstellung der angezeigten Sprache •... - Page 45 FILTER Kontaktnummer für den Fall von Fehlfunktionen (“CALL.”) Drücken BACK MONITOR/SET CHECK TEST Sie Taste Drücken Sie PAR-21MAA CLOCK OPERATION CLEAR Taste D. → Temperatureinstellung in °C/°F (“Wechsel °C/°F”) Siehe [4]–4. (1) Drücken Sie Drücken Sie Taste G. Taste G.
- Page 46 [Genaue Einstellung] * Wenn eine andere Einstellung als OFF gewählt wird, werden die Temperatur- bereichsgrenzen für Kühlen, Heizen und automatischen Betrieb gleichzeitig [4]–1. Einstellung CHANGE LANGUAGE (Sprache ändern) eingestellt. Der Bereich kann jedoch nicht begrenzt werden, wenn der einge- stellte Temperaturbereich sich nicht geändert hat. Die Sprache des Punktmatrix-Displays kann eingestellt werden.
- Page 47 (4) Kontaktnummer für den Fall von Fehlfunktionen ON/OFF] D. • Zur Umschaltung der Einstellung drücken Sie die Taste [ 1 CALL OFF : Die eingestellten Kontaktnummern werden im Falle von Fehlfunktionen nicht angezeigt. 2 CALL **** *** **** : Die eingestellten Kontaktnummern werden im Falle von Fehlfunktionen angezeigt.
-
Page 48: Technische Daten
Technische Daten Eintrag Angaben 120 (H) × 130 (W) × 19 (D) mm Abmessungen Gewicht 0,2 kg Stromquelle 10 bis 13 V DC (vom Innengerät geliefert) Stromverbrauch 0,3 W Betriebsumgebung 0° bis 40°C, 30% bis 90% relative Feuchtigkeit Zusammensetzung – 48 –... - Page 49 Système de contrôle CITY MULTI et commande à distance MA pour climatiseurs Mitsubishi ultra minces Mr. SLIM. Français Commande à distance MA PAR-21MAA Livret d’finstructions TABLE DES MATIERES 1. Précautions d’usage ..............50 2. Nomenclature ................52 3. Configuration d’écran ..............54 4.
-
Page 50: Précautions D'usage
Précautions d’usage G Les précautions sont classées comme suit, selon le danger potentiel. AVERTISSEMENT Indique une condition ou une opération qui, si elle est mal gérée, peut provoquer des blessures graves ou la mort. Indique une condition ou une opération qui, si elle est mal gérée, peut provoquer des blessures corporels ou des PRECAUTION dégâts matériels. - Page 51 Cet équipement doit être utilisé avec les systèmes de contrôle d’aération Ne pas démonter. de bâtiment Mitsubishi. Veuillez ne l’utiliser avec aucun autre système, à Toute tentatives de démontage pourrait entraîner un contact avec des aucun autre usage, cela pourrait provoquer des dysfonctionnements.
-
Page 52: Nomenclature
Nomenclature Témoin “Capteur” Section de l’affichage S’affiche lors de l’utilisation du capteur de la télécommande. Jour de la semaine Pour cette explication, toutes les Indique le jour de la semaine. parties de l’affichage sont mon- trées allumées. Lors du fonction- Affichage heure/programmateur nement réel, seuls les éléments Indicateur “Verrouillé”... - Page 53 MENU ON/OFF FILTER Avancer BACK MONITOR/SET CHECK TEST Bouton de ventilation mon- tante/descendante OPERATION PAR-21MAA CLOCK CLEAR Bouton marche/arrêt du pro- grammateur Bouton de louvre (Bouton de réglage de la date) (Bouton opération pour la précédente Ouvrir la opération porte.
-
Page 54: Configuration D'écran
Règle date / heure MENU ON/OFF FILTER BACK MONITOR/SET CHECK TEST TIME SUN PAR-21MAA CLOCK OPERATION CLEAR <Comment régler le jour de la semaine et l’heure…> Filtres de contrôle standards Réglage du jour de la semaine ˚F˚C TIME SUN ˚C Réglage de l’heure... -
Page 55: Utiliser La Télécommande
ON/OFF MENU ON/OFF FILTER BACK MONITOR/SET CHECK TEST PAR-21MAA CLOCK OPERATION CLEAR <Pour commencer l’opération> <Pour arrêter le fonctionnement> I Appuyez sur le bouton Marche/Arrêt 1. I Appuyez de nouveau sur le bouton • Le témoin de marche 1 et la zone d’af- Marche/Arrêt 1. - Page 56 <Sélectionner le mode> <Affichage de température ambiante> I Quand l’unité est en fonction, appuyez sur le bouton 2 autant de fois que nécessaire. Lors du fonctionnement, la température d’entrée est indiquée en 4. • À chaque fois que vous appuyez, vous passez au mode de fonctionnement Remarque : suivant, selon la séquence indiquée ci-dessous : G La portée affichée va de 8 °C à...
-
Page 57: Vitesse De Ventilateur, Direction De L'air, Et Ventilation
(2) Vitesse de ventilateur, direction de l’air, et ventilation <Pour changer la vitesse de ventilation...> <Pour changer la direction de l’air (montant/descendant)> I Appuyez sur le bouton de vitesse du ventilateur 5 autant de fois que nécessaire alors I Quand l’unité est en fonction, appuyez sur le bouton 6 de ventilation montante/ que le système est en fonction. - Page 58 <Utiliser la ventilation> Sur les modèles Mr. Slim : Sur les modèles CITY MULTI : G Pour lancer le ventilateur conjointement à l’unité intérieure : G Pour lancer le ventilateur conjointement à l’unité intérieure : I Appuyez sur le bouton Marche/Arrêt 1. I Appuyez sur le bouton Marche/Arrêt 1.
-
Page 59: Utiliser Le Programmateur
à 23 °C. BACK MONITOR/SET CHECK TEST • 10:00 • 10:00 • 10:00 • 10:00 No. 2 <Réglage de l’opération 2 pour PAR-21MAA CLOCK OPERATION CLEAR • OFF • OFF • OFF • OFF tous les jours> … Éteindre le conditionneur d’air à... - Page 60 <Régler le programmateur hebdomadaire> <Comment visualiser les réglages du programmateur hebdomadaire> Affiche l’opération choisie (Marche ou Arrêt) Affiche le réglage de l’heure Réglage du programmateur * N’apparaît pas si l’opération n’est pas réglée. TIMER ˚C WEEKLY Affiche le réglage de la température ˚C WEEKLY * N’apparaît pas si la température n’est pas...
-
Page 61: Utiliser Le Programmateur Simple
CHECK TEST Vos nouvelles informations seront effacées si vous tapez le bouton 2 Mode (Entrée) avant d’appuyer sur le bouton 4 Filter PAR-21MAA CLOCK OPERATION CLEAR 8. Appuyez sur le bouton 2 Mode (Entrée) pour retourner à l’écran de contrôle standard. - Page 62 <Afficher les réglages actuels du programmateur simple> Exemples Si les horaires de marche et d’arrêt ont été réglés pour le programmateur simple, l’opération et Réglage du programmateur l’affichage sont comme indiqués comme ci-dessous. Exemple 1 : TIMER Démarrer le programmateur, avec l’heure de démarrage avant l’heure d’arrêt AFTER Réglage Marche : 3 heures SIMPLE...
-
Page 63: Utiliser Le Programmateur Arrêt Auto
FILTER BACK MONITOR/SET CHECK TEST TIMER AFTER PAR-21MAA CLOCK OPERATION CLEAR AUTO OFF 1. Assurez-vous que l’indication “Arrêt Auto” apparaisse à l’écran (sur 1). 2. Appuyez sur le bouton Menu du programmateur B pendant 3 secondes, de manière à ce que “Moniteur” apparaisse à l’écran (en 4). - Page 64 <Pour éteindre le programmateur Arrêt Auto...> G Appuyez sur le bouton Marche/Arrêt du programmateur 9 pendant 3 secondes, de manière à ce que l’indication “Arrêt programmateur” apparaisse en 6 et que la valeur du programmateur (en 7) disparaisse. ˚C ˚C AUTO OFF G Sinon, il est possible d’éteindre le conditionneur d’air lui-même.
-
Page 65: Verrouiller Les Boutons De La Télécommande (Limite De Fonctionnement D'opération)
1. Tout en pressant le bouton Filter 4, maintenez appuyé le bouton ON/OFF 1 pendant ˚C ˚C 2 secondes—de manière à ce que l’indication “verrouillé” disparaisse de l’écran (en TEMP. ON/OFF ˚C MENU ON/OFF FILTER ˚C BACK MONITOR/SET CHECK TEST PAR-21MAA CLOCK OPERATION CLEAR – 65 –... -
Page 66: Autres Indications
(5) Autres indications <Commande centralisée> <Indicateur de mode clignotant> ˚C ˚C ˚C ˚C TEMP. TEMP. ON/OFF ON/OFF G S’affiche lorsque le fonctionnement est contrôlé par un contrôleur central, etc. I Lorsqu’il clignote de manière continue Les fonctionnements réduits sont illustrés ci-dessous. S’affiche lorsqu’un autre appareil intérieur connecté... - Page 67 <Codes d’erreur clignotants> Sur les modèles CITY MULTI Sur les modèles Mr. Slim ERROR CODE ERROR CODE Témoin de Témoin de ON/OFF ON/OFF marche marche (clignotant) (clignotant) Code d’erreur Code d’erreur N° d’unité intérieure Adresse du réfrigérant N° d’unité de l’unité intérieure intérieure Affichage alternant Si vous avez entré...
-
Page 68: Sélection Des Fonctions
Sélection des fonctions Sélection des fonctions de la commande à distance Le réglage des fonctions de la commande suivantes peut être modifié à l’aide du mode de sélection des fonctions de la commande à distance. Modifiez le réglage au besoin. Elément 1 Elément 2 Elément 3 (contenu de réglage) - Page 69 Reportez-vous au Appuyez BACK MONITOR/SET CHECK TEST point [4]–3. (4) sur la Appuyez sur PAR-21MAA CLOCK OPERATION CLEAR touche E. la touche D. → Réglage de l’affichage de la température °C/°F (“TEMPERATURE °C/°F”) Reportez-vous au point [4]–4. (1) Appuyez sur Appuyez sur la touche G.
- Page 70 [Réglage détaillé] 2 LIMITE TEMP MODE CHAUD : Le mode de la plage de températures peut être modifié en mode chauffage. [4]–1. Réglage CHANGE LANGUAGE (Modification de la langue) 3 LIMITE TEMP MODE AUTO : Le mode de la plage de températures peut être modifié en mode automa- La langue d’affichage de l’écran à...
- Page 71 2 PROG HORAIRE ARRET AUTO: L’arrêt différé automatique peut être utilisé. 3 PROG HORAIRE SIMPLIFIE: La minuterie simple peut être utilisée. 4 PROG HORAIRE INACTIF: Le mode de minuterie ne peut pas être utilisé. * Lorsque l’utilisation du réglage de l’horloge est définie sur OFF, la fonction “PROG HEBDO MADAIRE”...
-
Page 72: Spécifications
Spécifications Elément Détails 120 (H) × 130 (W) × 19 (D) mm Dimensions Poids 0,2 kg Alimentation 10 à 13V CC (fourni par l’unité intérieure) Consommation 0,3 W Environnement compatible 0°C à 40°C, humidité relative 30% à 90% Composition – 72 –... - Page 73 Sistema de control CITY MULTI y acondicionador-es de aire Mr. SLIM de Mitsubishi Controlador remoto MA Español PAR-21MAA Libro de instrucciones ÍNDICE 1. Precauciones de seguridad ............74 2. Nombres de las piezas ..............76 3. Configuración de la pantalla ............78 4.
-
Page 74: Precauciones De Seguridad
Precauciones de seguridad G Según el nivel de posibles daños, las advertencias se clasifican según se indica a continuación. ADVERTENCIA Indica una condición o funcionamiento que, tratado de manera incorrecta, puede provocar lesiones graves o la muerte. Indica una condición o funcionamiento que, tratado de manera incorrecta, puede provocar lesiones corporales o daños PRECAUCIÓN materiales. - Page 75 No utilice este equipo para fines no previstos. No tire ni retuerza los cables de comunicación. Este equipo se utiliza con los sistemas Mitsubishi de control de aire en Si se tiran o tuercen los cables, pueden provocarse incendios o fallos del edificios.
-
Page 76: Nombres De Las Piezas
Nombres de las piezas Indicador “Sensor” Sección de pantalla Aparece cuando se utiliza el sensor del mando a distancia. Para esta explicación, se mues- Día de la semana tran iluminadas todas las partes Muestra el día de la semana actual. de la pantalla. - Page 77 Botón Check (botón Clear) Back (Atrás) MENU ON/OFF FILTER Ahead (Adelante) BACK MONITOR/SET CHECK TEST Botón Airflow Up/Down OPERATION PAR-21MAA CLOCK CLEAR Botón Timer On/Off (botón Set Day) Botón Louver (Botón Operation) Al número de funciona- Apertura de miento anterior. la puerta.
-
Page 78: Configuración De La Pantalla
Selección de Función Set Day/Time MENU ON/OFF FILTER TIME SUN BACK MONITOR/SET CHECK TEST PAR-21MAA CLOCK OPERATION CLEAR <Cómo configurar el día de la semana y la hora…> Pantallas Standard Control Configuración del día de la semana ˚F˚C ˚C TIME SUN Configuración de la hora... -
Page 79: Utilización Del Mando A Distancia
ON/OFF MENU ON/OFF FILTER BACK MONITOR/SET CHECK TEST PAR-21MAA CLOCK OPERATION CLEAR <Para poner en marcha> <Para detener el funcionamiento> I Pulse el botón Start/Stop 1. I Pulse de nuevo el botón Start/Stop • Se encienden la lámpara de encendido 1 y la pantalla. - Page 80 <Selección de Modo> <Pantalla de temperatura ambiente> I Con la unidad en funcionamiento, pulse el botón Mode 2 tantas veces como sea Durante el funcionamiento, la temperatura de entrada de aire se muestra en 4. necesario. Nota: • Cada pulsación cambia el funcionamiento al modo siguiente en la secuencia que G El rango de visualización es de 8 °C a 39 °C.
-
Page 81: Velocidad Del Ventilador, Dirección De Circulación Del Aire Y Ventilación
(2) Velocidad del ventilador, dirección de circulación del aire y ventila- ción <Para cambiar la dirección de circulación del aire hacia Arriba/Abajo> I Con la unidad en funcionamiento, pulse el botón Airflow Up/Down 6 tantas veces <Para cambiar la velocidad del ventilador...> I Pulse el botón Fan Speed 5 tantas veces como sea necesario con el sistema en como sea necesario. - Page 82 <Utilización de la ventilación> En modelos Mr.Slim En modelos CITY MULTI G Para hacer funcionar el renovador de aire junto con la unidad interior: G Para hacer funcionar el renovador de aire junto con la unidad interior: I Pulse el botón Start/Stop 1. I Pulse el botón Start/Stop 1.
-
Page 83: Utilización Del Temporizador
23 °C. BACK MONITOR/SET CHECK TEST • 10:00 • 10:00 • 10:00 • 10:00 No. 2 <Valores de Operación 2 para PAR-21MAA CLOCK OPERATION CLEAR • OFF • OFF • OFF • OFF todos los días> … Apagar el acondicionador de aire a las 10:00. - Page 84 <Configuración del temporizador semanal> <Cómo visualizar los valores fijados del temporizador semanal> Muestra la operación seleccionada (encendido o apa- Muestra la configu- Valores fijados del temporizador gado) ración de la hora * No aparece si no se ha configurado la operación. TIMER ˚C WEEKLY...
-
Page 85: Utilización Del Temporizador Simple
Filter BACK MONITOR/SET CHECK TEST 4 para fijar el valor. Nota: PAR-21MAA CLOCK OPERATION CLEAR Sus configuraciones nuevas se cancelarán si pulsa el botón Mode (Return) 2 antes de Filter 4. pulsar el botón 8. Pulse el botón Mode (Return) 2 para regresar a la pantalla de control estándar. - Page 86 <Visualización de las configuraciones actuales del temporizador simple> Ejemplos Si se han configurado las horas de encendido y apagado en el temporizador simple, el Configuración del temporizador funcionamiento y la pantalla son según se indica a continuación. Ejemplo 1: TIMER Inicie el temporizador, con la hora de encendido fijada más temprano que la hora de apagado.
-
Page 87: Utilización Del Temporizador De Apagado Automático
FILTER Configuración del temporizador BACK MONITOR/SET CHECK TEST TIMER PAR-21MAA CLOCK OPERATION CLEAR AFTER AUTO OFF 1. Asegúrese de que “Auto Off” esté visible en la pantalla (en 1). 2. Mantenga pulsado el botón Timer Menu B durante 3 segundos, para que se indique en la pantalla “Monitor”... - Page 88 <Para desactivar temporizador de apagado automático...> G Mantenga pulsado el botón Timer On/Off 9 durante 3 segundos para que aparezca “Timer Off” (en 6) y desaparezca el valor del temporizador (en 7). ˚C ˚C AUTO OFF G Alternativamente, desconecte el acondicionador de aire. El valor del temporizador (en 7) desaparecerá...
-
Page 89: Bloqueo De Los Botones Del Mando A Distancia (Límite De Función De Operación)
1. Mientras pulsa el botón Filter 4, pulse y mantenga pulsado el botón ON/OFF 1 durante 2 segundos para que el indicador “Locked” desaparezca de la pantalla (en FUNCTION ˚C ˚C TEMP. ON/OFF ˚C ˚C MENU ON/OFF FILTER BACK MONITOR/SET CHECK TEST PAR-21MAA OPERATION CLOCK CLEAR – 89 –... -
Page 90: Otras Indicaciones
(5) Otras indicaciones <Centrally Controlled> <Indicador de modo parpadeante> ˚C ˚C ˚C ˚C TEMP. TEMP. ON/OFF ON/OFF G Aparece cuando el funcionamiento se controla desde el controlador central o sistema I Cuando parpadea de forma continua similar. Aparece cuando otra unidad interior conectada a la unidad exterior está en funcio- A continuación se muestra el funcionamiento restringido. - Page 91 <Códigos de error parpadeantes> En modelos CITY MULTI En modelos Mr.Slim ERROR CODE ERROR CODE Lámpara ON Lámpara ON ON/OFF ON/OFF (parpadeando) (parpadeando) Código de error Código de error N° de unidad interior Dirección del proveedor de re- N° de unidad interior frigerante de la unidad interior Pantalla alternante Si ha introducido un número telefónico al cual llamar en caso de problemas, la pantalla mostrará...
-
Page 92: Selección De Función
Selección de función Selección de funciones del controlador remoto El ajuste de las siguientes funciones del controlador remoto se puede cambiar utilizando el modo Selección de función del controlador remoto. Cambie el ajuste cuando sea necesario. Ítem 1 Ítem 2 Ítem 3 (Contenido de ajuste) 1. - Page 93 Ajuste de número de contacto en caso de error (“CALL.”) Vea [4]–3. (4) Presione el BACK MONITOR/SET CHECK TEST botón E. Presione el PAR-21MAA CLOCK OPERATION CLEAR botón D. → Ajuste del indicador de temperatura °C/°F (“TEMP. GRADOS °C/°F”) Vea [4]–4. (1) Presione el Presione el botón G.
- Page 94 [Ajuste detallado] * Cuando se ajusta una posición distinta de la de desactivación (OFF), se ajusta a la vez el límite de rango de temperatura en modo refrigeración, calefacción [4]–1. Ajuste de Cambio de idioma y automático. No obstante, no se puede limitar el rango cuando no ha cambiado el rango de temperatura establecido.
- Page 95 * Cuando el uso del ajuste de reloj está desactivado (OFF), no se puede usar el “TEMPORIZADOR SEMANAL”. (4) Ajuste de número de contacto en caso de error ON/OFF] D. • Para cambiar el ajuste, presione el botón [ 1 CALL OFF : Los números de contacto establecidos no aparecen en el indicador en caso de error.
-
Page 96: Especificaciones
Especificaciones Ítem Detalles 120 (H) × 130 (W) × 19 (D) mm Dimensiones Peso 0,2 kg Fuente de alimentación Corriente directa de 10 a 13 voltios (suministrada desde la unidad interior) Consumo de energía eléctrica 0,3 W 0 °C a 40 °C, 30% a 90% de humedad relativa Condiciones medioambientales Composición –... - Page 97 Sistema controllo di CITY MULTI e climatizzatori Mitsubishi Mr. SLIM Comando a distanza MA PAR-21MAA Italiano Manuale di istruzioni INDICE 1. Precauzioni di sicurezza .............. 98 2. Nomenclatura delle parti ............100 3. Configurazione schermo ............102 4. Impostazione del giorno della settimana e dell’ora ....102 5.
-
Page 98: Precauzioni Di Sicurezza
Precauzioni di sicurezza G Le misure di precauzione sono classificate nel modo seguente, a seconda del livello di potenziale pericolo. Indica una condizione o un funzionamento che, se gestiti nel modo sbagliato, potrebbero causare lesioni gravi o addirittura ATTENZIONE letali. Indica una condizione o un funzionamento che, se gestiti nel modo sbagliato, potrebbero causare lesioni personali o danni CAUTELA materiali. - Page 99 Non destinare l’apparecchio ad usi diversi da quelli previsti. dell’apparecchio. Questo apparecchio è da utilizzare con gli impianti di condizionamento dell’aria per edifici Mitsubishi. Non usarlo con altri sistemi o per altri scopi; Non smontare l’apparecchio. diversamente l’apparecchio potrebbe funzionare in modo anomalo.
-
Page 100: Nomenclatura Delle Parti
Nomenclatura delle parti Indicatore “Sensore” Sezione display Visualizzata quando il sensore te- lecomando viene utilizzato. Giorno della settimana In questa spiegazione, tutte le parti Visualizza il giorno corrente della settimana. del display sono raffigurate illumi- nate. Durante il normale funzio- Display ora/timer namento saranno illuminate sol- Indicatore “Locked”... - Page 101 (Pulsante “Clear”) Avanti MENU ON/OFF FILTER Indietro BACK MONITOR/SET CHECK TEST Pulsante “Airflow Up/Down” OPERATION PAR-21MAA CLOCK CLEAR Pulsante “Timer On/Off” (Pulsante “Set Day”) Pulsante “Louver” (Pulsante “Operation” Al numero di operazione Apertura dello precedente. sportellino. Pulsante “Ventilation” (Pulsante “Operation”...
-
Page 102: Configurazione Schermo
MENU ON/OFF FILTER Selezione funzioni Imposta giorno/ora BACK MONITOR/SET CHECK TEST TIME SUN PAR-21MAA CLOCK OPERATION CLEAR <Come impostare il giorno della settimana e l’ora…> Schermate di controllo standard Impostazione del giorno della settimana TIME SUN ˚F˚C ˚C Impostazione dell’ora A per visualizzare il display 2. -
Page 103: Uso Del Telecomando
TEMP. ON/OFF MENU ON/OFF FILTER BACK MONITOR/SET CHECK TEST PAR-21MAA CLOCK OPERATION CLEAR <Per avviare il funzionamento> <Interrompere il funzionamento> I Premere il pulsante “Start/Stop” 1. I Premere nuovamente il pulsante • L’indicatore ON 1 e l’area display sono “Start/Stop” 1. - Page 104 <Selezione della modalità> <Display Temperatura ambiente> I Quando l’unità è in funzione, premere il pulsante “Mode” 2 il numero di volte Durante il funzionamento, la temperatura di ingresso è visualizzata in 4. necessario. Nota: • Ad ogni pressione del pulsante si passa alla modalità di funzionamento succes- G L’intervallo sul display è...
-
Page 105: Fan Speed (Velocità Ventola), Airflow Direction (Direzione Flusso D'aria), E Ventilation (Ventilazione)
(2) Fan Speed (Velocità ventola), Airflow Direction (Direzione flusso d’aria), e Ventilation (Ventilazione) <Per modificare la direzione verso l’alto/il basso del flusso d’aria> I Quando l’unità è in funzione, premere il pulsante “Airflow Up/Down” 6 il numero di <Cambiare la velocità della ventola...> I Premere il pulsante “Fan Speed”... - Page 106 <Utilizzo della ventilazione> Sui modelli Mr.Slim Sui modelli CITY MULTI: G Per far funzionare il ventilatore insieme all’unità interna: G Per far funzionare il ventilatore insieme all’unità interna: I Premere il pulsante “Start/Stop” 1. I Premere il pulsante “Start/Stop” 1. •...
-
Page 107: Utilizzo Del Timer
23 °C. BACK MONITOR/SET CHECK TEST • 10:00 • 10:00 • 10:00 • 10:00 No. 2 <Impostazioni Operazione 2 PAR-21MAA CLOCK OPERATION CLEAR • OFF • OFF • OFF • OFF per tutti i giorni> … Spegnere il condizionatore alle 10.00. - Page 108 <Impostazione del timer settimanale> <Come visualizzare le impostazioni del timer settimanale> Visualizza l’operazione selezionata (ON o OFF) Visualizza l’ora impostata Impostazioni del timer * Non viene visualizzato se non si è impostata un’operazione. TIMER ˚C WEEKLY Visualizza la temperatura impostata ˚C WEEKLY * Non viene visualizzato se non si è...
-
Page 109: Utilizzo Del Timer Semplice
BACK MONITOR/SET CHECK TEST confermare il valore. Nota: PAR-21MAA CLOCK OPERATION CLEAR Le nuove impostazioni immesse saranno cancellate se si preme il pulsante “Mode” (Return) 2 prima di premere il pulsante 4 “Filter” 8. Premere il pulsante 2 “Mode” (Return) per tornare alla schermata di controllo standard. - Page 110 <Visualizzazione delle impostazioni correnti del timer semplice> Esempi Se gli orari di accensione (ON) e spegnimento (OFF) sono stati impostati sul timer semplice, Impostazione del timer l’operazione e il display si presenteranno nel modo seguente. Esempio 1: TIMER Avvio del timer, con orario di accensione (ON) impostato prima dell’orario di spegnimento (OFF) AFTER Impostazione di accensione (ON): 3 ore...
-
Page 111: Utilizzo Del Timer Di Arresto Automatico (Auto Off)
MONITOR/SET CHECK TEST TIMER AFTER OPERATION PAR-21MAA CLOCK CLEAR AUTO OFF 1. Assicurarsi che l’indicatore corrispondente al timer di arresto automatico sia visibile sullo schermo (in 1). 2. Premere il pulsante “Timer Menu” B per 3 secondi, fino a visualizzare il messaggio “Monitor”... - Page 112 <Disattivare il timer di arresto automatico...> G Tenere premuto il pulsante “Timer On/Off” 9 per 3 secondi, fino a quando viene visualizzato “Timer Off” (in 6) e scompare il valore timer (in 7). ˚C ˚C AUTO OFF G In alternativa, spegnere il condizionatore d’aria. Il valore timer (in 7) scomparirà dallo schermo.
-
Page 113: Blocco Dei Pulsanti Del Telecomando (Limite Di Funzionamento)
1. Tenendo premuto il pulsante “Filter” 4, premere e tenere premuto il pulsante ON/ TIME SUN OFF 1 per 2 secondi; l’indicazione “Locked” scomparirà dallo schermo (in 1). FUNCTION ˚C ˚C TEMP. ON/OFF ˚C ˚C MENU ON/OFF FILTER BACK MONITOR/SET CHECK TEST OPERATION PAR-21MAA CLOCK CLEAR – 113 –... -
Page 114: Altre Indicazioni
(5) Altre indicazioni <Centrally Controlled (Controllo centralizzato)> <Indicatore “Mode” lampeggiante> ˚C ˚C ˚C ˚C TEMP. TEMP. ON/OFF ON/OFF G Viene visualizzato quando il funzionamento è controllato dal sistema di controllo I Lampeggiamento continuo centrale, ecc. Viene visualizzato quando un’altra sezione interna collegata alla sezione esterna è Le operazioni limitate sono indicate sotto. - Page 115 <Codici di errore lampeggianti> Sui modelli CITY MULTI: Sui modelli Mr.Slim ERROR CODE ERROR CODE Indicatore ON Indicatore ON ON/OFF ON/OFF (Lampeggiante) (Lampeggiante) Codice di errore Codice di errore N. unità interna Indirizzo refrigerante N. unità interna unità interna Display alternato Se si è...
-
Page 116: Selezione Delle Funzioni
Selezione delle funzioni Selezione delle funzioni del comando a distanza L’impostazione delle funzioni del comando a distanza elencate di seguito può essere modificata mediante la modalità di selezione delle funzioni del comando a distanza. Modificare l’impostazione se necessario. Elemento 1 Elemento 2 Elemento 3 (descrizione dell’impostazione) 1. - Page 117 Impostazione numero da chiamare in caso di errore (“CALL.”) Vedere [4]–3. (4) Premere il BACK MONITOR/SET CHECK TEST pulsante Premere il PAR-21MAA CLOCK OPERATION CLEAR pulsante D. → Impostazione display temperatura °C/°F (“TEMPERATURA °C/°F”) Vedere [4]–4. (1) Premere il Premere il pulsante G.
- Page 118 [Impostazione dettagliata] 3 LIMITAZIONE MODO AUTO : L’intervallo di temperatura può essere mo- dificato nella modalità automatica. [4]–1. Impostazione CHANGE LANGUAGE (Cambia lingua) 4 OFF (impostazione iniziale) : Il limite dell’intervallo di temperatura non è attivo. La lingua visualizzata nel display a matrice di punti può essere selezionata. * Quando viene eseguita un’impostazione diversa da OFF, contemporanea- MENU] G.
- Page 119 3 TIMER SEMPLIFICATO : È possibile utilizzare il timer semplice. 4 TIMER OFF : Non è possibile utilizzare la modalità timer. * Se l’orologio è impostato in modo da non essere usato (OFF), non è possibile utilizzare il “TIMER SETTIMANALE”. (4) Impostazione numero da chiamare in caso di errore ON/OFF] D.
-
Page 120: Dati Tecnici
Dati tecnici Elemento Dettagli 120 (H) × 130 (W) × 19 (D) mm Dimensioni Peso 0,2 kg Alimentazione da 10 a 13V CC (alimentata dall’unità interna) Potenza assorbita 0,3 W da 0 °C a 40 °C, dal 30% a 90% di umidità relativa Ambiente d’uso Composizione –... - Page 121 CITY MULTI bedieningssysteem en Mitsubishi Mr. SLIM airconditioners MA-afstandsbediening PAR-21MAA Handleiding INHOUDSOPGAVE Nederlands 1. Voorzorgsmaatregelen ............... 122 2. Onderdelen ................124 3. Schermconfiguratie ..............126 4. De dag van de week en de tijd instellen ........126 5. De afstandsbediening ..............127 TEMP.
-
Page 122: Voorzorgsmaatregelen
Voorzorgsmaatregelen G De voorzorgsmaatregelen zijn gerangschikt op gevaarniveau. Waarschuwt voor een situatie of handeling die, als het apparaat niet op de juiste wijze wordt gebruikt, de dood of WAARSCHUWING ernstig persoonlijk letsel tot gevolg kan hebben. Waarschuwt voor een situatie of handeling die, als het apparaat niet op de juiste wijze wordt gebruikt, letsel of VOORZICHTIG schade aan het eigendom tot gevolg kan hebben. - Page 123 Het trekken aan of draaien van een kabel kan leiden tot brand of bedoeld. mankementen aan de apparatuur. Deze apparatuur is bedoeld voor gebruik in combinatie met Mitsubishi luchtbehandelingssystemen voor gebouwen. Gebruik deze niet in combi- Haal de apparatuur niet uit elkaar.
-
Page 124: Onderdelen
Onderdelen Indicatie “Sensor” Weergave Wordt weergegeven als de sensor op de afstandsbediening wordt gebruikt. Dag van de week In deze uitleg worden alle Toont de huidige dag van de week. oplichtendelen van het display weergegeven. Tijdens de werking Weergave Tijd/Timer van het apparaat branden alleen Indicator “Locked”... - Page 125 (Knop Clear) Achteruit MENU ON/OFF FILTER Vooruit BACK MONITOR/SET CHECK TEST Knop Luchtstroom naar boven/beneden OPERATION PAR-21MAA CLOCK CLEAR Knop Timer On/Off (Knop Set Day) Knop Uitblaasrooster (knop Werking Vorige werkingsnummer. Deur openen. Knop Ventilatie (knop Operation Volgende werkings- nummer.
-
Page 126: Schermconfiguratie
Function Selection (Functie selecteren) Dag/tijd instellen MENU ON/OFF FILTER BACK MONITOR/SET CHECK TEST TIME SUN PAR-21MAA CLOCK OPERATION CLEAR <De dag van de week en de tijd instellen…> Standaard bedieningsschermen Dag van de week instellen ˚F˚C ˚C TIME SUN Tijd instellen... -
Page 127: De Afstandsbediening
TEMP. ON/OFF MENU ON/OFF FILTER BACK MONITOR/SET CHECK TEST PAR-21MAA CLOCK OPERATION CLEAR <De werking starten> <De werking stoppen> I Druk op Start/Stop 1. I Druk nogmaals op Start/Stop 1. • Het ON-lampje 1 gaat aan en het • Het ON-lampje 1 gaat uit en schermgebied licht op. - Page 128 <De modus selecteren> <Weergave omgevingstemperatuur> I Druk, als de unit aan staat, zo vaak als nodig is op Mode 2. Tijdens de werking wordt de aanvoertemperatuur weergegeven bij 4. • Met elke druk op de knop wordt geschakeld naar de volgende modus, in de Opmerking: hieronder aangegeven volgorde.
-
Page 129: Ventilatorsnelheid, Luchtuitstroomrichting En Ventilatie
(2) Ventilatorsnelheid, luchtuitstroomrichting en ventilatie <Zo wijzigt u de ventilatorsnelheid...> <De richting van de luchtuitstroom wijzigen naar beneden of naar boven> I Druk, als de unit is ingeschakeld, zo vaak op de knop voor de ventilatiesnelheid 5 I Druk, als de unit is ingeschakeld, zo vaak op Airflow Up/Down 6 als nodig is. als nodig is. - Page 130 <Ventileren> Op Mr.Slim-modellen Op CITY MULTI-modellen G De ventilator in combinatie met de binnenunit laten werken: G De ventilator in combinatie met de binnenunit laten werken: I Druk op Start/Stop 1. I Druk op Start/Stop 1. • De indicatie Vent wordt weergegeven op het scherm (bij 8). De ventilator •...
-
Page 131: De Timer
• 10:00 • 10:00 • 10:00 • 10:00 No. 2 <Operation 2-instellingen voor • OFF • OFF • OFF • OFF PAR-21MAA CLOCK OPERATION CLEAR elke dag> … Zet de airconditioner uit om 10.00 uur. No. 8 Opmerking: Als u de dag instelt op “Sun Mon Tues Wed Thurs Fri Sat”, kunt u elke dag dezelfde handelingen laten uitvoeren op dezelfde tijd. - Page 132 <Schakelklok instellen> <Schakelklokinstellingen weergeven> De geselecteerde handeling (ON of OFF) De ingestelde tijd Timerinstellingen * Wordt niet weergegeven als de handeling niet is ingesteld. TIMER ˚C WEEKLY De ingestelde temperatuur ˚C WEEKLY * Wordt niet weergegeven als de temperatuur niet is ingesteld. 1.
-
Page 133: De Simple Timer (Enkelvoudige Timer)
FILTER waarden te vergrendelen. BACK MONITOR/SET CHECK TEST Opmerking: PAR-21MAA CLOCK OPERATION CLEAR De nieuwe waarden worden geannuleerd als u op Mode (Return) 2 drukt voordat u op Filter 4 hebt gedrukt. 8. Druk op Mode (Return) 2 om terug te keren naar het standaard bedieningsscherm. - Page 134 <De huidige instellingen van de enkelvoudige timer weergeven> Voorbeelden Als zowel de ON- als de OFF-tijden zijn ingeschakeld voor de enkelvoudige timer, is de werking Timer instellen en weergave als volgt. Voorbeeld 1: TIMER Start de timer, waarbij de ON-tijd vroeger is dan de OFF-tijd AFTER ON-instelling: 3 uur SIMPLE...
-
Page 135: Automatisch Uitschakelen (De Auto Off-Timer)
MONITOR/SET CHECK TEST TIMER AFTER OPERATION PAR-21MAA CLOCK CLEAR AUTO OFF 1. Controleer dat “Auto Off” zichtbaar is op het scherm (bij 1). 2. Houd Timer Menu B drie seconden lang ingedrukt, zodat “Monitor” op het scherm verschijnt (bij 4). - Page 136 <De Auto-Off timer uitschakelen...> G Houd Timer On/Off 9 drie seconden lang ingedrukt, zodat “Timer Off” op het scherm verschijnt (bij 6) en de timerwaarde (bij 7) verdwijnt. ˚C ˚C AUTO OFF G Of zet de airconditioner zelf uit. De timerwaarde (bij 7) verdwijnt van het scherm. AUTO OFF <De Auto-Off timer starten...>...
-
Page 137: De Knoppen Van De Afstandsbediening Vergrendelen (Functiebeperking Van Operation)
1. Druk, terwijl u de knop Filter 4 ingedrukt houdt, op ON/OFF 1 en houd deze twee FUNCTION seconden ingedrukt, zodat de indicatie “Locked” (Vergrendeld) verdwijnt van het ˚C ˚C scherm (bij 1). TEMP. ON/OFF ˚C MENU ON/OFF FILTER ˚C BACK MONITOR/SET CHECK TEST OPERATION PAR-21MAA CLOCK CLEAR – 137 –... -
Page 138: Andere Indicaties
(5) Andere indicaties <Centrally Controlled (Centrale besturing)> <Indicator Knipperende modus> ˚C ˚C ˚C ˚C TEMP. TEMP. ON/OFF ON/OFF G Wordt weergegeven als er een bedieningshandeling wordt uitgevoerd via het I Als de aanduiding blijft knipperen bedieningspaneel CENTRAAL REGELEN. De aanduiding verschijnt als een ander binnenapparaat dat op het buitenapparaat is Hieronder treft u een overzicht aan van de handelingen die niet kunnen worden aangesloten al in werking is, maar in een andere werkstand staat. - Page 139 <Knipperende foutcodes> Op CITY MULTI-modellen Op Mr.Slim-modellen ERROR CODE ERROR CODE ON-lampje ON-lampje ON/OFF ON/OFF (knippert) (knippert) Foutcode Foutcode Nummer binnenunit Adres koelmiddel Nummer binnenunit binnenunit Wisselende weergave Als u een telefoonnummer hebt opgegeven dat moet worden gebeld in geval van problemen, wordt dit nummer op het scherm weergegeven.
-
Page 140: Functiekeuze
Functiekeuze Functiekeuze van de afstandsbediening De instelling van de volgende functies van de afstandsbediening kan in de functiekeuzestand van de afstandsbediening worden gewijzigd. Wijzig de instelling indien nodig. Item 1 Item 2 Item 3 (betekenis van de instelling) 1. De taal wijzigen Instelling displaytaal •... - Page 141 Instelling contactnummer bij storingen (“CALL.”) Druk op de Zie [4]–3. (4) BACK MONITOR/SET CHECK TEST E-knop. Druk op de PAR-21MAA CLOCK OPERATION CLEAR D-knop. → Instelling temperatuurweergave °C/°F (“TEMP MODE °C/°F”) Zie [4]–4. (1) Druk op de Druk op de G-knop.
- Page 142 [Details van de instellingen] * Indien de instelling wordt gemaakt (behalve bij OFF (uit)), wordt tegelijkertijd de temperatuurbegrenzing bij koelen, verwarmen en automatisch ingesteld. [4]–1. Instelling CHANGE LANGUAGE (taal wijzigen) Het bereik kan echter niet worden begrensd als het ingestelde temperatuur- bereik niet is gewijzigd.
- Page 143 (4) Instelling contactnummer bij storingen ON/OFF]-knop D. • Om de instelling te wijzigen drukt u op de [ 1 CALL OFF : De ingestelde te bellen nummers worden bij een storing niet getoond. 2 CALL **** *** **** : De ingestelde te bellen nummers worden bij een storing getoond.
-
Page 144: Specificaties
Specificaties Item Details 120 (H) × 130 (W) × 19 (D) mm Afmetingen Gewicht 0,2 kg Voeding 10 tot 13 V DC (geleverd door de binnenunit) Stroomverbruik 0,3 W 0 °C tot en met 40 °C, 30% tot en met 90% relatieve vochtigheid Gebruiksomgeving Samenstelling –... - Page 146 HEAD OFFICE: MITSUBISHI DENKI BLDG., 2-2-3, MARUNOUCHI, CHIYODA-KU, TOKYO 100-8310, JAPAN WT04474X01...
Need help?
Do you have a question about the PAR-21MAA and is the answer not in the manual?
Questions and answers