Table of Contents
Advertisement
Quick Links
Advertisement
Table of Contents
Troubleshooting

Related Manuals for Hyd-Mech S-23


Summary of Contents for Hyd-Mech S-23
- Page 1 OPERATIONS & MAINTENANCE M A N U A L B A N D S A W T E C H N O L O G Y...
- Page 2 S-23 S-23 S-23 S-23 S-23 2001, rev e, 393350 THANK YOU, On behalf of everyone at HYD . MECH, I would like to thank and congratulate you on your decision to purchase a HYD . MECH band saw. Your new machine is now ready to play a key role in increasing the efficiency of your operation, helping you to reduce cutting costs while boosting quality and productivity.
- Page 3 THIS PAGE INTENTIONALLY LEFT BLANK...
-
Page 4: Table Of Contents
S23 Table of Contents SECTION 1, INSTALLATION SAFETY PRECAUTIONS ............................1 LIFTING THE S-23 with a FORK LIFT ........................2 WRAPPED FOR SHIPPING ............................ 2 LEVELLING THE SAW ............................. 3 HYDRAULIC OIL ..............................3 CUTTING FLUID ..............................3 SPEED ADJUSTOR INSTALLATION ........................3 POWER CABLE ROUTING ............................ - Page 5 SECTION 6, MECHANICAL ASSEMBLIES GUIDE ARM & CARBIDE ASSEMBLIES ......................27 BLADE DRIVE ASSEMBLY (and speed adjustor installation) ................. 28 HM4 GEAR BOX ASSEMBLY ..........................30 IDLER WHEEL ASSEMBLY ........................... 31 BLADE BRUSH ASSEMBLY ..........................32 COUNTER BALANCE SPRING ASSEMBLY ....................... 33 HEAD CYLINDER ASSEMBLY (Less hoses) ......................
- Page 6 SECTION 1 INSTALLATION...
-
Page 8: Section 1, Installation
SAFETY PRECAUTIONS The S-23 has been designed to give years of reliable service. It is essential that operators be alerted to the safe operation of this saw, and the practices to avoid that could lead to injury. The following safety rules are at the minimum necessary for the safe installation, operation, and maintenance of the saw. -
Page 9: Lifting The S-23 With A Fork Lift
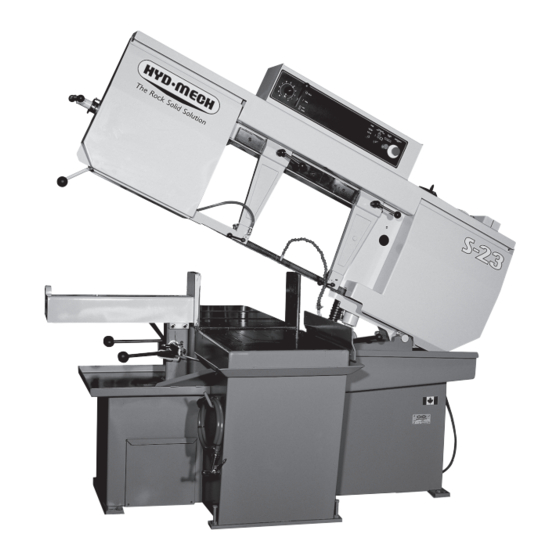
Front view of the S-23 . LIFTING THE S-23 with a FORK LIFT The S-23 is shipped with a shipping pallet attached to the saw. When lifting the pallet with a forklift truck make sure that the load is firmly balanced. The following photo shows a lift truck lifting the saw and pallet from the correct side. -
Page 10: Levelling The Saw
Coolant Return (Shown with tank removed) HYDRAULIC OIL The S-23 is supplied with ISO viscosity grade #22 mineral hydraulic oil in the Head cylinder. Substitutes must be of the same viscosity in order for the system to work properly. -
Page 11: Power Cable Routing
As supplied your new S-23 is set to run on three phase voltage or single phase. The supply voltage of the machine is displayed on the Serial # Plate and the Voltage Label. - Page 12 SECTION 2 OPERATING INSTRUCTIONS...
-
Page 14: Section 2, Operation Instructions
SECTION 2, OPERATION INSTRUCTIONS OPERATOR CONTROL PANEL The operator control panel provides the operator with all the controls necessary to operate the saw after the cutting angle has been set and the stock has been loaded and secured. All of the electrical functions and the Feed Rate setting are operated from the control panel. -
Page 15: Blade Basics
Before any material is cut, it is necessary to have good understanding of the basics of cutting metals. Damage to the blade and the saw it’s self as well as injury to the operator may occur if the saw is not used properly. Refer to Section I for safety instructions. -
Page 16: Determine Optimum Blade Pitch
DETERMINE OPTIMUM BLADE PITCH TEETH PER INCH (T.P.I.) Selecting a blade with proper tooth pitch is important in order to achieve optimal cutting rates and good blade life. For cutting narrow or thin wall structural materials a fine, blade with many teeth per inch (T.P.I.) is recommended. For wide materials a blade with a coarse pitch should be used. -
Page 17: Blade Speed Adjustment
Blade Speed Adjustor Indicator Handle HEAD SWING and BREAK An integral function of the S-23 is the ability to make mitred cuts at angles between 90 and 45 . The Head swing of the S-23 is easily changed to set a different... -
Page 18: Guide Arm Positioning
Tensioned Position ( Upright ) COOLANT FLOW The S-23 bandsaw is equipped with two needle valves that independently control the coolant nozzles which are capable of supplying a generous flow of coolant to the blade. - Page 19 THIS PAGE INTENTIONALLY LEFT BLANK...
- Page 20 SECTION 3 MAINTENANCE AND TROUBLE SHOOTING...
-
Page 22: Section 3, Maintenance And Troubleshooting
SECTION 3, MAINTENANCE and TROUBLESHOOTING BLADE CHANGING PROCEDURE NOTE: Wear gloves for protection from the sharp blade. 1. Open the Idler Wheel and Drive Wheel doors and swing the head to as this will make it easier to grip the blade closer to both wheels. 2. -
Page 23: Blade Tracking Adjustment
BLADE CHANGING PROCEDURE, CONTINUED 9A. As the blade tracking will stay fairly constant, it should be checked occasionally as shown on the drive wheel tracking photo below. The blade teeth should protrude from .195" to .210" (5mm to 5.3mm) from the face of the blade wheels. -
Page 24: Blade Guide Adjustment
BLADE BRUSH ADJUSTMENT The S-23 leaves the factory with the blade brush adjusted for maximum life of the brush. This setting places the ends of the blade brush wires so as to contact the blade at the bottom of the blade gullets. The plastic drive wheel that is driven by the drive wheel face should be held against the blade face with the minimum force that is necessary. -
Page 25: Drive Belt Replacement
DRIVE BELT REPLACEMENT The drive belt on the S-23 is a long life grooved belt. It should last for many of hours of operation and should rarely require replacement. See the BLADE DRIVE ASSEMBLY drawing on Pg 6.2. HEAD DOWN LIMIT SWITCH The Head down limit switch operates to cut power to the blade motor and the coolant pump motor when the Head has descended to the bottom of its travel. -
Page 26: Lubrication
The lubrication requirements of the S-23 are primarily the saw pivot points which are equipped with grease fittings and metal to metal surfaces ( S ) that require lubrication to prevent wear and seizure, as shown on this page and page. -
Page 27: Trouble Shooting Guide
TROUBLE SHOOTING GUIDE PROBLEM PROBLEM CAUSE 1. Cutting out of square vertically. - Carbide guide adjustment incorrect (adjust). - Feed rate excessive (reduce). - Blade worn (replace). - Guide arms too far apart. - Blade Pitch Incorrect . 2. Cutting out of square horizontally. - Angle not set correctly(adjust). -
Page 28: Service Record & Notes
SERVICE RECORD & NOTES DATE SERVICED BY COMMENTS Pg 17 S23 2001d... - Page 29 THIS PAGE INTENTIONALLY LEFT BLANK...
-
Page 30: Section 4, Electrical System
SECTION 4 ELECTRICAL SYSTEM... -
Page 32: Control Panel & Components
CONTROL PANEL & COMPONENTS This machine has been built to the customers requirements, however, if any voltage changes are required, refer to the information on page 4.3 and then consult Hyd-Mech service department before implementing any changes. The following photos show the S-20 control panel layout. The component codes shown are listed on the following pages. -
Page 33: Electrical Components Lists
ELECTRICAL COMPONENTS LISTS " # $ # &$ # $ ,- & " # $ # & " - . &&&- 12' $3 ), ' $& 8, 4 ! * 9 %%$ ! $& & ,;* ;1% 0 ! $& & ,;* ;1% 40 ! $&... - Page 34 " " $ 0 123 4 12&& "- - - > ', '> @ $ 5 < & 5 < & 5 $ & 5 $ & 5 $ & 5 $ & >8 4>,5 @$ > 4A 4 $5 -$ 4 $5 -$ 4 $5 - $ 4 $5 - &...
-
Page 35: Electrical Drawings
ELECTRICAL DRAWINGS Pg 22 S23 2001d... - Page 36 Pg 23 S23 2001d...
-
Page 37: Electrical Drawings C/W Blade Breakage Option
ELECTRICAL DRAWINGS c/w blade breakage option Pg 24 S23 2001d... - Page 38 Pg 25 S23 2001d...
- Page 39 THIS PAGE INTENTIONALLY LEFT BLANK...
- Page 40 SECTION 6 MECHANICAL ASSEMBLIES...
-
Page 42: Section 6, Mechanical Assemblies
SECTION 6, MECHANICAL ASSEMBLIES GUIDE ARM & CARBIDE ASSEMBLIES " " %" & & Pg 27 S23 2001d... -
Page 43: Blade Drive Assembly (And Speed Adjustor Installation)
BLADE DRIVE ASSEMBLY Pg 28 S23 2001d... - Page 44 5 HORSE POWER DRIVE, speed adjustor installation, " $ " '( ! instructions and parts list. The speed adjustor is packaged seperately for shipping purposes. Installation of the speed adjustor must be completed prior to connecting the power supply. Remove the assembly from the coolant reservoir and remove the wrapping.
-
Page 45: Hm4 Gear Box Assembly
HM4 GEAR BOX ASSEMBLY Pg 30 S23 2001d... -
Page 46: Idler Wheel Assembly
IDLER WHEEL ASSEMBLY " " %" $ % +, ! " " ! " " -./01 2345+1 345+1 6 7809$ :849 ,59 ;+ 9.3/01 /+1< %" Pg 31 S23 2001d... -
Page 47: Blade Brush Assembly
BLADE BRUSH ASSEMBLY !" !" !" Pg 32 S23 2001d... -
Page 48: Counter Balance Spring Assembly
COUNTER BALANCE SPRING ASSEMBLY " " Pg 33 S23 2001d... -
Page 49: Head Cylinder Assembly (Less Hoses)
HEAD CYLINDER ASSEMBLY (Less hoses) %"= " " Pg 34 S23 2001d... -
Page 50: Three Position Valve Assembly
THREE POSITION VALVE ASSEMBLY 3 Postion valve. 3 Postion valve controls. & & '()*+ ,)*+- '()*+ ,)*+- & " Pg 35 S23 2001d... -
Page 51: Pivot Link Assembly
PIVOT LINK ASSEMBLY " " " " % = ;1 %"= $ % = Pg 36 S23 2001d... -
Page 52: Vise Assembly
VISE ASSEMBLY #" %" $ %" ' " " & & " & " Pg 37 S23 2001d... -
Page 53: Coolant Group
COOLANT GROUP ○ ○ ○ ○ ○ ○ ○ ○ ○ ○ ○ ○ ○ ○ ○ ○ ○ ○ ○ ○ ○ ○ ○ ○ ○ ○ ○ ○ ○ ○ TO OUTFEED FENCE 494 ASSY SNAPLOC HOSE ASSEMBLY 101-B 1/4"... -
Page 54: Doors And Covers
DOORS and COVERS Idler wheel door. Control box lid. S23-32A-00 S22-71-02 Drive belt cover Blade tension S22-41-02 & handle. speed label S22-42-00 S22-41-021. Lifting handle. S22-31-08B Lower blade gaurd. S22-41-01D with 1/4-20 x 3/4 Drive wheel door. thumb screw & S23-33A-00 hex nut. - Page 55 THIS PAGE INTENTIONALLY LEFT BLANK...
- Page 56 SECTION 7 OPTIONAL ASSEMBLIES...
-
Page 58: Section 7, Options
SECTION 7, OPTIONS WORK STOP " Pg 41 S23 2001d... -
Page 59: Blade Breakage
BLADE BREAKAGE, (STANDARD ON CE MACHINES) XCKL 115H7 LIMIT SWITCH BLADE TENSIONER ASSEMBLY WORK LAMP ASSEMBLY #MS3 WORK LAMP MOUNTING STUD 0618-3-AS WITH HEX NUT & TOOTH WASHER Pg 42 S23 2001d... -
Page 60: Omitre Cutting
MITRE CUTTING Angle scale on the head swing pivot. HYDRAULIC POWER PACK System operates head up and vise. Power pack found mounted on the door at the drive side of the infeed table. Parts consist of 1/ 4hp motor, accumulator assembly and a gear pump &... - Page 61 THIS PAGE INTENTIONALLY LEFT BLANK...
- Page 62 SECTION 8 SPECIFICATIONS...
-
Page 64: Section 8, Specifications
SECTION 8, SPECIFICATIONS SPECIFICATION LIST IMPERIAL DIMENSIONS Cutting Capacity rectangular 16" High x 18" Wide round 16" Diameter 15" Diameter @ 45 Degrees Blade length 15' 6" width 1 1/4" (measurment 1.350" including teeth.) thickness .042" Blade speed 5 HP, 75 to 400 Surface Feet/Minute - Variable Blade guides Carbide Blade wheel diameter... -
Page 65: Layout Drawings
LAYOUT DRAWINGS Pg 46 S23 2001d... - Page 66 Pg 47 S23 2001d...
- Page 67 THIS PAGE INTENTIONALLY LEFT BLANK...
-
Page 68: Warranty
SECTION 9 WARRANTY... - Page 70 Liability or obligation on the part of Hyd-Mech for damages, whether general, special or for negligence and expressly including any incidental and consequential damages is hereby disclaimed. Hyd-Mech's obligation to repair or replace shall be the limit of its liability under this warranty and the sole and exclusive right and remedy of the user.
- Page 71 OPERATIONS & MAINTENANCE MANUAL OPERATIONS & MAINTENANCE MANUAL OPERATIONS & MAINTENANCE MANUAL OPERATIONS & MAINTENANCE MANUAL OPERATIONS & MAINTENANCE MANUAL OPERATIONS & MAINTENANCE MANUAL OPERATIONS & MAINTENANCE MANUAL OPERATIONS & MAINTENANCE MANUAL OPERATIONS & MAINTENANCE MANUAL OPERATIONS & MAINTENANCE MANUAL OPERATIONS &...
Need help?
Do you have a question about the S-23 and is the answer not in the manual?
Questions and answers