
Related Manuals for Seiko MPU-L465


Summary of Contents for Seiko MPU-L465
- Page 1 USER’S GUIDE Thermal Printer MPU-L465 Read this manual carefully before use. Keep this maual in a place where it can be accessed quickly. Seiko Instruments Inc.
- Page 2 (including consequential) caused by reliance on the materials presented, including but not limited to typographical, arithmetic, and listing errors. is a trademark of Seiko Instruments Inc. Applicable EC Directives and Standards Product: Thermal Printer DPU-3445-10A...
- Page 3 Federal Communications Commission (FCC) compliance statement Your printer has been tested and found to comply with the limits for a Class B digital device pursuant to Part 15 of the FCC Rules. These limits are designed to provide reasonable protection against harmful interference in a residential installation.
-
Page 4: Table Of Contents
CONNECTING TO THE HOST COMPUTER ........34 CHARGING THE BATTERY PACK ..........36 THERMAL HEAD/PLATEN ROLLER MAINTENANCE ..... 38 TROUBLESCHOOTING ..............39 SPECIFICATIONS................40 OPTIONAL UNITS AND CONSUMABLES ........41 For more details, please ask your dealer for a copy of the MPU-L465 Technical Reference. -
Page 5: Safety Precautions
SAFETY PRECAUTIONS The following symbols are used in this manual in order to make proper use of the printer and avoid incidental damages. Follow the instructions marked with each individual symbol. Failure to follow the guidelines marked with this WARNING symbol could result in severe personal injury or death. - Page 6 WARNING If you find any of the following abnormalities in the printer, power off the printer, unplug the AC cable, and remove the battery pack from the printer. ♦ When an unusual state was not recovered to the normal’s. ♦ When the printer gave out a nasty smell or smoke, or emitted abnormal sound.
- Page 7 CAUTION When not in use for long periods of time, power off the printer, unplug the AC cable, and remove the battery pack from the printer. If not, it might cause a fire or an electricshock. When you clean the printer, power off the printer, unplug AC cable, and remove the battery pack from the printer.
- Page 8 When AC adapter is used WARNING If you find any of the following abnormalities in the AC adapter, unplug the AC cable. ♦ When the AC adapter differs from usual [ smoke has come out from the AC adapter / strange smell comes out from the AC adapter / the AC adapter is unusually hot] ♦...
- Page 9 CAUTION Pull out AC plug from a wall socket in the case of care of the AC adapter. It becomes the cause of an electricshock. Put the AC adapter on the place which infants' hand does not reach. It becomes causes, such as an injury. Do not put the AC adapter on the place where direct sun light hits, and the place which becomes high temperature.
- Page 10 When a battery pack is used WARNING When the battery pack is as follows, remove the battery pack from the printer and stop using, and keep away from fire. When there is a strange smell, or the battery pack is unusually hot When the case breaks When liquid has leaked There is fear of liquid leakage, generation of heat, a burst, and ignition, and...
- Page 11 CAUTION When the liquid which came out of the battery pack goes into eyes, wash away with clean water immediately and take a doctor's medical treatment. It becomes the cause of loss of eyesight. Put the battery pack on the place which infants' hand does not reach. It becomes causes, such as an injury.
- Page 12 When the charger is used WARNING Pull out AC plug of AC cable from a wall socket, when the charger is in the status as follows. • When there is a strange smell, or the battery pack is unusually hot •...
- Page 13 CAUTION Pull out the AC plug of the charger from a wall socket except the time of use. Even when having not equipped with the battery pack, the charger is operating. Pull out the AC plug from a wall socket in the case of care of the charger. It becomes the cause of an electricshock.
- Page 14 When AC and an interface cable are used WARNING When AC cable of the AC adapter or the charger is damaged, pull out the AC plug from a wall socket. It becomes the cause of a fire, an electricshock, or failure. Do not let dust or a metal adhere to AC plug of the AC adapter or the charger.
- Page 15 CAUTION When you pull out the AC cable of the AC adapter or the charger from a wall socket or pull out the interface cable from the connector, remove them holding the connector portion. Wires of the cable is exposed, or is disconnected and it becomes the cause of a fire and an electricshock.
-
Page 16: Operating Precautions
OPERATING PRECAUTIONS Please follow the precautions shown below to ensure full functionality of the printer. Using the Printer Switch the power off when not in use. The printer has the structure which can stand for drop from 1.2m height to concrete surface (1 time drop for each 6 face side). -
Page 17: Notations Used In This Manual
Keep the battery pack in a cool place in the case of long-term storage. Moreover, if possible, avoid long-term storage in the fully charged state. It affect a bad influence on the battery life. Clean the terminal of the battery pack regularly (wipe them with a dry cloth). In order to fully demonstrate the performance of a battery pack, charge in the state where circumference temperature and the temperature of the battery pack are 10 ºC - 35 ºC. -
Page 18: Preparation
1. PREPARATION Once you have opened the carton, make sure it contains the printer and its User’s Guide. Printer functions and package contents differ depending on the printer model. User’s Guide (this document) Printer The following are available as optional units: (1) AC cables AC cables for an optional AC adapter and a battery charger are not contained in this carton. -
Page 19: Names Of Parts
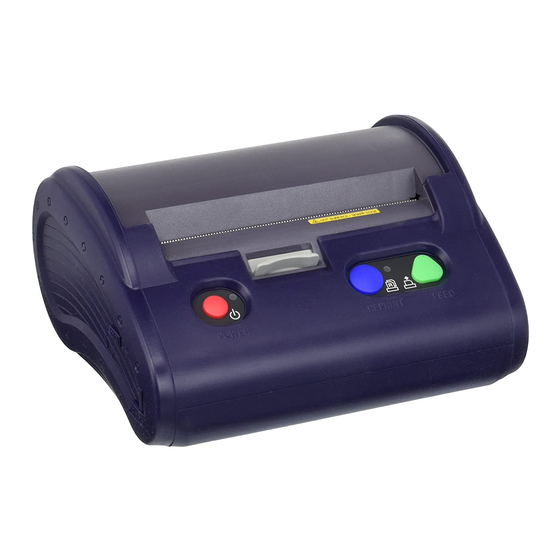
2. NAMES OF PARTS (1) POWER button (3) REPRINT button The POWER button turns the printer ON The REPRINT button prints the previous or OFF. To power the printer on, hold print again. A reprint is available when the down the POWER button until the REPRINT lamp lights. - Page 20 (7) Battery rubber cover (12) Paper guide Mounts and secures the battery pack. Open the rubber cover to detach and Changes the right and left paper guide attach the battery pack. width depending on the paper widths. Changes the paper roll adapter for various (8) Battery release button paper roll diameters.
-
Page 21: Power Connecting
3. POWER CONNECTING The printer can be powered by either battery pack or AC adapter. Attaching and Detaching the Battery Pack The battery pack should be fully charged. See Section 9, Charging the Battery Pack, for details on the charging method. Attaching the battery pack Open the battery cover and press the battery release lever with your fingers to the arrow direction. - Page 22 Detaching the battery pack Power the printer off. Remove the hook located on the lower part of the battery cover from the projection of the printer and open the battery cover. When the battery release lever is released to the arrow direction, the battery pack is taken off due to its spring force.
- Page 23 Connecting the AC Adapter (Optional Part) (1) Connect the AC cable to the AC adapter. (2) Open the interface cover and insert the DC jack of the AC adapter into the power connector of the printer. (3) Insert the AC plug of the AC cable into the electric outlet. (4) The printer turns on automatically.
-
Page 24: Paper Setup
4. PAPER SETUP This printer supports both thermal paper roll and thermal label roll. The printer function setting differs depending on paper you use. See Section 7, Function Settings, for details. Mounting/Removing the Paper Roll Adapter The printer supports paper roll whose internal diameter is a ∅8 mm, ∅12.0 mm, and ∅25.4 mm. -
Page 25: Installing Paper
Installing Paper to the Pincher Unit (1) Press the paper cover open lever to the arrow direction and open the paper guide. (2) Widen the paper guide space while pressing the paper guide lock lever to the arrow direction. (3) Position the control projection part of the paper guide (paper roll adapter) so that it can be accommodated in the paper roll tube. - Page 26 HINT • The printer function setting for the marked paper is different from that for non-marked paper. See Section7, Function Settings, for details. • This printer also supports the paper roll of max 58 mm external diameter. When the internal diameter of the paper roll is different from that of the paper roll adapter, it is necessary to, reduce the external diameter of the paper roll to protect it against its loose-fitting.
-
Page 27: Attaching And Detaching The Belt Clip And Strap
Attaching and Detaching the Belt Clip and Strap The belt clip is provided with the grooves to attach the strap. When using the strap, it is necessary to attach the belt clip to the printer. Attaching and Detaching the Belt Clip Attach/Detach the belt clip using screws (3 positions). -
Page 28: Test Printing
(2) Press the POWER and FEED buttons simultaneously. When the POWER lamp lights, release the POWER button, then the FEED button. (3) Several dozens of lines are printed as follows: "Mobile Label Printer" "MPU-L465 [Ver.*.**]" " **.***.****" "Copyright (C) : SII" "**************************"... -
Page 29: Function Settings
7. FUNCTION SETTINGS This printer allows for numerous function settings according to the operating conditions and applications. The settings are saved in the software DIP switches (non-volatile memory) mounted on the printer. The setting can be controlled by the buttons or commands. This manual describes how to set functions by using buttons. - Page 30 (4) If the message shown below is printed, press the FEED button. [SETTING MODE] Yes: FEED/No: REPRINT HINT • If you press the REPRINT button, the printer leaves the function setting mode and turns off. • If you do not press any button within 30 seconds after the message is printed, the printer turns off.
-
Page 31: Changing Settings
Changing Settings In the function setting mode, you can initialize or modify settings. To initialize the settings to defaults, follow step (1) shown below. To change settings, follow step (2) shown below. (1) Initializing software DIP switch settings 1. When the message shown below is printed in the function setting mode, press the FEED button. - Page 32 Operation 1: Transmission selection When the FEED button is pressed in the status where the following message is printed, the printer moves to the transmissions selection mode. When REPRINT button is pressed, the printer moves to the paper selection mode without changing the setting.
- Page 33 Operation 2: Paper selection When the FEED button is pressed in the startus where the following message is printed, the printer moves to the paper selection mode. When the REPRINT button is pressed, the printer moves to the function selection mode without changing the setting.
- Page 34 Operation 3: Exit function setting mode If you press the FEED button when the message shown below is printed, you can return to operation (1) and set DIP switch 1 again. DIP Switch setting mode. Continue: Feed SW/Quit: Power SW If you press the REPRINT button, the message shown below is printed.
- Page 35 Software DIP Switch Setting List : Factory settings DIP switch 1 Posi- Function Setting tion Bit7 Not used Bit6 Even 0 Odd Parity Bit5 0 Yes Bit4 Hardware Flow control Bit3 115200 57600 38400 19200 Baud rate Bit2 Bit1 Transmission AUTO Bluetooth Serial...
- Page 36 Paper selection DIP switch Posi Function Setting -tion Bit7 Marked 1 Normal paper 0 Marked paper Bit6 Print speed 1 High speed 0 High quality Bit5 Print Bit4 density Bit3 Bit2 Bit1 Paper type See the following table. Bit0 Paper type Bit2 Bit1 Paper type Bit0...
-
Page 37: Connecting To The Host Computer
CONNECTING TO THE HOST COMPUTER The printer supports serial and USB transmissions via an interface cable. The Bluetooth-mounted printer supports Bluetooth (Ver.1.1, Serial port profile)-compliant wireless transmission. The printer function setting differs depending upon a transmission method to be used. See Section7, Function Settings, for details. - Page 38 Bluetooth-based Wireless Transmission (Bluetooth-mounted Printer) (1) Power the printer off. (2) Select a transmission method to be used. See Section 7, Function Settings, for details. (3) Power the printer on and send data from the host computer to the printer. (4) Verify that the data is correctly printed.
-
Page 39: Charging The Battery Pack
9. CHARGING THE BATTERY PACK Immediately after purchasing or leaving the printer unused status for long periods of time, charge the battery pack before use. The battery pack is charged prior to shipping, and provides power enough to check the printer operation. - Page 40 Charging by a Dedicated Battery Charger (Optional Unit) The following two types of dedicated battery chargers are available: • Battery charger for only one pack. • Battery charger for 5 packs. Follow the steps shown below to charge the battery pack: (1) Connect the AC cable to the battery charger.
-
Page 41: Thermal Head/Platen Roller Maintenance
THERMAL HEAD/PLATEN ROLLER MAINTENANCE If paper dust accumulates, wipe and clean the thermal printhead as well as the platen roller to ensure the maximum print quality for long periods of time. Cleaning the Thermal Printhead and the Platen Roller (1) Power the printer off. (2) Open the paper cover. -
Page 42: Troubleschooting
11.TROUBLESHOOTING Please check the following points before asking for repair. Power does not turn on: • Make sure the recommended AC adapter or battery pack is used. • Make sure the AC cable and AC adapter are correctly connected. • Make sure the AC adapter is correctly connected to the printer. •... -
Page 43: Specifications
12.SPECIFICATIONS Printer Specifications AC Adapter (PW-0904-W1) Specifications (Optional unit) Item Specification Printing method Thermal Item Specification Print speed 85 mm/s maximum Input voltage 100 - 240 VAC, 50/60 Hz Dots available 1280 dots Output capacity 9.3 VDC, 4A Dot density 300 dpi Operating temperature 0°C to 40°... -
Page 44: Optional Units And Consumables
13. OPTIONAL UNITS AND CONSUMABLES Optional units Paper Name Model Name Model (Manufacturer) Normal paper AFP235 Battery pack BP-L0718-A1 (MITSUBISHI PAPER) AC adapter PW-3009-W1 Label paper TL69KS-HD75 Battery charger PWC-L07A1-W1 (JAPAN PAPER) AC cable Label paper KL470-ST95 for Japan: CB-JP01-18A (KSP (KANZAKI)) for USA CB-US01-18A... - Page 45 4-5/F, Wyler Centre 2,200 Tai Lin Pai Road, Kwai Chung, N.T., Kowloon, Hong Kong Telephone:+852-2421-8611 Facsimile:+852-2480-5479 Seiko Instruments Taiwan Inc. 4F, No.40, Sec. 2, Min-Chuan E.Rd,.Taipei 104, Taiwan, R.O.C. Telephone:+886-2-563-5001 Facsimile:+886-2-521-9519 Seiko Instruments Singapore Pte. Ltd. 2, Marsiling Lane Singapore 739144 Telephone:+65-269-1370 Facsimile:+65-269-9729 (Specifications are subject to change without notice.)
Need help?
Do you have a question about the MPU-L465 and is the answer not in the manual?
Questions and answers