Table of Contents
Advertisement
Quick Links
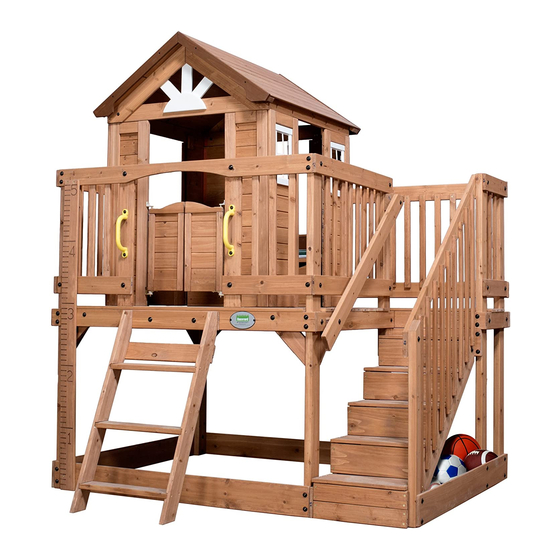
SCENIC HEIGHTS
PLAYHOUSE
MODEL: # 1605336
• Owner's Manual
• Frequently Asked Questions
• Assembly Instructions
• Warranty Information
Features the
fastening system.
Save this assembly manual for future reference in the event that
you need to order replacement parts.
Made in China
Advertisement
Table of Contents

Related Manuals for Backyard Discovery SCENIC HEIGHTS


Summary of Contents for Backyard Discovery SCENIC HEIGHTS
- Page 1 SCENIC HEIGHTS PLAYHOUSE MODEL: # 1605336 • Owner's Manual • Frequently Asked Questions • Assembly Instructions • Warranty Information Features the fastening system. Save this assembly manual for future reference in the event that you need to order replacement parts.
- Page 2 GENERAL SAFETY INSTRUCTIONS PURPOSE This product is intended for outdoor, domestic use only. It is not suitable for commercial or medical use. DANGER FOR CHILDREN WARNING! No eating while using the product This product may only be used with adult supervision at all times. ...
- Page 3 In certain areas during winter, snow buildup and the low temperatures can damage the product. It is recommended to remove snow buildup and to store the product indoor. We strongly recommend visual inspections every 3 months to insure the integrity of the entire product. Replace any parts as necessary.
- Page 4 Consumer Information Sheet for Playground Surfacing Materials The US Consumer Product Safety Commission (CPSC) estimates that about 100 000 playground equipment- related injuries resulting from falls to the ground surface are treated annually in US hospital emergency rooms. Injuries involving this hazard pattern tend to be among the most serious of all playground injuries, and have the potential to be fatal, particularly when the injury is to the head.
- Page 5 2 – 10 years. 4. Is the wood treated with chemicals? Backyard Discovery uses 100% Chinese Cedar wood which is naturally bug resistant, decay and rot resistant. To help ensure your child’s safety, our wood is completely chemical free and we do not use pressure-treated wood.
- Page 6 Tools Required for Installation: (These are the tools that are generally required for assembly of our outdoor products. These tools are not included with the outdoor product purchase.) (Square) (Level 24") (Open End Wrenches 1/2") (Tape Measure) (7/16" Drill Bit) (Claw Hammer) (Phillips Screw Driver) (Rubber Mallet - Optional)
- Page 7 SAFETY AND ASSEMBLY INFORMATION SELECTING THE CORRECT LOCATION FOR YOUR PLAY PRODUCT IS IMPORTANT FOR YOUR CHILDREN’S SAFETY AND THE PRODUCT’S LONGEVITY Dimensions: General Information: • The Chalet has one layout option. Your set has been designed and engineered for Layout Ground Dimension Safe Play Area*...
- Page 8 BASIC SETUP DIMENSIONS 6'-4 13/16" 1'-6 7/8" 2'-10 3/8" 1'-3 3/8" 35° 3'-2 9/16" 2'-1" 7'-7 1/4" 5'-2 3/8" 2'-11 5/8" 2'-7 5/8" 1'-7 7/8" 1'-1 3/4" 4'-8 1/8" 6'-3 1/8" 6'-4 7/8" FRONT VIEW...
- Page 9 BASIC SETUP DIMENSIONS 6'-4 13/16" 1'-1 7/8" 2'- 3/8" 3'-2 5/8" 1'-5 3/8" 2'-2 3/4" 7'-7 1/4" 5'-2 3/8" 2'-11" 38.4° 1'-5" 3'-3 1/8" 6'-1" RIGHT SIDE VIEW...
- Page 10 BASIC SETUP DIMENSIONS 19 1/8" 21 3/4" 24 3/8" 91 1/4" 62 3/8" 5 7/8" 26 3/8" 35" 38° 7 1/2" 48 1/8" LEFT SIDE VIEW...
- Page 11 Parts Identification Wood Components (NOT TO SCALE) E1 - LEFT FRONT UPRIGHT - W4L06667 1 3/8"x3 3/8"x62 3/8" (36x86x1584) E2 - RIGHT FRONT UPRIGHT - W4L06666 1 3/8"x3 3/8"x62 3/8" (36x86x1584) E3 - RIGHT REAR UPRIGHT - W4L06648 1 3/8"x3 3/8"x62 3/8" (36x86x1584) E4 - LEFT REAR UPRIGHT - W4L06388 1 3/8"x3 3/8"x35"...
- Page 12 Parts Identification Wood Components (NOT TO SCALE) H6 - FLOOR RAIL - W4L06654 1"x3 3/8"x16 3/8" (24x86x416) H7 - FLOOR RAIL - W4L06655 1"x3 3/8"x19" (24x86x482) H8 - STAIR HAND RAIL - W4L06663 1"x3 3/8"x54" (24x86x1372) H14 - STAIR HAND RAIL - W4L06679 1"x3 3/8"x47 3/8"...
- Page 13 Parts Identification Wood Components (NOT TO SCALE) K4 - GROUND BOARD - W4L06650 5/8"x5 1/4"x73 7/8" (16x134x1876) K5 - GROUND BOARD - W4L06652 5/8"x5 1/4"x55" (16x134x1397) K6 - STAIR BOARD - W4L06674 5/8"x5 1/4"x16 7/8" (16x134x430) L1 - FLOOR BOARD - W4L06400 5/8"x4 3/8"x52"...
- Page 14 Parts Identification Wood Components (NOT TO SCALE) M2 - WALL RAIL - W4L06393 5/8"x3 3/8"x17 1/2" (16x86x445) M3 - WALL RAIL - W4L06394 5/8"x3 3/8"x54 7/8" (16x86x1394) M4 - FLOOR BOARD - W4L06401 5/8"x3 3/8"x56 3/4" (16x86x1442) M5 - FLOOR BOARD - W4L06402 5/8"x3 3/8"x54 3/8"...
- Page 15 Parts Identification Wood Components (NOT TO SCALE) M16 - WALL RAIL - W4L06653 5/8"x3 3/8"x16 3/8" (16x86x416) M33 - FASCIA BOARD - W4L06559 5/8"x3 3/8"x25 5/8" (16x86x652) M73 - REAR SUPPORT - W4L06608 5/8"x3 3/8"x19 1/4" (16x86x488) M110 - ATTACHMENT BOARD - W4L06610 5/8"x3 3/8"x19 1/4"...
- Page 16 Parts Identification Wood Components (NOT TO SCALE) (1) WP2 - REAR RIGHT CORNER PANEL - W2A01914 (1) WP1 - FRONT RIGHT CORNER PANEL - W2A01911 (1) WP3 - FRONT LEFT CORNER PANEL - W2A01917 (1) WP4 - REAR LEFT CORNER PANEL - W2A01920 (1) WP5 - REAR CENTER PANEL - W2A01922 (1) WP6 - LEFT CENTER PANEL - W2A01924...
- Page 17 Parts Identification Wood Components (NOT TO SCALE) (2) WP8 - HEADER ASSEMBLY - W2A01926 (2) SR1 - STAIR STRINGER ASSEMBLY - W2A01940 (2) RP1 - LOWER ROOF PANEL - W2A01929 (2) RP2 - UPPER ROOF PANEL - W2A01930 (1) DP1 - RIGHT DOOR ASSEMBLY - W2A01927 (1) DP2 - LEFT DOOR ASSEMBLY - W2A01928...
- Page 18 Parts Identification Hardware - BOLT WH 1/4x1 BLK - H100171 - BOLT WH 5/16x4 1/4 BLK - H100513 - BOLT WH 1/4x1/2 BLK - H100401 P - BOLT WH 5/16x3 BLK - H100416 VK - NUT BARREL WH 5/16x7/8 BLK - H100192 VN - BOLT WH 5/16x2-3/4 BLK - H100195 - NUT BARREL WH 5/16x5/8 BLK - H100469 VY - BOLT WH 5/16x2-1/4 BLK - H100205...
- Page 19 Parts Identification Hardware (22) BN - SCREW PFH 8x1 - H100085 (160) BR - SCREW PFH 8x1 1/8 - H100088 (18) - LAG SCREW WH 5/16x2 BLK - H100458 (142) BQ - SCREW PFH 8x1 1/4 - H100087 (99) BP - SCREW PFH 8x1 1/2 - H100086 (15) - LAG SCREW WH 5/16x1 1/2 BLK - H100471 (11)
- Page 20 Parts Identification Accessories (NOT TO SCALE) SQ - "A" REVISION TAG - A100314 (12) - 90° L-BRACKET - BLK - A4M00555 (2) - SALOON DOOR HINGE KIT - A4M00642 EA - HAND GRIP YELLOW PLASTIC - A100043 - BYD ID TAG (MEDIUM) AGES 2 TO 10 - A4M00528 - L BRACKET 2.5x38x50x55 - A4M00615 VB - PLASTIC SUNBURST - A100361 - STOVE KIT - A6P00025...
- Page 21 H79 - LEFT UPRIGHT - W4L06611 H76 - LADDER RUNG - W4L06609 1"x3 3/8"x38 3/8" (24x86x976) 1"x3 3/8"x18 1/8" (24x86x460) 3 FOOT LADDER ASSEMBLY STEP 1 SCREW PFH SCREW PFH 8x2 (6 PLCS)
- Page 22 H80 - RIGHT UPRIGHT - W4L06612 1"x3 3/8"x38 3/8" (24x86x976) 3 FOOT LADDER ASSEMBLY STEP 2 SCREW PFH SCREW PFH 8x2 (6 PLCS)
- Page 23 M73 - REAR SUPPORT - W4L06608 5/8"x3 3/8"x19 1/4" (16x86x488) 3 FOOT LADDER ASSEMBLY STEP 3 SCREW PFH SCREW PFH 8x2 (4 PLCS) 1 1/4...
- Page 24 M110 - ATTACHMENT BOARD - W4L06610 5/8"x3 3/8"x19 1/4" (16x86x488) 3 FOOT LADDER ASSEMBLY STEP 4 SCREW PFH 8x2 (4 PLCS) M110 SCREW PFH FLUSH...
- Page 25 E1 - LEFT FRONT UPRIGHT - W4L06667 H2 - FLOOR RAIL - W4L06392 1 3/8"x3 3/8"x62 3/8" (36x86x1584) 1"x3 3/8"x54 7/8" (24x86x1394) E4 - LEFT REAR UPRIGHT - W4L06388 K2 - GROUND BOARD - W4L06390 1 3/8"x3 3/8"x35" (36x86x889) 5/8"x5 1/4"x56 1/8" (16x134x1426) STEP 1 NOTE: WE RECOMMEND THAT YOU INSTALL ALL "T-NUTS"...
- Page 26 K1 - GROUND BOARD - W4L06389 5/8"x5 1/4"x54 7/8" (16x134x1394) K4 - GROUND BOARD - W4L06650 5/8"x5 1/4"x73 7/8" (16x134x1876) STEP 2 LAG SCREW WH 5/16x1 1/2 WASHER LOCK EXT 8x19 BLK WASHER LOCK EXT 8x19 BLK (4 PLCS) LAG SCREW WH 5/16x1 1/2 BLK (4 PLCS)
- Page 27 E5 - RIGHT CENTER UPRIGHT - W4L06644 M11 - FILLER BOARD - W4L06656 (1) SR1 - STAIR STRINGER ASSEMBLY - W2A01940 5/8"x3 3/8"x5 1/2" (16x86x139) 1 3/8"x3 3/8"x36 1/4" (36x86x920) E2 - RIGHT FRONT UPRIGHT - W4L06666 H4 - FLOOR RAIL - W4L06645 1 3/8"x3 3/8"x62 3/8"...
- Page 28 STEP 4 LAG SCREW WH 5/16x1 1/2 WASHER LOCK EXT 8x19 BLK WASHER LOCK EXT 8x19 BLK (2 PLCS) LAG SCREW WH 5/16x1 1/2 BLK (2 PLCS)
- Page 29 E3 - RIGHT REAR UPRIGHT - W4L06648 M16 - WALL RAIL - W4L06653 H6 - FLOOR RAIL - W4L06654 1 3/8"x3 3/8"x62 3/8" (36x86x1584) 1"x3 3/8"x16 3/8" (24x86x416) 5/8"x3 3/8"x16 3/8" (16x86x416) E6 - RIGHT REAR UPRIGHT - W4L06651 1 3/8"x3 3/8"x62 3/8" (36x86x1584) K5 - GROUND BOARD - W4L06652 5/8"x5 1/4"x55"...
- Page 30 STEP 6 LAG SCREW WH 5/16x2 WASHER LOCK EXT 8x19 BLK LAG SCREW WH 5/16x2 BLK (2 PLCS) WASHER LOCK EXT 8x19 BLK (2 PLCS)
- Page 31 - 90° L-BRACKET - BLK - A4M00555 STEP 7 90° L-BRACKET - BLK BOLT WH 1/4x1/2 BLK (2 PLCS) (4 PLCS) BOLT WH 1/4x1/2 BLK NUT BARREL WH 1/4x5/8 BLK (4 PLCS) WASHER LOCK EXT 8x15 BLK (4 PLCS) WASHER LOCK EXT 8x15 BLK NUT BARREL...
- Page 32 H7 - FLOOR RAIL - W4L06655 H1 - FLOOR RAIL - W4L06391 1"x3 3/8"x19" (24x86x482) 1"x3 3/8"x56 3/4" (24x86x1442) STEP 8 SCREW PFH 8x2 1/2 LAG SCREW WH 5/16x2 WASHER LOCK EXT 8x19 BLK NOTE HOLE LOCATION FOR PROPER INSTALLATION. SCREW PFH 8x2 1/2 (2 PLCS) LAG SCREW WH 5/16x2 BLK...
- Page 33 H3 - FLOOR RAIL - W4L06646 1"x3 3/8"x75 3/4" (24x86x1924) STEP 9 SCREW PFH 8x2 1/2 LAG SCREW WH 5/16x2 BLK LAG SCREW (4 PLCS) WH 5/16x2 WASHER LOCK EXT 8x19 BLK WASHER LOCK EXT 8x19 BLK (4 PLCS) SCREW PFH 8x2 1/2 NOTE HOLE LOCATION FOR (2 PLCS) PROPER INSTALLATION.
- Page 34 G1 - STAIRCASE BOARD - W4L06657 1"x5 1/4"x20 3/8" (24x134x518) STEP 10 LAG SCREW WASHER WH 5/16x2 LOCK EXT 8x19 BLK WASHER LOCK EXT 8x19 BLK (2 PLCS) WASHER LOCK EXT 8x19 BLK (2 PLCS) LAG SCREW WH 5/16x2 BLK (2 PLCS) LAG SCREW WH 5/16x2 BLK (2 PLCS)
- Page 35 H20 - DECK BRACE - W4L06397 1"x3 3/8"x13" (24x86x330) STEP 11 T-NUT 5/16 LAG SCREW WH 1/4x1-1/2 BOLT WH 5/16x1 3/4 WASHER LOCK EXT 6x15 BLK WASHER LOCK EXT 8x19 BLK BOLT WH 5/16x1 3/4 BLK T-NUT 5/16 BLK (6 PLCS) (6 PLCS) WASHER LOCK EXT 8x19 BLK WASHER LOCK EXT 6x15 BLK...
- Page 36 J1 - FLOOR SUPPORT BLOCK - W4L06403 1"x2 3/8"x3 3/8" (24x60x86) STEP 12 RIGHT SCREW PFH 8x2 1/4 FLUSH (TYP) FRONT SCREW PFH 8x2 1/4 (6 PLCS) REAR...
- Page 37 H5 - FLOOR SUPPORT - W4L06399 1"x3 3/8"x54 7/8" (24x86x1394) STEP 13 FLUSH SCREW PFH 8x2 1/2 (TYP) (8 PLCS) SCREW PFH 8x2 1/2 FRONT RIGHT...
- Page 38 M12 - FLOOR BOARD - W4L06659 L1 - FLOOR BOARD - W4L06400 5/8"x3 3/8"x75 3/4" (16x86x1924) 5/8"x4 3/8"x52" (16x112x1321) M13 - FLOOR BOARD - W4L06660 L2 - FLOOR BOARD - W4L06658 5/8"x3 3/8"x75 3/4" (16x86x1924) 5/8"x4 3/8"x73 3/8" (16x112x1864) 18 11/16" M14 - FLOOR BOARD - W4L06661 5/8"x3 3/8"x73 3/8"...
- Page 39 M2 - WALL RAIL - W4L06393 M7 - WALL RAIL - W4L06643 5/8"x3 3/8"x17 1/2" (16x86x445) 5/8"x3 3/8"x38 1/4" (16x86x970) M3 - WALL RAIL - W4L06394 M16 - WALL RAIL - W4L06653 5/8"x3 3/8"x54 7/8" (16x86x1394) 5/8"x3 3/8"x16 3/8" (16x86x416) STEP 15 LAG SCREW WH 5/16x1 1/2...
- Page 40 4" 1 3/4" M6 - WALL BOARD - W4L06668 EA - HAND GRIP YELLOW PLASTIC - A100043 - 90° L-BRACKET - BLK - A4M00555 5/8"x3 3/8"x26 3/4" (16x86x679) STEP 16 BOLT WH 1/4x1 BLK (2 PLCS) WASHER LOCK EXT 6x15 BLK HAND GRIP YELLOW PLASTIC (2 PLCS) BOLT WH...
- Page 41 S1 - RAIL BOARD - W4L06664 M8 - WALL RAIL - W4L06409 1"x1"x26 3/4" (24x24x679) 5/8"x3 3/8"x17 1/4" (16x86x439) STEP 17 BOLT WH 5/16x2 BLK (2 PLCS) WASHER LOCK EXT 8x19 BLK (2 PLCS) SCREW PFH 8x1 1/8 BOLT WH 5/16x2 BLK T-NUT 5/16 WASHER...
- Page 42 M9 - WALL RAIL - W4L06647 5/8"x3 3/8"x36 3/8" (16x86x924) S1 - RAIL BOARD - W4L06664 1"x1"x26 3/4" (24x24x679) STEP 18 LAG SCREW LAG SCREW WH 5/16x1 1/2 BLK WH 5/16x1 1/2 (2 PLCS) WASHER LOCK EXT 8x19 BLK SCREW PFH (2 PLCS) 8x1 1/8 RIGHT...
- Page 43 O1 - PICKET - W4L06665 5/8"x1 3/8"x20 1/2" (16x34x520) STEP 19 2 1/8"TYP SCREW PFH 8x1 1/8 (6 PLCS) (3 SPCS) SCREW PFH 8x1 1/8 2" FRONT RIGHT...
- Page 44 O1 - PICKET - W4L06665 5/8"x1 3/8"x20 1/2" (16x34x520) STEP 20 2 3/16" TYP 2 3/16" TYP SCREW PFH (3 PLCS) (12) (3 PLCS) 8x1 1/8 SCREW PFH 8x1 1/8 (12 PLCS) 2" TYP RIGHT FRONT...
- Page 45 O1 - PICKET - W4L06665 5/8"x1 3/8"x20 1/2" (16x34x520) STEP 21 SCREW PFH 8x1 1/8 (16 PLCS) 2 1/4" TYP (8 SPCS) SCREW PFH (16) 8x1 1/8 2" RIGHT FRONT...
- Page 46 O1 - PICKET - W4L06665 5/8"x1 3/8"x20 1/2" (16x34x520) STEP 22 2 5/16" TYP (2 SPCS) SCREW PFH 8x1 1/8 SCREW PFH 8x1 1/8 (4 PLCS) 2" RIGHT REAR...
- Page 47 O1 - PICKET - W4L06665 5/8"x1 3/8"x20 1/2" (16x34x520) STEP 23 2 1/8" TYP (9 SPCS) SCREW PFH (18) 8x1 1/8 SCREW PFH 8x1 1/8 (18 PLCS) 1 15/16" REAR FRONT...
- Page 48 F1 - STAIRCASE POST - W4L06662 1 3/8"x2 3/8"x33 3/4" (36x60x858) (1) SR1 - STAIR STRINGER ASSEMBLY - W2A01940 - L BRACKET 2.5x38x50x55 - A4M00615 STEP 24 BOLT WH 5/16x1/2 BLK BOLT WH 5/16x1 BLK WASHER LOCK EXT RIGHT T-NUT 5/16 12x19 BLK BOLT WH 5/16x2-3/4...
- Page 49 Y1 - STAIR BOARD - W4L06669 (10) 5/8"x4"x16 7/8" (16x102x430) STEP 25 SCREW PFH (40) 8x1 1/4 1/8" TYP 5/8" TYP OVERHANG RIGHT FRONT SCREW PFH 8x1 1/4 (40 PLCS)
- Page 50 M15 - STAIR BOARD - W4L06675 5/8"x3"x16 7/8" (16x75x430) K6 - STAIR BOARD - W4L06674 5/8"x5 1/4"x16 7/8" (16x134x430) STEP 26 SCREW PFH (24) 8x1 1/4 1/16 TYP RIGHT FRONT SCREW PFH 8x1 1/4 (24 PLCS)
- Page 51 E7 - HANDRAIL BLOCK - W4L06678 1 3/8"x3 3/8"x1" (36x86x26) W1 - HANDRAIL BLOCK - W4L06677 2"x3 3/8"x3 3/8" (50x86x86) H14 - STAIR HAND RAIL - W4L06679 1"x3 3/8"x47 3/8" (24x86x1204) STEP 27 PREVIOUSLY INSTALLED T-NUT. T-NUT 5/16 WASHER BOLT WH LOCK EXT 5/16x3 BLK 8x19 BLK...
- Page 52 H8 - STAIR HAND RAIL - W4L06663 1"x3 3/8"x54" (24x86x1372) STEP 28 T-NUT 5/16 BOLT WH 5/16x2-1/4 WASHER BOLT WH LOCK EXT 5/16x2-3/4 8x19 BLK T-NUT 5/16 BLK (1 PLC) RIGHT FRONT T-NUT 5/16 BLK WASHER LOCK EXT 8x19 BLK (1 PLC) (1 PLC) BOLT WH 5/16x2-3/4 BLK...
- Page 53 O2 - PICKET - W4L06676 5/8"x1 3/8"x29 1/2" (16x34x750) STEP 29 SCREW PFH 8x1 1/4 (18 PLCS) SCREW PFH (18) 8x1 1/4 START HERE 2 1/4" 2 3/8" TYP (9 PLCS) 1 1/8" TYP RIGHT FRONT...
- Page 54 (1) 3 FT LADDER ASSEMBLY STEP 30 BOLT WH 5/16x1 1/2 WASHER LOCK EXT 8x19 BLK T-NUT 5/16 T-NUT 5/16 BLK (2 PLCS) WASHER LOCK EXT 8x19 BLK (2 PLCS) BOLT WH 5/16x1 1/2 BLK (2 PLCS)
- Page 55 (1) WP1 - FRONT RIGHT CORNER PANEL - W2A01911 (1) WP2 - REAR RIGHT CORNER PANEL - W2A01914 (1) WP3 - FRONT LEFT CORNER PANEL - W2A01917 (1) WP4 - REAR LEFT CORNER PANEL - W2A01920 Playhouse Assembly STEP 31 STAND THE (4) CORNER WALL ASSEMBLIES AS SHOWN BELOW.
- Page 56 (1) WP6 - LEFT CENTER PANEL - W2A01924 STEP 32 SCREW PFH (10) SCREW PFH 8x1 (10 PLCS) BACK LEFT FRONT RIGHT...
- Page 57 (1) WP5 - REAR CENTER PANEL - W2A01922 STEP 33 SCREW PFH (10) SCREW PFH 8x1 (10 PLCS) BACK LEFT RIGHT FRONT...
- Page 58 (2) WP8 - HEADER ASSEMBLY - W2A01926 STEP 34 ALL INTERIOR SURFACES ARE FLUSH. SCREW PFH 8x2 1/2 SCREW PFH 8x2 1/2 (4 PLCS) LEFT BACK RIGHT FRONT...
- Page 59 N1 - TIE STRAP - W4L05043 5/8”x2”x3 1/8” (16x50x80) STEP 35 SCREW PFH 8x1 1/4 (32 PLCS) SCREW PFH (32) 8x1 1/4 BACK LEFT INSTALL WITH THE EDGE SURFACE OF 'N1' FLUSH WITH THE END OF WALL BOARD, AS SHOWN. FRONT RIGHT...
- Page 60 L3 - GABLE BOARD - W4L06412 5/8"x4 3/8"x25 3/8" (16x112x644) STEP 36 BOLT WH 1/4x1 BLK (4 PLCS) WASHER LOCK EXT 6x15 BLK BOLT WH (4 PLCS) 1/4x1 BLK WASHER WASHER LOCK EXT 8x15 BLK LOCK EXT (4 PLCS) 6x15 BLK NUT BARREL WH 1/4x7/8 BLK (4 PLCS) WASHER...
- Page 61 VB - PLASTIC SUNBURST - A100361 STEP 37 PLASTIC SUNBURST (2 PLCS) SCREW PWH 8x3/4 (8 PLCS) SCREW PFH 8x1 1/4 SCREW PWH 8x3/4 SCREW PFH 8x1 1/4 (4 PLCS) LEFT BACK RIGHT FRONT...
- Page 62 (2) RP2 - UPPER ROOF PANEL - W2A01930 STEP 38 SCREW PFH 8x1 1/2 (8 PLCS) SCREW PFH 8x1 1/2 BACK LEFT RIGHT FRONT...
- Page 63 (2) RP1 - LOWER ROOF PANEL - W2A01929 STEP 39 SCREW PFH 8x1 1/2 BACK LEFT FRONT RIGHT SCREW PFH 8x1 1/2 (8 PLCS)
- Page 64 N3 - LEFT WINDOW SHELF - W4L06415 5/8"x2 3/8"x19 1/8" (16x60x485) STEP 40 SCREW PFH 8x1 1/4 (2 PLCS) SCREW PFH FLUSH SURFACES 8x1 1/4 LEFT BACK FRONT RIGHT...
- Page 65 N2 - REAR WINDOW SHELF - W4L06414 5/8"x2 3/8"x18 7/8" (16x60x479) STEP 41 SCREW PFH 8x1 1/4 (2 PLCS) FLUSH SURFACES SCREW PFH 8x1 1/4 BACK LEFT RIGHT FRONT...
- Page 66 - 90° L-BRACKET - BLK - A4M00555 STEP 42 ALIGN BRACKETS WITH PILOT HOLES. SCREW PWH 8x5/8 BLK BACK LEFT FRONT RIGHT SCREW PWH 8x5/8 BLK (8 PLCS) 90° L-BRACKET - BLK (8 PLCS) EDGES FLUSH IN DOOR OPENINGS.
- Page 67 Q1 - COUNTER TOP SUPPORT - W4L06416 1"x4 3/8"x5 7/8" (24x112x150) STEP 43 SCREW PFH 8x1-1/2 BLK BACK RIGHT LEFT FRONT DOWN 5/8" (16mm) SCREW PFH 8x1-1/2 BLK (2 PLCS)
- Page 68 J2 - COUNTER TOP SUPPORT - W4L06411 1"x2 3/8"x5 7/8" (24x60x150) STEP 44 SCREW PFH 8x1 1/4 (2 PLCS) SCREW PFH 8x1 1/4 FRONT 13 3/4" BACK RIGHT 1 1/4"...
- Page 69 M10 - COUNTER TOP - W4L06413 5/8"x3 3/8"x23 5/8" (16x86x600) STEP 45 SCREW PFH 8x1 1/4 FRONT FLUSH BACK RIGHT SCREW PFH 8x1 1/4 (4 PLCS)
- Page 70 SQ - "A" REVISION TAG - A100314 STEP 46 SCREW PWH 8x5/8 LEFT FRONT RIGHT BACK "A" REVISION TAG (1 PLC) SCREW PWH 8x5/8 (2 PLCS)
- Page 71 - FAUCET KIT - A6P00024 STEP 47 SCREW PFH 8x1 1/2 SCREW PFH 8x1 1/2 (2 PLCS) 1" FAUCET LOCATION FAUCET KIT (1 PLC)
- Page 72 - SURFACE MOUNT BASIN - A6P00032 STEP 48 SCREW PWH 8x5/8 SURFACE MOUNT BASIN (1 PLC) 3/8" SINK BASIN SCREW PWH 8x5/8 (2 PLCS) LOCATION...
- Page 73 - STOVE KIT - A6P00025 STEP 49 SCREW PFH 8x1 1/8 SCREW PFH 8x1 1/8 (4 PLCS) 1 1/8" STOVE LOCATION STOVE KIT (1 PLC)
- Page 74 J3 - SEAT SUPPORT - W4L06417 1"x2 3/8"x8 3/8" (24x60x214) STEP 50 SCREW PFH 8x1 1/4 MATE END OF 'J3' TO THE EDGE OF PLASTIC HINGE. 7 5/8" SCREW PFH 8x1 1/4 (4 PLCS)
- Page 75 N4 - SEAT CLEAT - W4L06419 L8 - SEAT BOARD - W4L06418 5/8"x2 3/8"x9" (16x60x230) 1"x4 3/8"x36 3/4" (24x112x934) STEP 51 SCREW PFH 8x1 1/4 (6 PLCS) SCREW PFH 8x1 1/4 SCREW PFH SCREW PFH 8x1 1/2 8x1-1/2 BLK FLUSH L8 BOARDS WITH N4 BOARD. ASSEMBLE BENCH SUB-ASSEMBLY FIRST.
- Page 76 M33 - FASCIA BOARD - W4L06559 5/8"x3 3/8"x25 5/8" (16x86x652) STEP 52 SCREW PFH 8x1 1/4 BLK SCREW PFH 8x1 1/4 BLK (4 PLCS) FRONT RIGHT...
- Page 77 M33 - FASCIA BOARD - W4L06559 5/8"x3 3/8"x25 5/8" (16x86x652) STEP 53 SCREW PFH 8x1 1/4 BLK SCREW PFH 8x1 1/4 BLK (2 PLCS) RIGHT BACK...
- Page 78 STEP 54 (2) - SALOON DOOR HINGE KIT - A4M00642 BOTH THE LEFT AND RIGHT DOOR SHOULD BE ASSEMBLED BEFORE INSTALLATION ON THE PLAYHOUSE. SPRING PFH SCREW (1 PLC) (2 PLCS) TOP PIVOT (1 PLC) ASSEMBLED TO PLAYHOUSE. NOTE HOLE LOCATION FOR PROPER INSTALLATION.
- Page 79 STEP 55 FRONT NOTE HOLE LOCATION FOR PROPER INSTALLATION. PFH SCREW (4 PLCS) BOTTOM HINGE BRACKET (2 PLCS)
- Page 80 STEP 56 TOP HINGE (1 PLC) PLACE THE TOP HINGE OVER THE POST AND COMPRESS THE SPRING UNTIL THE HOLES IN THE TOP HINGE AND THE HOLES IN THE PANEL ALIGN. SECURE WITH PPH SCREWS, AS SHOWN. PPH SCREW (2 PLCS)
- Page 81 STEP 57 TOP HINGE (1 PLC) PLACE THE TOP HINGE OVER THE POST AND COMPRESS THE SPRING UNTIL THE HOLES IN THE TOP HINGE AND THE HOLES IN THE PANEL ALIGN. SECURE WITH PPH SCREWS, AS SHOWN. PPH SCREW (2 PLCS)
- Page 82 (1) PLAYHOUSE ASSEMBLY STEP 58 SCREW PWH 8x1/2 BLK SCREW PFH 8x1 3/4 (8 PLCS) SCREW PFH 8x1 3/4 SCREW PWH 8x1/2 BLK (8 PLCS)
- Page 83 L4 - BOTTOM BOARD - W4L06420 L5 - LONG SIDE BOARD - W4L06421 L6 - SHORT SIDE BOARD - W4L06422 5/8"x4 3/8"x15" (16x112x380) 5/8"x4 3/8"x15" (16x112x380) 5/8"x4 3/8"x7 1/2" (16x112x192) STEP 59 SCREW PFH (10) SCREW PFH 8x1 1/8 8x1 1/8 (10 PLCS)
- Page 84 S2 - CORNER BOARD - W4L06424 1"x1"x8 7/8" (24x24x224) STEP 60 SCREW PFH (16) 8x1 1/8 SCREW PFH 8x1 1/8 (16 PLCS)
- Page 85 L7 - ARCHED SIDE BOARD - W4L06423 L5 - LONG SIDE BOARD - W4L06421 L6 - SHORT SIDE BOARD - W4L06422 5/8"x4 3/8"x15" (16x112x380) 5/8"x4 3/8"x15" (16x112x380) 5/8"x4 3/8"x7 1/2" (16x112x192) STEP 61 SCREW PFH SCREW PFH 8x1 1/8 (16) 8x1 1/8 (16 PLCS) REPEAT STEPS 59 THROUGH 61 TO BUILD THE SECOND TOY BOX ASSEMBLY.
- Page 86 (2) TOY BOX ASSEMBLY STEP 62 TOY BOX ASSEMBLY (2 PLCS)
- Page 87 - SEAT CUSHION - A6P00107 STEP 63 SEAT CUSHION (1 PLC)
- Page 88 - BYD ID TAG (MEDIUM) AGES 2 TO 10 - A4M00528 STEP 64 SCREW PWH 8x5/8 BLK SCREW PWH 8x5/8 BLK (2 PLCS) BYD ID TAG (MEDIUM) AGES 2 TO 10 (1 PLCS) 11 9/16"...
- Page 89 M1 - GROWTH BOARD - W4L06690 5/8"x3 3/8"x60 1/4" (16x86x1530) STEP 65 SCREW PFH 8x1 1/8 SCREW PFH 8x1 1/8 (4 PLCS) 2 7/8"...
- Page 90 - GROUND STAKE REBAR - A4M00527 STEP 66 BOLT WH 5/16x1/2 BLK WASHER LOCK EXT 12x19 BLK NUT BARREL WH 5/16x5/8 NUT BARREL WH 5/16x5/8 BLK (2 PLCS) WASHER LOCK EXT 12x19 BLK (2 PLCS) GROUND STAKE REBAR (2 PLCS) DRILL THROUGH 'K5' BOARD USING A 7/16"...
- Page 91 - GROUND STAKE REBAR - A4M00527 STEP 67 BOLT WH 5/16x1/2 BLK WASHER LOCK EXT 12x19 BLK NUT BARREL WH 5/16x5/8 NUT BARREL WH 5/16x5/8 BLK (2 PLCS) WASHER LOCK EXT 12x19 BLK (2 PLCS) GROUND STAKE REBAR (2 PLCS) BOLT WH 5/16x1/2 BLK (2 PLCS) DRILL THROUGH 'K5' BOARD...
- Page 92 WARRANTY AUSTRALIAN CONSUMER LAW Many of our products come with a guarantee or warranty from the manufacturer. In addition, they come with guarantees that cannot be excluded under the Australian Consumer law. You are entitled to a replacement or refund for a major failure and compensation for any other reasonably foreseeable loss or damage. You are entitled to have the goods repaired or replaced if the goods fail to be of acceptable quality and the failure does not amount to a major failure.
Need help?
Do you have a question about the SCENIC HEIGHTS and is the answer not in the manual?
Questions and answers