
Related Manuals for Animo OptiBean Touch


Summary of Contents for Animo OptiBean Touch
- Page 1 OptiBean (XL) Touch gebruiksaanwijzing betjeningsvejledning user manual bruksanvisning betriebsanleitung användarmanual mode d’emploi käyttöohjekirja...
-
Page 2: Copyright
This also applies to the corresponding diagrams and/or charts. Animo retains the right to alter parts at any given time without prior or immediate announcement to the consumer. The content of this manual can also be changed without any prior warning. This manual is valid for the standard model of the device. -
Page 3: Table Of Contents
OptiBean (XL) Touch TABLE OF CONTENTS Copyright ..........................54 Safety ............................56 Important information ....................... 56 Warning signs ........................56 Intended use ........................57 Modifications ........................57 Safety devices ........................58 Safety precautions ......................59 Users ..........................60 Directives .......................... 61 Guarantee ........................ -
Page 4: Safety
OptiBean (XL) Touch Safety Important information This user manual is intended to help you operate this machine safely and effectively. This manual gives information about installation, operation and maintenance of the equipment. Make sure to read and understand the manual before use. It is your responsibility to operate this machine in accordance with all the safety instructions and procedures in this manual, and with all other safety procedures in your workplace. -
Page 5: Intended Use
Do not attempt to apply changes that violate local, regional or national regulations. WARNING Make sure the main switch and operating button are freely accessible. Animo is always willing to discuss improving the value of its machines to users by means of modifications or alterations. Refer to 1.11. 2017/06 Rev. 2.0... -
Page 6: Safety Devices
OptiBean (XL) Touch Safety devices 1.5.1 Door switch The door switch (A) automatically switches off the machine when the door is opened. 1.5.2 Temperature safety device in the coffee brew system A temperature safety device in the coffee brew system turns off the heating element if the temperature of the system is too high. -
Page 7: Safety Precautions
General safety precautions • Make sure that the environment around the machine is dry, clean and lit sufficiently well; • Keep away from moving parts; • Use Animo replacement parts only. • Use Animo recommended products only. 1.6.2 During installation •... -
Page 8: Users
If a separate supply cord is delivered with the machine, replace it by a new supply cord in order to avoid a hazard. Use Animo replacement parts only. If the machine is delivered with a fixed supply cord, it must be replaced by the manufacturer, its service agent or similarly qualified persons in order to avoid a hazard. -
Page 9: Directives
1.11 Further help and information Animo is committed to provide the highest level of support to users and operators of its products. Contact the dealer for information regarding settings, maintenance and repair work, which is not included in this document. -
Page 10: Description
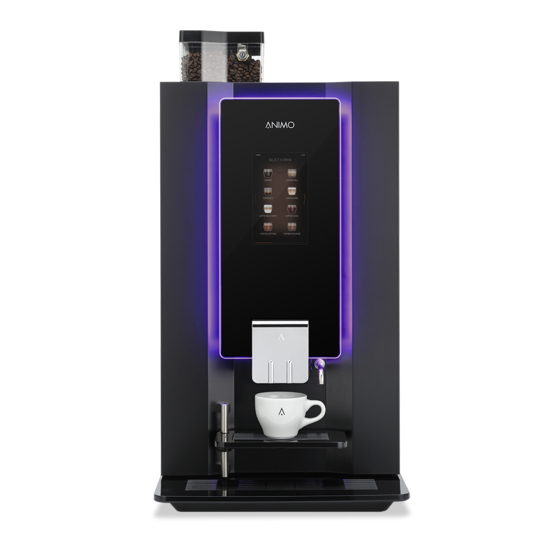
OptiBean (XL) Touch Description Overview 2.1.1 Front A: Bean canister B: Touchscreen C: Outlet D: Tray E: Drip tray F: Water outlet G: Door lock H: OptiLight 2017/06 Rev. 2.0... - Page 11 OptiBean (XL) Touch 2.1.2 Back A: Fan B: Water connection C: Power cord 2017/06 Rev. 2.0...
- Page 12 OptiBean (XL) Touch 2.1.3 Inside A: Grinder B: Canisters C: Brewer D: On/off switch E: Mixer F: Waste bins G: Outlet H: Cover SD card slot and USB port (behind the cover) J: Cleaning instructions sticker 2017/06 Rev. 2.0...
-
Page 13: Working Principle
OptiBean (XL) Touch Working principle 2.2.1 Canisters The canisters contain the coffee beans (A) and instant products (B). 2.2.2 Grinder The grinder (A) grinds the coffee beans and transfers the product to the brewer. 2017/06 Rev. 2.0... - Page 14 OptiBean (XL) Touch 2.2.3 Brewer The brewer (A) receives the product from the grinder. The product is made after adding pressurized hot water. The brewer transfers the product to the outlet and transfers the residue to the waste bin. 2.2.4 Mixer The mixer (A) mixes the instant products with hot water and transfers the product to the outlet.
-
Page 15: Specifications
OptiBean (XL) Touch 2.2.5 Outlet The outlet (A) transfers the product into the cup or jug. Specifications 2.3.1 Standard machine Item Specification Machine dimensions 402 x 564 x 790 mm Weight: empty/full 36/40 kg Pressure 2-10 bar Water temperature 90 °C Water hardness >... - Page 16 OptiBean (XL) Touch Item Specification Operating mode without dispensing 28.4 Wh/Litre (IM) Energy saving mode (ESM) 6.6 Wh Heat up from stand-by (HU-ESM) 81.5 Wh 2.3.4 Media file specifications Note The machine has 400MB of space for media files. Media Size in pixels Data format Image...
- Page 17 OptiBean (XL) Touch Media Size in pixels Data format Logo on cup 120 x 120 PNG with 24 bit. Transparent 2.3.5 Folder structure for media files on USB or SD Folder structure File type A. Media B. Screensaver C. Slideshow D.
-
Page 18: Touchscreen
Water pressure ........MPA ...~..V ..Hz ..W Made in The Netherlands Dr. A.F. Philipsweg 47 • NL-9403 AD Assen • www.animo.eu A: Model number B: Article number C: Supply voltage [V] D: Machine number E: Water pressure [MPa] F: Power [W]... - Page 19 OptiBean (XL) Touch C: Enter the management menu (tap and hold to open the menu) D: Selection panel E: Page indicator (navigation bar) 2.4.2 Operate the touchscreen Use your finger to tap or swipe on the icons, prompts, or slider bars on the touchscreen. 2.4.3 Icons Icon...
- Page 20 OptiBean (XL) Touch Icon Name Description Progress bar Wait. Jug mode. Select a beverage, or confirm your selection. Beverage quantity Less beverage. (decrease) Beverage quantity More beverage. (increase) Dot active Tap to indicate your taste preference on the selection slider bars. Dot inactive Indicates your taste preference on the slider bar.
-
Page 21: Configuration Menu
OptiBean (XL) Touch Configuration menu 2.5.1 Main menu Note To enter the Operator menu, tap and hold the main message on the main screen. Tap item 0.06 and enter the pincode: 11111. Note Tap the arrow icon to go 1 step back. Tap the cross icon to exit the menu. Screen Title Level... - Page 22 OptiBean (XL) Touch 2.5.4 Switching times Screen Item Description 1.02.00 Monday - Friday To set the on and off time from Mondays until Fridays [hour:min] 00:00 = not active. To set the pricing time from Mondays until Fridays [hour:min]. 00:00 = not active.
- Page 23 OptiBean (XL) Touch 2.5.8 Service menu Screen Item Description 1.07 PIN-code To enter the service menus. 2.5.9 OptiLight Screen Item Description 1.08.00 To set the amount of red in the color [0-100%] 1.08.01 Green To set the amount of green in the color [0-100%] 1.08.02 Blue To set the amount of blue in the color [0-100%]...
- Page 24 OptiBean (XL) Touch 2.5.14 Change free vend pin Screen Item Description 1.13 Free vend pin To change and confirm the free vend pin. 2.5.15 Refill canisters Screen Item Description 1.14 Canisters refilled? To send the refill information to the telemetry system [Yes/No]. 1.
-
Page 25: Energy Safe Mode
OptiBean (XL) Touch Energy safe mode The machine in energy safe mode uses less energy. The recipe buttons are still active and the boiler cools down in steps of 5 °C. After choosing a recipe the machine needs some time to heat up the boiler. Example: Three set switching times 9.00 - 11.00... - Page 26 OptiBean (XL) Touch Energy safe mode without switching times If the machine is switched on and there is no dispensing, the machine will be in energy safe mode after 30 min. The temperature of the boiler drops every 30 min. with 5 °C. If there is dispensing after 2 hours the machine is reactivated.
-
Page 27: Transport & Installation
OptiBean (XL) Touch Transport & Installation Transport 3.1.1 General When the machine and its additional equipment is delivered: • Check the machine for possible transport damage. • Make sure the delivery is complete. Refer to the sales and delivery conditions. Installation Caution •... - Page 28 OptiBean (XL) Touch 3.2.2 Positioning Place the machine at work top on a firm, flat surface. If available, place the machine on a base cabinet. Make sure that the area on the left of the machine is at least 11 cm to open the door. Make sure that the area above the machine is at least 22 cm to remove and/or refill the canisters.
- Page 29 OptiBean (XL) Touch If necessary, connect the machine (A) with the hose (B) to the stand-alone pump set (C). Make sure that the minimal water pressure is not below 2 bar (at 5 l/min flow pressure). 3.2.4 Electrical connection Connect the power cord with the machine. 3.2.5 Drip tray discharge Open the drip tray discharge (A) with a drill (Ø...
- Page 30 OptiBean (XL) Touch 3.2.6 Applying the ingredient stickers Open the machine door. Place the stickers as shown (A & B). 3.2.7 Setting the software for first use Note The software is set by your dealer. You do not have to set up the software for first use. Contact your dealer if the settings of the software are incorrect.
-
Page 31: Customize The Touchscreen
OptiBean (XL) Touch Customize the touchscreen 3.3.1 Access the Sound and Vision menu Note You must have a login code to access the Operator menu. At the main screen of the touchscreen, tap and hold on the main message (A). Tap to select the Operator menu. - Page 32 OptiBean (XL) Touch 3.3.3 Connect the storage device to the port Open the machine door. Refer to 4.1 Behind the door, remove the screw (A) and the cover (B). Connect the storage device to the port (C). 3.3.4 Delete media files Access the Sound and Vision menu.
- Page 33 OptiBean (XL) Touch 3.3.6 Configure a movie as a screensaver Upload the media file. Refer to 3.3.2 Tap on the <video> button. Tap on the <Select video> button. Select the video file, and confirm your choice. When the file is loaded, tap the confirmation button. Tap <X>...
- Page 34 OptiBean (XL) Touch 3.3.9 Set the delay timer on the screensaver Access the Sound and Vision menu. Refer to 3.3.1 Tap on the <Sound and Vision> button. Tap on the <Screensaver delay time> button. Set the delay time of the screensaver. Tap the confirmation button.
-
Page 35: Operation
OptiBean (XL) Touch Operation WARNING • Inspect the machine for damage before use. • Do not submerge or hose down the machine. • Unplug the machine and unplug the water supply when the machine is not used for a longer period of time. Note The energy safe mode is activated by default. -
Page 36: Switching On And Off
OptiBean (XL) Touch Switching on and off Open the machine door. Press the on/off switch (A) to switch the machine on or off. Start dispensing cups Place a cup on the tray. On the touchscreen, select a recipe or tap on the hot water icon. -
Page 37: Stop Dispensing Cups Or Jugs
OptiBean (XL) Touch Stop dispensing cups or jugs Tap the stop button on the touchscreen. Caution Do not pull away a cup or jug. A running cycle will still have to be finished first. Filling the bean canister If required, unlock the cover of the bean canister. Remove the cover (A). -
Page 38: Using The Coin Mechanism (Optional)
OptiBean (XL) Touch Remove the cover (C). Fill the instant canister. Make sure that you do not overfill the instant canister. Replace the cover. Replace the canister into the socket. Make sure the canister locks into place with the pin in the hole. -
Page 39: Maintenance
Maintenance Cleaning and disinfecting detergents WARNING • Do not use other chemicals unless it is approved by Animo. • Do not put the machine parts in a dishwasher except for the instant canister. • Dry the canister thoroughly before replacing it. - Page 40 OptiBean (XL) Touch 5.2.4 Using the rinsing program On the touchscreen, tap and hold your finger on ’make your choice’ (A) for several seconds. Tap ’Rinse’. Place a bowl (min. 1.5 l) under the outlet. Follow the instructions on the touchscreen. 5.2.5 Using the cleaning program On the touchscreen, tap and hold your finger on the ’make...
- Page 41 OptiBean (XL) Touch 5.2.6 Cleaning the touchscreen On the touchscreen, tap and hold your finger on ’make your choice’ (A) for several seconds. Tap ’Clean the touchscreen’. Follow the instructions on the touchscreen. 5.2.7 Cleaning the brewer Open the machine door. Switch off the machine.
- Page 42 OptiBean (XL) Touch 5.2.10 Cleaning/Emptying the drip tray Remove the drip tray (A) under the machine. If required, remove the trip tray hose. Clean the drip tray. Replace the trip tray hose. Replace the trip tray under the machine. 2017/06 Rev. 2.0...
- Page 43 OptiBean (XL) Touch 5.2.11 Cleaning the mixer Turn the canister’s outlet upwards. Remove the outlet hose from the mixer. Turn the mounting ring (A) counterclockwise. Take off the mixer housing (C). Pull off the mixer fan (B). Turn the mounting ring (A) further counterclockwise. Remove the mounting ring.
- Page 44 OptiBean (XL) Touch 5.2.12 Cleaning the bean canister Close the supply (A) to the grinder. Take out the bean canister (B). Remove the cover (C). Clean and dry the canister. Clean the grinder (D) with the brush. Replace the bean canister (B). Replace the cover (C).
- Page 45 OptiBean (XL) Touch 5.2.13 Cleaning the instant canisters Open the machine door. Turn the canister’s outlet upwards (A). Lift the canister from the socket and pull it out (B). Remove the cover (C). Clean the instant canister and its parts. Dry the parts thoroughly.
- Page 46 OptiBean (XL) Touch 5.2.14 Cleaning the outlet Open the machine door. Remove the outlet front (A) while holding the tab at the back of the front. Take out the outlet housing (B). Clean the outlet housing. Replace the outlet housing. Replace the outlet front.
- Page 47 OptiBean (XL) Touch Remove the front piece from the outlet arm (F). Clean the parts. 10 Replace the outlet hoses. 2017/06 Rev. 2.0...
-
Page 48: Troubleshooting
OptiBean (XL) Touch Troubleshooting Error messages Problem Possible cause Correction E3 Fill error Boiler is filling up too slowly. Check the water pressure. Turn the water supply tap completely open. Check the connection tube for any kinks. Switch the machine off and on again. - Page 49 OptiBean (XL) Touch Problem Possible cause Correction E20 Software error Software error. Switch the machine off and on again. Contact the dealer or serv- ice engineer. E21 Boiler timeout Boiler is not heating. Contact the dealer or service engineer. E22 Brew timeout Brewer process too long.
-
Page 50: Display Messages
OptiBean (XL) Touch Display messages Problem Possible cause Correction Out of order boiler filling Boiler is still empty, boiler is not No action required. filling up or is filling up too slowly. Out of order boiler heating The boiler temperature is too low Wait until the boiler temperature because too much water is used. - Page 51 OptiBean (XL) Touch Problem Possible cause Correction The mixer is not cleaned. Clean the mixer. The ingredient has expired. Replace the ingredient. The boiler temperature is too low. Contact the dealer or service engineer. The ingredient is damp. Check the ventilation system and replace the ingredient.
- Page 52 Animo B.V. Dr. A. F. Philipsweg 47 9403 AD Assen The Netherlands Tel: +31 (0) 592 376376 Fax: +31 (0) 592 341751 E-mail: info@animo.nl www.animo.eu 2017/06 Rev. 2.0 1006087...
Need help?
Do you have a question about the OptiBean Touch and is the answer not in the manual?
Questions and answers