Table of Contents
Advertisement
Quick Links
See also:
User Manual
Advertisement
Table of Contents

Subscribe to Our Youtube Channel
Related Manuals for Audio Technica AT-LP7


Summary of Contents for Audio Technica AT-LP7
- Page 1 AT-LP 7 User Manual Belt-Drive Turntable IMPORTANT: Turntable belt needs to be attached or turntable will not operate. See page 5 for instructions. For assistance, contact our Audio Solutions Department at 330-686-2600 x5000 or audio-solutions@atus.com.
-
Page 2: Package Contents
Package contents Make sure that you have all the included items listed below before using this product. If some items are missing or damaged, contact your local Audio-Technica dealer. • Turntable body • Dust cover •... -
Page 3: Safety Precautions
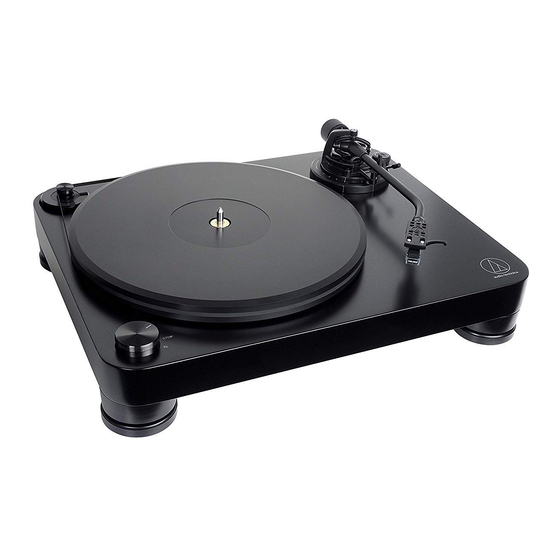
Safety precautions Notes on use Important information Turntable body Warning: • Do not set and use the product in locations that are considerably hot To prevent fire or shock hazard, do not expose this apparatus to rain or or humid, dirty, or subject to extreme vibrations. moisture. - Page 4 Part names and functions Overall diagram Motor pulley Pre-amplifier selector switch If connecting to an amplifier's PHONO input jack, set this switch to Platter the PHONO position. If connecting to the AUX jack of an amplifier, set this switch to the LINE position. Spindle Stereo output terminals Power indicator...
- Page 5 Part names and functions Tonearm Counterweight Balances the tonearm and adjusts to provide the proper tracking force. Tracking force gauge ring Use to adjust the tracking force. Tonearm lift Moves the tonearm vertically to and from the face of the record. Tonearm rest with clamp Use the clamp to secure the tonearm so that it does not move.
-
Page 6: Preparation For Use
Preparation for use Leveling the turntable Placing the platter 1. After positioning the product where you want to use it, adjust the This product requires some assembly before using it for the first time. feet so that the product is level. Do not connect the AC adapter until assembly is complete. - Page 7 Preparation for use Tonearm balance and tracking force Setting tracking force In order for the cartridge to pick up sound correctly from the record’s 1. While supporting the counterweight so that it does not move, turn the tracking force gauge ring so that its “0” position lines up grooves, the tonearm’s balance and tracking force must be adjusted with the centerline on the back of the tonearm.
- Page 8 Preparation for use • The RCA audio cable's red jack is for the right (R) channel, and the Installing/removing the dust cover white jack is for the left (L) channel. • The dust cover is designed to protect the product's sensitive With PHONO input* Without PHONO input components when the product is not in use.
-
Page 9: Playing A Record
Playing a record • Alternatively, you can skip steps 2 to 4, and use your fingers to lift the Before playing a record headshell, move the tonearm over the desired location on the record, and then place the headshell down to begin playing the record. 1. - Page 10 Replacing the stylus Replacing a cartridge Refer to the user manual for the cartridge that you will be using if you Removing the stylus are replacing the cartridge (VM520EB) included with this product with another, commercially available cartridge. After you replace the old •...
- Page 11 Replacing the belt Adjusting the tonearm's height • The belt is a consumable part. Replace the belt if the speed of When installing a cartridge other than the one provided, you must playback slows down or irregular rotation occurs. As a rule of thumb, maintain a suitable distance between the cartridge and the surface of we suggest replacing the belt once a year.
- Page 12 Adjusting the overhang The position of the cartridge must be accurately determined (adjusting the overhang) when mounting a cartridge or headshell other than the one provided. 1. Mount the cartridge so it is parallel to the headshell. • Match up the positions of the cartridge and headshell to the figure below and mount the cartridge so it is parallel to the headshell.
-
Page 13: Troubleshooting
Troubleshooting Problem Solution The platter does not spin. • Is the AC adapter connected to the outlet? Connect AC adapter to the outlet. • Has the AC adapter's plug come off? Check whether or not the plug is properly attached to the AC adapter. •... -
Page 14: Specifications
AT-HS10 Effective length 247 mm separately) Overhang 17 mm Replacement belt (sold AT-LP7 exclusive belt separately) Maximum tracking error angle Less than 2.5° Stylus pressure adjustment 0 to 2.5 g Specifications are subject to change without notice due to range improvements. - Page 15 Memo...
- Page 16 Garantía limitada de un año Audio-Technica U.S., Inc. (A.T.U.S.) ofrece una garantía de un año desde la fecha de compra en lo que se reere a materiales y fabricación para todos los productos de la marca Audio-Technica adquiridos en Estados Unidos. En caso de que tenga algún defecto, el producto será...
- Page 17 Garantia limitada de um ano Produtos da marca Audio-Technica adquiridos nos EUA são garantidos por um ano a partir da compra pela Audio- Technica U.S., Inc. (A.T.U.S.) como livres de defeitos de materiais e mão de obra. No caso de tais defeitos, o produto será...
- Page 18 Audio-Technica Corporation 2-46-1 Nishi-naruse, Machida, Tokyo 194-8666, Japan ©2017 Audio-Technica Corporation 162501140-01-01 ver.1 2017.11.01 Global Support Contact: www.at-globalsupport.com...
Need help?
Do you have a question about the AT-LP7 and is the answer not in the manual?
Questions and answers