Table of Contents
Advertisement
Quick Links
Advertisement
Table of Contents

Related Manuals for Audio Technica AT-LP2022


Summary of Contents for Audio Technica AT-LP2022
- Page 1 AT-LP2022 Belt-Drive Turntable User Manual English...
- Page 2 Introduction This product can be used only in the countries where the product is sold. Make sure that the operating voltage and the plug of AC adapter of the product are correct for the country you live in.
-
Page 3: Safety Precautions
Safety precautions Although this product was designed to be used safely, failing to use it correctly may result in an accident. To ensure safety, observe all warnings and cautions while using the product. Important information Warning To prevent fire or shock hazard, do not expose this apparatus to rain or moisture. Caution Do not expose this apparatus to drips or splashes. -
Page 4: For Customers In Canada
Safety precautions Note: This equipment has been tested and found to comply with the limits for a Class B digital device, pursuant to part 15 of the FCC Rules. These limits are designed to provide reasonable protection against harmful interference in a residential installation. -
Page 5: Notes On Use
Notes on use Turntable body Do not set and use the product in locations that are considerably hot or humid, dirty, or subject to extreme vibrations. The product should be positioned on a flat, level surface. When closing the dust cover, close it completely. Cartridge Attach the provided protector to the cartridge when the product is not in use. -
Page 6: Package Contents
Package contents Make sure that you have all the included items before using this product. If some items are missing or damaged, contact your local Audio-Technica dealer. After purchase, we suggest that you save all packaging materials for possible future storage, moving, or shipping. Turntable body Platter (with drive belt) Remove the protective sheet before use. - Page 7 Package contents Dust cover hinges Headshell (AT-HS4 SV) with VM stereo cartridge (AT-VM95E BK) Replacement stylus (AT-VMN95SH CL) Counterweight 45 RPM adapter AC adapter (Approx. 1.5 m (4.9')) RCA audio cable (Approx. 1.0 m (3.3')) Hexagonal wrench (For tonearm height adjustment) Gloves Quick Start Guide Caution Guide...
-
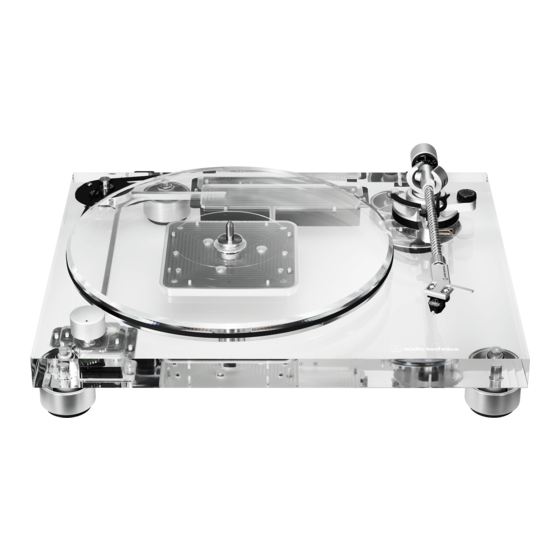
Page 8: Part Names And Functions
Part names and functions Top view Motor pulley Drive belt Platter Spindle Control knob Use to select the platter speed (33-1/3 or 45 RPM) or start/stop the platter. Tonearm... -
Page 9: Rear View
Part names and functions Rear view Dust cover hinge holders Attachment points for dust cover hinges. Feet Adjust the level of the product. Ground (earth) terminal Connect the amplifier's ground (earth) terminal to this terminal using the RCA audio cable's ground line. Stereo output terminals Connect the RCA audio cable. - Page 10 Part names and functions Tonearm Counterweight Balances the tonearm and adjusts to provide the proper tracking force. Tracking force gauge ring Use to adjust the tracking force. Tonearm lift Moves the tonearm vertically to and from the face of the record. Tonearm rest with clamp Use the clamp to secure the tonearm so that it does not move.
- Page 11 Part names and functions Locking ring Rotate the ring to the left (counterclockwise) to secure the headshell. To remove the headshell, rotate the ring to the right. Headshell and cartridge The cartridge is attached to the headshell.
-
Page 12: Preparation For Use
Preparation for use Setting up the turntable Position the product on a level surface. To avoid the effects of vibrations and acoustic pressure, do not mount the product next to such items as speakers. The product may pick up radio static if placed next to a radio. Therefore, try to keep the product away from radios. If the product is near equipment (cell phone, etc.) that emits strong radio waves, noise may occur. - Page 13 Preparation for use With the power turned off, set the platter on the spindle. Make sure that the control knob is in the "STOP" position. Do not mistake the front and back of the platter. The side where you can see the hexagonal nut is the back side of the platter.
-
Page 14: Assembling The Tonearm
Preparation for use Assembling the tonearm Remove the cable tie used to secure the tonearm at the time of delivery. Use the clamp to temporarily secure the tonearm to the tonearm rest. Insert the headshell into the tonearm. Hold the right and left edges of the headshell so that you do not damage the stylus or cut the cartridge’s wires. -
Page 15: Setting Tonearm Balance
Preparation for use Setting tonearm balance Remove the cartridge’s protector. Protector Remove the clamp and lift the tonearm lift control lever. The tonearm is tilted because the balance has yet to be adjusted. Move the tonearm over the platter. Lower the tonearm lift control lever while holding the headshell. Be careful not to allow the stylus tip to touch the platter. -
Page 16: Setting Tracking Force
Preparation for use Tonearm Return the tonearm to the tonearm rest. Setting tracking force While supporting the counterweight so that it does not move, turn the tracking force gauge ring so that its “0” position lines up with the centerline on the back of the tonearm. The tracking force is not adjusted simply by turning the tracking force gauge ring. -
Page 17: Setting The Anti-Skate Adjustment
Preparation for use Setting the anti-skate adjustment While the record is playing, a force acts on the stylus tip to pull it inward. This force can be counteracted by setting the same values for anti-skate and the tracking force. Adjust the anti-skate control dial to have the same value as the tracking force value. The tracking force value for the cartridge provided with this product is 2.0 g. - Page 18 Preparation for use When removing the dust cover, slowly pull the dust cover out from the dust cover hinge holders on the body. The dust cover should remain open or off while records are playing.
-
Page 19: Using The Product
Using the product This product does not have a built-in phono equalizer function. Connect the RCA audio cable to the PHONO input terminal of a phono equalizer or an amplifier with a built-in phono equalizer. Connecting to a phono equalizer or an amplifier with built-in phono equalizer The RCA audio cable's red jack is for the right (R) channel, and the white jack is for the left (L) channel. - Page 20 Using the product For safety, raise the tonearm by lifting the tonearm lift control lever to the UP position. Make sure that the power switch is off and the control knob is in the “STOP” position. If the power switch remains on while the AC adapter is connected, a standby current is always running through the product, even when it is not being used.
-
Page 21: Playing A Record
Using the product Playing a record Lower the volume of the amplifier, active speakers, etc. sufficiently. Turn on the power switch. Use the control knob to select the speed. Select “33” for a 33-1/3 RPM record and “45” for a 45 RPM record. The platter begins spinning. -
Page 22: Pausing The Record
Using the product Tonearm lift control lever Position the tonearm over the desired location (groove) on the record. Lower the tonearm by moving the tonearm lift control lever to the DOWN position. Alternatively, you can skip steps 3 and 4, and use your fingers to lift the headshell, move the tonearm over the desired location on the record, and then place the headshell down to begin playing the record. -
Page 23: Stopping The Record
Using the product Stopping the record Lower the volume of the amplifier, etc. sufficiently. Lift the tonearm lift control lever. Return the tonearm to its original position and fix it with the clamp. Turn the control knob to the “STOP” position. The platter slows down and rotation stops. - Page 24 Care Turntable body When the turntable body is dirty or dusty, first turn off the power switch, disconnect the AC adapter, and then wipe off the dirt and dust with a soft, dry cloth. Do not use alcohol, benzenes, thinners, etc. If the platter gets dirty, it can easily scratch the record, so remove the platter periodically and wipe off any dust.
-
Page 25: Replacing The Stylus
Replacing the stylus A replacement stylus (AT-VMN95SH CL) is included with the product. We recommend using this replacement stylus for improved sound while listening to your records. Removing the stylus In addition to the deterioration of sound quality, records may also be damaged as the cartridge’s stylus tip wears down. -
Page 26: Replacing A Cartridge
Replacing a cartridge Refer to the user manual for the cartridge that you will be using if you are replacing the cartridge with a commercially available one. After you replace the old cartridge with a new one, you must readjust the overhang and the tonearm’s balance and tracking force. -
Page 27: Replacing The Belt
Replacing the belt The belt is a consumable part. Replace the belt if the speed of playback slows down or irregular rotation occurs. As a rule of thumb, we suggest replacing the belt once a year. Before replacing the belt, first turn off the power switch, and disconnect the product’s AC adapter from the outlet. Remove the belt from the motor pulley, and then remove the old belt. - Page 28 Adjusting the tonearm's height When installing a cartridge other than the one provided, you must maintain a suitable distance between the cartridge and the surface of the record. Place the stylus with recommended tracking force on the record and confirm that the tonearm is parallel to the record's surface.
-
Page 29: Adjusting The Overhang
Adjusting the overhang The position of the cartridge must be accurately determined (adjusting the overhang) when mounting a cartridge or headshell other than the one provided. Please use a printer to print the PDF version of this page at equal size. Please note that the HTML version is not the actual size. -
Page 30: When The Turntable Is Moved
When the turntable is moved Using the product’s original packaging materials, pack the turntable in the reverse order of unpacking it. If you do not have the original packaging materials, take the following measures: After turning off the power switch, disconnect the AC adapter from the outlet, remove the platter, and then wrap the turntable body so that it does not get damaged. -
Page 31: Troubleshooting
Troubleshooting The platter does not spin. Is the AC adapter connected to the outlet? Connect AC adapter to the outlet. Has the belt slipped from the platter? Correctly place the belt on the platter. Is the belt placed on the motor pulley? Check that the belt is placed on the motor pulley correctly. Has the belt been damaged? Replace it with a new belt. - Page 32 Troubleshooting The sound when the record is playing is either too fast or too slow. Are the speed settings for the product correct? Use the control knob to select the correct speed for the type of record being played. Playing speed slows down or there is irregular rotation. Is the belt stretched out? Replace it with a new belt.
- Page 33 Dimensions (Unit: mm)
-
Page 34: Specifications
Specifications Turntable specifications Type Belt-drive manual turntable Motor DC servo with Active Speed Stabilization Drive method Belt drive Speeds 33-1/3 RPM, 45 RPM 16 mm-thick acrylic platter Turntable platter Wow and flutter < 0.15% WRMS (33 RPM) at 3 kHz Signal-to-noise ratio >... -
Page 35: General Specifications
[1] The replacement stylus (AT-VMN95SH CL (clear color)) is a limited product of AT-LP2022. Repair parts are limited. Please note that we may not be able to fulfill your request for repair if repair parts are no longer available. In such cases, a commercially available replacement stylus (AT-VMN95SH (brown color)) can be used. - Page 36 株式会社オーディオテクニカ 〒194-8666 東京都町田市西成瀬2-46-1 www.audio-technica.co.jp Audio-Technica Corporation 2-46-1 Nishi-naruse, Machida, Tokyo 194-8666, Japan www.audio-technica.com ©2022 Audio-Technica Corporation Global Support Contact: www.at-globalsupport.com 162502790-02-01 ver.1 2022.12.15...
Need help?
Do you have a question about the AT-LP2022 and is the answer not in the manual?
Questions and answers