Advertisement
Table of Contents
- 1 Main Features
- 2 Troubleshooting
- 3 Specifications
- 4 Table of Contents
- 5 System Requirements
- 6 A Note about Software
- 7 Installing Audacity Software for Mac OSX and above
- 8 Setting up Your Mac (OSX and Above) to Work with Your USB Turntable
- 9 Additional Mac Audio Settings
- 10 Installing Audacity Software for PC
- 11 Control Panel
- 12 Setting up Your PC (with Windows XP) to Work with Your USB Turntable
- 13 Setting up Your PC (with Windows Vista) to Work with Your USB Turntable
- 14 Setting up Your PC to Work with Audacity
- 15 Recording Albums with Audacity
- 16 To Learn more about Audacity
- Download this manual
AT-LP120-USB Direct-Drive Professional USB and Analog Turntable System
Installation and Operation Pages 2-10
AT-LP120-USB
Systeme de tourne-disque USB professionnel
entrai'nement direct
Installation
et utilisation Pages 11-20
AT-LP120-USB
Sistema tocadiscos USB profesional con
accionamiento directo
Instalaci6n y funcionamiento Paginas 21-30
@audio-technica@
a
Advertisement
Table of Contents

Related Manuals for Audio Technica AT-LP120-USB


Summary of Contents for Audio Technica AT-LP120-USB
- Page 1 AT-LP120-USB Direct-Drive Professional USB and Analog Turntable System Installation and Operation Pages 2-10 AT-LP120-USB Systeme de tourne-disque USB professionnel entrai'nement direct Installation et utilisation Pages 11-20 AT-LP120-USB Sistema tocadiscos USB profesional con accionamiento directo Instalaci6n y funcionamiento Paginas 21-30 @audio-technica@...
- Page 2 USB stereo turntable, complete with USB output that allows direct connection to your computer; Audacity recording software for MAC or PC; an integral dual-magnet Audio-Technica phono cartridge; a USB cable and adapter cables. The turntable also offers a built-in switchable...
-
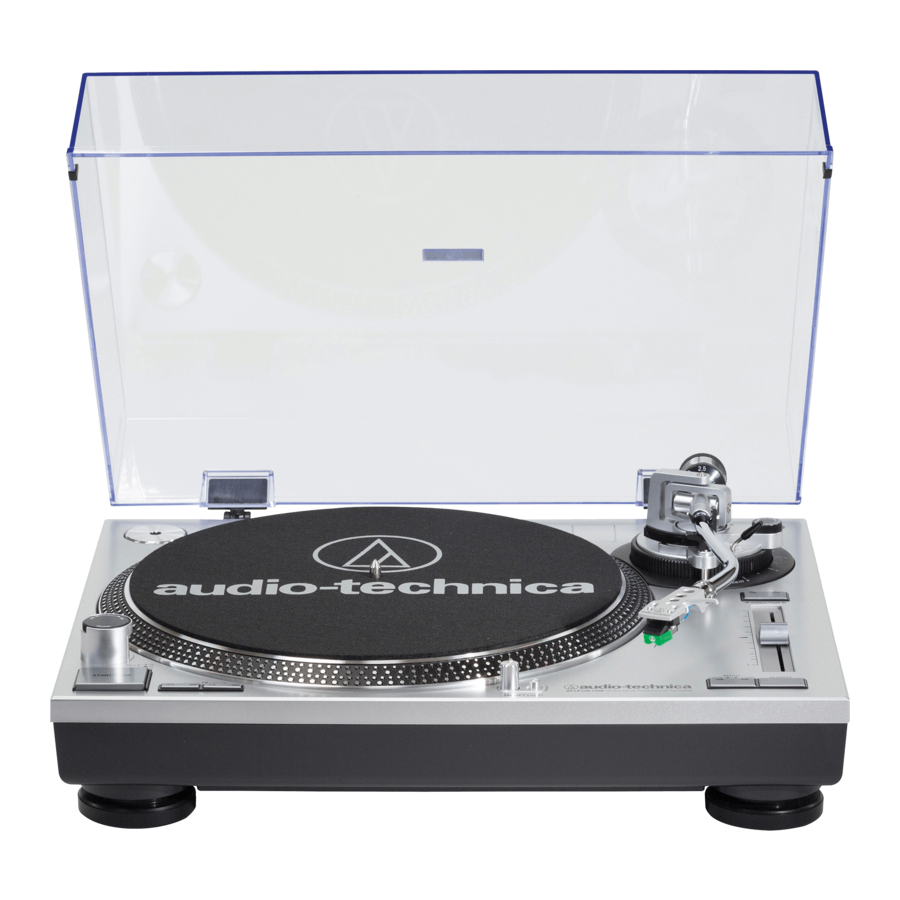
Page 3: Main Features
Main Features Figure 1 8--+------Il. . . I-----+--w;:~--- :;: @audio-technica _ _ T .._ A~Dwoc<er- POWER DIAL 11. DIRECTION BUTTON Controls power to the unit. Controls platter's rotational direction: F - Forward (clockwise) START/STOP BUTTON R - Reverse (counter-clockwise) Engages and disengages the motor/platter. - Page 4 Rear View Diagram Figure 3 PRE-AMP SELECTOR SWITCH Allows the internal stereo phono pre-amp to be bypassed when the turntable is used with equipment having PHONO LINE magnetic phono inputs. USB OUTPUT Use this output to connect your turntable to the USB input of your computer.
- Page 5 [Figure 2, page 4, #271; the The AT-LP120-USB requires some assembly before first use. counterweight will engage the spiral groove in the rear arm IMPORTANT: Do not connect the AC power cord until assembly is section and move forward.
- Page 6 Connecting to Computers with USB Input balance and tracking force must be carefully set to the cartridge The USB cable (included) connects your AT-LP120-USB turntable to manufacturer's specifications. Failure to properly set up the tone arm your computer without need for special drivers. Refer to included assembly can cause damage to the cartridge stylus and/or records.
- Page 7 Operation For best results, do not install or operate this unit near conditions of Checking and Adjusting Pitch heat, moisture, dust, or heavy vibrations. (Note: Bright fluorescent lights If desired, select a 10% or 20% pitch adjustment range by may affect the visibility of the speed-indicating strobe dots. If this is a pressing the pitch button.
- Page 8 Replacing the Stylus damage the stylus. The stylus assembly should click into place. The AT-LP12Q-USB comes supplied with a high-quality Audio-Technica ATP-2 cartridge. The stylus should be replaced with a genuine Replace the headshell assembly on the tone arm and secure with Audio-Technica ATP-N2 stylus.
-
Page 9: Troubleshooting
Troubleshooting Turntable operates but emits no sound or not enough sound. Record sounds too fast or too slow. The stylus guard is still in place. Remove the stylus guard. Turntable is set for wrong speed. Make proper speed selection for record type being played with platter speed buttons. -
Page 10: Specifications
Specifications Turntable Specifications Cartridge Specifications (ATP-2) Type 3-Speed, fully manual operation Frequency response 15 - 22,000 Hz Motor DC motor Channel separation 23/17 (dB at 1 kHz/1 0 kHz) Direct drive Drive method Vertical tracking force 3,0 - 5.0 grams 33-1/3 RPM, 45 RPM, 78 RPM Speeds Stylus construction... - Page 11 One-Year Limited Warranty Audio-Technica brand products purchased in the U.S.A are warranted for one year from date of purchase by Audio-Technica U.S., Inc. (AT.U.s.) to be free of defects in materials and workmanship. In event of such defect, product will be repaired promptly without charge or, at our option, replaced with a new product of equal or superior value if delivered to AT.U.S.
- Page 12 & Audio-Technica AT-LP60-USB AT-LP120-USB Turntables Software Guide Pages 2-15 Tourne-disques USB Audio-Technica Guide /ogicie/ Pages 16-21 Tocadiscos USB de Audio-Technica Gufa de software Paginas 22-27 @audio-technica.
-
Page 13: Table Of Contents
Audio-Technica USB Turntables Contents A note about software Your Audio-Technica AT-LP60-USB or AT-LP120-USB turntable is supplied with Audacity software A note about recording software for your convenience. Please note that other third-party recording System requirements software packages are also compatible with this turntable. -
Page 14: Installing Audacity Software For Mac Osx And Above
Installing Audacity software for MAC OSX and above Before installing software, assemble the turntable, following directions in the 5. Turn your computer on. included Owners Manual. 6. Insert the included Audacity CD in your Mac's CD drive. Open the CD icon on your 2. -
Page 15: Setting Up Your Mac (Osx And Above) To Work With Your Usb Turntable
Setting up your MAC (OSX and above) to work with your USB Turntable 1. Open the Audacity program. 3. Select Audio I/O tab at the top left. • Under Playback, Device, select Built-in Audio. 2. Select Preferences from the Audacity menu. •... - Page 16 Setting up your MAC (OSX and above) to work with your USB Turntable 4. Next, select Quality tab at the top. 5. Next, from the main Audacity window, select the drop-down box (arrow pointing down) next to the microphone at the right side of your screen. •...
-
Page 17: Additional Mac Audio Settings
Additional MAC audio settings We have set the Audacity playback and record settings. Now it's time to set the separate Macintosh audio playback and record settings. 1. Go to Applications> Utilities> then select and open Audio MIDI Setup. 2. In the Audio Midi window under the tab Audio Devices, select the following: •... -
Page 18: Installing Audacity Software For Pc
Installing Audacity software for PC 1. Before installing software, assemble the turntable, following directions in the 5. Turn your computer on. included Owners Manual. 6. Insert the included Audacity CD. An Audacity window will appear. Click Audacity Setup icon to install. Follow the directions on the pop-up windows to install 2. -
Page 19: Setting Up Your Pc (With Windows Xp) To Work With Your Usb Turntable
Setting up your PC (with Windows XP) to work with your USB Turntable 1. Close programs operating on your computer. • Select (double-click) Sounds and Audio Devices. 2. Start menu> Control Panel> Sounds and Audio Devices • Begin at your Start menu. Select Control Panel. If:: r;";";'I. - Page 20 3. The following screen will pop up: 4. Select the Voice tab. • In the Voice playback area of the window, select your computer's internal mlX'l sound card (not USB Audio CO DEC; Microsoft Sound Mapper). Sounds and Audio Devices Properties •...
- Page 21 Setting up your PC (with Windows XP) to work with your USB Turntable 5. Next, select the Audio tab. • In the Sound playback area of the window, select your computer's internal sound card. • In the Sound recording area of the window, select USB Audio CODEC. •...
-
Page 22: Setting Up Your Pc (With Windows Vista) To Work With Your Usb Turntable
Setting up your PC (with Windows Vista) to work with your USB Turntable Start menu> Control Panel> Sound. 3. Select the Recording tab. Make sure that the USB Audio CODEC is set as the Begin at your Start menu. Select Control Panel (classic view). default recording device. - Page 23 Setting up your PC (with Windows Vista) to work with your USB Turntable 4. Select the Playback tab. Select your internal sound card speakers (these are usually the first listed). 5. Click Apply; then click OK. 6. Close your Control Panel. Speakers SigmaTel C-rvlajor Audio Working...
-
Page 24: Setting Up Your Pc To Work With Audacity
Setting up your PC to work with Audacity 1. Launch the Audacity program from your Start menu. 3. Select Audio I/O tab at the top left. • Under Playback, Device, select your internal sound card. • Under Recording, Device, select USB Audio CODEC. 2. - Page 25 Setting up your PC to work with Audacity 4. Next, select Quality tab at the top. Next, from the main Audacity window, select the drop-down box (arrow pointing down) next to the microphone near the middle of your screen. • Default Sample Rate: 44100 Hz. •...
-
Page 26: Recording Albums With Audacity
Recording Albums with Audacity To get started with Audacity, follow the instructions below. For in-depth information 2. How to record on recording and saving projects, please visit the on-line Audacity manual at http:// • Set your USB turntable up to play the song or album you want to record. audacity.sourceforge.netl manual-1.2Iindex.html 1. - Page 27 @audio-technica Audio-Technica U.S., Inc. 1221 Commerce Drive, Stow, Ohio 44224 (330) 686-2600 audio-technica.com P52122 ©2009 Audio-Technica US., Inc.
- Page 28 USB RECORDING under the GNU nse (GPL).
Need help?
Do you have a question about the AT-LP120-USB and is the answer not in the manual?
Questions and answers