Yeastar Technology TG200 User Manual
Tg series gsm/3g voip gateway
Hide thumbs
Also See for TG200:
- User manual (34 pages) ,
- Manual (24 pages) ,
- Installation manual (16 pages)

Related Manuals for Yeastar Technology TG200


Summary of Contents for Yeastar Technology TG200
-
Page 1: User Guide
TG Series GSM/3G VoIP Gateway User Guide Sales Tel: +86-592-5503309 E-mail: sales@yeastar.com Support Tel: +86-592-5503301 E-mail: support@yeastar.com Web: http://www.yeastar.com Version: 91.1.0.7 Revised: November 2, 2017... -
Page 2: Declaration Of Conformity
TG Series User Guide Copyright Copyright 2006-2017 Yeastar Information Technology Co., Ltd. All rights reserved. No parts of this publication may be reproduced or transmitted in any form or by any means, electronic or mechanical, photocopying, recording, or otherwise, for any purpose, without the express written permission of Yeastar Information Technology Co., Ltd. -
Page 3: Table Of Contents
TG Series User Guide Table of Contents About This Guide ........................6 TG Series Overview ........................ 7 TG200 Gateway Overview ........................7 TG400 Gateway Overview ........................8 TG800 Gateway Overview ........................9 TG1600 Gateway Overview ........................11 Hardware Installation ......................13 Package Contents .......................... - Page 4 TG Series User Guide Connect TG Gateway to Your PBX (Account Mode) ............30 Connect TG Gateway to Your PBX (Account Mode)................30 Set up a Mobile to IP Route (Account Mode) ..................31 Set up an IP to Mobile Route (Account Mode) ..................31 Connect TG Gateway to Your PBX (Register Trunk) ............
- Page 5 TG Series User Guide Change Date and Time .......................... 56 Upload Custom Prompts ........................57 Set up System Email ..........................57 Update System Firmware ........................58 Backup and Restore ..........................60 Reboot the System ..........................62 Schedule Automatic Reboots ......................... 62 Reset the System ...........................
-
Page 6: About This Guide
TG series gateway. We begin by assuming that you are interested in TG series gateway and familiar with networking and other IT disciplines. Products Covered This guide explains how to configure the following Yeastar TG series gateways: TG200 TG400 TG800 ... -
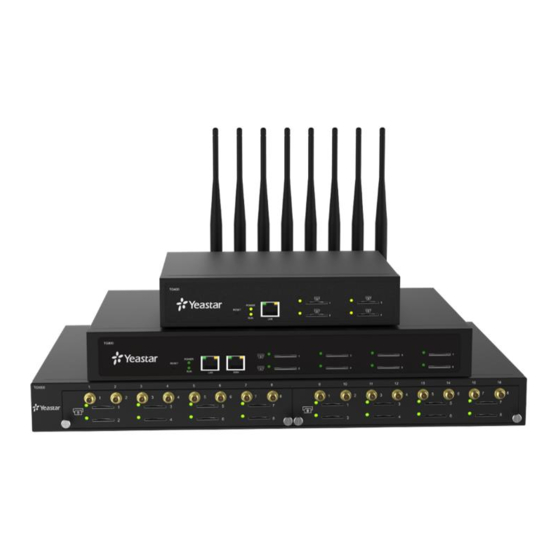
Page 7: Tg Series Overview
TG400 Gateway Overview TG800 Gateway Overview TG1600 Gateway Overview TG200 Gateway Overview TG200 Gateway Front Panel Feature Description ① Reset Button Press and hold for 10 seconds to restore the factory defaults Indicates the power status. ②... -
Page 8: Tg400 Gateway Overview
TG Series User Guide TG200 Gateway Back Panel Feature Description ① Antenna Connector Connect to GSM/3G Antenna. Port 3 and Port 4 are invalid. ② Power Switch Press this button to switch on/off the device. ② Power Interface Connect the supplied power supply to the port. -
Page 9: Tg800 Gateway Overview
TG Series User Guide ④ LAN Port 10/100 adaptive RJ45 Ethernet port. Indicates the GSM/3G module status. Static Green: the module and the inserted SIM card are working properly. GSM/3G Module ⑤ Blinking Slowly: no SIM card is detected or the port is working ... - Page 10 TG Series User Guide Feature Description ① Reset Button Press and hold for 10 seconds to restore the factory defaults Indicates the power status. ② Power LED On: the power is switched on. Off: the power is switched off. ...
-
Page 11: Tg1600 Gateway Overview
TG Series User Guide TG1600 Gateway Overview TG1600 Gateway Front Panel Feature Description Indicates the GSM/3G module status. Static Green: the module and the inserted SIM card are working properly. GSM/3G Module ① Blinking Slowly: no SIM card is detected or the port is working ... - Page 12 TG Series User Guide ③ WAN Port 10/100 adaptive RJ45 Ethernet port. ④ LAN Port 10/100 adaptive RJ45 Ethernet port. ⑤ Reset Button Press and hold for 10 seconds to restore the factory defaults ⑥ Power Switch Press this button to switch on/off the device. ⑦...
-
Page 13: Hardware Installation
Rack Installation Ground Connection Connect Your Gateway Package Contents Check the package contents before you start to step up the TG gateway. Item TG200 TG400 TG800 TG1600 TG Gateway Power cord Warranty card Quick Start Guide Network cable... -
Page 14: Insert/Remove Sim Card
TG Series User Guide temperature/humidity extremes. The operating temperature should be kept below 104° F (40° C). Insert/Remove SIM Card Yeastar TG gateway supports hot plugging of SIM cards. You can insert and remove your SIM cards to the TG gateway directly without powering off the device. Procedure 1. -
Page 15: Connect Antennas
TG Series User Guide Procedure 1. Place the TG gateway on a steady platform. 2. Remove the adhesive backing paper from the rubber feet. 3. Turn over the device and attach the supplied rubber feet to the recessed areas on the bottom at each corner of the device. -
Page 16: Rack Installation
TG Series User Guide Rack Installation WARNING Be careful not to drop any components. Dropping components may damage them or cause an injury. Procedure 1. Fix the brackets to the left and right sides of the TG gateway with 4 screws. 2. -
Page 17: Ground Connection
TG Series User Guide Ground Connection WARNING Proper grounding (connection to ground) is very important to reduce the risk to the user of electrocution or protect the TG gateway from the bad effects of external noise in the case of a lightning strike. -
Page 18: Connect Your Gateway
TG Series User Guide Connect Your Gateway Procedure 1. Connect one end of a network cable to the LAN port of TG gateway, and the other end to any port of your company’s LAN switch/router. 2. Plug the provided power cord into the power inlet on TG gateway and the other end to a standard electrical wall socket. -
Page 19: Getting Started
TG Series User Guide Getting Started Log in Web User Interface Web Configuration Panel Log in Web User Interface Yeastar TG gateway provides web-based configuration interface, you can manage the device by logging in the Web interface. Check the factory defaults below: IP address: http://192.168.5.150 ... -
Page 20: Web Configuration Panel
TG Series User Guide Web Configuration Panel There are 4 main sections on the Web Configuration Panel for users to check the TG gateway’s status and configure it. Status: Check System Status, Port Status, Trunk Status, Network Status and check call logs, system logs. -
Page 21: Manage Gsm/3G Modules
TG Series User Guide Manage GSM/3G Modules Configure GSM/3G Module Profile Reboot GSM/3G Modules Enable/Disable GSM/3G Module Adjust GSM/3G Module Volume Configure the Call Duration of Mobile Trunks Configure Network Mode and Band Enable VoLTE on Mobile Trunk ... -
Page 22: Reboot Gsm/3G Modules
TG Series User Guide Reboot GSM/3G Modules You can reboot a specific GSM/3G module on the Web user interface. This action will not affect other GSM/3G modules and can ensure the system is running properly. Procedure 1. Navigate to Gateway > Mobile List > Mobile List, select the desired Module, click Reboot. The module starts to reboot. -
Page 23: Configure The Call Duration Of Mobile Trunks
TG Series User Guide 3. Click Save and Apply Changes. Configure the Call Duration of Mobile Trunks You can limit call duration for each call of a mobile trunk or make a monthly talk plan for the mobile trunk. Note: the system starts to count the talk time when the SIM card is installed on the TG gateway. The system doesn’t count the talk time that has been used formerly on the SIM card. - Page 24 TG Series User Guide 3. Click Save and Apply Changes. Set a Monthly Talk Plan of Mobile Trunk By default, the system doesn’t limit monthly talk time of mobile trunks. You can set monthly talk plan for the mobile trunks to count and limit the talk time of outgoing calls on your TG gateway. Procedure 1.
- Page 25 TG Series User Guide 5. (Optional) Enable clear stat and set the clear period and time. The system will clear the call duration data on the TG gateway monthly. Set Enable Clear Stat to Yes. b. Set Clear Period to Every Month, and choose the clear day. Set the Clear Period Time.
-
Page 26: Configure Network Type And Band
TG Series User Guide 6. (Optional) Enable E-mail notification and enter the email address to receive alarm e-mail. 7. Click Save and Apply Changes. Configure Network Type and Band By default, TG gateway identifies the SIM card network type and band automatically. If the network type and band are not suitable for you, you can change the settings manually. -
Page 27: Enable Volte On Mobile Trunk
TG Series User Guide Enable VoLTE on Mobile Trunk You can enable VoLTE (Voice over LTE) to make high-quality audio calls over 4G network. Prerequisites The installed module should be a LTE module. Insert a 4G SIM card in the LET module. ... -
Page 28: Configure Sim Card Forwarding And Clir
TG Series User Guide 4. Click Save and Apply Changes. Configure SIM Card Forwarding and CLIR You can set call forwarding and CLIR for your SIM cards on Yeastar TG gateway. TG gateway can send service request to the SIM carrier to configure the call forwarding and CLIR settings. Note: this feature should be supported by your SIM carrier. - Page 29 TG Series User Guide make outbound calls using the outgoing strategy. 4. Select desired trunks to the Selected box. 5. Click Save and Apply. 29/86...
-
Page 30: Connect Tg Gateway To Your Pbx (Account Mode)
TG Series User Guide Connect TG Gateway to Your PBX (Account Mode) If you choose account mode, you need to create one VoIP account on TG gateway, and configure the following settings Connect TG Gateway to Your PBX (Account Mode) On your PBX, set up an outbound route for the VoIP trunk ... -
Page 31: Set Up A Mobile To Ip Route (Account Mode)
TG Series User Guide Set up a Mobile to IP Route (Account Mode) Procedure 1. Navigate to Gateway > Routes Settings > Mobile to IP. 2. Click Add Mobile to IP Route. 3. Enter a name in the Route Name field. 4. - Page 32 TG Series User Guide 6. Click Save and Apply Changes A PBX user can make a call through the selected GSM/3G trunk. 32/86...
-
Page 33: Connect Tg Gateway To Your Pbx (Register Trunk)
TG Series User Guide Connect TG Gateway to Your PBX (Register Trunk) If you choose register trunk mode, you need to create one VoIP account on your PBX, and use the account to register a VoIP trunk on Yeastar TG gateway. ... -
Page 34: Set Up A Mobile To Ip Route (Register Trunk Mode)
TG Series User Guide 3. Check the trunk status on TG gateway Status > System Status > Trunk Status. If the trunk status shows , then the TG gateway and your PBX are connected. Set up a Mobile to IP Route (Register Trunk Mode) Procedure 1. -
Page 35: Set Up An Ip To Mobile Route (Register Trunk Mode)
TG Series User Guide 7. Click Save and Apply Changes When a call reaches the selected GSM/3G trunk, the call will be routed to the desired destination. Set up an IP to Mobile Route (Register Trunk Mode) Procedure 1. Navigate to Gateway > Routes Settings > IP to Mobile. 2. - Page 36 TG Series User Guide 7. Click Save and Apply Changes When a PBX user makes a call through the selected GSM/3G trunk, he/she will hear a dial tone. The PBX user needs to dial the destination number after hearing the dial tone. 36/86...
-
Page 37: Connect Tg Gateway To Your Pbx (Peer Trunk)
TG Series User Guide Connect TG Gateway to Your PBX (Peer Trunk) If you choose peer trunk mode, you need to create one peer trunk on TG gateway and configure the following settings: On your PBX, create a peer trunk which connects to TG gateway ... -
Page 38: Set Up A Mobile To Ip Route (Peer Trunk Mode)
TG Series User Guide If the status of the two peer trunks both indicate connected, then the TG gateway and your PBX are connected. Set up a Mobile to IP Route (Peer Trunk Mode) Procedure 7. Navigate to Gateway > Routes Settings > Mobile to IP. 2. -
Page 39: Set Up An Ip To Mobile Route (Peer Trunk Mode)
TG Series User Guide Set up an IP to Mobile Route (Peer Trunk Mode) Procedure 7. Navigate to Gateway > Routes Settings > IP to Mobile. 2. Click Add IP to Mobile Route. 3. Enter a name in the Route Name field. 4. -
Page 40: Call Control
TG Series User Guide Call Control Route Calls Based on Caller ID Route Calls on Destination Numbers Block Incoming Numbers Block Outgoing Numbers Callback AutoCLIP Route Route Calls Based on Caller ID You can set the TG gateway to route calls based on the caller ID number of the person that is calling. If the incoming caller ID doesn’t match the route settings, the call will fail. -
Page 41: Block Incoming Numbers
TG Series User Guide 6. (Optional) Set which digits to prepend on the dialed numbers in Prepend these digits field. The gateway will prepend the digits to the phone number, and send the rewritten number. 7. Click Save and Apply Changes. Block Incoming Numbers You can block the incoming numbers to call from TG gateway to your PBX. -
Page 42: Callback
TG Series User Guide 5. Click Save and Apply Changes. When the PBX user tries to call the number 15880270666 through TG gateway, the call will fail. Callback Callback feature allows callers to hang up and get called back to TG gateway. Callback feature could reduce the cost for the users who work out of the office using their own mobile phones. - Page 43 TG Series User Guide 6. Click Save and Apply Changes. Set up Callback for All Numbers You can enable callback feature for all numbers. When any one calls in TG gateway and disconnects the call, the system will call back the user. Procedure 1.
-
Page 44: Autoclip Route
TG Series User Guide Prepend: define digits added before a callback number before the callback is placed. 5. Click Save and Apply Changes. AutoCLIP Route Yeastar TG gateway can automatically stores records of failed outgoing call to AutoCLIP route table. When the called person calls back, TG gateway will route the call directly to the original caller's extension. -
Page 45: Manage Messages
TG Series User Guide Manage Messages Send SMS Messages Manage SMS Contacts Manage Sent SMS Messages Manage Received SMS Messages SMS to Email Email to SMS Schedule SMS Clear Tasks Send USSD Messages ... -
Page 46: Manage Sms Contacts
TG Series User Guide Manage SMS Contacts Add an SMS Contact A contact list allows you to target and text contacts with common interests. Once you have all your contacts created on TG gateway, you can send SMS messages to a single contact or a group or all contacts by directly selecting rather than typing in the numbers manually each time. -
Page 47: Manage Received Sms Messages
TG Series User Guide Port: the system uses which GSM/3G port to send SMS messages. Status: choose the sent status of the SMS messages. Destination: enter a destination number. Procedure 1. Navigate to SMS > SMS > Outbox. 2. - Page 48 TG Series User Guide 1. Navigate to SMS > SMS > Inbox. 2. Choose the desired record, click to view the detailed messages. Reply SMS Messages Procedure 1. Navigate to SMS > SMS > Inbox. 2. Choose the desired record, click 3.
-
Page 49: Sms To Email
TG Series User Guide Procedure 1. Navigate to SMS > SMS > Inbox. 2. Set the searching criteria. 3. Click Start Searching, the filtered SMS messages appears on the page. Download Searched Results After searching the desired SMS messages, you can download and export the records to a .csv file. Procedure 1. - Page 50 TG Series User Guide 2. Check the checkbox of Enable SMS To Email. 3. Enter the email password in the Password field. 4. Enter the POP3 Server and SMTP Port of the email. 5. Click Test POP3 Settings to test if the email settings are correct. If the web page prompts “Tested successfully”, the email settings are correct.
-
Page 51: Email To Sms
TG Series User Guide Email to SMS To send Email to SMS, you need to configure Email SMTP settings and Email to SMS settings. Configure Email SMTP Settings Procedure 1. Navigate to SMS > SMS Settings > Email Settings. 2. Enter a valid email address in the Email Address field. 3. -
Page 52: Schedule Sms Clear Tasks
TG Series User Guide Send Email to SMS To send email to SMS, you need to send an email to the SMS email address of TG gateway. The system will receive the email and forward the email to the GSM/3G port, so that the email can be sent out through SMS to the expected destinations. -
Page 53: Send Ussd Messages
TG Series User Guide Procedure 1. Navigate to SMS > SMS > SMS Clear Settings. 2. Set clear schedule for inbox or outbox. a. Check the checkbox of SMS Clear Enabled. b. (Optional) Set the Start Date and End Date. The system will clear the messages periodically during this period. -
Page 54: Enable Tg Gateway Api
TG Series User Guide 4. Click Copy to the Selected Port. The message will apply to the selected ports. 5. Click Send. Exit USSD Sessions When you want to subscribe a new service from the GSM/3G carrier, you need to exit the former USSD sessions first. - Page 55 TG Series User Guide Default password: password Procedure 1. Navigate to SMS > SMS > SMS Password. 2. Enter the old password first. 3. Enter a new password and retype the new password to confirm. A strong password is comprised of letters, numbers and characters. 4.
-
Page 56: Configure System Settings
TG Series User Guide Configure System Settings Change Web Login Password Change Date and Time Upload Custom Prompts Set up System Email Update System Firmware Backup and Restore Reboot the System Schedule Automatic Reboots ... -
Page 57: Upload Custom Prompts
TG Series User Guide 7. Click Reboot Now to reboot the TG gateway. Upload Custom Prompts The default voice prompts and announcements in the system are suitable for almost every situation. However, you may want to use your own voice prompt to make it more meaningful and suitable for your case. -
Page 58: Update System Firmware
TG Series User Guide Procedure 1. Navigate to System > System Preferences > Email Settings. 2. Enter a valid email address in the Email Address field. 3. Enter the email password in the Password field. 4. Enter the SMTP Server and SMTP Port of the email. 5. - Page 59 TG Series User Guide 5. Click Start to start downloading the file from the HTTP server. After downloading the desired firmware file, the system will reboot automatically to take effect. Upgrade Firmware through TFTP Server Procedure 1. Set up TFTP server. Below is an example of Tftpd32. Open Tftpd32.
-
Page 60: Backup And Restore
TG Series User Guide 6. Click Start to start downloading the file from the TFTP server. After downloading the desired firmware file, the system will reboot automatically to take effect. Backup and Restore Create a Backup File Procedure 1. Navigate to System > System Preferences > Backup and Restore. 2. - Page 61 TG Series User Guide Procedure 1. Navigate to System > System Preferences > Backup and Restore. 2. Click Upload a Backup. The following window appears. Restore System Configurations Procedure 1. Navigate to System > System Preferences > Backup and Restore. 2.
-
Page 62: Reboot The System
TG Series User Guide Reboot the System You can reboot the system on Web user interface. Procedure 1. Navigate to System > System Preferences > Reset and Reboot. 2. Click Reboot. The system starts to reboot immediately. Schedule Automatic Reboots You can easily schedule an automatic reboots for TG gateway. -
Page 63: Reset The System
TG Series User Guide Reset the System A factory reset will erase all configuration data on the system. Important: when the system is being reset, don’t power off the device, or the system will be damaged. Procedure 1. Navigate to System > System Preferences > Reset and Reboot. 2. -
Page 64: Configure System Network
TG Series User Guide Configure System Network Change the IP Address of TG Gateway Set up VLAN for the TG Gateway Set up DDNS for the TG Gateway Static Route Change the IP Address of TG Gateway After successfully logging in the Web user interface for the first time with the factory IP address, you can change the network of TG gateway according to your local network. -
Page 65: Set Up Openvpn Network
TG Series User Guide You have more than 200 devices on your LAN. You have a lot of broadcast on your LAN. Groups of users need more security or are being slowed down by too many broadcasts. Groups of users need to be on the same broadcast domain because they are running the same ... -
Page 66: Set Up Ddns For The Tg Gateway
TG Series User Guide Set up DDNS for the TG Gateway You can set up DDNS for the TG gateway to access the TG gateway using domain names instead of IP address. The DDNS server can change IP address and update your domain information dynamically. - Page 67 TG Series User Guide Set up Static Routes Procedure 1. Navigate to Settings > System > Network Preferences > Static Routes. 2. Configure the static route. Destination: enter the destination IP address or IP subnet for the TG gateway to reach using the static route.
-
Page 68: Configure Voip Settings
TG Series User Guide Configure VoIP Settings Group VoIP Trunks Configure SIP Settings Configure IAX Settings Configure General Preferences Group VoIP Trunks You can manage the VoIP trunks efficiently by grouping the trunks. The group of VoIP trunks can be selected directly when you are configuring the routes settings. - Page 69 TG Series User Guide Configure SIP General Settings Navigate to Gateway > VoIP Settings > SIP Settings > General, to configure the SIP general settings. Check the description of SIP general settings below. Option Description UDP Port Port used for SIP registrations, the default is 5060. TCP Port Port used for SIP registrations, the default is 5060.
- Page 70 TG Series User Guide Configure NAT Settings If you want to register the TG VoIP account remotely, you need to configure NAT setting on TG gateway. Navigate to Gateway > VoIP Settings > SIP Settings > NAT, to configure the SIP NAT settings.
- Page 71 TG Series User Guide Configure SIP Codec Settings Navigate to Gateway > VoIP Settings > SIP Settings > Codec to configure the SIP codec settings. Configure QoS Settings QoS (Quality of Service) is a major issue in VoIP implementations. You can configure QoS settings to guarantee that packet traffic for a voice or other media connection will not be delayed or dropped due interference from other lower priority traffic.
- Page 72 TG Series User Guide Configure SIP Advanced Settings Navigate to Gateway > VoIP Settings > SIP Settings > Advanced Settings, to configure the SIP advanced settings. Check the description of SIP advanced settings below. Option Description From Field Where to get the caller ID in SIP packet To Field Where to get the DID in SIP packet There are two modes Alerted and Immediately.
-
Page 73: Configure Iax Settings
TG Series User Guide Enable session-timer mode, by default it is “yes”. If you found the call Session-timers is cut off every 15 minutes , please disable this. Session-expires The max refresh interval. · Session-minse The min refresh interval, which mustn't be shorter than 90s. Session-refresher Choose session-refresher, the default is Uas. -
Page 74: Secure Your Gateway
TG Series User Guide Secure Your Gateway Security Center Configure Alert Settings Upload Certificate Files Configure Firewall Rules Security Center You can check TG gateway security configuration in “Security Center” page. And also, you can enter the relevant security settings page rapidly. -
Page 75: Upload Certificate Files
TG Series User Guide 3. Configure the E-mail Notification Settings. If you want to enable e-mail notification, set E-mail Notification to Yes. b. In To field, enter the email address to receive alert emails. (Optional) Change the e-mail subject and the e-mail template. 4. -
Page 76: Configure Firewall Rules
TG Series User Guide Gateway certificate is made for the TG gateway. Click Upload Certificate, choose Type to Gateway Certificate. b. Click Browse to select the file from your local PC. Click Save to start uploading. You can see the certificate appear on Gateway Certificate list. 4. - Page 77 TG Series User Guide 9. Click Save and Apply Changes. Enable Firewall Function Procedure 1. Navigate to System > Security Center > Firewall Rules, check the checkbox of Enable Firewall. 2. Click Save and Apply Changes. The web page will prompt you that the firewall is enabled. Block Pings through Your TG Gateway By default, users can use the ping command from other devices to check if the TG gateway is alive.
- Page 78 TG Series User Guide The system has 3 default IP blacklist rules, you can edit them or add a new one. Procedure 1. Navigate to System > Security Center > IP Blacklist, click Add Rule. 2. Enter the desired port in Port field. 3.
-
Page 79: System Status
TG Series User Guide System Status Check Trunk Status Check Network Status Check System Info Check Trunk Status Navigate to Status > System Status > Trunk Status to check the mobile trunk status and VoIP trunks status. Mobile Trunk Status Status Description... -
Page 80: Check Network Status
TG Series User Guide Malfunction in module; please examine the relevant module. VoIP Trunk (Account) Status Status Description Trunk registration failed Unregistered Successful registration, trunk is ready for use Registered Registering Request Sent Waiting for authentication Waiting VoIP Trunk (Service Provider) Status Status Description Successful registration, trunk is ready for use... - Page 81 TG Series User Guide 81/86...
-
Page 82: Reports
TG Series User Guide Reports Call Logs System Logs Call Logs You can perform the following operations on the Call Logs page. View call logs Search call logs Download searched call logs Delete searched call logs View Call Logs By default, one call log page displays a maximum of 25 records. -
Page 83: System Logs
TG Series User Guide Billing Duration: the billing duration. Enter a value to filter the call logs that have billing duration equal to or greater than the value. Status: choose a call status. Communication Type: choose a communication type. ... - Page 84 TG Series User Guide Trace Hardware Logs The system supports storing up to 4 hardware log files. When the system generates more than 4 hardware log files, the system will replace the oldest file with the new file. Procedure 1. Navigate to Status > Reports > System Logs > Options. 2.
- Page 85 TG Series User Guide The system starts to trace the asterisk debug logs. You can check the debug log file on System Logs page. Trace Web Logs The system supports storing up to 2 files of web operation logs. The maximum size of each log file is 1Mb.
- Page 86 TG Series User Guide The system will start to capture the Ethernet packet. 6. Click Stop to stop capturing packet. 7. Click Download to download the captured packet to your local PC and use Wireshark to open the packet file. 86/86...
Need help?
Do you have a question about the TG200 and is the answer not in the manual?
Questions and answers