Table of Contents
Advertisement
Quick Links
CL4500 Installation Instructions
Box Contents
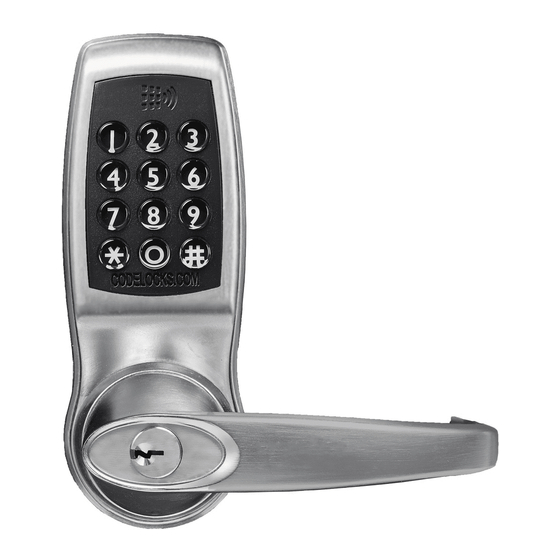
Check the contents of the box are correct
according to the model
1
Front Plate
2
Back Plate
3
Lever Handles
4
Gaskets
5
Sprung Spindle (x1)
6
Spring Spindle (x3) 15/26/60mm ( / "/
7
1.5vAA Batteries (x4)
8
Mortice Latch, Strike and 4 screws
9
Fixing Bolts x 3 incl. spare
10
Latch Support Post
11
Allen Keys
12
Euro profile cylinder escutcheons (x2)
13
Double euro profile cylinder & 3 keys
14
Cable Connections for REM1 and REM2
15
Front Plate Cylinder Keys
16
Front Plate Cylinder Cover
17
Classroom Function Tailpiece
18
Mortice Lock
This box should also contain the installation template and getting started guide.
Tools Required
Power Drill
Drill bits CL4510 10mm ( / ") & 25mm (1")
Drill bits CL4520 10mm ( / "), 12mm ( / "), 16mm ( / ") & 20mm ( / ")
Hammer / mallet
Philips screwdriver
1
11
3
/ "/ 2 / ")
2
32
8
3
8
3
15
5
8
32
8
Page 1
Find more online at www.codelockssupport.com
4510
4520
25
32
Advertisement
Table of Contents

Subscribe to Our Youtube Channel
Related Manuals for CODELOCKS CL4500


Summary of Contents for CODELOCKS CL4500
-
Page 1: Tools Required
Find more online at www.codelockssupport.com CL4500 Installation Instructions Box Contents Check the contents of the box are correct according to the model 4510 4520 Front Plate Back Plate Lever Handles Gaskets Sprung Spindle (x1) Spring Spindle (x3) 15/26/60mm ( / ”/ / ”/ 2 / ”) - Page 2 Find more online at www.codelockssupport.com Chisel 25mm (1") Stanley knife Adhesive tape, pencil, bradawl, tape measure Pliers and hacksaw for cutting bolts Operations Check You should familiarise yourself with the operation of the lock and check that all the parts work properly. Remove the battery cover from the back plate and install the 4 x AA cells supplied.
- Page 3 Find more online at www.codelockssupport.com Functions CL4510 Latch Function Outside handle turns freely without operating the latchbolt. When the code is entered the keypad will flash blue and the handle will retract the latchbolt. The latch automatically locks the door when closed. The key will open the door without the code. CL4520 Anti-Panic Lock Function Outside handle and key functions as before.
- Page 4 Find more online at www.codelockssupport.com Take time to be precise and finish the job quicker. Installation holes must be drilled in exactly the correct positions and precisely at right angles to the door surface. Lock components must be vertically and horizontally accurate in relation to each other and to the door. Wedge the door firmly to prevent movement whilst drilling and chiselling.
- Page 5 Find more online at www.codelockssupport.com 7. Fit the self-adhesive gaskets to the front and back plates. The gaskets provide friction against the door so that it is not necessary to over-tighten the fixing bolts to provide stability. 8. Cut the fixing bolts to correct length. Measured from beneath the bolt head, the length should be the door thickness, plus approximately 15mm ( / ") to the nearest cutting point of the bolt.
- Page 6 Find more online at www.codelockssupport.com This safety feature ensures that it is not possible to accidentally lock someone in a room by throwing the deadbolt from outside. Throwing the deadbolt will deny access to code users when appropriate. All door locks should be installed with a degree of precision to ensure that all components are horizontally and vertically accurate in relation to each other, and in relation to the door.
- Page 7 Find more online at www.codelockssupport.com breaks through. 6. Check that the two screws have been removed from the follower on the lock case on the outside of the door. DO NOT remove the screws from both sides of the follower. 7.
- Page 8 To download right click on the link below and select "Save target as" : Installation Template (PDF) Codelocks UK Headquarters Codelocks Inc US Codelocks (Australia) PTY LTD Tel: +44 (0) 1635 239645 Tel: +1 714 979 2900 Tel: +61 2 9882 1009...
Need help?
Do you have a question about the CL4500 and is the answer not in the manual?
Questions and answers