
Related Manuals for TPI 721


Summary of Contents for TPI 721
- Page 1 Combustible Gas Leak Detector Instruction Manual GlobalTestSupply www. .com Find Quality Products Online at: sales@GlobalTestSupply.com...
-
Page 2: Table Of Contents
TABLE OF CONTENTS A. INTRODUCTION 1. Congratulations ......3 2. Product Description ....3 B. SAFETY CONSIDERATIONS ....4 C. TECHNICAL DATA 1. Features and Benefits....5 2. Product Applications ....5 3. Specifications......6 D. MEASUREMENT TECHNIQUES 1. Controls and Functions ....7 2. Step by Step Procedures: ..9 E. -
Page 3: Introduction
A. INTRODUCTION 1. Congratulations!! Thank you for purchasing TPI products. The 721 is easy to use and is built to last. It is backed by a 3 year limit- ed warranty. Please remember to complete and return your product warranty registration card. -
Page 4: Safety Considerations
B. SAFETY CONSIDERATIONS WARNING: Please follow manufacturers test procedures whenever possible. Do not place the sensor cage located on the end of the gooseneck on hot or in hot locations. GENERAL GUIDELINES ALWAYS • Turn your detector on in a “clean air” environment away from the test location. -
Page 5: Technical Data
When enabled, the 721 turns off after approximately 20 minutes to saves battery life. Can be disabled 2. Product Applications Perform the following tests and/or measurements with the 721 leak detector: • Locate combustible gas leaks in joints and fittings. • Determine Lower Explosive Limit percentage. -
Page 6: Specifications
3. Specifications Leak Detection Sensitivity (methane): 10ppm Gases Detected (partial listing): Acetone, Acetylene, Alcohol, Ammonia, Benzene, Butane, Ethanol, Ethylene Oxide, Gasoline, Hexane, Hydrogen, Methane, Naphtha, Natural Gas, Paint Thinners, Propane, Solvents Display Type: Dual display with backlight Display Modes: Real (ppm), Leak Level (stepped ppm), %LEL Ranges: Real ppm: 0 to 9999ppm Stepped ppm: 0, 500, 1000, 3000, 5000, 9999ppm... -
Page 7: Measurement Techniques
D. MEASUREMENT TECHNIQUES 1. Controls and Functions: Push Buttons Short Press: Turns the 721 on. Long Press (3 seconds): Turns the 721 off. Short Press: Silences the alarm. Long Press (3 seconds): Activates Menu Mode. Short Press: Activates sensor zero. -
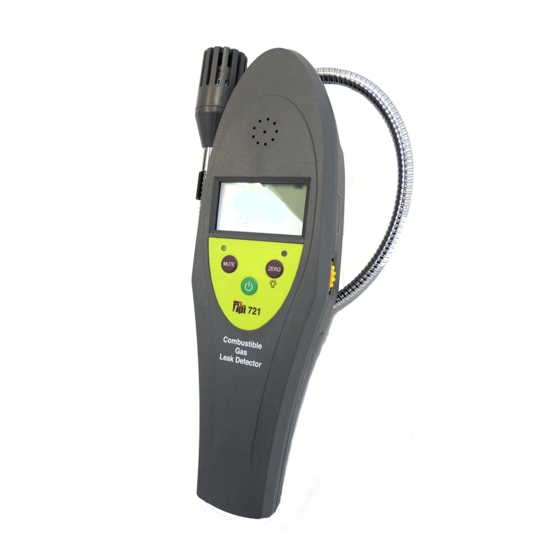
Page 8: Instrument Layout
D. MEASUREMENT TECHNIQUES 1. Controls and Functions (continued): Instrument Layout Sensor cage containing the sensor and visual alarm indicator Speaker Gooseneck Display On Indicator Alarm LED Earphone Jack Keypad Tick adjust wheel GlobalTestSupply www. .com Find Quality Products Online at: sales@GlobalTestSupply.com... -
Page 9: Step By Step Procedures
At this point the display mode can be selected. Once the dis- play mode is selected the 721 will turn on in the same mode each time unless changed. If the display mode does not need to be changed, proceed to step 8. - Page 10 Step by Step Procedures (continued): 6. Depending on the last display mode selected one of the following displays will be seen. The display modes can be changed by using the key to cycle between them. “REAL” mode will display leak levels in ppm (parts per million) “LEL %”...
- Page 11 Step by Step Procedures (continued): Once the desired display mode is selected, press the and the following display will be seen: Press the key again to exit menu mode and return to nor- mal operation. Turn the thumbwheel on the side and set a consistent tic rate. If necessary the key can be used to zero the display.
-
Page 12: Additional Features
E. Additional Features: Alarm Level Adjustment The alarm level can be adjusted by performing the following steps: After the 721 has been turned on and has gone through the warm up period, press and hold the key for approximately 3 seconds to enter menu mode. The following will be displayed: Press the key to proceed to the display mode screen. -
Page 13: Auto Power Off
Display Backlight The backlight can be activated at any time as required: After the 721 has been turned on and has gone through the warm up period, press and hold the key for approximately 3 seconds to activate the backlight. -
Page 14: Zero Function
Zero Function If the 721 fails to auto zero the zero key can be used to zero the dis- play. Turn the 721 on in a clean air environment, wait for the sensor test to end, then press the key. -
Page 15: Trouble Shooting Guide
Depress the latch on the back housing and slide the cover down. Replace batteries (2 x “C” alkaline) and reattach the cover. Sensor Replacement: Turn the 721 off. Turn the sensor cage counter clockwise and remove it. Unplug the old sensor and discard. Replace sensor and sensor cap. Cleaning your 721: Use a mild detergent and slightly damp cloth to clean the surfaces of the 721.
Need help?
Do you have a question about the 721 and is the answer not in the manual?
Questions and answers