
Related Manuals for AAT SOLO PLUS


Summary of Contents for AAT SOLO PLUS
- Page 1 D/GB Originalbedienungsanleitung SOLO Translation of the original user‘s manual www.aat-online.de...
- Page 2 Bestimmungen der EG- is conform to the current regulations Richtlinie 2006/42/EG, 2007/47/EG und of the European Union, EEC Guidelines 93/42/EG entspricht. 2006/42/EG, 2007/47/EG and 93/42/EG. Bei einer nicht mit der Firma AAT This declaration becomes void, if the Alber Antriebstechnik GmbH abge- SOLO has been altered without the stimmten Änderung des SOLO, verliert...
-
Page 3: Table Of Contents
Inhaltsverzeichnis Symbole und Sicherheitshinweise . . . . . . . . . . . . . . . . 07 Produktbeschreibung . . . . . . . . . . . . . . . . . . . . . . 11 Geräteübersicht . - Page 4 Pflege und Wartung . . . . . . . . . . . . . . . . . . . . . . 57 Akku-Pack .
- Page 5 Table of contents Symbols and safety instructions . . . . . . . . . . . . . . . . . 07 Description of the product .
- Page 6 Care and maintenance . . . . . . . . . . . . . . . . . . . . . 57 Battery pack .
-
Page 7: Symbole Und Sicherheitshinweise
1 Symbole und Sicherheits- 1 Symbols and safety instruc- hinweise tions WARNUNG - WARNING - Kann zu Tod oder Can lead to schwerer Körperverletzung serious injuries death! führen! VORSICHT - CAUTION - Kann zu leichten Can lead to light Körperverletzungen führen! injuries! HINWEIS - NOTE -... - Page 8 » Niemals in rotierende/bewegende Teile » Never touch rotating or moving parts. fassen. » If the drive elements block or the » Beim Blockieren der Antriebselemente driving characteristics change, turn off oder bei Änderungen am Fahrverhalten the SOLO immediately and stop using it. sofort ausschalten und SOLO nicht »...
- Page 9 » Bei Defekt oder Beschädigung - Akku- » Should the battery pack be damaged or Pack nicht verwenden! Hersteller, AAT- defect, do not use it! Contact the manu- Außendienst oder autorisierten Fach- facturer or authorized personnel.
- Page 10 » Nur AAT Alber Antriebstechnik GmbH » Only use accessories by AAT Alber Zubehörteile verwenden. Antriebstechnik GmbH. » Nur AAT Alber Antriebstechnik GmbH » Only use the charger of AAT Alber Ladegerät verwenden. Antriebstechnik GmbH. » Nach dem Durchlesen Bedienungsan- » Store user‘s...
-
Page 11: Produktbeschreibung
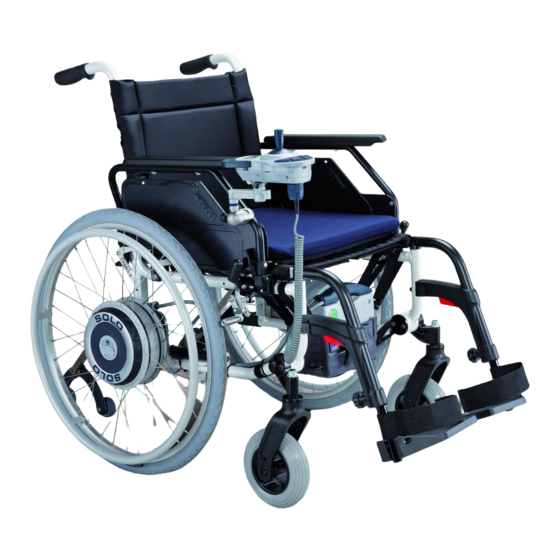
2 Produktbeschreibung 2 Description of the product 2.1 Geräteübersicht 2.1 Features of the device Schnittstelle Interface Akku-Pack Battery pack Akku-Tasche Bag for battery pack Spiralkabel Helix cable Bediengeräte-Halterung Bracket for control unit Verschiebeteil Adjustment part Bediengerät Control unit Antriebsräder Powered wheels Kippstützen Anti-tilt support Halterung... - Page 12 Halterung Bracket Receptacle Aufnahme Adapting shell for the wheels with quick- Adapterhülse für Steckachsenräder release axles Plug contact Steckkontakt...
- Page 13 Bediengerät Control unit Hupe Horn Geschwindigkeitsvorwahl schnell Pre-selection speed control (fast) Joystick Joystick Display Display Handauflage Hand rest Geschwindigkeitsvorwahl langsam Pre-selection speed control (slow) EIN/AUS ON/OFF...
- Page 14 Antriebsräder Powered wheels hinten back Steckkontakt Plug contact Klinke Latch Aufnahmebolzen Locating bolt...
- Page 15 vorne front Kupplungsscheibe Coupling disk Entriegelung Unlocking mechanism...
-
Page 16: Technische Daten
2.2 Technische Daten SOLO Technik Lithium-Ionen Blei-Gel Akku-Pack: Akku-Pack: Abmessungen Höhe = 191 mm Höhe = 220 mm Breite = 180 mm Breite = 215 mm Tiefe = 111 mm Tiefe = 117 mm beide Antriebsräder = 18,0 kg Akku-Tasche = 0,2 kg Bediengerät = 0,4 kg Schnittstelle = 0,1 kg Eigengewicht... - Page 17 Geräuschangaben Der A-bewertete Schalldruckpegel be- trägt typischerweise unter 60 dB (A) Lager-/Betriebstemperatur: Gerät 0° C bis +50° C / -10° C bis +50° C Lager-/Betriebstemperatur: Akku-Pack 0° C bis +50° C / -10° C bis +50° C Ladetemperatur: Lithium-Ionen Akku-Pack 0°...
-
Page 18: Technical Data
2.2 Technical data SOLO Technology lithium ion lead gel Battery pack: Battery pack: Measurements Height = 191 mm Height = 220 mm Width = 180 mm Width = 215 mm Depth = 111 mm Depth = 117 mm Both powered wheels = 18.0 kg Bag for battery pack = 0.2 kg Control unit = 0.4 kg Interface = 0.1 kg... - Page 19 Noise level The device‘s A weighted noise level lies typically below 60 dB (A) Storing/operating temperature: device 0° C up to +50° C / -10° C up to +50° C Storing/operating temperature: battery pack 0° C up to +50° C / -10° C up to +50° C Charging temperature: lithium ion battery 0°...
-
Page 20: Mass-Skizze
2.3 Mass-Skizze 2.3 Dimensioned sketch +30 mm +30 mm... -
Page 21: Lieferumfang
2.4 Lieferumfang 2.4 Scope of delivery Ladegerät Charger Antriebsräder Powered wheels Bediengerät mit Bediengerätehalterung Control unit with its bracket Akku-Pack Battery pack Akku-Tasche Bag for the battery pack... -
Page 22: Zubehör
2.5 Zubehör 2.5 Accessories Halterung Bracket Kippstützen Anti-tilt support Speichenschutz Spokes‘ protection Akku-Pack Battery pack Kfz-Spannungswandler Voltage converter for the car Einbau Therapietisch Einbau Therapietisch Attachment of therapy table Halterung für Begleitsteuerung Bracket for control unit for the attendant Handflächenbedienung Palm control Kugel 40 oder 50 mm Ball 40 or 50 mm... -
Page 23: Montage
3 Montage 3 Assembly 3.1 Antriebsräder 3.1 Powered wheels HINWEIS Steckkontakte NOTE Keep plug-in müssen trocken sein! contacts dry! Rollstuhl anheben. Lift the wheelchair. Antriebsrad positionieren. Position powered wheel. Aufnahmebolzen in Auf- Location bolt in receptacle nahme. device. - Page 24 Antriebsrad verriegeln. Lock the powered wheel. » Muss einrasten! » It must click into place! Bild 1-4 auf anderen Seite Repeat picture 1-4 on the wiederholen. other side.
-
Page 25: Steckachsenräder
3.2 Steckachsenräder 3.2 Wheels with quick-release axle WARNUNG - Steckachsenräder WARNING - The wheels with müssen einrasten! quick-release axles must lock! Entriegelungsknopf Steck- Press the release knob on achse drücken. the axle. Rad adaptieren. Adapt the wheel. Entriegelungsknopf Steck- Let go of the release knob. achse loslassen. -
Page 26: Akku-Pack
3.3 Akku-Pack 3.3 Battery pack WARNUNG - Pole des Akku- WARNING - Never short-circuit Pack niemals kurzschließen or connect the battery pack’s oder verbinden! poles! HINWEIS Steckkontakte NOTE Keep plug-in müssen trocken sein! contacts dry! Fahrmodus herstellen Go into driving mode - Lithium-Ionen Akku-Pack Lithium ion battery pack Schrauben lösen. - Page 27 Anschließen Connecting In Tasche einsetzen und Insert into the bag and mit Klettverschluss fixieren. close the Velcro fastening. Schnittstelle einstecken. Plug in the interface.
- Page 28 Akku-Pack prüfen Check battery pack Infotaste am Akku-Pack Press the information key drücken. on the battery pack. Grün = voll Green = full Gelb = gering Yellow = little charge » Ggf. laden! » Charge, if applicable! Rot = leer Red = empty »...
-
Page 29: Bediengerät
3.4 Bediengerät 3.4 Control unit HINWEIS Steckkontakte NOTE Keep plug-in müssen trocken sein! contacts dry! Bediengeräte-Halterung Attach the bracket for the anbringen. control unit. Bediengerät Ver- Put the control unit on the schiebeteil setzen. adjustment part. Verriegeln. Lock it. - Page 30 Spiralkabel einstecken. Plug in the helix cable.
-
Page 31: Kippstützen
Wenn serienmäßig keine am Rollstuhl vor- Should there be no anti-tilt support on your handen - AAT-Kippstützen verwenden! wheelchair – use AAT anti-tilt support! Rastbolzen ziehen. Pull out the locking bolt. In Halterung schieben. Slide in anti-tilt support. - Page 32 Rastbolzen loslassen. Release locking bolt. Bild 1-3 auf anderen Seite Repeat pictures 1-3 on the wiederholen. other side.
-
Page 33: Demontage
3.6 Demontage 3.6 Disassembly Evtl. SOLO ausschalten. Turn off the SOLO, optionally. Kippstützen Anti-tilt support Rastbolzen ziehen. Pull out locking bolt. Kippstütze abnehmen. Remove anti-tilt support. Bild 1-2 auf anderen Seite Repeat pictures 1-2 on the wiederholen. other side. - Page 34 Bediengerät Control unit Spiralkabel ausstecken. Unplug the helix cable. Entriegeln. Unlock. Abnehmen. Remove. Bediengeräte-Halterung Remove the control unit’s abnehmen. bracket.
- Page 35 Akku-Pack Battery pack Schnittstelle ausstecken. Unplug interface. Klettverschluss öffnen und Unfasten Velcro fastener Akku-Pack entnehmen. and remove the battery pack.
- Page 36 Antriebsräder Powered wheels Entriegelung klappen. Fold out the unlocking mechanism. Entriegelung drehen. Turn it. Antriebsrad abnehmen. Remove powered wheel. Bild 1-3 auf anderen Seite Repeat pictures 1-3 on the wiederholen. other side.
- Page 37 Steckachsensräder Wheels with quick-release axles Entriegelungsknopf Steck- achse drücken. Press the unlocking knob on the axle. Steckachsenrad abneh- Remove the wheel. men. Bild 1-2 auf anderen Seite Repeat pictures 1-2 on the wiederholen. other side.
-
Page 38: Inbetriebnahme
4 Inbetriebnahme 4 Initial operation WARNUNG - Feststellbremsen WARNING - The wheelchair‘s des Rollstuhls müssen richtig locking brakes must be adjusted justiert sein! properly! WARNUNG - Vor Inbetrieb- WARNING Before initial nahme elektronische Funktion, operation, check the electronic Kippstützen, Halterung und ggf. function, anti-tilt supports,... -
Page 39: Einschalten
Antriebsräder Greif- Turn the powered wheels reifen drehen bis hörbar on the handrims until you einrastet. hear them lock. 4.2 Einschalten 4.2 Turn on the SOLO SOLO einschalten. Turn on the SOLO. -
Page 40: Bedienung
5 Bedienung 5 Operation WARNUNG - Bedienung nur WARNING - Operation only by durch eine einzelne geschulte one trained person! This person Person! Person sollte körperlich should physically und geistig in der Lage sein, den intellectually capable to handle SOLO sicher zu bedienen! the SOLO safely! WARNUNG - Auf einer Ebene WARNING - Practice outside... - Page 41 WARNUNG - Das Befahren von WARNING - Avoid driving down Gefällen mit Antriebsräder im slopes manually with powered manuellen Betrieb vermeiden! wheels! WARNUNG - Während Fahr- WARNING When not in use, e.g. pausen, bei Nutzung von Nah- while using mass transportation verkehrsmitteln (Omnibusse, (bus, subway, etc.) or when...
-
Page 42: Displayanzeigen
5.1 Displayanzeigen 5.1 Display Startanzeige Initial display Standardanzeige Standard display » Akku-Kapazität » Battery capacity » Geschwindigkeitsstufe » Speed selection Wegfahrsperre Immobiliser... - Page 43 Warnhinweis Warning Radverriegelung Wheel lock Beide Räder Both wheels Linkes Rad Left wheel Rechtes Rad Right wheel...
- Page 44 Warnhinweis Warning Kupplungssscheibe Coupling disc Beide Räder Both wheels Linkes Rad Left wheel Rechtes Rad Right wheel...
- Page 45 Warnhinweis Unterspan- Warning, undervoltage, nung Akku-Pack battery pack Warnhinweis Überspan- Warning, overvoltage, nung Akku-Pack battery pack Warnhinweis Überlast Warning, overload...
- Page 46 Warnhinweis Warning Temperatur Temperature Akku-Pack Battery pack Antriebsräder Powered wheels Aufstehfunktion Get up function...
- Page 47 Parametrisierung Parameterization Akku-Pack wird geladen Battery pack being charged...
- Page 48 Fehlermeldungen Malfunction (s.h. Kapitel 7.2) (See chapter 7.2) Akku-Pack Battery pack Antriebsräder Powered wheels Bediengerät Control unit...
-
Page 49: Fahren Mit Solo
5.2 Fahren mit SOLO 5.2 Driving the SOLO WARNUNG - Niemals in rotieren- WARNING - Never touch rotating de / bewegende Teile fassen! or moving parts! VORSICHT - Beim Blockieren der CAUTION - If the drive elements Antriebselemente oder block driving Änderungen am Fahrverhalten characteristics change, turn off... - Page 50 Joystick gewünschte Move the joystick in the Fahrtrichtung bewegen. desired direction. » 360° stufenlos! » 360° continuously adjustable! Hupe. Horn. Wegfahrsperre aktivieren Activate immobiliser Tasten gleichzeitig Press the keys simultane- Sekunden drücken. ously for 2 seconds. » SOLO schaltet ab! »...
- Page 51 Wegfahrsperre deaktivieren Deactivate immobiliser SOLO einschalten. Turn on the SOLO. Tasten gleichzeitig Press the keys simultane- Sekunden drücken. ously for 2 seconds.
-
Page 52: Fahren Manuell Mit Antriebsräder
5.3 Fahren manuell mit Antriebsräder 5.3 Driving manually with powered wheels WARNUNG - Das Befahren von WARNING - Avoid driving down Gefällen mit Antriebsrädern im slopes manually with powered manuellen Betrieb vermeiden! wheels! VORSICHT Klemmgefahr CAUTION - Danger of jamming zwischen Reifen und Seitenteil / between wheels and side part / Armauflage! - Page 53 Antriebsrad auskuppeln. Disengage powered wheel. Manuell fahren. Drive manually.
-
Page 54: Fahren Mit Steckachsenräder
5.4 Fahren mit Steckachsenräder 5.4 Driving with quick-release axle wheels VORSICHT Klemmgefahr CAUTION - Danger of jamming zwischen Reifen und Seitenteil / between wheels and side part / Armauflage! arm rest! SOLO ausschalten. Turn off the SOLO. Antriebsräder demontieren Disassemble powered (s.h. -
Page 55: Transport
Fachhandel verständigen! WARNUNG - SOLO mit Rollstuhl WARNING - Do not use the nicht als Sitz in einem Fahrzeug SOLO plus wheelchair as a seat verwenden! in a vehicle! WARNUNG - Beim Transport in WARNUNG - During transport- Fahrzeugen gemäß... - Page 56 Flugmodus herstellen Put into flight mode - Lithium-Ionen Akku-Pack Lithium-Ionen battery pack Schrauben lösen. Loosen screws. Schaltleiste drehen und Turn switch rail and insert einsetzen. » Pfeile beachten! » Pay attention to arrows! Schrauben festziehen. Tighten screws.
-
Page 57: Pflege Und Wartung
Akku-Pack WARNING - Should the battery nicht verwenden! Hersteller, pack be damaged or defect, do AAT-Außendienst oder autorisier- not use it! Contact the manu- ten Fachhandel verständigen! facturer or authorized personnel! VORSICHT - Beim Ladevorgang CAUTION - When charging the... - Page 58 HINWEIS - Ladegerät niemals am NOTE - Never carry the charger Ladekabel / Ladeleitung tragen! at the charging cable! HINWEIS - Akku-Pack nach NOTE - Charge the battery pack jedem Gebrauch laden! after each use! HINWEIS Ladegerät NOTE - Protect the charger and Kfz-Spannungswandler vor Ölen, the voltage converter for the car Fetten, aggressiven Reinigungs-...
-
Page 59: Lithium-Ionen Akku-Pack Laden
6.1.1 Lithium-Ionen Akku-Pack laden 6.1.1 Charge lithium ion battery pack Ggf. Schnittstelle aus- Unplug interface, stecken. applicable. Ladegerät anschließen. Connect charger. LED grün = Akku voll LED green = batteries full » ca. 8 Stunden » approx. 8 h LED orange = Akku wird ge- LED orange = batteries are laden being charged... - Page 60 Kontrolle der Kapazität am Check the capacity at the Akku-Pack (s.h. Kapitel battery pack (see chapter 3.3) 3.3) Akku-Pack im Kraftfahrzeug Charge battery pack in a laden vehicle SOLO ausschalten. Turn off the SOLO. Schnittstelle ausstecken. Unplug interface.
- Page 61 Klettverschluss öffnen und Unfasten Velcro fastener Akku-Pack entnehmen. and remove battery pack. Kfz-Spannungswandler Connect voltage und Ladegerät anschließen. converter for the car and the charger. Kfz-Spannungswandler Turn on the voltage conver- einschalten. ter for the car. » Warnton = Spannung »...
- Page 62 LED orange = Akku wird LED orange = batteries are geladen being charged Kontrolle der Kapazität am Check the capacity at the Akku-Pack (s.h. Kapitel battery pack (see chapter 3.3) 3.3)
-
Page 63: Blei-Gel Akku-Pack Laden
6.1.2 Blei-Gel Akku-Pack laden 6.1.2 Charge lead gel battery pack Ggf. Schnittstelle aus- Unplug interface, stecken. applicable. Ladegerät anschließen. Connect charger. LED grün = Akku voll LED green = batteries full » ca. 4,5 Stunden » approx. 4,5 h LED orange = Akku wird LED orange = batteries are geladen being charged... -
Page 64: Reinigung/Desinfektion
6.2 Reinigung/Desinfektion 6.2 Cleaning/Desinfection HINWEIS - SOLO von Zünd- NOTE - Keep the SOLO away quellen fern halten! from ignition sources! HINWEIS - Rollstuhl nach An- NOTE - Clean the wheelchair gaben des Herstellers reinigen! according to the manufacturer‘s specifications! HINWEIS Keinen Hoch-... -
Page 65: Entsorgung
Lebensdauer However, if your SOLO is können Sie diese Kompo- old and has reached the nenten an die AAT Alber end of its lifespan you may Antriebstechnik GmbH return its components to oder deren Fachhändler AAT Alber Antriebstechnik Entsorgung zurück... -
Page 66: Sicherheitstechnische Prüfung
6.4 Safety checks WARNUNG - Sicherheitstech- WARNING - Safety checks may nische Prüfungen dürfen nur only be done by the manufactu- vom Hersteller, AAT-Außendienst rer or authorized personnel! oder vom authorisierten Fach- handel durchgeführt werden! WARNING - We recommend a... -
Page 67: Warnhinweise, Fehlermeldungen Und Problemlösungen
7 Warnhinweise, Fehlermeldun- 7 Warning notices, malfunction gen und Problemlösungen and troubleshooting 7.1 Warnhinweise 7.1 Warning notices Radverriegelung Wheel lock Beide Antriebsräder Both powered wheels » Rad und beide Pfeile » Wheel and both arrows blinken! are blinking! Linkes Antriebsrad Powered wheel on the left »... - Page 68 Kupplungsscheibe Coupling disc Beide Antriebsräder Both powered wheels » Nabe und beide Pfeile » Hub and both arrows are blinken! blinking! Linkes Antriebsrad Powered wheel on the left » Nabe und linker Pfeil » Hub and left arrow are blinken! blinking! Rechtes Antriebsrad Powered wheel on the right...
- Page 69 Unterspannung Undervoltage » Akku blinkt! » Battery is blinking! Akku-Pack laden (s.h. Kapitel 6.1) Charge battery pack (see chapter 6.1) Überspannung Overvoltage » Akku blinkt! » Battery is blinking! Geschwindigkeit reduzieren Reduce speed (s.h. Kapitel 5.2) (see chapter 5.2)
- Page 70 Überlast Overload » Gewicht blinkt - Signal- » Load is blinking – beep! ton! Joystick loslassen und Fahrt unter Berück- Release the joystick and continue driving sichtigung der Ursache (Blockade beseiti- considering the reason for the message gen, umdrehen bei zu steilen Steigungen) (remove blockade, turn around on slopes fortsetzen.
- Page 71 Temperatur Antriebsräder Temperature, powered wheels » Rad blinkt! » Wheel is blinking! Fahrt mit SOLO beenden und abkühlen Stop driving the SOLO and let it cool. lassen. Aufstehfunktion Rollstuhl Getting up function of the wheelchair » Pfeil blinkt! » Arrow is blinking! Rollstuhl in Sitz-/Normalposition bringen.
-
Page 72: Fehlermeldungen
Fehlermeldung Fehlerbehebung Bremse Hersteller verständigen! Motorcontroller Hersteller verständigen! Elektronik Hersteller verständigen! Parameter-Daten Hersteller, AAT-Außendienst, autorisier- ten Fachhändler verständigen! Software-Ablauf Solo ausschalten, 10 sek. warten, Solo einschalten! Fehler noch vorhanden? Ja: Hersteller verständigen! Falsches Kommando Solo ausschalten, 10 sek. warten, Solo... - Page 73 Seriennummer Hersteller, AAT-Außendienst, autorisier- ten Fachhändler verständigen! Parameter-Daten SOLO ausschalten, 10 sek. warten, SOLO einschalten! Fehler noch vorhanden? Ja: Hersteller, AAT-Außendienst, autori- sierten Fachhändler verständigen! Software-Ablauf SOLO ausschalten, 10 sek. warten, SOLO einschalten! Fehler noch vorhanden? Ja: Hersteller, AAT-Außendienst, autori- sierten Fachhändler verständigen!
-
Page 74: Malfunction
7.2 Malfunction Malfunction, battery pack Code Malfunction Troubleshooting No connection to the battery Contact manufacturer! pack Battery cell Contact manufacturer! C error Contact manufacturer! Parameter data Put into flight mode, wait 10 sec. Put into driving mode! Malfunction still present? Yes: Contact the manufacturer! Software sequence Put into flight mode, wait 10 sec. - Page 75 Malfunction, control unit Code Malfunction Troubleshooting Keypad Contact the manufacturer or authorized personnel! Joystick Contact the manufacturer or authorized personnel! Serial number Contact the manufacturer or authorized personnel! Parameter data Turn off the SOLO, wait for 10 sec., turn on the SOLO. Malfunction still present? Yes: Contact the manufacturer! Software sequence...
-
Page 76: Problemlösungen
Nein: Einstecken! SOLO lässt sich nicht einschalten Akku-Pack leer? Ja: Laden! Akku-Pack im Fahrmodus? Nein: Fahrmodus herstellen! Problem noch vorhanden? Ja: Hersteller, AAT-Außendienst, autorisierten Fachhändler verständigen! Ladegerät noch eingesteckt? Ja: Ausstecken! SOLO eingeschaltet? Nein: Einschalten! Wegfahrsperre aktiviert? SOLO fährt nicht Ja: Wegfahrsperre deaktivieren! Antriebsräder verriegelt? -
Page 77: Troubleshooting
7.3 Troubleshooting Problem Check and potential solution Is the interface connected? No? Connect it. Is the helix cable plugged in? No? Plug it in. SOLO cannot be turned on Is the battery pack empty? Yes? Charge it. Is the battery pack in driving mode? No? Go into driving mode. -
Page 78: Garantie Und Haftung
For the battery pack, always assuming gemäße Pflege vorausgesetzt - übernimmt correct maintenance AAT Alber Antriebs- die AAT Alber Antriebstechnik GmbH die technik GmbH grants a warranty of one Garantie für den Zeitraum von einem Jahr year from the date of purchase. -
Page 79: Haftung
8.2 Haftung 8.2 Liability AAT Alber Antriebstechnik GmbH ist als The manufacturer AAT Alber Antriebs- Hersteller des SOLO nicht verantwortlich technik GmbH, is neither liable nor für eventuell auftretende Schäden, wenn: responsible for potential damage of the SOLO in case of: »... - Page 80 Important safety advice for the US market! WARNING: RADIO WAVE SOURCES MAY AFFECT POWERED CHAIR CONTROL Radio wave source, such as radio stations, TV stations, amateur radio (HAM) transmit- ters, two-way radios, and cellular phones, can affect powered wheelchairs. Following the warning listed below should reduce the chance of unintended brake re- lease or powered wheelchair movement, which could result in serious injury.
- Page 81 Notizen: Notes:...
- Page 82 Notizen: Notes:...
- Page 83 Notizen: Notes:...
Need help?
Do you have a question about the SOLO PLUS and is the answer not in the manual?
Questions and answers