DirecTV GENIE AIR Product Manual
Hide thumbs
Also See for GENIE AIR:
- User manual (182 pages) ,
- User manual (2 pages) ,
- User manual (7 pages)
Advertisement
Table of Contents
- 1 B. Top Panel
- 2 Physical Installation
- 3 Genie Wired Client
- 4 Settings & Help -> Settings -> Info & Test Screen Differences
- 5 Settings & Help -> Settings -> Whole-Home Screen Differences
- 6 Settings & Help -> Settings -> Reset Screen Differences
- 7 Settings & Help -> Settings -> Remote Control Screen Differences
- 8 Tilt Error OSD
- 9 New Wireless IV Diagnostic Codes
- 10 Wireless Connection Lost
- Download this manual
See also:
User Manual
Advertisement
Table of Contents

Related Manuals for DirecTV GENIE AIR


Summary of Contents for DirecTV GENIE AIR
- Page 1 – G RODUCT ANUAL ENIE Version 1.3.0, 11/22/2016 AT&T DIRECTV, Inc. Proprietary and Confidential REVISION HISTORY...
- Page 2 Date Author Description of Change Version Sept 02,2016 S. Pardue First Draft 0.0.1 DRAFT Sept 21, 2016 Pardue Initial Review with Eng 0.0.2 DRAFT Oct 7,2016 S. Pardue Review with Eng and Care 0.0.3 DRAFT Nov 18, 2016 Pardue Received Updated tech comm and Product Name 0.0.4 DRAFT Nov 22, 2016 S.Pardue...
- Page 3 Product Manuals are intended to aid a customer in understanding the workings of the hardware devices. This Product Manual will be posted online at ATT.com for customer access. The purpose of this document is to communicate information associated with the Genie Air and to provide an overview addressing specific functions of the device.
- Page 4 The purpose of this document is to communicate the technical information associated with the Genie Air, and to provide an overview addressing how the new capabilities may impact the customer, agent and field technician.
- Page 5 Product Manual Genie Air ONTENTS Overview ........................... 6 Hardware Information ......................7 A. Front Panel ........................7 B. Top Panel ........................7 C. Rear Panel ........................8 D. Side Panel ........................9 E. Remote ........................9 F. Power Supply ......................9 G.
- Page 6 Product Manual Genie Air A. Main Menu ......................3029 B. My DIRECTV ......................3029 C. Search & Browse ....................3029 D. Recordings ......................3029 E. Extras ........................3029 F. Settings & Help -> Settings ..................3029 1. Settings & Help -> Settings -> Info & Test Screen Differences ......
-
Page 7: B. Top Panel
Product Manual Genie Air 1. Status LED Table ....................4746 2. Wireless LED (Internal WVB Status) ..............4847 B. Top Panel LED – Add Client ................... 4847 C. Back Panel LEDs ....................4847 1. Power LED ....................... 4847 2. MoCA LED ...................... - Page 8 Product Manual Genie Air FIGURES Figure 1: Genie Air Front Panel ..................... 7 Figure 2: Genie Air Top Panel ....................7 Figure 3: Genie Air Rear Panel ....................8 Figure 4: Genie Air Side Panel ....................9 Figure 5: EPS17 Power Supply ....................9 Figure 6: SIM Card Front &...
- Page 9 Samsung RVU TV, Sony RVU TV, PS3 etc. clients DECA (CCK) DIRECTV Ethernet to Coaxial Adapter, also known as CCK, facilitates an easy connection of a DIRECTV receiver with the customer provided internet, using a single coaxial cable. DECA (CCK) BB Broadband Ethernet to Coaxial Adapter Hard Disk Drive Local User Interface, Samsung RVU TV’s user interface, such as...
- Page 10 Product Manual Genie Air VERVIEW Welcome to AT&T’s DIRECTV video service. Genie Air is the next generation Genie Server, satellite receiver that, provides breakthrough features, sophisticated integration and enhanced customer experience. Genie Air is a Headless Server. A Headless Server is a satellite receiver that has no local display (no TV connection) on its own and is dedicated to providing services to its Genie clients and RVU TV Clients.
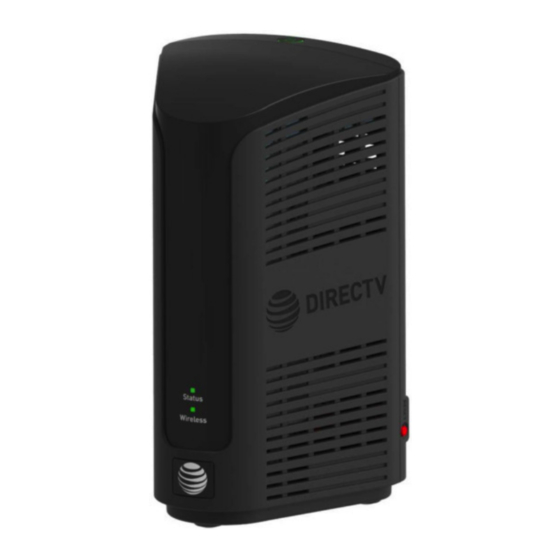
- Page 11 Product Manual Genie Air ARDWARE NFORMATION A. F RONT ANEL No Front-Panel Buttons. • ”Status”: Multi-Color Status Indicator LED • ”Wireless”: Multi-Color Wi-Fi Status Indicator LED (Internal WVB Status) • FIGURE 1: GENIE AIR FRONT PANEL B. T ANEL ”Add Client”: Add Client Button with Green LED (At the Top) •...
- Page 12 Product Manual Genie Air C. R ANEL “DC IN – 25.2V”: DC power connector with power indicator LED • “SAT IN - SWM”: One satellite input coax connector (SWiM) • “MoCA”: One MoCA status indicator LED • “USB”: One USB 3.0 port •...
- Page 13 • during troubleshooting FIGURE 4: GENIE AIR SIDE PANEL E. R EMOTE There is no remote with the Genie Air . However Genie Air has RF4CE. It will serve to program remotes (RC71/RC72/RC73) for RVU TV clients F. P OWER...
- Page 14 Genie Air has a SIM card in the Rear Panel (Ref: Figure 3). The SIM card replaces the Access Card. The SIM card will be pre-installed in the Genie Air . Similar to the Access card, the SIM card is paired to the Genie Air (with a Receiver ID) and can be swapped out with a new SIM card if necessary.
- Page 15 Product Manual Genie Air Mechanical Housing Design • Genie Air needs to be placed in a Vertical position. Sensors will detect • when the orientation is not vertical. The Wireless LED will display Flashing Yellow, and the clients will display a Tilt Error OSD.
- Page 16 Product Manual Genie Air III. EATURES Genie Air is a Headless Server satellite receiver that has no output to a TV. • Supports Wired, Wireless, 4K and RVU Clients • Has built-in capability to connect to an internet Wi-Fi access point.
- Page 17 Product Manual Genie Air SIM Card Receiver ID 1 (USB 2.0) 1 (USB 3.0) EPS44 (12V) EPS17 (25.2V) Power Supply AM21 Support B. S OFTWARE EATURE OMPARISON Feature HR54 Genie Air 4K ready (Receive, Record and Distribute 4K content) Display 4K content (local decode)
- Page 18 Product Manual Genie Air IV. M INIMUM EQUIREMENTS All Minimum Requirements of Genie are applicable to Genie Air EXCEPT the Genie Air requires: DSWiM (DSWiM 13 module, SL3DS LNB, 3D2 LNB, 3D2RB LNB or 5D2RB LNB) • Minimum of 11 available SWiM channels •...
-
Page 19: Physical Installation
• installation using the built-in SWiM power inserter. 2) If Internet is available (or will be available soon if known), place the Genie Air near the customer’s router and connect the Ethernet cable from the customer’s router to the Genie Air . - Page 20 • that will be displayed on the Mobile Installation App. If the screens don’t appear, press the “Add Client” Button on the Genie Air Connect a Wired Client to a TV and the Genie Air MoCA network to see •...
- Page 21 LED will change to solid Yellow and the Satellite Dish Setup (Dish configuration settings) screen will be displayed. The user needs to manually configure Dish/Switch type before they can continue further. 6) The Status LED then displays Solid Blue and Genie Air is ready for Activation. Since Genie Air does not have any display on its own, there is no option to switch language to Spanish.
- Page 22 • remains the same as present day install. 8) The Status LED continues to display Flashing Green as the Genie Air acquires the Advanced Program Guide with the download status as shown on screen. Unlike the Genie’s, There is no option to “Continue” in the APG screen.
- Page 23 • Solid Yellow. Troubleshooting remains the same as present day install. 10) Once Initial Setup is complete, Status LED displays Solid Blue and Genie Air is ready to Add Client. The following screen is displayed only in the Mobile Installation App. The Genie Mini clients and RVU TVs will display, the Add Client screen (Refer –...
-
Page 24: Genie Wired Client
“Connect Now”. FIGURE 13: CONNECTING TO WVB - EXCELLENT SIGNAL STRENGTH SCREEN If Signal Strength/Quality is Yellow/Fair or Red/Poor, the Genie Air • Wireless Client should be moved, or an External WVB should be added to the install (follow normal guidance for WVB and Wireless Client placement and troubleshooting). - Page 25 ROCESS The Add Client process will be different than current Genie process. Full Client Tracking process will be used to Add Clients (Genie Air does not use Lenient Mode). Full Client Tracking is documented in detail in the D-088 Goliath-Flower SWDL Tech Comm (Refer the Appendix).
- Page 26 The “Completion Code” is displayed in the screen. FIGURE 161615: FULL CLIENT TRACKING - GUIDED SETUP COMPLETE SCREEN (SUBJECT TO CHANGE) 5) After the first Client has been added the Status LED on the Genie Air turns Solid Green.
- Page 27 The following are the steps to install an External WVB. 1) Install the WVB in an optimal location as per current WVB placement guidance. 2) Ensure the Genie Air server is Turned On. 3) Ensure all the Wireless clients are turned Off (in standby).
- Page 28 USING ERVER The procedure to program the Remote to the DIRECTV Ready RVU TVs is the same as the present day (see D-137 Mimic SWDL Tech Comm for detailed programming steps). See “DIRECTV Ready RVU TV Client Remote Control Programming” section III.A.2 in the Mimic tech comm.
- Page 29 EMOVE A. R EPLACE ENIE The following are steps to be followed when the user needs to replace an old Genie Air with a new one. 1) Swap the old Genie Air with the new Genie Air 2) Follow normal steps to Reset Connection (Reset to Default) on the Wireless Client (if any).
- Page 30 Product Manual Genie Air 4) Plug in the new WVB. 5) Power on all the Wireless clients. 6) Ensure the Wireless clients connected to the new WVB have a Green LED and show video. Else troubleshoot Wireless clients as present day troubleshooting.
- Page 31 If it does not get connected, the following steps need to be followed. A. N EVER ONNECTED The following are the steps to be followed when connecting a Genie Air to the Internet. 1) Connect the Ethernet cable to the Genie Air . The server will automatically connect to the Internet.
- Page 32 6) If the user selects “Go Wireless Instead” at Figure 20, another Wireless Warning confirmation screen will be displayed. This screen is used to re-confirm Wireless broadband connection since Genie Air performs better in Wired broadband. FIGURE 23: WIRELESS INTERNET CONFIRMATION SCREEN 7) If the user selects “Continue with Wired”, the previous “Plug in Ethernet Cable”...
- Page 33 3) When the user selects Yes, the Plug in Ethernet Cable screen will be displayed (Ref: Figure 20). The purpose is to redirect the user to prefer Wired Internet over Wireless connection. 4) Follow the same steps as in Never Connected flow to connect the Genie Air the Internet. 功 功 功 功 能變...
- Page 34 Menu -> Settings & Help -> Settings screens will change and have some differences from present Genie and Clients. All Left Menu Options in the Setting Screen seen on a Client connected to an Genie Air will remain the same.
-
Page 35: Settings & Help -> Settings -> Info & Test Screen Differences
Product Manual Genie Air The following screens from the Settings left menu are no different than what is normally seen on a Client, whether the client is connected to a Genie or Genie Air Display • Audio • Internet Setup •... - Page 36 Product Manual Genie Air FIGURE 28: GENIE & CLIENTS CONNECTED TO GENIE - INFO & TEST SCREEN This is the Setting screen on a Client connected to an Genie Air Genie Air client will display the Run System Test, <Client Location •...
- Page 37 Product Manual Genie Air FIGURE 30: GENIE AIR INFO SCREEN 功 功 功 功 能變 能變數代 數代碼變 碼變更 更 更 更 能變 能變 數代 數代 碼變 碼變 Version 1.3.0 – 11/22/2016 Page 33 DIRECTV, Inc. Proprietary and Confidential...
-
Page 38: Settings & Help -> Settings -> Whole-Home Screen Differences
These are the Manage Client screens on the Genie and Client connected to a Genie today: FIGURE 31: MANAGE CLIENTS - GENIE CLIENT & GENIE SERVER This is the Manage Client screen on a Client connected to an Genie Air FIGURE 32: GENIE AIR MANAGE CLIENTS SCREEN 功... - Page 39 Product Manual Genie Air The following are the differences in Manage Clients for a Client connect to a Genie server versus a Client Connected to an Genie Air 1) When the user selects the “Add Clients” button, the following screen is displayed.
-
Page 40: Settings & Help -> Settings -> Reset Screen Differences
This is the Reset screen on the Genie and Client connected to a Genie today: FIGURE 35: RECEIVER RESET - GENIE CLIENT & SERVER This is the Reset screen on a Client connected to an Genie Air FIGURE 363634: GENIE AIR - RESET CLIENT SCREEN 功... - Page 41 Product Manual Genie Air When the user selects “Reboot <Client Location Name>”, the following confirmation screen is displayed and when the user presses the Dash key, the client will reboot. FIGURE 37: GENIE AIR - RESET CLIENT CONFIRMATION SCREEN When the user selects “Reboot <Client Location Name> to Default”, a confirmation screen is displayed and when the user press the Dash key, the specific client will reset to defaults.
-
Page 42: Settings & Help -> Settings -> Remote Control Screen Differences
Product Manual Genie Air FIGURE 39: GENIE AIR - REBOOT EVERYWHERE SCREEN When the user selects “Everywhere to Default”, the following confirmation screen is displayed and when the user presses the Dash key the server and all the client locations are reset to default. This functionality is similar to the Reset Defaults on the Genie server and clients. - Page 43 EVER ONNECTED ONTENT ISSING Genie Text: “Connect your Receiver to the Internet to access DIRECTV's massive On Demand library, including thousands of free & premium shows and movies! Select Learn More for details.” Genie Air client Text: “Connect your receiver to the Internet and get access to DIRECTV’s huge On Demand library of free &...
- Page 44 In the current Genie products, when a user exceeds streaming limits, a Streaming Conflict OSD is displayed, and when a user tries to record on too many tuners, a Recording Conflict warning is displayed. On a Client connected to an Genie Air , these two limitations will be combined into one screen.
- Page 45 Product Manual Genie Air Clients could be either a Genie Client or a MRV Client • If the user does not wish to cancel and there is a title with no option, they • should find the Genie Client that is watching the blocking title and put it in Standby to release the session;...
-
Page 46: Tilt Error Osd
Troubleshooting: Check and make sure that nothing is blocking airflow to the Genie . The graphic in the OSD will inform the user the state / position the Genie Air should be placed in. Select OK to restart the Genie. -
Page 47: New Wireless Iv Diagnostic Codes
IAGNOSTIC ODES 1. New Wireless IV Diagnostic Codes 2. Updates to MoCA Test Errors All Genie MoCA test errors apply to Genie Air also. The following Error text strings have been updated. a. System Test Error Code 47 or 48 Genie Text: “Home Network Distribution Problem. - Page 48 One of the clients may be on a screen such as: • • System Test • Signal Strength • Satellite Setup There may be a connection issue between the Genie Air and the • wired client. There may be a connection issue between the Genie Air and the •...
-
Page 49: Wireless Connection Lost
• the OSD, schedule service call. If all Clients have the same Is this the first time using the Wireless Genie OSD; Mini after a Genie Air server replacement? If No, continue. • Or if there are no other If Yes: Reset the Wireless Connection as with a Clients in the home: •... - Page 50 Product Manual Genie Air Genie Air Wireless LED table. Reset the Genie Air If the Wireless Genie Mini clients still have • the OSD, schedule service call. 功 功 功 功 能變 能變數代 數代碼變 碼變更 更 更 更 能變 能變...
- Page 51 Product Manual Genie Air XII. LED S UMMARY A. F RONT ANEL 1. Status LED Table Color Interpretation Troubleshooting Off/No Color No Power Check if the Power LED at the back panel is Green and wait for 10 seconds. If LED continues to remain Off, reboot server.
- Page 52 Product Manual Genie Air Solid White Power On, Booting up Normal Behavior during boot-up 2. Wireless LED (Internal WVB Status) Color Interpretation Troubleshooting Wireless Video Not Transmitting (Can’t Wait for TBD minutes to check if the LED changes to another...
- Page 53 Product Manual Genie Air MoCA LED Color Interpretation Troubleshooting Off/no color No link When there is a wired client or external WVB in the network, the MoCA LED will turn On or change states. It will remain Off when there are Only wireless clients in the network.
- Page 54 Follow the below steps to configure the Installer’s mobile device so that it can connect to the WVB. The Mobile Installation App is a One-time setup. Once these steps are completed the Installer’s mobile device should automatically connect to any WVB and Genie Air that is in Add Client mode.
- Page 55 Product Manual Genie Air FIGURE 46: IOS SETTINGS SCREEN B. F EDERAL OMMUNICATIONS OMMISSION NTERFERENCE STATEMENT Federal Communication Commission Interference Statement This equipment has been tested and found to comply with the limits for a Class B digital device, pursuant to Part 15 of the FCC Rules. These limits are designed to provide reasonable protection against harmful interference in a residential installation.
- Page 56 Product Manual Genie Air IMPORTANT NOTE: FCC Radiation Exposure Statement: This equipment complies with FCC radiation exposure limits set forth for an uncontrolled environment. This equipment should be installed and operated with minimum distance 20cm between the radiator & your body.
Need help?
Do you have a question about the GENIE AIR and is the answer not in the manual?
Questions and answers